
Android笔记(四十) Android中的数据存储——SQLite(二) insert
准备工作:
我们模拟一个注册的页面,先看UI
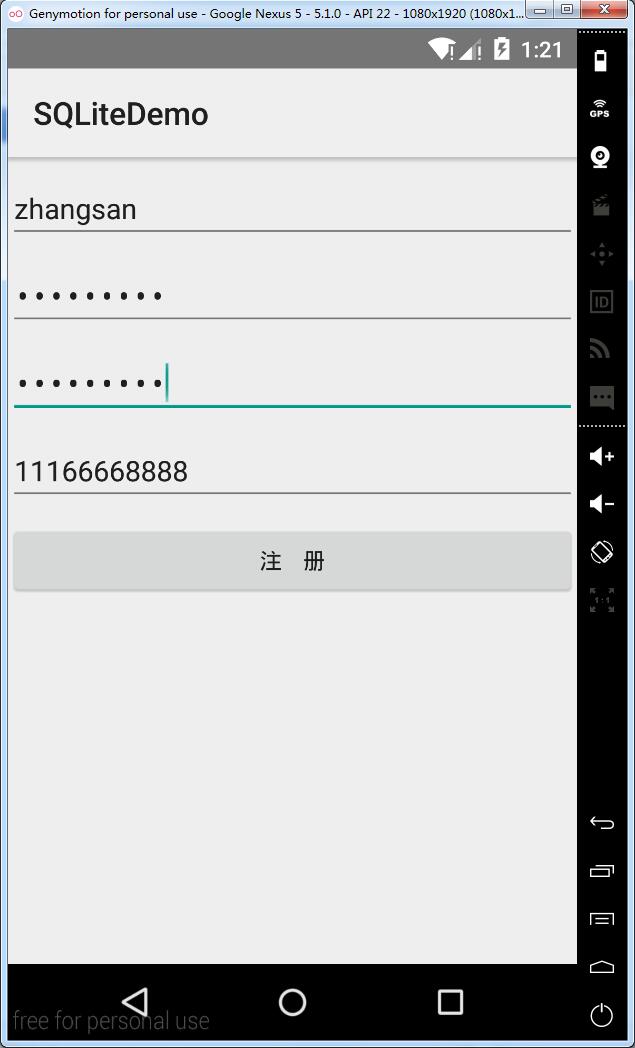
我们需要创建一个数据库:user,数据库包含表user,user表包含字段id、username、password、mobilephone
MainActivity.java
package cn.lixyz.sqlitedemo;

import android.app.Activity;

import android.database.sqlite.SQLiteDatabase;

import android.os.Bundle;

import android.view.Menu;

import android.view.MenuItem;

import android.view.View;

import android.widget.Button;

import android.widget.EditText;

import android.widget.Toast;

public class MainActivity extends Activity {

    private EditText username,password,againPassword,mobilephone;

    private Button register;

    @Override

    protected void onCreate(Bundle savedInstanceState) {

        super.onCreate(savedInstanceState);

        setContentView(R.layout.activity_main);

        findView();

        MyDatabaseHelper mdh = new MyDatabaseHelper(MainActivity.this,"user.db",null,1);

        SQLiteDatabase database = mdh.getWritableDatabase();

        String dbName = mdh.getDatabaseName();

        Toast.makeText(MainActivity.this,"数据库 " + dbName + " 创建成功",Toast.LENGTH_SHORT).show();

        register.setOnClickListener(new View.OnClickListener() {

            @Override

            public void onClick(View v) {

            }

        });

    }

    private void findView(){

        username = (EditText) findViewById(R.id.username);

        password = (EditText) findViewById(R.id.password);

        againPassword = (EditText) findViewById(R.id.againPassword);

        mobilephone = (EditText) findViewById(R.id.mobilephone);

        register = (Button) findViewById(R.id.register);

    }

}
MyDatabaseHelper.java
package cn.lixyz.sqlitedemo;

import android.content.Context;

import android.database.sqlite.SQLiteDatabase;

import android.database.sqlite.SQLiteOpenHelper;

import android.widget.Toast;

/**

 * Created by LGB on 2015/10/16.

 */

public class MyDatabaseHelper extends SQLiteOpenHelper {

    public static final String CREATE_USER = "create table user (id integer primary key autoincrement,username text,password text,mobilephone text)";

    private Context mContext;

    public MyDatabaseHelper(Context context, String name, SQLiteDatabase.CursorFactory factory, int version) {

        super(context, name, factory, version);

        mContext = context;

    }

    @Override

    public void onCreate(SQLiteDatabase db) {

        db.execSQL(CREATE_USER);

        Toast.makeText(mContext,"user表创建成功",Toast.LENGTH_SHORT).show();

    }

    @Override

    public void onUpgrade(SQLiteDatabase db, int oldVersion, int newVersion) {

    }

}
activity_main.xml
<LinearLayout xmlns:android="http://schemas.android.com/apk/res/android"

    android:layout_width="match_parent"

    android:layout_height="match_parent"

    android:orientation="vertical">

    <EditText

        android:id="@+id/username"

        android:layout_width="match_parent"

        android:layout_height="wrap_content"

        android:layout_marginTop="10dp"

        android:hint="请输入您要注册的用户名" />

    <EditText

        android:id="@+id/password"

        android:layout_width="match_parent"

        android:layout_height="wrap_content"

        android:layout_marginTop="10dp"

        android:hint="输入您的密码"

        android:password="true"/>

    <EditText

        android:id="@+id/againPassword"

        android:layout_width="match_parent"

        android:layout_height="wrap_content"

        android:layout_marginTop="10dp"

        android:hint="确认您的密码"

        android:password="true"/>

    <EditText

        android:id="@+id/mobilephone"

        android:layout_width="match_parent"

        android:layout_height="wrap_content"

        android:hint="输入您的手机号"

        android:layout_marginTop="10dp"/>

    <Button

        android:id="@+id/register"

        android:layout_width="match_parent"

        android:layout_height="wrap_content"

        android:layout_marginTop="10dp"

        android:text="注    册"/>

</LinearLayout>
我们要做的是,点击注册按钮,将用户填入的信息存入到user.user中去
添加数据:
在android中,SQLiteDatabase提供了一个insert方法,这个方法就是专门用于添加数据的
insert(String table, String nullColumnHack, ContentValues values)
第一个参数是要插入的表名,第二个参数是用于在未指定添加数据的情况下给某些可以为空的列自动赋值NULL,第三个参数是一个ContentValues对象。
ContentValues提供了一系列的put方法重载,用于向ContentValues对象中添加数据,ContentValues对象内包含一个Map对象,其key为数据库表中的列名,values为要添加的内容
例子:
MainActivity.java
package cn.lixyz.sqlitedemo;

import android.app.Activity;

import android.content.ContentValues;

import android.content.Context;

import android.database.sqlite.SQLiteDatabase;

import android.os.Bundle;

import android.view.Menu;

import android.view.MenuItem;

import android.view.View;

import android.widget.Button;

import android.widget.EditText;

import android.widget.Toast;

public class MainActivity extends Activity {

    private EditText ed_username,ed_password,ed_againPassword,ed_mobilephone;

    private Button bt_register;

    private SQLiteDatabase database;

    @Override

    protected void onCreate(Bundle savedInstanceState) {

        super.onCreate(savedInstanceState);

        setContentView(R.layout.activity_main);

        findView();

        MyDatabaseHelper mdh = new MyDatabaseHelper(MainActivity.this,"user.db",null,1);

        database = mdh.getWritableDatabase();

        String dbName = mdh.getDatabaseName();

        Toast.makeText(MainActivity.this,"数据库 " + dbName + " 创建成功",Toast.LENGTH_SHORT).show();

        bt_register.setOnClickListener(new View.OnClickListener() {

            @Override

            public void onClick(View v) {

                ContentValues cv = new ContentValues();

                String username = ed_username.getText().toString();

                cv.put("username",username);

                if (ed_password.getText().toString().equals(ed_againPassword.getText().toString())){

                    String password = ed_password.getText().toString();

                    cv.put("password",password);

                }else{

                    Toast.makeText(MainActivity.this,"您的密码不一致",Toast.LENGTH_SHORT).show();

                    cv.clear();

                    return;

                }

                String mobilephone = ed_mobilephone.getText().toString();

                cv.put("mobilephone",mobilephone);

                database.insert("user", null, cv);

                Toast.makeText(MainActivity.this,"插入成功",Toast.LENGTH_SHORT).show();

                cv.clear();

            }

        });

    }

    private void findView(){

        ed_username = (EditText) findViewById(R.id.ed_username);

        ed_password = (EditText) findViewById(R.id.ed_password);

        ed_againPassword = (EditText) findViewById(R.id.ed_againPassword);

        ed_mobilephone = (EditText) findViewById(R.id.ed_mobilephone);

        bt_register = (Button) findViewById(R.id.bt_register);

    }

}
MyDatabaseHelper.java
package cn.lixyz.sqlitedemo;

import android.content.Context;

import android.database.sqlite.SQLiteDatabase;

import android.database.sqlite.SQLiteOpenHelper;

import android.widget.Toast;

/**

 * Created by LGB on 2015/10/16.

 */

public class MyDatabaseHelper extends SQLiteOpenHelper {

    public static final String CREATE_USER = "create table user (id integer primary key autoincrement,username text,password text,mobilephone text)";

    private Context mContext;

    public MyDatabaseHelper(Context context, String name, SQLiteDatabase.CursorFactory factory, int version) {

        super(context, name, factory, version);

        mContext = context;

    }

    @Override

    public void onCreate(SQLiteDatabase db) {

        db.execSQL(CREATE_USER);

        Toast.makeText(mContext,"user表创建成功",Toast.LENGTH_SHORT).show();

    }

    @Override

    public void onUpgrade(SQLiteDatabase db, int oldVersion, int newVersion) {

    }

}
activity_main.xml
<LinearLayout xmlns:android="http://schemas.android.com/apk/res/android"

    android:layout_width="match_parent"

    android:layout_height="match_parent"

    android:orientation="vertical">

    <EditText

        android:id="@+id/ed_username"

        android:layout_width="match_parent"

        android:layout_height="wrap_content"

        android:layout_marginTop="10dp"

        android:hint="请输入您要注册的用户名" />

    <EditText

        android:id="@+id/ed_password"

        android:layout_width="match_parent"

        android:layout_height="wrap_content"

        android:layout_marginTop="10dp"

        android:hint="输入您的密码"

        android:password="true"/>

    <EditText

        android:id="@+id/ed_againPassword"

        android:layout_width="match_parent"

        android:layout_height="wrap_content"

        android:layout_marginTop="10dp"

        android:hint="确认您的密码"

        android:password="true"/>

    <EditText

        android:id="@+id/ed_mobilephone"

        android:layout_width="match_parent"

        android:layout_height="wrap_content"

        android:hint="输入您的手机号"

        android:layout_marginTop="10dp"/>

    <Button

        android:id="@+id/bt_register"

        android:layout_width="match_parent"

        android:layout_height="wrap_content"

        android:layout_marginTop="10dp"

        android:text="注    册"/>

</LinearLayout>
运行结果:
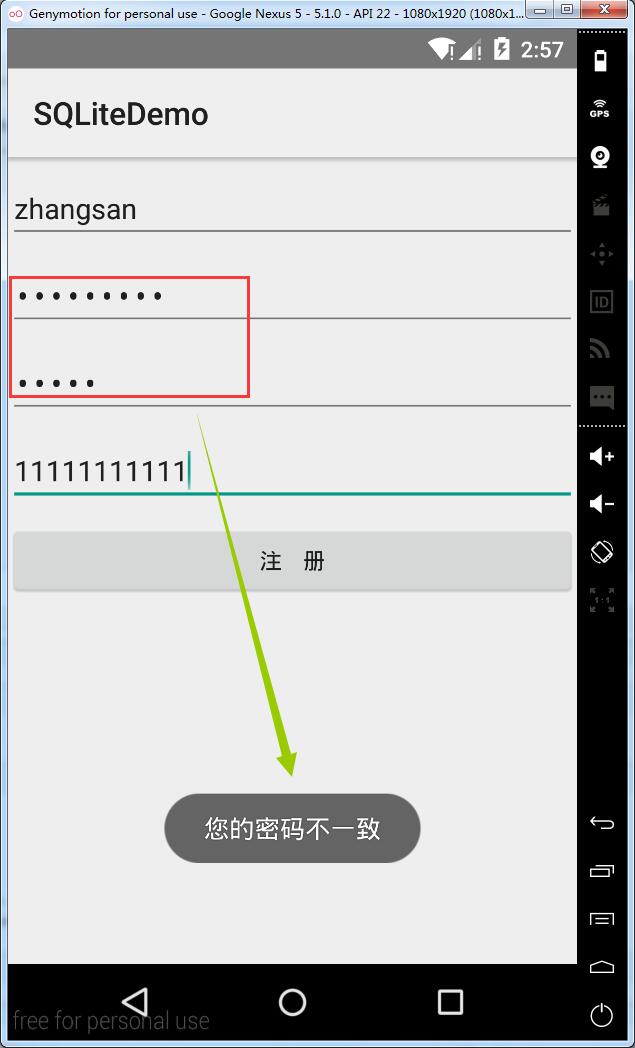
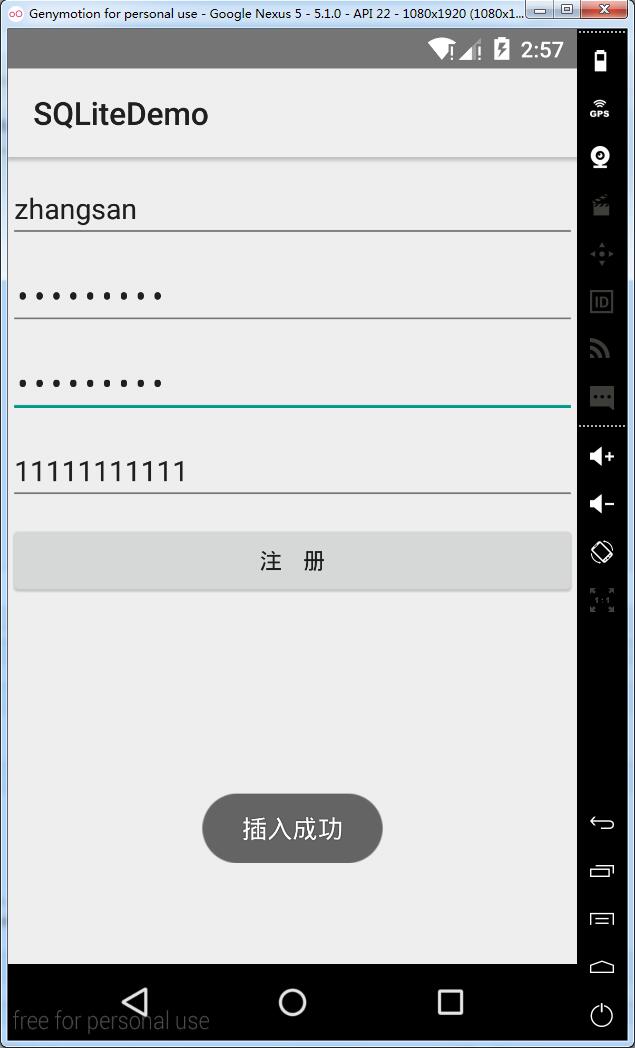
DDMS导出数据库查看:
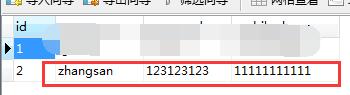
插入成功!
Android笔记(四十) Android中的数据存储——SQLite(二) insert的更多相关文章
- Android中的数据存储(二):文件存储 2017-05-25 08:16 35人阅读 评论(0) 收藏
文件存储 这是本人(菜鸟)学习android数据存储时接触的有关文件存储的知识以及本人自己写的简单地demo,为初学者学习和使用文件存储提供一些帮助.. 如果有需要查看SharedPreference ...
- Android笔记(四十二) Android中的数据存储——SQLite(四)update
update方法的四个参数: update()方法参数 对应的sql部分 描述 table update table_name 更新的表名 values set column=xxx ContentV ...
- Android笔记(四十四) Android中的数据存储——SQLite(六)整合
实现注册.登录.注销账户 MainActivity.java package cn.lixyz.activity; import android.app.Activity; import androi ...
- Android笔记(四十一) Android中的数据存储——SQLite(三)select
SQLite 通过query实现查询,它通过一系列参数来定义查询条件. 各参数说明: query()方法参数 对应sql部分 描述 table from table_name 表名称 colums s ...
- Android笔记(四十三) Android中的数据存储——SQLite(五)delete
SQLite通过delete()方法删除数据 delete()方法参数说明: delete()方法参数 对应sql部分 描述 table delte from table_name 要删除的表 whe ...
- Android笔记(三十九) Android中的数据存储——SQLite(一) create
SQLite是内置于Android的一款轻量级关系型数据库,她运算速度快,占用资源少,通常只需要几百K的内存就足够了,因而特别适合在移动设备上使用. SQLite不仅支持标准的SQL语法,还遵循数据库 ...
- Android笔记(三十八) Android中的数据存储——SharedPreferences
SharedPreferences是Android提供的一种轻型的数据存储方法,其本质是基于xml文件存储的,内部数据以key-value的方式存储,通常用来存储一些简单的配置信息. SharedPr ...
- 67.Android中的数据存储总结
转载:http://mp.weixin.qq.com/s?__biz=MzIzMjE1Njg4Mw==&mid=2650117688&idx=1&sn=d6c73f9f04d0 ...
- Android中的数据存储
Android中的数据存储主要分为三种基本方法: 1.利用shared preferences存储一些轻量级的键值对数据. 2.传统文件系统. 3.利用SQLite的数据库管理系统. 对SharedP ...
随机推荐
- curl 使用手册
curl.1 the man page Related: Manual FAQ HTTP Scripting NAME curl - transfer a URL SYNOPSIS curl [opt ...
- redis中key和value的存储大小限制
String类型:一个String类型的value最大可以存储512M List类型:list的元素个数最多为2^32-1个,也就是4294967295个. Set类型:元素个数最多为2^32-1个, ...
- Angularjs Select获取数组下标
一.定义资源 //资源类型 $scope.status=['项目测试','开发工具','安装包','工作计划','测试项目','我的游戏','我的音乐','博客首页图片']; 二.没错直接用 {{$ ...
- Javascript 将 console.log 日志打印到 html 页面中
如何将 console.log() 打印的日志输出到 html 页面中 (function () { var old = console.log; var logger = document.getE ...
- Bladex-Boot使用Postman调用服务说明
一:GitBladex-Boot项目,并启动服务 二:打开Postman 三:使用Post,调用http://localhost/blade-auth/oauth/token/ 配置:Header中增 ...
- 取消Windows server 关机提示备注的方法
打开“开始”-“运行”,在“打开”一栏中输入“gpedit.msc”命令打开组策略编辑器,依次展开“计算机配置”→“管理模板”→“系统”,双击右侧窗口出现的“显示‘关闭事件跟踪程序’”,将“未配置”改 ...
- mysql之各版本rpm包安装
发现每次想用mysql的rpm包直接安装的时候,都会出现找不到对应的rpm包的情况,故记录一下查找过程 进入官网->downloads->community->mysql commu ...
- [LeetCode] 265. Paint House II 粉刷房子
There are a row of n houses, each house can be painted with one of the k colors. The cost of paintin ...
- RAID磁盘阵列结构
RAID磁盘阵列结构原理其实很简单,就是每块硬盘不插在主板的硬盘接口上了,而是全插在RAID卡上,然后RAID卡再插到主板上,由RAID卡统一管理硬盘,做各种RAID磁盘策略(RAID0,RAID1, ...
- c#通过socket判断服务器连接是否正常
判断Socket是否连接上,需要通过发包来确认. 之前确认都是调用调用socket的connected属性,然而该属性是上次的连接是否成功的结果,不及时. // 检查一个Socket是否可连接 pri ...