
滚动条mCustomScrollbar自定义
mCustomScrollbar 是个基于 jQuery UI 的自定义滚动条插件,它可以让你灵活的通过 CSS 定义网页的滚动条,并且垂直和水平两个方向的滚动条都可以定义,它通过 Brandon Aaron jquery mouse-wheel plugin 提供了鼠标滚动的支持,并且在滚动的过程中,还可以缓冲滚动使得滚动更加的平滑,还可以自动调整滚动条的位置和定义滚动到的位置等。(HTML必须存在于文档流, 不能为display:none)
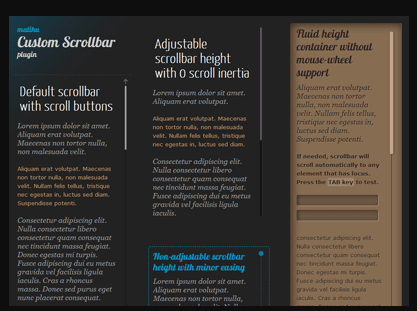
1.如何使用 mCustomScrollbar(必须要加载如下的4个文件)
jquery.mCustomScrollbar.js
jquery.mousewheel.min.js
jquery.mCustomScrollbar.css
mCSB_buttons.png
jQuery:这个插件的必备库
jQuery UI:扩展 jQuery 库并且为我们的滚动条提供了简单的动画和拖动功能。
jquery.mousewheel.min.js:这是 Brandon Aaron 编写的一个伟大的只有2kb的插件,它面向所有的操作系统和浏览器,为我们提供了鼠标滚动事件的支持。
jquery.mCustomScrollbar.js:这是我们的插件主文件。在插件包的 minified 你可以找到它的压缩版。
jquery.mCustomScrollbar.css: 这个 CSS 文件是让我们来定义边栏用的。你可以在这个文件中定义你的边栏,当然你可以在其他的 CSS 文件中定义,要注意的是,你要用 CSS 中的顺序,其中的优先级关系来覆盖这个文件中的定义。
mCSB_buttons.png: 这个 png 图片文件,包含了向上向下向左向右滚动的按钮。可以使用 CSS sprites 技术,来使用这个图片中的相应按钮。插件包中包含了这个图片的 PSD 源文件(sources/mCSB_buttons.psd ),你可以根据自己的需求自定义。
其实如果只是简单的滚动条,只要加载如下2个文件即可
jquery.mCustomScrollbar.js
jquery.mCustomScrollbar.css
第一步:加载 mCustomScrollbar 的样式文件。
<link href="css/jquery.mCustomScrollbar.css" rel="stylesheet" type="text/css" />
第二步:加载必须的 JS 文件。
需要加载的文件有如下几个:jQuery、jQuery UI, jquery.mousewheel.min.js 和 jquery.mCustomScrollbar.js 这四个。
jQuery 和 jQuery UI 是必须的, jquery.mousewheel.min.js 是用来提供滚动支持的,jquery.mCustomScrollbar.js 则是插件的主文件。
<script src="js/jquery.mCustomScrollbar.js" type="text/javascript"><\/script>
<script src="js/jquery.mousewheel.min.js" type="text/javascript"><\/script>
第三步:应用 mCustomScrollbar
$(function(){
$("#id").mCustomScrollbar();
})
mCustomScrollbar 的参数介绍
setWidth: false                                 //设置你内容的宽度 值可以是像素值或者百分比(string),取值300,"30%"

setHeight: false                                //设置你内容的高度 值可以是像素值或者百分比(string),取值300,"30%"

setTop: 0                                       //设置一开始纵向滚动的位置,取值"100px",值为字符串

setLeft: 0                                      //设置一开始横向滚动的位置,取值"100px",值为字符串

axis: "string"                                  //"x","y",值为字符串,分别对应横纵向滚动

scrollInertia:Integer                           //滚动的惯性值 在毫秒中 使用0可以无滚动惯性 (滚动惯性可以使区块滚动更加平滑)

scrollbarPosition: "string"                     //取值"inside","outside",值为字符串,父元素必须是relative定位,滚动条出在元素的内部(inside)或者外部(outside);

autoDraggerLength:Boolean:                     //根据内容区域自动调整滚动条拖块的长度 值:true,false

alwaysShowScrollbar:Integer                     //保持滚动条的显示,取值0,1(保持滚动块可见),2(保持滚动条所有的显示)

mouseWheel:{

    enable: boolean                             //启用或禁用通过鼠标滚轮滚动内容。

    scrollAmount: Integer                       //滚轮滚动的像素

    invert: boolean                             //反转滚动方向

}

scrollButtons:{ enable:Boolean }                //是否添加 滚动条两端按钮支持 值:true,false

scrollButtons:{ scrollType:String }             //滚动按钮滚动类型 值:”continuous”(当你点击滚动控制按钮时断断续续滚动) “pixels”(根据每次点击的像素数来滚动) 点击这里可以看到形象的例子

scrollButtons:{ scrollSpeed:Integer }           //设置点击滚动按钮时候的滚动速度(默认 20) 设置一个更高的数值可以更快的滚动

scrollButtons:{ scrollAmount:Integer }          //设置点击滚动按钮时候每次滚动的数值 像素单位 默认 40像素

advanced:{ updateOnBrowserResize:Boolean }      //根据百分比为自适应布局 调整浏览器上滚动条的大小 值:true,false 设置 false 如果你的内容块已经被固定大小

advanced:{ updateOnContentResize:Boolean }      //自动根据动态变换的内容调整滚动条的大小 值:true,false 设置成 true 将会不断的检查内容的长度并且据此改变滚动条大小 建议除非必要不要设置成 true 如果页面中有很多滚动条的时候 它有可能会产生额外的移出 你可以使用 update 方法来替代这个功能

advanced:{ autoExpandHorizontalScroll:Boolean } //自动扩大水平滚动条的长度 值:true,false 设置 true 你可以根据内容的动态变化自动调整大小 可以看Demo

advanced:{ autoScrollOnFocus:Boolean }          //是否自动滚动到聚焦中的对象 例如表单使用类似TAB键那样跳转焦点 值:true false

callbacks:{ onScrollStart:function(){} }        //使用自定义的回调函数在滚动时间开始的时候执行 具体请看Demo

callbacks:{ onScroll:function(){} }             //自定义回调函数在滚动中执行 Demo 同上

callbacks:{ onTotalScroll:function(){} }        //当滚动到底部的时候调用这个自定义回调函数 Demo 同上

callbacks:{ onTotalScrollBack:function(){} }    //当滚动到顶部的时候调用这个自定义回调函数 Demo 同上

callbacks:{ onTotalScrollOffset:Integer }       //设置到达顶部或者底部的偏移量 像素单位

callbacks:{ whileScrolling:function(){} }       //当用户正在滚动的时候执行这个自定义回调函数

callbacks:{ whileScrollingInterval:Integer }    //设置调用 whileScrolling 回调函数的时间间隔 毫秒单位
//默认值
(function($){

    $(document).ready(function(){

        $("#content").mCustomScrollbar({

            setWidth: false,

            setHeight: false,

            setTop: 0,

            setLeft: 0,

            axis: "y",

            scrollInertia:0,

            scrollbarPosition: "inside",

            autoDraggerLength:false

            autoExpandScrollbar:true

            alwaysShowScrollbar:2

            mouseWheel:{

                enable:true

                scrollAmount:10

                preventDefault:true

                invert:true

            },

            scrollButtons:{

                enable:false,

                scrollType:"continuous",

                scrollSpeed:20,

                scrollAmount:40

            },

            advanced:{

                updateOnBrowserResize:true,

                updateOnContentResize:false,

                autoExpandHorizontalScroll:false,

                autoScrollOnFocus:true

            },

            callbacks:{

                onScrollStart:function(){},

                onScroll:function(){},

                onTotalScroll:function(){},

                onTotalScrollBack:function(){},

                onTotalScrollOffset:0,

                whileScrolling:false,

                whileScrollingInterval:30

            }

        });

    });

})(jQuery);
mCustomScrollbar 的使用方法
update
用法:$(selector).mCustomScrollbar(“update”);
调用 mCustomScrollbar 函数的 update 方法去实时更新滚动条当内容发生变化(例如 通过 Javascript 增加或者移除一个对象、通过 ajax 插入一段新内容、隐藏或者显示一个新内容等)
下面是例子:
$(".content .mCSB_container").append("<p>New content here...</p>");
$(".content").mCustomScrollbar("update");
$(".content .myImagesContainer").append("<img src='myNewImage.jpg' />");
$(".content .myImagesContainer img").load(function(){
$(".content").mCustomScrollbar("update");
});
$("#content-1").animate({height:800},"slow",function(){
$(this).mCustomScrollbar("update");
});
当新内容完全加载或者动画完成之后,update 方法一直被调用。
scrollTo
用法:$(selector).mCustomScrollbar(“scrollTo”,position);
你可以使用这个方法自动的滚动到你想要滚动到的位置。这个位置可以使用字符串(例如 “#element-id”,“bottom” 等)描述或者是一个数值(像素单位)。下面的例子将会滚动到最下面的对象
$(".content").mCustomScrollbar("scrollTo","last");
scrollTo 方法的参数
$(selector).mCustomScrollbar(“scrollTo”,String);:滚动到某个对象的位置,字符串型的值可以是 id 或者 class 的名字
$(selector).mCustomScrollbar(“scrollTo”,”top”);:滚动到顶部(垂直滚动条)
$(selector).mCustomScrollbar(“scrollTo”,”bottom”);:滚动到底部(垂直滚动条)
$(selector).mCustomScrollbar(“scrollTo”,”left”);:滚动到最左边(水平滚动条)
$(selector).mCustomScrollbar(“scrollTo”,”right”);:滚动到最右边(水平滚动条
$(selector).mCustomScrollbar(“scrollTo”,”first”);:滚动到内容区域中的第一个对象位置
$(selector).mCustomScrollbar(“scrollTo”,”last”);:滚动到内容区域中的最后一个对象位置
$(selector).mCustomScrollbar(“scrollTo”,Integer);:滚动到某个位置(像素单位)
scrollTo 方法还有两个额外的选项参数
moveDragger: Boolean:滚动滚动条的滑块到某个位置像素单位,值:true,flase。例如:$(selector).mCustomScrollbar(“scrollTo”,200,{ moveDragger:true });
callback:Boolean:执行回调函数当 scroll-to 完成之后,值:true,false 例如:$(selector).mCustomScrollbar(“scrollTo”,200,{ callback:true });
disable
用法:$(selector).mCustomScrollbar(“disable”);
调用 disable 方法去使滚动条不可用。如果想使其重新可用,调用 update方法。disable 方法使用一个可选参数(默认 false)你可以设置 true 如果你想重新让内容区域滚动当 scrollbar 不可用时。例如:
$(".content").mCustomScrollbar("disable",true);
可以看一些使用 disable 的例子
destroy
用法:$(selector).mCustomScrollbar(“destroy”);
调用 destroy 方法可以移除某个对象的自定义滚动条并且恢复默认样式
可以看一些使用 destroy 的例子
定义滚动条外观
滚动条的 HTML 结构
//垂直滚动条结构:

<div class="content mCustomScrollbar _mCS_1">

  <div class="mCustomScrollBox">

    <div class="mCSB_container">

      <!-- your long content here... -->

    </div>

    <div class="mCSB_scrollTools">

      <a class="mCSB_buttonUp"></a>

      <div class="mCSB_draggerContainer">

        <div class="mCSB_dragger ui-draggable">

          <div class="mCSB_dragger_bar"></div>

        </div>

        <div class="mCSB_draggerRail"></div>

      </div>

      <a class="mCSB_buttonDown"></a>

    </div>

  </div>

</div>

//水平滚动条 mCSB_buttonUp 和 mCSB_buttonDown 这两个 a 标签只有当你启用了 scroll buttons 功能的时候,才可用。

  <div class="mCustomScrollBox mCSB_horizontal">

    <div class="mCSB_container">

      <!-- your long content here... -->

    </div>

    <div class="mCSB_scrollTools">

      <a class="mCSB_buttonLeft"></a>

      <div class="mCSB_draggerContainer">

        <div class="mCSB_dragger ui-draggable">

          <div class="mCSB_dragger_bar"></div>

        </div>

        <div class="mCSB_draggerRail"></div>

      </div>

      <a class="mCSB_buttonRight"></a>

    </div>

  </div>

</div>

知道这些之后,我们就可以来定义滚动条样式了,对于同一页面多个滚动条,官方推荐如下的写法:
//每个容器都有个ID,如第一个是_mCS_1,如第二个是_mCS_2,如第三个是_mCS_3
._mCS_1 .mCSB_scrollTools .mCSB_dragger .mCSB_dragger_bar{

    // 1st scrollbar dragger style...

}

._mCS_2 .mCSB_scrollTools .mCSB_dragger .mCSB_dragger_bar{

    // 2nd scrollbar dragger style...

}

._mCS_3 .mCSB_scrollTools .mCSB_dragger .mCSB_dragger_bar{

    // 3rd scrollbar dragger style...

}
例如:
._mCS_1 .mCSB_scrollTools .mCSB_dragger .mCSB_dragger_bar{ background-color: red; }           //小滚动条的背景色

._mCS_1 .mCSB_scrollTools .mCSB_dragger:hover .mCSB_dragger_bar{ background-color: blue; }    //小滚动条hover上去的颜色

._mCS_1 #mCSB_1_scrollbar_vertical .mCSB_dragger{ height: 100px; }                     //小滚动条的宽高

._mCS_1 .mCSB_scrollTools .mCSB_draggerRail{width:10px;}                               //长滚动条的宽高

._mCS_1 .mCSB_scrollTools .mCSB_draggerRail:hover{background:yellow;}                  //长滚动条hover上去的颜色

._mCS_1 .mCSB_scrollTools .mCSB_buttonUp{background-position:-83px 0;}                 //小铵钮图标背景

._mCS_1 .mCSB_scrollTools .mCSB_buttonDown{background-position:-83px 0;}               //小铵钮图标背景

._mCS_1 ._mCS_1 .mCSB_inside > .mCSB_container{margin-right:0px;}                      //内容与滚动条的距离

._mCS_1 .mCSB_scrollTools{right:0px;}                                                  //滚动条的位置
原文链接:https://www.cnblogs.com/alantao/p/5239262.html/
滚动条mCustomScrollbar自定义的更多相关文章
- 【JQuery插件】元素根据滚动条位置自定义吸顶效果
;(function($){ $.fn.extend({ /* 元素根据滚动条位置自定义吸顶插件 @defaultTop 初始化top位置 @startTop 开始滚动和回复原样的位置 @demo v ...
- 自定义滚动条 - mCustomScrollbar
项目中需要使用自定义滚动条,但是试用了很多都功能不够全,今天发现一个比较全而且用法很简单的 -- mCustomScrollbar http://manos.malihu.gr/jquery-cust ...
- 自定义滚动条mCustomScrollbar
mCustomScrollbar 是个基于 jQuery UI 的自定义滚动条插件,它可以让你灵活的通过 CSS 定义网页的滚动条,并且垂直和水平两个方向的滚动条都可以定义,它通过 Brandon A ...
- 使用jquery.mCustomScrollbar自定义滚动条(4)live使用,向未来元素添加滚动条,不实用,了解一下
.div_box元素是本来没有的,在滚动条初始化的时候方法是加在$('.content .div_box').mCustomScrollbar()上面,参数live:on; 点击按钮的时候,进行con ...
- 使用jquery.mCustomScrollbar自定义滚动条(3)callback onCreate
碰到了一个问题,想简洁,所以在页面上使用 <div class="div_box mCustomScrollbar" data-mcs-theme="dark-3& ...
- 使用jquery.mCustomScrollbar自定义滚动条(2)
参考博客:http://www.qianxingzhem.com/post-1602.html 接着上篇,另一个使用的例子,使用js来初始化滚动条,并且div中的内容可变化.需要调用相应的方法, 代码 ...
- 使用jquery.mCustomScrollbar自定义滚动条(1)
参考博客:https://blog.csdn.net/cdnight/article/details/41351505 api网址:http://manos.malihu.gr/jquery-cust ...
- HTML+CSS 滚动条样式自定义 - 适用于 div,iframe, html 等
友言:这两天被滚动条整的无与伦比,在此做下总结: 首先自定义浏览器滚动条的实现原理:计算浏览器滚动条的高度,层级1的高度与滚动条的总高度是一样的,通过相似比例计算: 浏览器滚动条总高度 :滚动条高度 ...
- css滚动条样式自定义
很简单的几行代码 <!DOCTYPE html> <html lang="en"> <head> <meta charset=" ...
随机推荐
- Python 3.6 抓取微博m站数据
Python 3.6 抓取微博m站数据 2019.05.01 更新内容 containerid 可以通过 "107603" + user_id 组装得到,无需请求个人信息获取: 优 ...
- LeetCode 1060. Missing Element in Sorted Array
原题链接在这里:https://leetcode.com/problems/missing-element-in-sorted-array/ 题目: Given a sorted array A of ...
- bootstrap轮播图组件
一.轮播图组件模板(官方文档) <div id="carousel-example-generic" class="carousel slide" dat ...
- android 自己制作Jar包 和 修改 现成的 Jar包文件
先看如何创建自己的 Jar 包 里面随便写个方法 public int add(int a,int b){ return (a+b); } task makeJar(type: Copy) { del ...
- vuex 之既生‘mutation’何生‘action’
vuex 中,action 及 mutation 均为操作数据的作用而存在,既然二者均可改变数据,为什么要分成两个方法来处理呢,因为: Mutation 必须是同步函数 mutations: { so ...
- 56、Spark Streaming: transform以及实时黑名单过滤案例实战
一.transform以及实时黑名单过滤案例实战 1.概述 transform操作,应用在DStream上时,可以用于执行任意的RDD到RDD的转换操作.它可以用于实现,DStream API中所没有 ...
- C博客作业01——分支,顺序结构
C博客作业01--分支,顺序结构 0.展示PTA总分 1本章学习内容 1.1学习内容总结 1)格式化输出函数printf(),scanf(). 它是什么? 对于初学者而言,一开始了解接触它们,只是被硬 ...
- Python调用win32 API绘制正弦波
Python调用win32 API新建窗口与直接创建窗口的流程相同 流程:注册窗口→创建窗口→显示窗口→更新窗口→消息循环 代码: # -*- coding: utf-8 -*- import win ...
- Spring重定向
1.使用HttpServletResponse的sendRedirect()方法. 示例: @PostMapping("/user/product/id") public void ...
- TICK/TIGK运维栈安装运行 docker【中】
InfluxDB docker search influxdb docker pull influxdb docker run -d -p 8086:8086 -v /var/lib/influxdb ...