CloudStack学习-2
环境准备
这次实验主要是CloudStack结合glusterfs。 两台宿主机,做gluster复制卷
VmWare添加一台和agent1配置一样的机器
系统版本:centos6.6 x86_64

内存:4GB

网络:机器是nat

磁盘:装完系统后额外添加个50GB的磁盘

额外:勾选vt-x
配置主机名为agent2
正式开始
关闭iptables和selinux
sed  -i   's#SELINUX=enforcing#SELINUX=disabled#g'   /etc/selinux/config

setenforce  0

chkconfig iptables off

/etc/init.d/iptables  stop
配置IP地址为静态的
[root@agent2 ~]#  cat /etc/sysconfig/network-scripts/ifcfg-eth0

DEVICE=eth0

TYPE=Ethernet

ONBOOT=yes

BOOTPROTO=static

IPADDR=192.168.145.153

NETMASK=255.255.255.0

GATEWAY=192.168.145.2

DNS1=10.0.1.11

[root@agent2 ~]#
配置主机名为agent2
配置hosts文件
cat >>/etc/hosts<<EOF

192.168.145.151 master1

192.168.145.152 agent1

192.168.145.153 agent2

EOF
保证master和两台agent的配置都如下
[root@agent2 ~]# cat /etc/hosts

127.0.0.1   localhost localhost.localdomain localhost4 localhost4.localdomain4

::1         localhost localhost.localdomain localhost6 localhost6.localdomain6

192.168.145.151 master1

192.168.145.152 agent1

192.168.145.153 agent2

[root@agent2 ~]#
配置ntp
yum  install ntp -y

chkconfig ntpd on

/etc/init.d/ntpd start
检查 hostname --fqdn
[root@agent2 ~]# hostname  --fqdn

agent2

[root@agent2 ~]#
安装epel源
yum install epel-release -y
agent2上也如下操作,注意agent2新建primary目录
[root@agent2 tools]# mkdir /export/primary  -p

[root@agent2 tools]#
agent2上操作,格式化磁盘
[root@agent2 ~]# mkfs.ext4 /dev/sdb

mke2fs 1.41.12 (17-May-2010)

/dev/sdb is entire device, not just one partition!

Proceed anyway? (y,n) y

Filesystem label=

OS type: Linux

Block size=4096 (log=2)

Fragment size=4096 (log=2)

Stride=0 blocks, Stripe width=0 blocks

3276800 inodes, 13107200 blocks

655360 blocks (5.00%) reserved for the super user

First data block=0

Maximum filesystem blocks=4294967296

400 block groups

32768 blocks per group, 32768 fragments per group

8192 inodes per group

Superblock backups stored on blocks:

	32768, 98304, 163840, 229376, 294912, 819200, 884736, 1605632, 2654208,

	4096000, 7962624, 11239424

Writing inode tables: done

Creating journal (32768 blocks): done

Writing superblocks and filesystem accounting information: done

This filesystem will be automatically checked every 36 mounts or

180 days, whichever comes first.  Use tune2fs -c or -i to override.

[root@agent2 ~]#
agent2上操作
[root@agent2 ~]#  echo "/dev/sdb   /export/primary  ext4  defaults  0  0">>/etc/fstab

[root@agent2 ~]# mount -a

[root@agent2 ~]# df -h

Filesystem      Size  Used Avail Use% Mounted on

/dev/sda3        35G  2.3G   31G   7% /

tmpfs           1.9G     0  1.9G   0% /dev/shm

/dev/sda1       380M   33M  328M   9% /boot

/dev/sdb         50G   52M   47G   1% /export/primary

[root@agent2 ~]#
删除之前实验残留的配置
master端操作
删除之前的配置
先操作master,删除之前的库
[root@master1 ~]# mysql -uroot -p123456

Welcome to the MySQL monitor.  Commands end with ; or \g.

Your MySQL connection id is 14

Server version: 5.1.73-log Source distribution

Copyright (c) 2000, 2013, Oracle and/or its affiliates. All rights reserved.

Oracle is a registered trademark of Oracle Corporation and/or its

affiliates. Other names may be trademarks of their respective

owners.

Type 'help;' or '\h' for help. Type '\c' to clear the current input statement.

mysql> show databases;

+--------------------+

| Database           |

+--------------------+

| information_schema |

| cloud              |

| cloud_usage        |

| mysql              |

| test               |

+--------------------+

5 rows in set (0.01 sec)

mysql> drop database cloud;

Query OK, 274 rows affected (1.34 sec)

mysql> drop database cloud_usage;

Query OK, 25 rows affected (0.09 sec)

mysql> show databases;

+--------------------+

| Database           |

+--------------------+

| information_schema |

| mysql              |

| test               |

+--------------------+

3 rows in set (0.00 sec)

mysql>
停止management服务
[root@master1 ~]# /etc/init.d/cloudstack-management stop

Stopping cloudstack-management:                            [FAILED]

[root@master1 ~]# /etc/init.d/cloudstack-management stop

Stopping cloudstack-management:                            [  OK  ]

[root@master1 ~]# /etc/init.d/cloudstack-management status

cloudstack-management is stopped

[root@master1 ~]#
agent1上卸载gluster的包
卸载glusterfs会卸载kvm相关的依赖包,从c6.6开始的
6.5以前,kvm也不依赖glusterfs
如果replication包没安装的话,先执行上面的卸载操作
它会自动的把kvm的包卸载。libvirtd的包也被卸载
[root@agent1 ~]# rpm -qa | grep gluster

[root@agent1 ~]# yum remove glusterfs*

[root@agent1 ~]# rpm -qa | grep kvm

[root@agent1 ~]# rpm -qa | grep libvirt

libvirt-python-0.10.2-60.el6.x86_64

libvirt-client-0.10.2-60.el6.x86_64

[root@agent1 ~]#
小插曲
agent1本次实验完毕关机后,ifcfg-cloudbr0文件没生成。在这之前实验是正常的,重启后发现cloudbr0文件丢失

解决办法:复制ifcfg-eth0为ifcfg-cloudbr0,参照机器agent2上正常的cloudbr0文件修改
配置glusterfs
安装gluster3.7的源(agent1和agent2都操作)
如果你安装了3.6和3.8的包也没问题
[root@agent1 ~]# yum install centos-release-gluster37 -y

Loaded plugins: fastestmirror, security

Setting up Install Process

Loading mirror speeds from cached hostfile

 * epel: mirrors.tuna.tsinghua.edu.cn

centos-gluster37                                                  | 2.9 kB     00:00

centos-gluster37/primary_db                                       |  99 kB     00:07

Package centos-release-gluster37-1.0-4.el6.centos.noarch already installed and latest version

Nothing to do

[root@agent1 ~]#
查看yum源文件
[root@agent1 ~]# cat /etc/yum.repos.d/CentOS-Gluster-3.7.repo

# CentOS-Gluster-3.7.repo

#

# Please see http://wiki.centos.org/SpecialInterestGroup/Storage for more

# information

[centos-gluster37]

name=CentOS-$releasever - Gluster 3.7

baseurl=http://mirror.centos.org/centos/$releasever/storage/$basearch/gluster-3.7/

gpgcheck=1

enabled=1

gpgkey=file:///etc/pki/rpm-gpg/RPM-GPG-KEY-CentOS-SIG-Storage

[centos-gluster37-test]

name=CentOS-$releasever - Gluster 3.7 Testing

baseurl=http://buildlogs.centos.org/centos/$releasever/storage/$basearch/gluster-3.7/

gpgcheck=0

enabled=0

gpgkey=file:///etc/pki/rpm-gpg/RPM-GPG-KEY-CentOS-SIG-Storage

[root@agent1 ~]#
指定源,安装对应版本的glusterfs包(agent1和agent2都操作)
[root@agent1 ~]# yum --enablerepo=centos-gluster37-test install glusterfs-server glusterfs-cli gluster-geo-replication -y
也可以从下面路径下载rpm包,然后安装
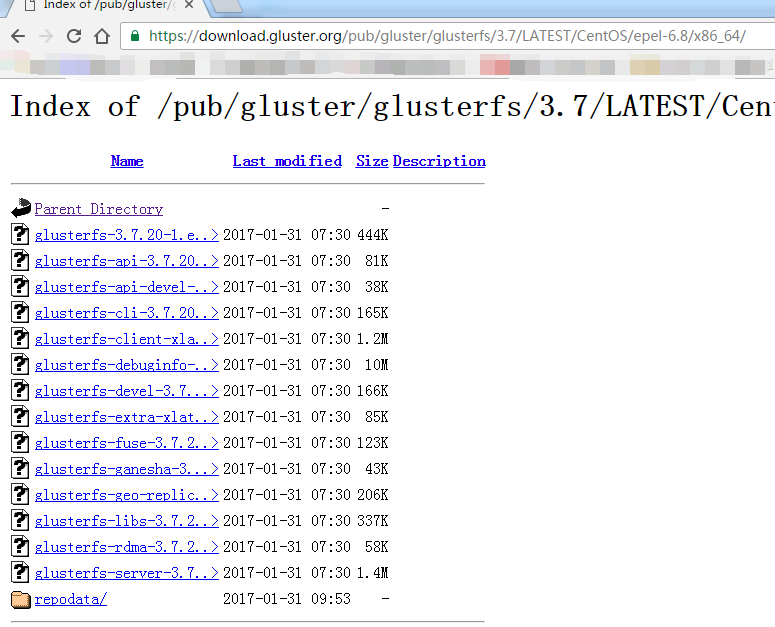
https://download.gluster.org/pub/gluster/glusterfs/3.7/LATEST/CentOS/epel-6.8/x86_64/
agent端删除之前残留文件
agent1删除挂载点原先的文件(原先的kvm等文件)
[root@agent1 ~]# cd /export/primary/

[root@agent1 primary]# ls

0cc65968-4ff3-4b4c-b31e-7f1cf5d1959b  cf3dac7a-a071-4def-83aa-555b5611fb02

1685f81b-9ac9-4b21-981a-f1b01006c9ef  f3521c3d-fca3-4527-984d-5ff208e05b5c

99643b7d-aaf4-4c75-b7d6-832c060e9b77  lost+found

[root@agent1 primary]# rm -rf *

[root@agent1 primary]# ls

[root@agent1 primary]#
agent2也如此操作。删除多余的东西
[root@agent2 ~]# cd /export/primary/

[root@agent2 primary]# ls

lost+found

[root@agent2 primary]# rm -rf *

[root@agent2 primary]# ls

[root@agent2 primary]#
agent2上安装CloudStack包(在这之前,已经把glusterfs3.7的包安装上了)
这些agent不需要手动起,它们是交给master管理的
其实master是通过22端口连接过来管理的
[root@agent2 tools]# yum install cloudstack-agent-4.8.0-1.el6.x86_64.rpm cloudstack-common-4.8.0-1.el6.x86_64.rpm -y
agent端检查glusterfs版本
[root@agent1 ~]# glusterfs -V

glusterfs 3.7.20 built on Jan 30 2017 15:39:27

Repository revision: git://git.gluster.com/glusterfs.git

Copyright (c) 2006-2013 Red Hat, Inc. <http://www.redhat.com/>

GlusterFS comes with ABSOLUTELY NO WARRANTY.

It is licensed to you under your choice of the GNU Lesser

General Public License, version 3 or any later version (LGPLv3

or later), or the GNU General Public License, version 2 (GPLv2),

in all cases as published by the Free Software Foundation.

[root@agent1 ~]#
启动glusterd并设置开机启动(两个agent上操作)
[root@agent1 ~]# /etc/init.d/glusterd start

Starting glusterd:                                         [  OK  ]

[root@agent1 ~]# chkconfig glusterd on

[root@agent1 ~]#
两台agent停止iptables
[root@agent1 ~]# /etc/init.d/iptables stop

iptables: Setting chains to policy ACCEPT: nat mangle filte[  OK  ]

iptables: Flushing firewall rules:                         [  OK  ]

iptables: Unloading modules:                               [  OK  ]

[root@agent1 ~]# chkconfig iptables off

[root@agent1 ~]#
gluster加入节点,并检查状态,在一台agent上操作即可
[root@agent1 ~]# gluster peer probe agent2

peer probe: failed: Probe returned with Transport endpoint is not connected

[root@agent1 ~]# gluster peer probe agent2

peer probe: success.

[root@agent1 ~]# gluster peer status

Number of Peers: 1

Hostname: agent2

Uuid: 2778cb7a-32ef-4a3f-a34c-b97f5937bb49

State: Peer in Cluster (Connected)

[root@agent1 ~]#
创建复制卷
开始操作
gv2是自定义的
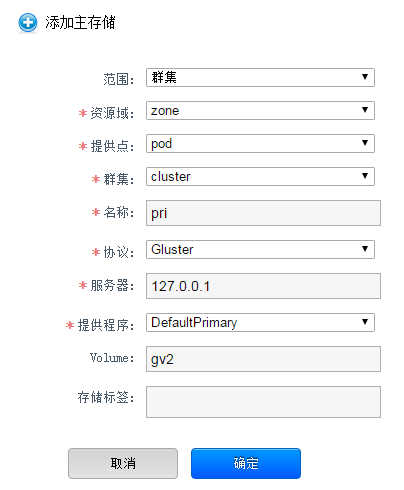
[root@agent1 ~]# gluster volume create gv2 replica 2 agent1:/export/primary  agent2:/export/primary force

volume create: gv2: success: please start the volume to access data

[root@agent1 ~]#
启动这个卷,并查看状态,Type显示Replicate,就表示复制卷的意思 ,为什么采用gluster呢,原先主存储是本地挂载的,假如宿主机挂掉后,宿主机上的kvm全部挂掉。
[root@agent1 ~]# gluster volume start gv2

volume start: gv2: success

[root@agent1 ~]# gluster volume info

Volume Name: gv2

Type: Replicate

Volume ID: 3a23ab68-73da-4f1b-bc5c-3310ffa9e8b7

Status: Started

Number of Bricks: 1 x 2 = 2

Transport-type: tcp

Bricks:

Brick1: agent1:/export/primary

Brick2: agent2:/export/primary

Options Reconfigured:

performance.readdir-ahead: on

[root@agent1 ~]#
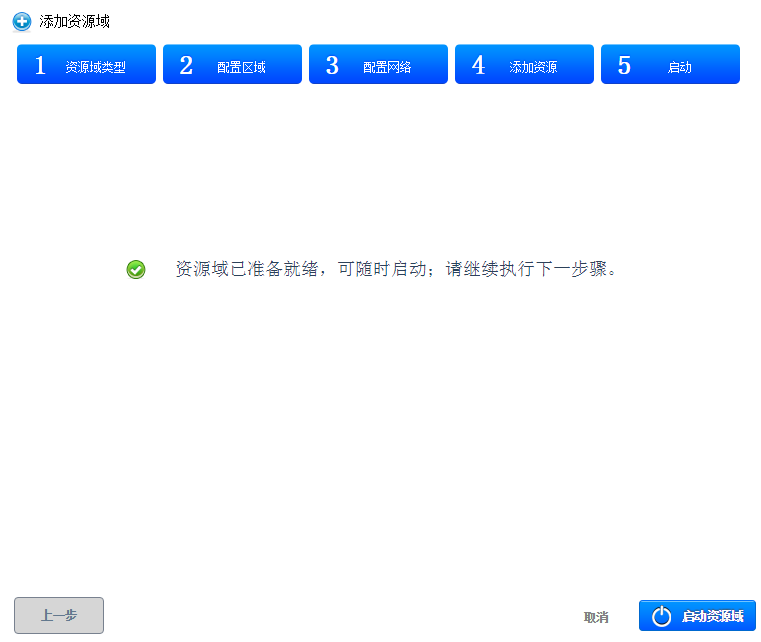
gluster的东西至此完毕,继续之前的内容
CloudStack配置和用户界面操作
继续在master上如下初始化数据库的操作,导入数据
[root@master1 ~]# cloudstack-setup-databases cloud:123456@localhost --deploy-as=root:123456

Mysql user name:cloud                                                           [ OK ]

Mysql user password:******                                                      [ OK ]

Mysql server ip:localhost                                                       [ OK ]

Mysql server port:3306                                                          [ OK ]

Mysql root user name:root                                                       [ OK ]

Mysql root user password:******                                                 [ OK ]

Checking Cloud database files ...                                               [ OK ]

Checking local machine hostname ...                                             [ OK ]

Checking SELinux setup ...                                                      [ OK ]

Detected local IP address as 192.168.145.151, will use as cluster management server node IP[ OK ]

Preparing /etc/cloudstack/management/db.properties                              [ OK ]

Applying /usr/share/cloudstack-management/setup/create-database.sql             [ OK ]

Applying /usr/share/cloudstack-management/setup/create-schema.sql               [ OK ]

Applying /usr/share/cloudstack-management/setup/create-database-premium.sql     [ OK ]

Applying /usr/share/cloudstack-management/setup/create-schema-premium.sql       [ OK ]

Applying /usr/share/cloudstack-management/setup/server-setup.sql                [ OK ]

Applying /usr/share/cloudstack-management/setup/templates.sql                   [ OK ]

Processing encryption ...                                                       [ OK ]

Finalizing setup ...                                                            [ OK ]

CloudStack has successfully initialized database, you can check your database configuration in /etc/cloudstack/management/db.properties

[root@master1 ~]#
数据库配置完毕后,启动master,它会做一些初始化的操作
以后不要这么启动,初始化只执行一次就行了
[root@master1 ~]# cloudstack-setup-management
查看日志,已经启动完成了,看到8080端口已经监听了
[root@master1 ~]# tail -f /var/log/cloudstack/management/catalina.out

INFO  [o.a.c.s.l.CloudStackExtendedLifeCycle] (main:ctx-d2bdddaf) (logid:) Done Configuring CloudStack Components

INFO  [c.c.u.LogUtils] (main:ctx-d2bdddaf) (logid:) log4j configuration found at /etc/cloudstack/management/log4j-cloud.xml

Feb 12, 2017 7:59:25 PM org.apache.coyote.http11.Http11NioProtocol start

INFO: Starting Coyote HTTP/1.1 on http-8080

Feb 12, 2017 7:59:25 PM org.apache.jk.common.ChannelSocket init

INFO: JK: ajp13 listening on /0.0.0.0:20400

Feb 12, 2017 7:59:25 PM org.apache.jk.server.JkMain start

INFO: Jk running ID=0 time=0/18  config=null

Feb 12, 2017 7:59:25 PM org.apache.catalina.startup.Catalina start

INFO: Server startup in 63790 ms
登录网页
http://192.168.145.151:8080/client
登录网页
admin/password
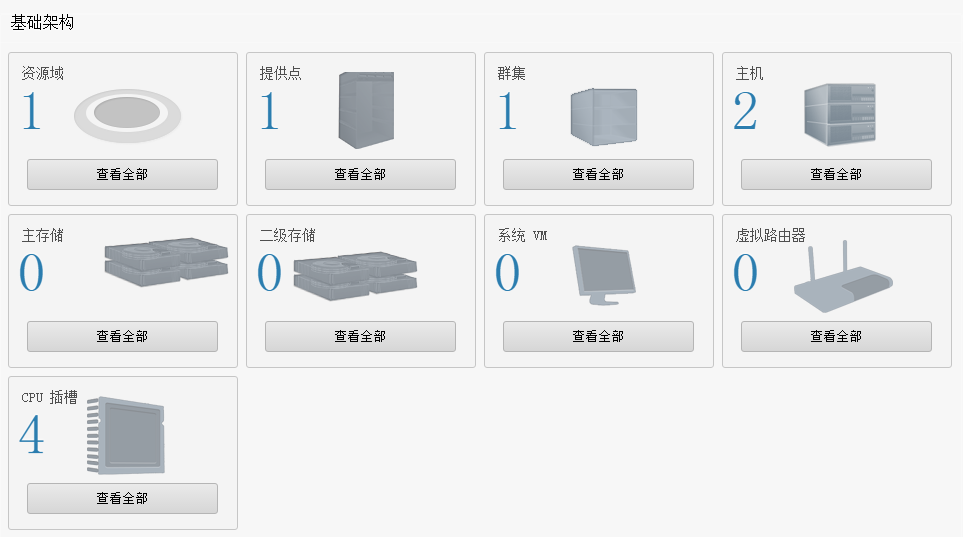
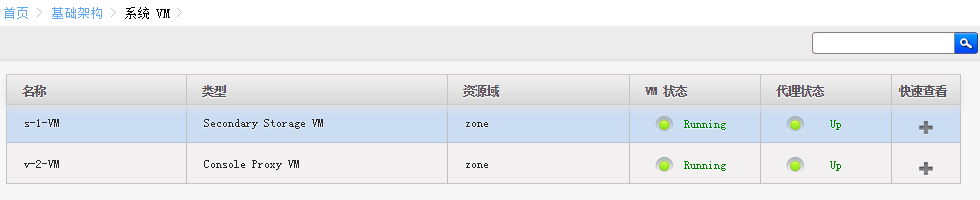
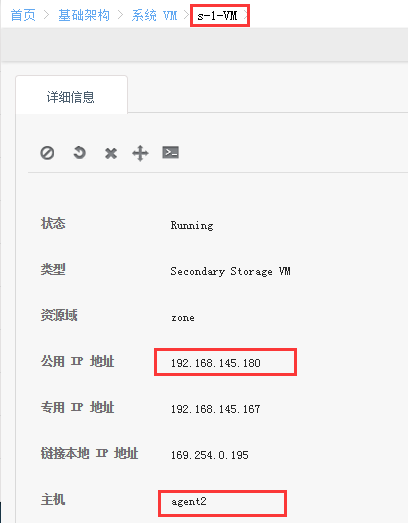
接下来创建系统虚拟机(master上操作)
系统虚拟路由,vnc窗口都是这些虚拟机的作用,master上执行下面命令
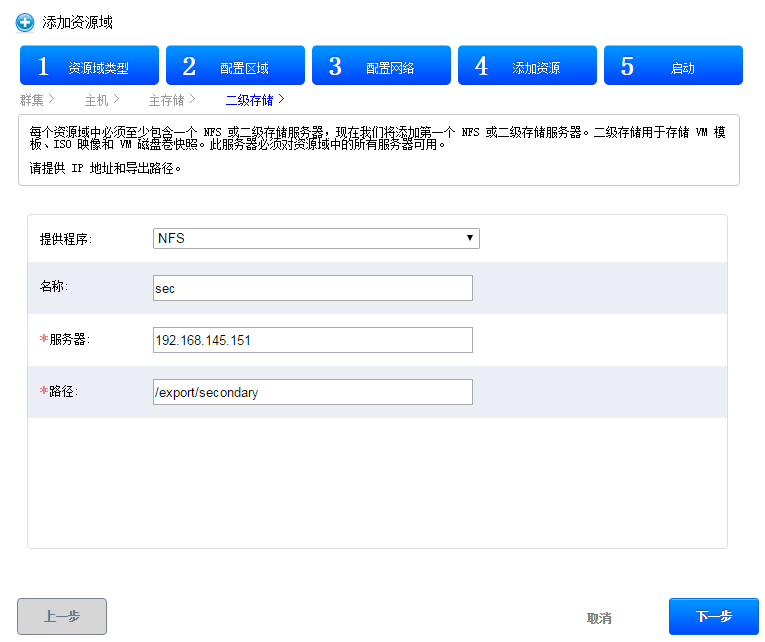
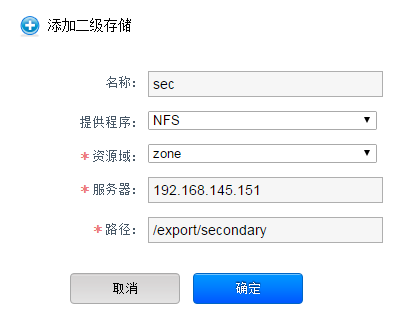
/usr/share/cloudstack-common/scripts/storage/secondary/cloud-install-sys-tmplt \

-m /export/secondary \

-f /tools/systemvm64template-4.6.0-kvm.qcow2.bz2 \

-h kvm -F
这个步骤的作用就是把虚拟机模板导入到二级存储,执行过程如下
[root@master1 tools]# /usr/share/cloudstack-common/scripts/storage/secondary/cloud-install-sys-tmplt \

> -m /export/secondary \

> -f /tools/systemvm64template-4.6.0-kvm.qcow2.bz2 \

> -h kvm -F

Uncompressing to /usr/share/cloudstack-common/scripts/storage/secondary/9824edc4-61db-4ad8-a08a-61f051b9ebfe.qcow2.tmp (type bz2)...could take a long time

Moving to /export/secondary/template/tmpl/1/3///9824edc4-61db-4ad8-a08a-61f051b9ebfe.qcow2...could take a while

Successfully installed system VM template /tools/systemvm64template-4.6.0-kvm.qcow2.bz2 to /export/secondary/template/tmpl/1/3/

[root@master1 ~]#
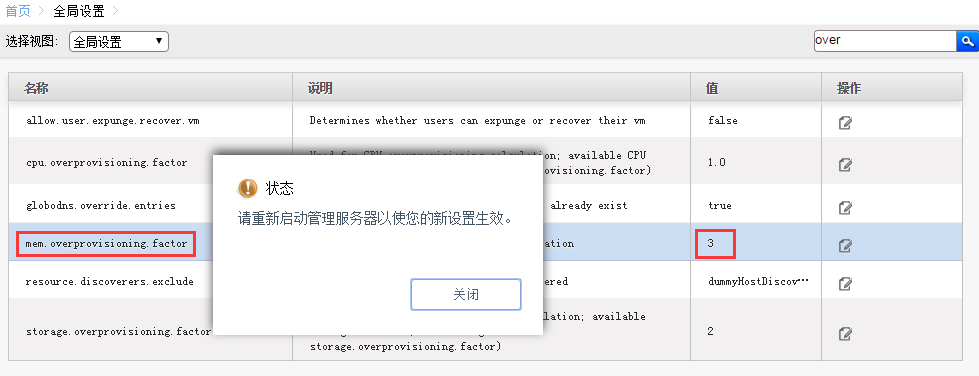
登录CloudStack管理页面,更改内存的超配
改完需要重启下服务。

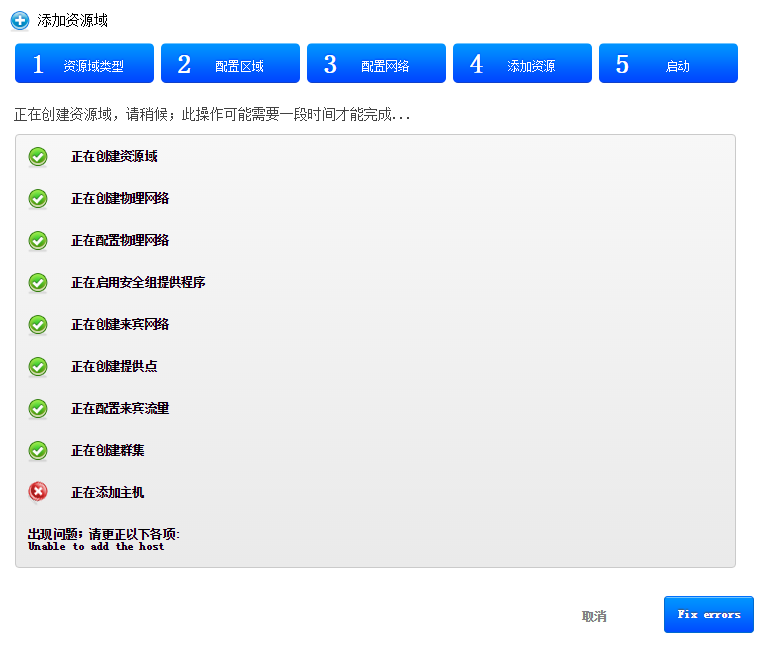

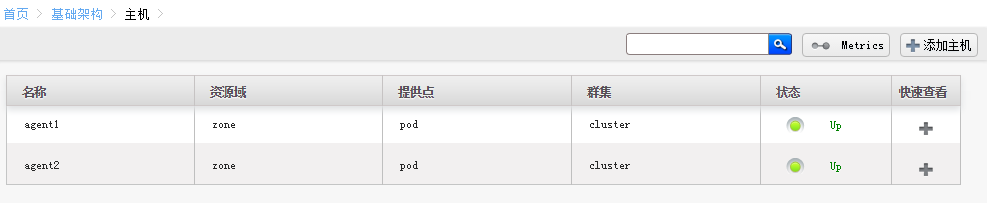
可以通过主机界面添加

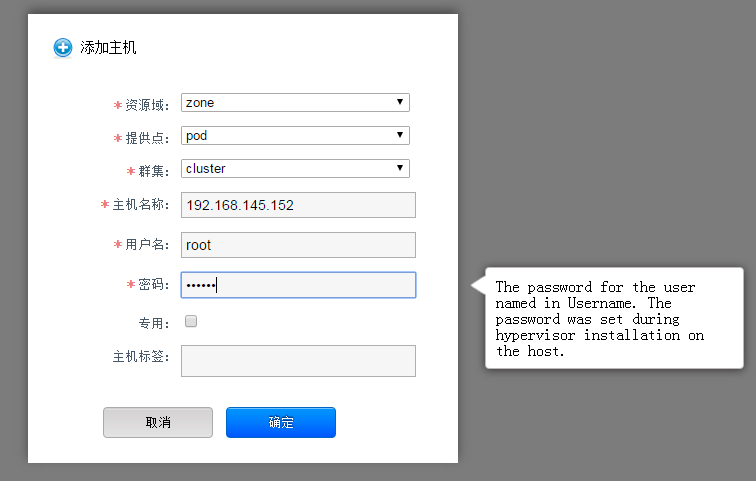

添加成功
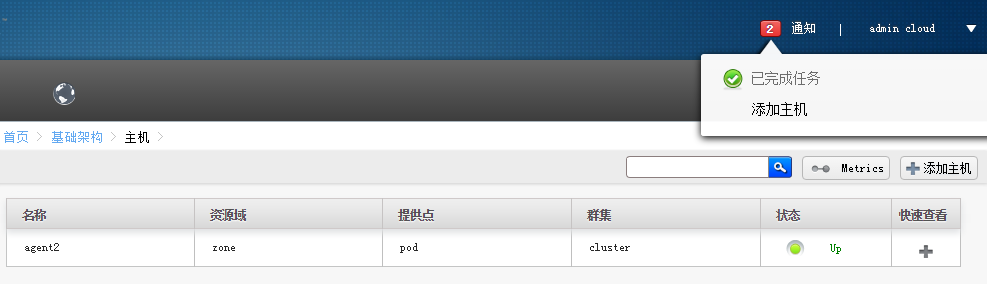
agent1没添加成功是上节课的cloudbr0 残留引起的
删除cloudbr0,重启agent1网络,再次master上添加,完成
[root@agent1 ~]# cd /etc/sysconfig/network-scripts/

[root@agent1 network-scripts]# ls ifcfg-cloudbr0

ifcfg-cloudbr0

[root@agent1 network-scripts]# rm -f ifcfg-cloudbr0

[root@agent1 network-scripts]# /etc/init.d/network restart

Shutting down interface eth0:                              [  OK  ]

Shutting down loopback interface:                          [  OK  ]

Bringing up loopback interface:                            [  OK  ]

Bringing up interface eth0:                                [  OK  ]

[root@agent1 network-scripts]#
rm -f ifcfg-cloudbr0

/etc/init.d/network restart
ps -ef | grep kvm

lsmod | grep kvm

rpm -qa | grep kvm

virsh list --all
cd /tools/

ls

yum install cloudstack-agent-4.8.0-1.el6.x86_64.rpm cloudstack-common-4.8.0-1.el6.x86_64.rpm  -y

ps -ef | grep kvm

lsmod | grep kvm

rpm -qa | grep kvm

/etc/init.d/libvirtd status

/etc/init.d/libvirtd restart
virsh list

ps -ef | grep kvm

kill -9 2776

ps -ef | grep kvm

kill -9 2532

ps -ef | grep kvm

kill -9 2304

ps -ef | grep kvm

virsh  list --all
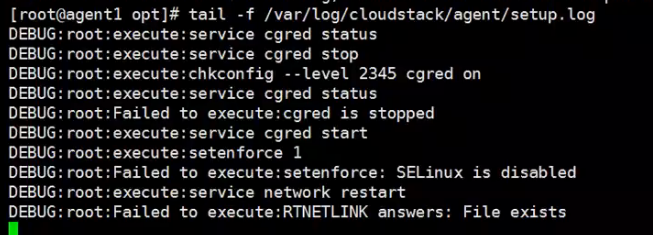
日志在刷,卡在这里,这里是别人做实验遇到的。就是cloudbr0文件没删除导致的
提示File exists
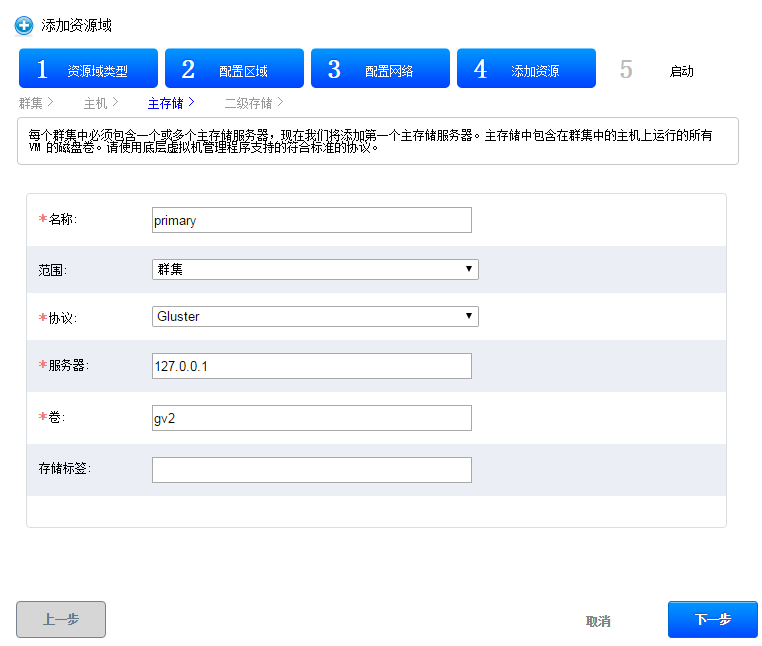
添加存储
先添加主存储

[root@agent1 ~]# df -h

Filesystem      Size  Used Avail Use% Mounted on

/dev/sda3        35G  2.7G   31G   8% /

tmpfs           1.9G     0  1.9G   0% /dev/shm

/dev/sda1       380M   33M  328M   9% /boot

/dev/sdb         50G   52M   47G   1% /export/primary

127.0.0.1:/gv2   50G   52M   47G   1% /mnt/6d915c5a-6640-354e-9209-d2c8479ca105

[root@agent1 ~]#

[root@agent2 ~]# df -h

Filesystem      Size  Used Avail Use% Mounted on

/dev/sda3        35G  2.7G   31G   9% /

tmpfs           1.9G     0  1.9G   0% /dev/shm

/dev/sda1       380M   33M  328M   9% /boot

/dev/sdb         50G   52M   47G   1% /export/primary

127.0.0.1:/gv2   50G   52M   47G   1% /mnt/6d915c5a-6640-354e-9209-d2c8479ca105

[root@agent2 ~]#

启动域之前,先优化一下
修改超配
关于超配可以参照上一节课的。
修改完之后需要重启master的management服务,可能服务第一次重启需要等待一段时间,为了确保成功,再次执行一次重启
[root@master1 ~]# /etc/init.d/cloudstack-management restart

Stopping cloudstack-management:                            [FAILED]

Starting cloudstack-management:                            [  OK  ]

[root@master1 ~]# /etc/init.d/cloudstack-management restart

Stopping cloudstack-management:                            [  OK  ]

Starting cloudstack-management:                            [  OK  ]

[root@master1 ~]#
重启过程中,日志有些报错,参照下。不用管
[root@master1 ~]# tail -f /var/log/cloudstack/management/catalina.out

INFO  [o.a.c.s.l.CloudStackExtendedLifeCycle] (Thread-85:null) (logid:) stopping bean VolumeDataStoreDaoImpl

INFO  [o.a.c.s.l.CloudStackExtendedLifeCycle] (Thread-85:null) (logid:) stopping bean UsageDaoImpl

INFO  [o.a.c.s.l.CloudStackExtendedLifeCycle] (Thread-85:null) (logid:) stopping bean ManagementServerNode

INFO  [o.a.c.s.l.CloudStackExtendedLifeCycle] (Thread-85:null) (logid:) stopping bean ConfigurationServerImpl

INFO  [o.a.c.s.l.CloudStackExtendedLifeCycle] (Thread-85:null) (logid:) stopping bean DatabaseIntegrityChecker

INFO  [o.a.c.s.l.CloudStackExtendedLifeCycle] (Thread-85:null) (logid:) stopping bean ClusterManagerImpl

INFO  [c.c.c.ClusterManagerImpl] (Thread-85:null) (logid:) Stopping Cluster manager, msid : 52236852888

log4j:WARN No appenders could be found for logger (com.cloud.cluster.ClusterManagerImpl).

log4j:WARN Please initialize the log4j system properly.

log4j:WARN See http://logging.apache.org/log4j/1.2/faq.html#noconfig for more info.

Exception in thread "SnapshotPollTask" java.lang.NullPointerException

	at org.slf4j.impl.Log4jLoggerAdapter.info(Log4jLoggerAdapter.java:304)

	at org.apache.cloudstack.managed.context.ManagedContextRunnable.getContext(ManagedContextRunnable.java:66)

	at org.apache.cloudstack.managed.context.ManagedContextRunnable.run(ManagedContextRunnable.java:46)

	at org.apache.cloudstack.managed.context.ManagedContextTimerTask.run(ManagedContextTimerTask.java:27)

	at java.util.TimerThread.mainLoop(Timer.java:555)

	at java.util.TimerThread.run(Timer.java:505)

Feb 12, 2017 8:50:21 PM org.apache.catalina.core.AprLifecycleListener init

Feb 12, 2017 8:50:22 PM org.apache.catalina.session.StandardManager doLoad

SEVERE: IOException while loading persisted sessions: java.io.WriteAbortedException: writing aborted; java.io.NotSerializableException: net.sf.cglib.proxy.NoOp$1

java.io.WriteAbortedException: writing aborted; java.io.NotSerializableException: net.sf.cglib.proxy.NoOp$1

	at java.io.ObjectInputStream.readObject0(ObjectInputStream.java:1354)

[root@master1 ~]#
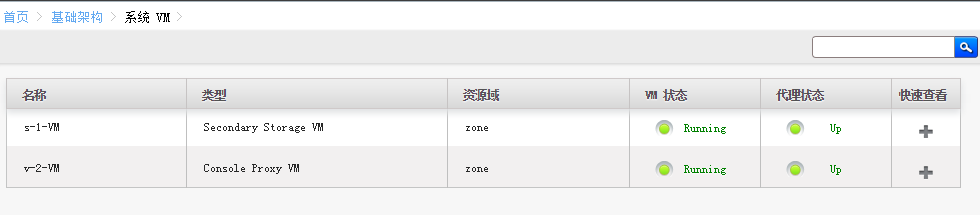
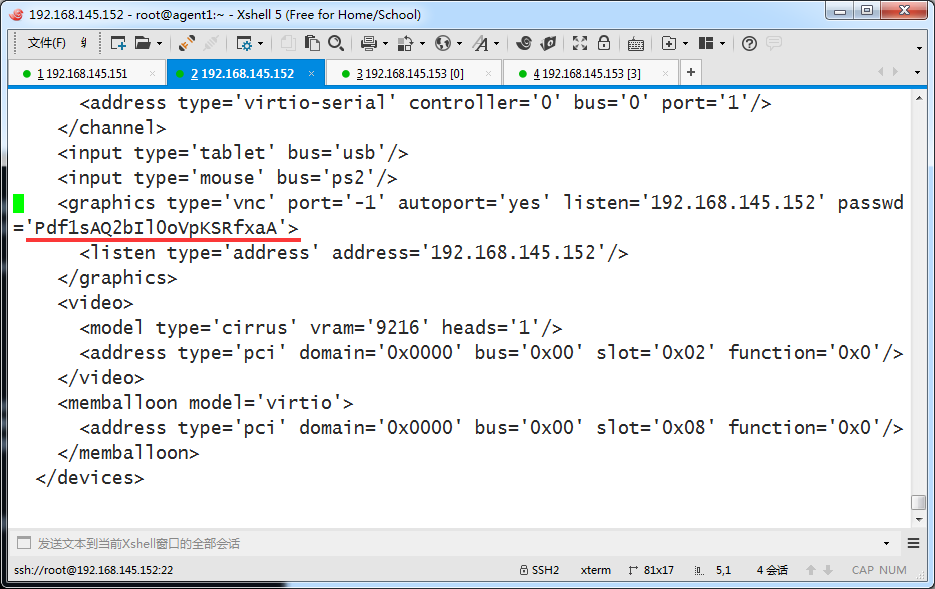
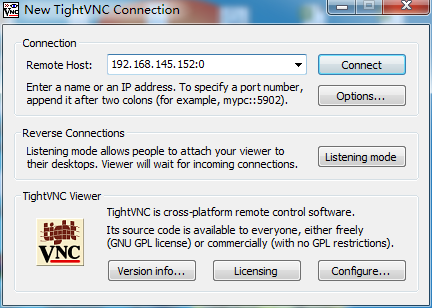
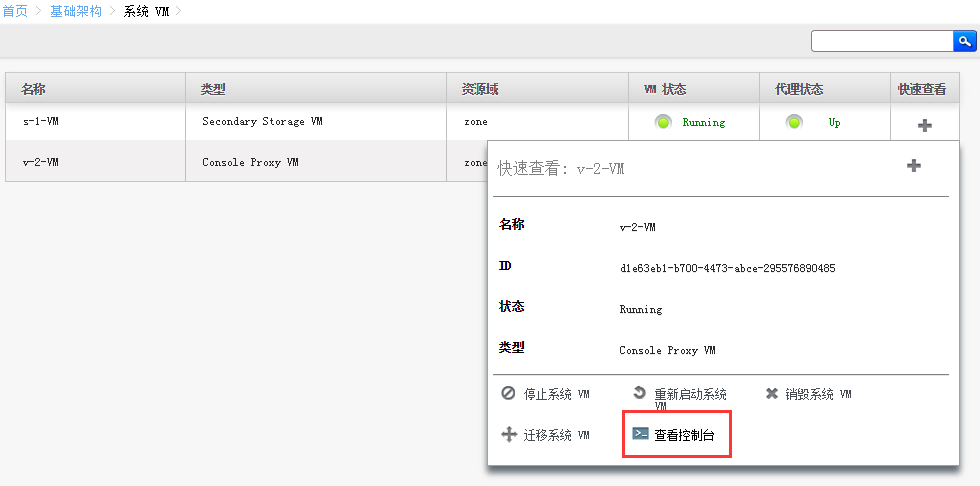
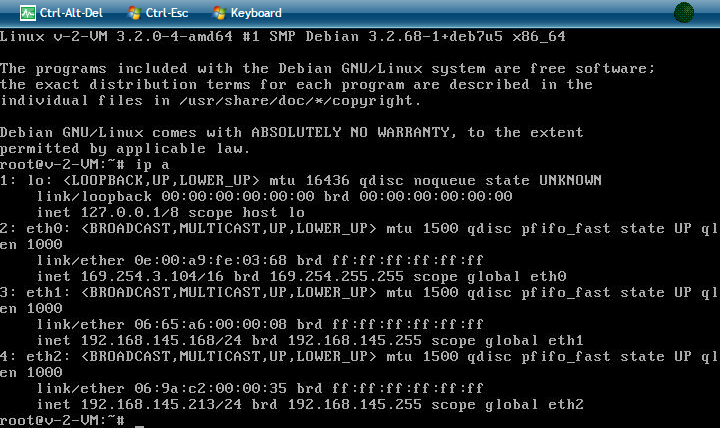
想判断kvm有没有启动成功,两种方法
1、网页查看
2、vnc登录看看
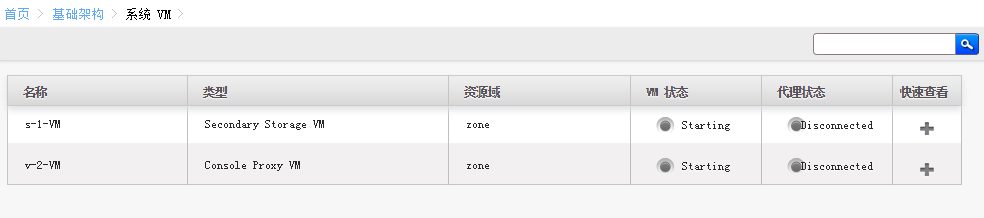
网页方式查看
启动中
找到如下内容,最后的密码就是vnc的密码
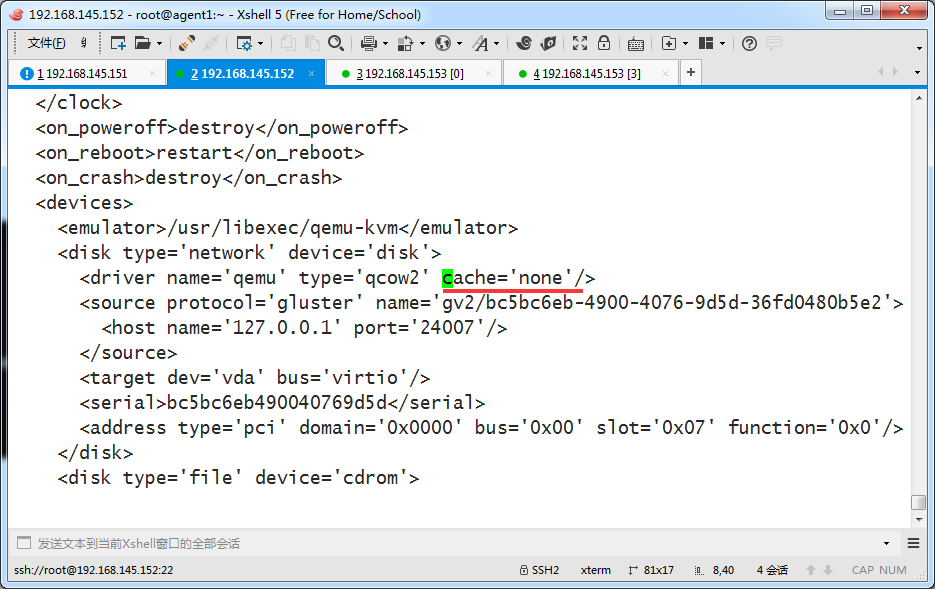
<graphics type='vnc' port='-1' autoport='yes' listen='192.168.145.152' passwd='Pdf1sAQ2bIl0oVpKSRfxaA'>

虚拟机启动成功后,查看所在位置
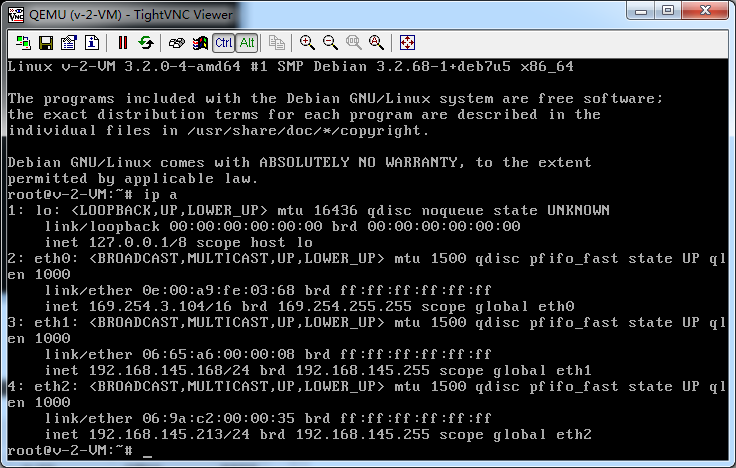
这里面就是模板还有那两个虚拟机,两个agent由于是复制卷,内容一致
[root@agent1 ~]# df -h

Filesystem      Size  Used Avail Use% Mounted on

/dev/sda3        35G  2.7G   31G   8% /

tmpfs           1.9G     0  1.9G   0% /dev/shm

/dev/sda1       380M   33M  328M   9% /boot

/dev/sdb         50G  682M   46G   2% /export/primary

127.0.0.1:/gv2   50G  682M   46G   2% /mnt/6d915c5a-6640-354e-9209-d2c8479ca105

[root@agent1 ~]# cd /mnt/6d915c5a-6640-354e-9209-d2c8479ca105/

[root@agent1 6d915c5a-6640-354e-9209-d2c8479ca105]# ls

745865fe-545e-4430-98ac-0ffd5186a9b6  bc5bc6eb-4900-4076-9d5d-36fd0480b5e2

9824edc4-61db-4ad8-a08a-61f051b9ebfe

[root@agent1 6d915c5a-6640-354e-9209-d2c8479ca105]#

内容一致

[root@agent2 ~]# cd /mnt/6d915c5a-6640-354e-9209-d2c8479ca105/

[root@agent2 6d915c5a-6640-354e-9209-d2c8479ca105]# ls

745865fe-545e-4430-98ac-0ffd5186a9b6  bc5bc6eb-4900-4076-9d5d-36fd0480b5e2

9824edc4-61db-4ad8-a08a-61f051b9ebfe

[root@agent2 6d915c5a-6640-354e-9209-d2c8479ca105]#
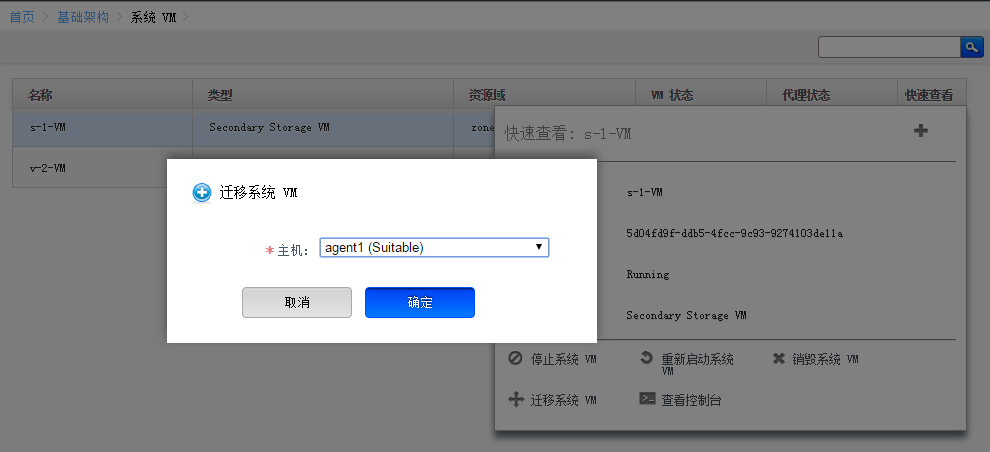
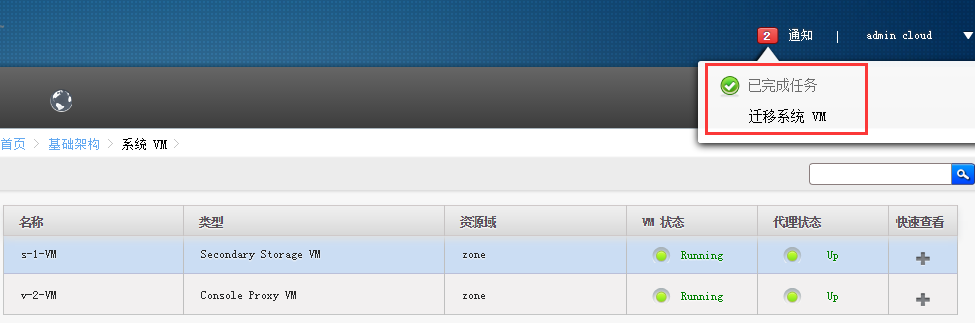
虚拟机的在线迁移
目前是一个宿主机分了一个系统虚拟机
[root@agent1 ~]# virsh list
Id Name State
----------------------------------------------------
1 v-2-VM running [root@agent1 ~]#
[root@agent2 ~]# virsh list
Id Name State
----------------------------------------------------
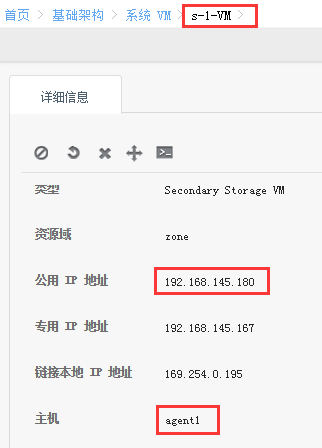
1 s-1-VM running [root@agent2 ~]#
[root@agent1 ~]# virsh list

 Id    Name                           State

----------------------------------------------------

 1     v-2-VM                         running

[root@agent1 ~]#
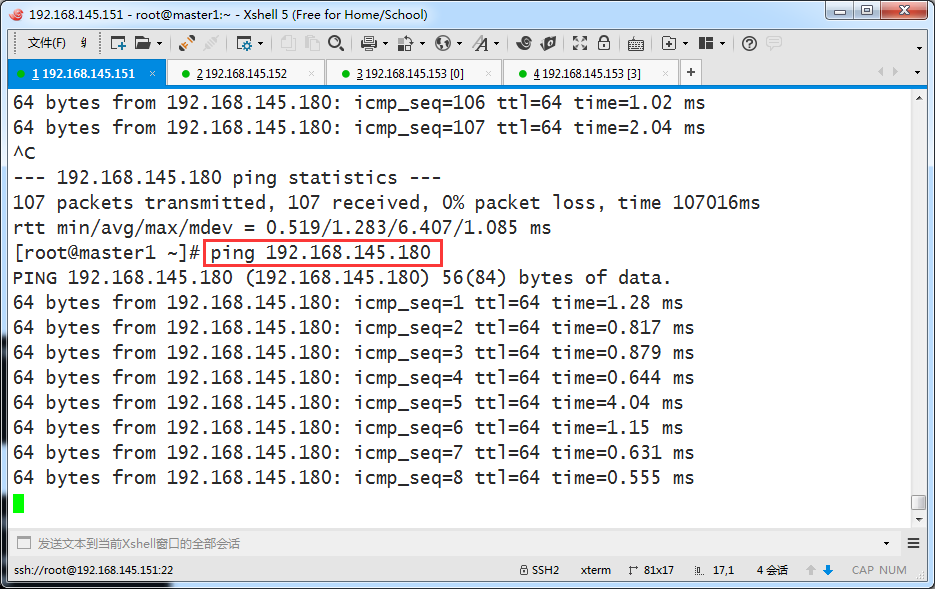

64 bytes from 192.168.145.180: icmp_seq=132 ttl=64 time=2.97 ms

64 bytes from 192.168.145.180: icmp_seq=133 ttl=64 time=0.830 ms

64 bytes from 192.168.145.180: icmp_seq=134 ttl=64 time=0.640 ms

64 bytes from 192.168.145.180: icmp_seq=135 ttl=64 time=0.850 ms

64 bytes from 192.168.145.180: icmp_seq=136 ttl=64 time=1.43 ms

^C

--- 192.168.145.180 ping statistics ---

136 packets transmitted, 132 received, 2% packet loss, time 135432ms

rtt min/avg/max/mdev = 0.447/1.331/8.792/1.268 ms

[root@master1 ~]#
[root@agent1 ~]# virsh list

 Id    Name                           State

----------------------------------------------------

 1     v-2-VM                         running

 3     s-1-VM                         running

[root@agent1 ~]#
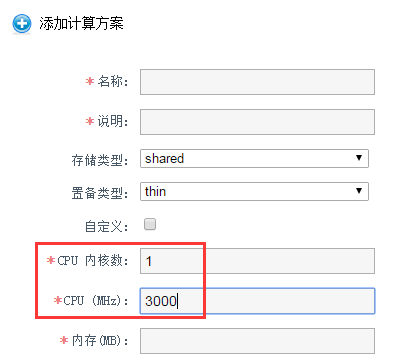
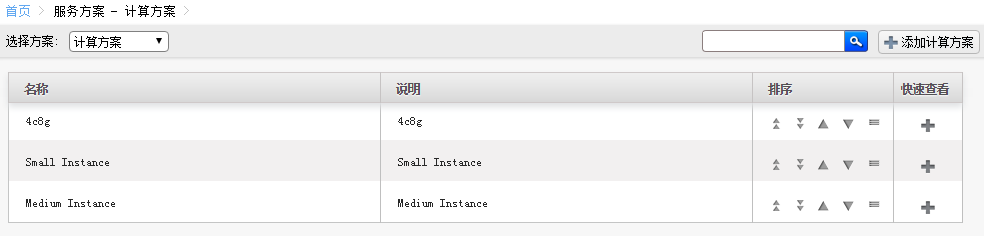
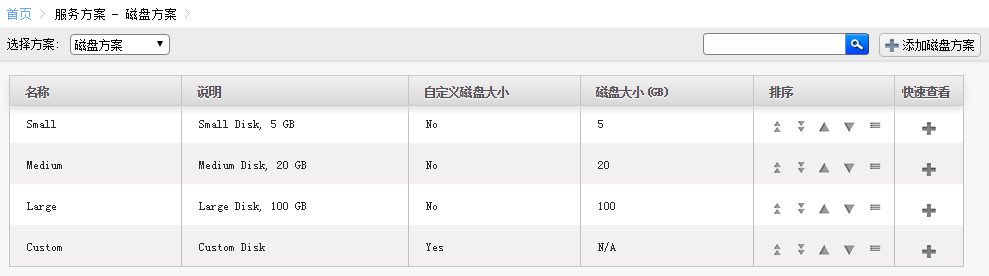
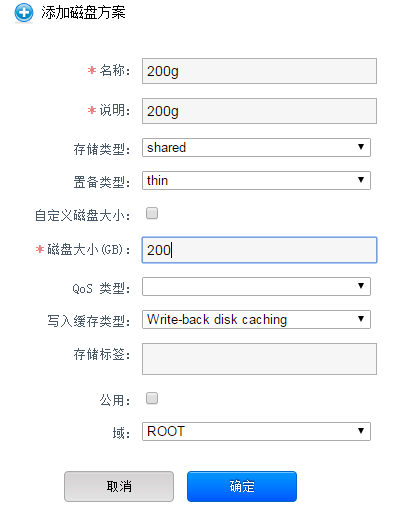
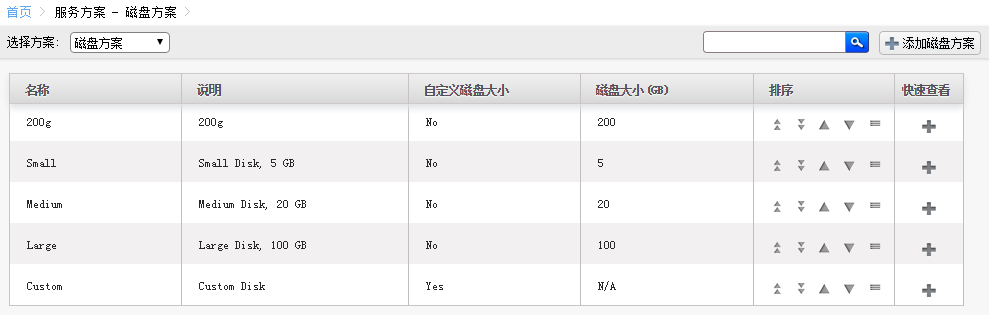
自定义虚拟机配置方案
你可以添加自定义的kvm配置套餐

[root@agent1 ~]# cat /proc/cpuinfo  | head -10

processor	: 0

vendor_id	: GenuineIntel

cpu family	: 6

model		: 42

model name	: Intel(R) Core(TM) i7-2670QM CPU @ 2.20GHz

stepping	: 7

microcode	: 26

cpu MHz		: 2192.909

cache size	: 6144 KB

physical id	: 0

[root@agent1 ~]#
假如你物理机是2.2GMHZ,比如上面这种
虽然物理机有多核,这里你创建1个3GMHz的。 是不可以的。


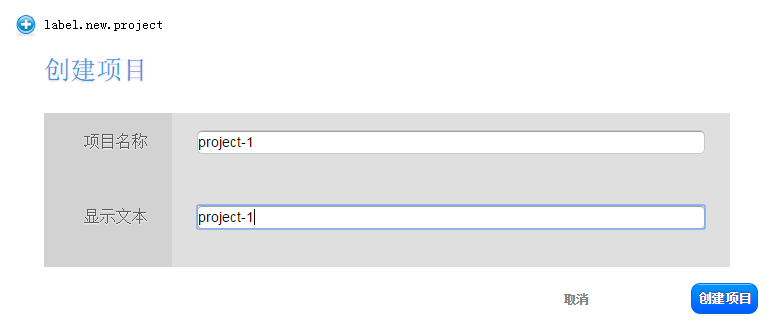
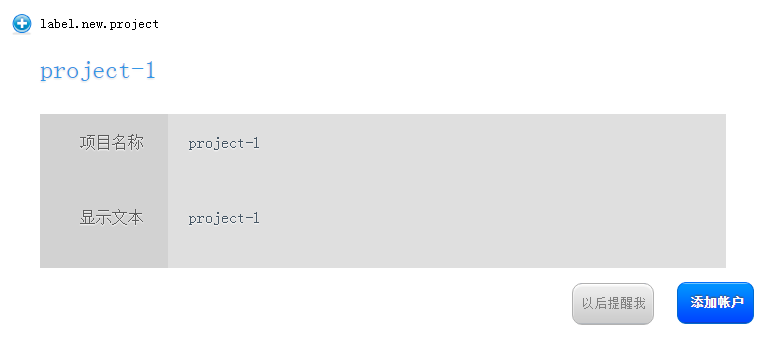
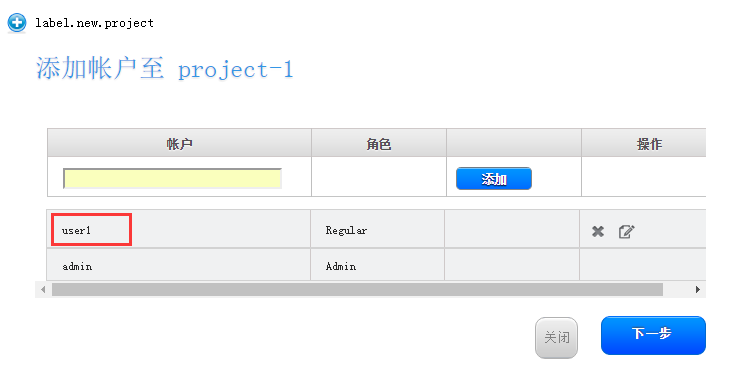
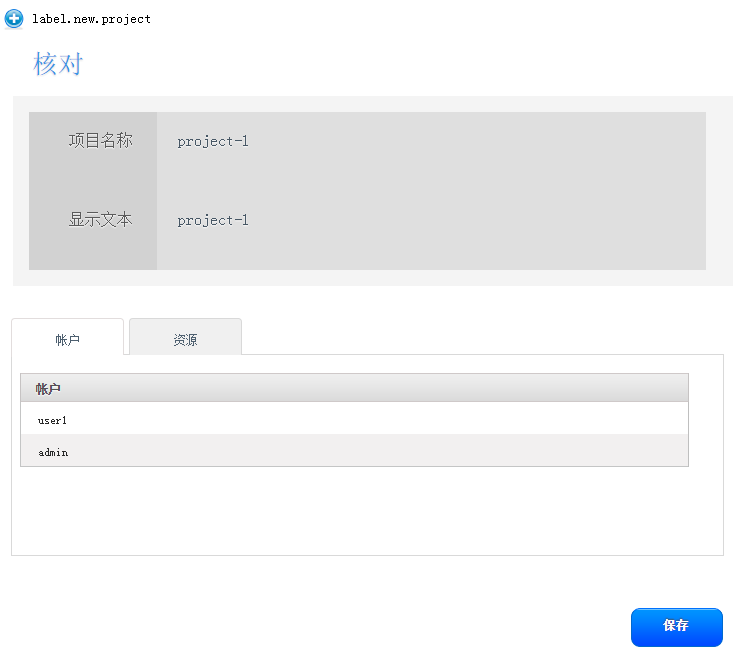
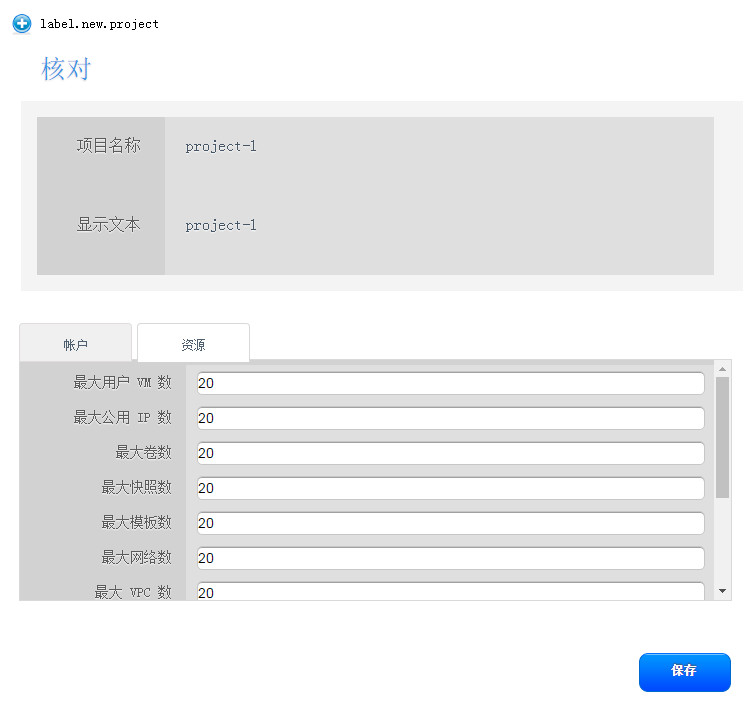
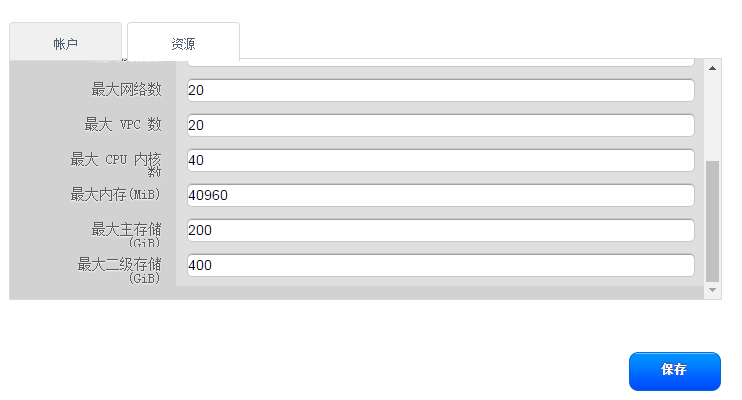
用户界面账户和项目使用


CloudStack学习-2的更多相关文章
- CloudStack学习-1
环境准备 实验使用的虚拟机配置 Vmware Workstation 虚拟机系统2个 系统版本:centos6.6 x86_64 内存:4GB 网络:两台机器都是nat 磁盘:装完系统后额外添加个50 ...
- CloudStack学习-3
此次试验主要是CloudStack结合openvswitch 背景介绍 之所以引入openswitch,是因为如果按照之前的方式,一个网桥占用一个vlan,假如一个zone有20个vlan,那么岂不是 ...
- 学习S5
rztyfx的专栏 目录视图 摘要视图 订阅 [专家问答]阿里陈康贤:探讨大型网站之架构 走进VR开发世界——我们离开发一款VR大作还有多远? C ...
- Cloudstack网络分析-基本网络
前言 相信对于很多初学者或者使用者来说,刚开始接触Cloudstack的时候可能会被Cloudstack的网络概念弄得有些糊涂,例如,基础网络,高级网络,细之网络流量分类(公共,管理,来宾,存储),这 ...
- linux运维需要掌握什么知识?linux运维学习路线
linux运维需要掌握什么知识?这个问题算是老生常谈了,但是本人认为知道需要掌握什么知识不是重点,重点是我们需要知道运维是做什么的?再来根据工作需求去讨论需要学习什么知识才是正途,须知知识是学不完的, ...
- 零基础学习openstack【完整中级篇】及openstack资源汇总
1.你是如何学习openstack的?2.你对openstack的组件了解多少?3.你认为openstack该如何学习? 一直想写关于openstack的方面的内容,今天终于整理完成.算是完成一桩心事 ...
- 快速部署简单私有云CloudStack(上)
前言: 亲身用了大半年,没出过重大毛病,也就是服务挂了,跟服务器也没啥关系.如果想更深入学习cloudstack可以试试高级网络,我是一直用的简单网络(扁平网络). 由来:CloudStack的前身是 ...
- 从直播编程到直播教育:LiveEdu.tv开启多元化的在线学习直播时代
2015年9月,一个叫Livecoding.tv的网站在互联网上引起了编程界的注意.缘于Pingwest品玩的一位编辑在上网时无意中发现了这个网站,并写了一篇文章<一个比直播睡觉更奇怪的网站:直 ...
- Angular2学习笔记(1)
Angular2学习笔记(1) 1. 写在前面 之前基于Electron写过一个Markdown编辑器.就其功能而言,主要功能已经实现,一些小的不影响使用的功能由于时间关系还没有完成:但就代码而言,之 ...
随机推荐
- Centos7部署kubelet(六)
1.二进制包准备将软件包从linux-node1复制linux-node2.linux-node3中去 [root@linux-node1 ssl]# cd /usr/local/src/kubern ...
- 火狐下,td 的 bug;
想实现类似的效果,看代码, <div style="width:488px;float:left; margin:-52px 0px 15px 15px;"> < ...
- css3宽高设置:calc() / vw / vh
对于720px的设计稿,100vw == 720px,1vw == 7.2px; vw可以替代rem 实现自适应布局. 相应的计算插件:postcss-px-to-viewport ******** ...
- 关于 数据库 my_slq的 安装及其卸载
安装的时候 注意事项 自定后 根据电脑的系统版本 选择32 或者64 然后选择→方向键 密码默认是123456 或者 123123 查看装的数据库是否安装好了 如何完全卸载 mysql 数据库 ...
- thinkphp5.1学习笔记
由于新公司使用的框架是thinkphp5.1,有必要进一步学习,看来我要把php框架使用完全了,之前就用过laravel和CI框架了. 现在打算只是一个学习的记录,结构会比较凌乱,基本我估计只能自己看 ...
- display_errors","On");和error_reporting 区别和联系
ini_set("display_errors","On");和error_reporting(E_ALL); 在用php做网站开发的时候 , 为防止用户看 ...
- 推荐内置android控件的开源项目alcinoe
开源地址:https://github.com/Zeus64/alcinoe 该控件包,含以下几个控件: 1.基于OpenGL实现的视频播放器 ALVideoPlayer. ALVideoPlayer ...
- mysql检查-优化-分析
Mysql分析.检查.优化表 l 分析表 对表进行分析(分析关键字的分布, 分析存储MyISAM等表中键的分布) MySQL中使用ANALYZE TABLE语句来分析表,该语句的基本语法如下: mys ...
- ubantu查看进程操作
可以使用ps命令.它能显示当前运行中进程的相关信息,包括进程的PID.Linux和UNIX都支持ps命令,显示所有运行中进程的相关信息. ps命令能提供一份当前进程的快照.如果想状态可以自动刷新,可以 ...
- Day19作业及默写
三级菜单 menu = { '北京': { '海淀': { '五道口': { 'soho': {}, '网易': {}, 'google': {} }, '中关村': { '爱奇艺': {}, '汽车 ...