spring 组件自动装载示例(@ComponentScan,@Component,@Scope)
今天学习spring的bean组件装载功能,个人不太喜欢xml文件一个个配置bean的方式,所以主要学习测试注解式的自动装载方式。下面将简单说明下@Component的用法,简单入门示例献给大家。
实现主要步骤说明:
1、ApplicationContext.xml(spring上下文环境配置)文件先配置好需要自动扫描的包位置。注册完成后,在spring初始化上下文环境时,会自动扫描声明的包以及子包下面有注解(@Component,@Repository,@Service,@Controller)的类型,并缓存起来。这里需要提一下@Component是一个基础的注解,不对代码功能分类进行区分,@Repository一般用于业务逻辑层的类注解,@Service用于dao层注解,@Controller用于控制器注解。
<?xml version="1.0" encoding="UTF-8"?>

<beans xmlns="http://www.springframework.org/schema/beans"

  xmlns:xsi="http://www.w3.org/2001/XMLSchema-instance"

  xmlns:context="http://www.springframework.org/schema/context"

  xsi:schemaLocation="http://www.springframework.org/schema/beans http://www.springframework.org/schema/beans/spring-beans.xsd

    http://www.springframework.org/schema/context http://www.springframework.org/schema/context/spring-context.xsd">

  <!-- 定义 bean 的 id,以及对应的 java 类 -->

  <context:component-scan base-package="com.spring.simm" use-default-filters="true"/>

  <!--<bean id="helloWorld" class="com.spring.simm.impls.HelloWorld">

    <property name="message" value="Hello World!" />

  </bean>-->

</beans>
2、添加一个HelloWorld组件。需要注意的是@Component注解的组件,默认都是单例模式,即缺省的@Scope("singleton")。通过spring去getBean实例时,其实都是同一个对象。我这里将改组件设置成多例模式,即添加注解@Scope("prototype")。
@Scope的模式有:singleton、prototype、request、session、global session,其他模式各位可以查阅网上资料
public interface IHelloWorld {

   void say(String name);

}
@Scope("prototype")

//@Scope("singleton")

@Component("hello")

public class HelloWorld implements IHelloWorld {

    private static int no = 0;

    public HelloWorld(){

        no++;

        System.out.println("IHelloWorld[" + no +"]运行");

    }

    /**

     * 说话

     */

    public void say(String name) {

        // TODO Auto-generated method stub

        System.out.println(name +" : hello world!");

    }

}
3、再添加一个HelloWorldService组件,注解成@Service,单例模式(后面,我们针对单例、多例两个组件的表现进行测试)。在服务内声明了一个自动装载的HelloWorld组件(@AutoWired),通过getHelloWorld方法返回,由于服务类是单例模式,因此这个helloworld对象也是唯一的,在服务的整个生命周期中不变。getHelloWorld2方法则每次都创建一个新的HelloWorld对象。
public interface IHelloWorldService {

    HelloWorld getHelloWorld();

    HelloWorld getHelloWorld2();

}
/**

 * Hello world 服务,默认情况下就是单例的

 * @author wh-simm

 *

 */

@Service("helloservice")

public class HelloWorldService implements IHelloWorldService {

    private static int no = 0;

    public HelloWorldService(){

        no++;

        System.out.println("HelloWorldService["+no+"]启动");

    }

    /**

     * 自动装载

     */

    @Autowired

    private HelloWorld helloWorld;

    /**

     * 获取自动装载的实例

     */

    public HelloWorld getHelloWorld(){

        return helloWorld;

    }

    /**

     * 新建实例

     */

    public HelloWorld getHelloWorld2(){

        return new HelloWorld();

    }

}
4、添加测试代码
public class app {

    public static void main(String[] args) {

        // 获取 classpath 中的 Beans.xml 到上下文 context

        //1.装载spring上下文配置文件,完成spring容器的初始化

        ApplicationContext context = new ClassPathXmlApplicationContext("Beans.xml");

        //2.从spring容器中获取bean-helloworld 实例1

        IHelloWorld obj1 = (IHelloWorld) context.getBean("hello");

        obj1.say("simm1");

        //3.从spring容器中获取bean-helloworld 实例2

        IHelloWorld obj2 = (IHelloWorld) context.getBean("hello");

        obj2.say("simm2");

        //3.从spring容器中获取bean-HelloWorldService 实例1(单例)

        IHelloWorldService service = (IHelloWorldService)context.getBean("helloservice");

        service.getHelloWorld().say("simm3");

        service.getHelloWorld().say("simm4");

        //3.从spring容器中获取bean-HelloWorldService 实例2(单例)

        IHelloWorldService service2 = (IHelloWorldService)context.getBean("helloservice");

        service2.getHelloWorld2().say("simm5");

        service2.getHelloWorld2().say("simm6");

        // 关闭上下文,防止内存泄漏

        ((ClassPathXmlApplicationContext) context).close();

    }

}
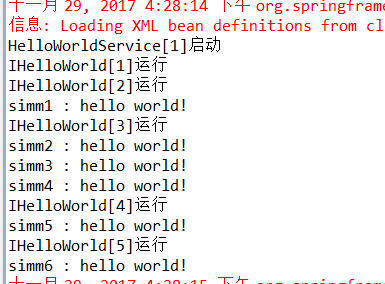
5、测试结果显示,从spring容器中两次获取HelloWorldService服务,确实只运行了一次,说明默认情况下Component确实是单例的,而HelloWorld组件每次获取都是创建新的对象,属于多例模式。服务中自动装载的HelloWorld组件(@AutoWired)在单例的组件中使用时,要考虑清楚对象的生命周期。
参考资料
https://www.cnblogs.com/lonecloud/p/5745902.html
http://blog.csdn.net/qiuhan/article/details/45581371
spring 组件自动装载示例(@ComponentScan,@Component,@Scope)的更多相关文章
- spring 组件@Scope(request,session)示例
上回说到, spring组件的注解Scope大约有singleton.prototype.request.session.global session 这么几种常用的场景.这里需要特别说明一下,根据源 ...
- 【译】Spring 4 自动装配、自动检测、组件扫描示例
前言 译文链接:http://websystique.com/spring/spring-auto-detection-autowire-component-scanning-example-with ...
- Spring Boot 自动配置的原理、核心注解以及利用自动配置实现了自定义 Starter 组件
本章内容 自定义属性快速入门 外化配置 自动配置 自定义创建 Starter 组件 摘录:读书是读完这些文字还要好好用心去想想,写书也一样,做任何事也一样 图 2 第二章目录结构图 第 2 章 Spr ...
- Spring组件扫描<context:component-scan/>使用详解
1.如果不想在xml文件中配置bean,我们可以给我们的类加上spring组件注解,只需再配置下spring的扫描器就可以实现bean的自动载入. <!-- 注解注入 --> <co ...
- 转 Spring 组件 <context:component-scan base-pakage="">用法
1.如果不想在xml文件中配置bean,我们可以给我们的类加上spring组件注解,只需再配置下spring的扫描器就可以实现bean的自动载入. <!-- 注解注入 --> <co ...
- spring Bean类自动装载实现
先贴spring的开发文档,有助于大家学习http://shouce.jb51.net/spring/beans.html#beans-factory-class 一直想研究一下spring bean ...
- Spring核心技术(八)——Spring自动装载的注解
本文针对自动装载的一些注解进行描述. 基于注解的容器配置 @Required注解 @Required注解需要应用到Bean的属性的setter方法上面,如下面的例子: public class Sim ...
- Spring深入浅出(二)IOC的单例 ,继承,依赖,JDBC,工厂模式以及自动装载
IOC的单例模式--Bean Spring中的bean是根据scope来决定的. scope有4种类型: 1.singleton:单例模型,表示通过Spring容器获取的该对象是唯一的.常用并且默认. ...
- Spring框架——IOC 自动装载
IOC自动装载有两种形式 <?xml version="1.0" encoding="UTF-8"?> <beans xmlns=" ...
随机推荐
- 数据结构 哈希表(Hash Table)_哈希概述
哈希表支持一种最有效的检索方法:散列. 从根来上说,一个哈希表包含一个数组,通过特殊的索引值(键)来访问数组中的元素. 哈希表的主要思想是通过一个哈希函数,在所有可能的键与槽位之间建立一张映射表.哈希 ...
- MyCat 启蒙:分布式系统的数据库架构演变
文章首发于[博客园-陈树义],点击跳转到原文<MyCat 启蒙:分布式系统的数据库架构演变> 单数据库架构 一个项目在初期的时候,为了尽可能快地验证市场,其对业务系统的最大要求是快速实现. ...
- Java calendar获取月份注意事项
Calendar中月份month得取值是从0开始,到11,对应着日历中的1-12月.所以在用此取月份的话,需要在原有基础上加1.
- Redis进阶实践之七Redis和Lua初步整合使用
一.引言 Redis学了一段时间了,基本的东西都没问题了.从今天开始讲写一些redis和lua脚本的相关的东西,lua这个脚本是一个好东西,可以运行在任何平台上,也可以嵌入到大多数语言当 ...
- esp8266 终于装上固件了!半个月了!开始进军简单粗暴的lua语言!!
第一次测试2017-10-2720:33:33 感谢这位大神的汇总资料太详细了 http://www.cnblogs.com/yangfengwu/p/7524326.html --first tes ...
- python3 第十四章 - 数据类型之Dictionary(字典)
在python中字典是另一种可变容器模型,且可存储任意类型对象. 字典的每个键值(key=>value)对用冒号(:)分割,每个对之间用逗号(,)分割,整个字典包括在花括号({})中 ,格式如下 ...
- TP手册学习第三天
命令行先在cmd进入项目目录,再执行命令 生成index模块的Blog控制器类库文件:php think make:controller index/Blog 如果仅仅生成空的控制器则可以使用:php ...
- TCP粘包和拆包问题
问题产生 一个完整的业务可能会被TCP拆分成多个包进行发送,也有可能把多个小的包封装成一个大的数据包发送,这个就是TCP的拆包和封包问题. 下面可以看一张图,是客户端向服务端发送包: 1. 第一种情况 ...
- kali初探:root用户打开wireshark打开失败
启动wireshark后,报错: 该界面提示在init.lua文件中使用dofile函数禁用了使用超级用户运行wireshark.这是因为wireshark工具是使用Lua语言编写的,并且在kali ...
- hadoop初学
Hadoop: 官网(hadoop.apache.org)的定义: 一:Hadoop Common: 为Hadoop其它模块提供通用的支持 二:HDFS: 是Hadoop的分布式文件系统,其特点是高度 ...