OpenShift实战(一):OpenShift高级安装
1.1 服务器基本信息
本次安装采用一个master、5个node、3个etcd,node节点两块硬盘,60G磁盘用于docker storage,xxx改为自己的域名或主机名。
|
节点 |
功能 |
IP |
内存 |
磁盘 |
CPU |
|
master1.xxx.net |
Master节点 |
192.168.10.110 |
16G |
40G |
8C |
|
node1.xxx.net |
Node节点 |
192.168.10.112 |
8G |
40G/60G |
4C |
|
node2.xxx.net |
Node节点 |
192.168.10.113 |
8G |
40G/60G |
4C |
|
node3.xxx.net |
Node节点 |
192.168.10.116 |
8G |
40G/60G |
4C |
|
node4.xxx.net |
Node节点 |
192.168.10.114 |
8G |
40G/60G |
4C |
|
node5.xxx.net |
Node节点 |
192.168.10.117 |
8G |
40G/60G |
4C |
|
etcd1.xxx.net |
etcd |
192.168.10.109 |
4G |
40G |
2C |
|
etcd2.xxx.net |
etcd |
192.168.10.111 |
4G |
40G |
2C |
|
etcd3.xxx.net |
etcd |
192.168.10.115 |
4G |
40G |
2C |
1.2 基本配置
所有节点hosts文件配置
[root@openshift-master1 ~]# cat /etc/hosts
192.168.10.110 master1.xxx.net
192.168.10.112 node1.xxx.net
192.168.10.113 node2.xxx.net
192.168.10.116 node3.xxx.net
192.168.10.114 node4.xxx.net
192.168.10.117 node5.xxx.net
192.168.10.109 etcd1.xxx.net
192.168.10.111 etcd2.xxx.net
192.168.10.115 etcd3.xxx.net
Master1节点SSH互信
[root@master1 ~]# ssh-keygen -t rsa
Generating public/private rsa key pair.
Enter file in which to save the key (/root/.ssh/id_rsa):
Created directory '/root/.ssh'.
Enter passphrase (empty for no passphrase):
Enter same passphrase again:
Your identification has been saved in /root/.ssh/id_rsa.
Your public key has been saved in /root/.ssh/id_rsa.pub.
The key fingerprint is:
SHA256:yFOKV/QRdQoxQ12uW8v0UWmpLcrxDQo8VNyVEuRWHlE root@master1.xxx.net
The key's randomart image is:
+---[RSA 2048]----+
| ..X*++==E|
| . ..*o*o.+|
| o.. .oo=.|
| o =o ..+ .|
| . * S+ ..+oo |
| . . + ==+o.|
| +..o..|
| |
| |
+----[SHA256]-----+
for i in `cat /etc/hosts | grep -v openshift | grep xxx.net | awk '{print $2}'`;do ssh-copy-id -i .ssh/id_rsa.pub $i;done
所有节点安装基本环境
yum install wget git net-tools bind-utils iptables-services bridge-utils bash-completion kexec-tools sos psacct vim ntpdate httpd-tools -y
所有节点更改时区并同步时间
ln -sf /usr/share/zoneinfo/Asia/Shanghai /etc/localtime
ntpdate cn.ntp.org.cn
yum update
reboot
yum install docker-1.13.1 -y
备注:docker可安装docker-ce
所有节点激活网络
nmcli con show
nmcli con up ens160
nmcli con mod ens160 connection.autoconnect yes
systemctl restart NetworkManager
所有Node节点更改/etc/sysconfig/docker-storage-setup如下:
DEVS=/dev/sdb
VG=docker-vg
所有Node节点执行docker-storage-setup
[root@openshift-node1 ~]# docker-storage-setup
WARNING: Device for PV 28oz2p-ZKrx-gSc2-k6Tg-E49Y-MK4A-YcQq7h not found or rejected by a filter.
WARNING: Device for PV 28oz2p-ZKrx-gSc2-k6Tg-E49Y-MK4A-YcQq7h not found or rejected by a filter.
INFO: Device node /dev/sdb1 exists.
WARNING: Device for PV 28oz2p-ZKrx-gSc2-k6Tg-E49Y-MK4A-YcQq7h not found or rejected by a filter.
Physical volume "/dev/sdb1" successfully created.
WARNING: Device for PV 28oz2p-ZKrx-gSc2-k6Tg-E49Y-MK4A-YcQq7h not found or rejected by a filter.
Volume group "docker-vg" successfully created
WARNING: Device for PV 28oz2p-ZKrx-gSc2-k6Tg-E49Y-MK4A-YcQq7h not found or rejected by a filter.
Using default stripesize 64.00 KiB.
Rounding up size to full physical extent 84.00 MiB
Thin pool volume with chunk size 512.00 KiB can address at most 126.50 TiB of data.
Logical volume "docker-pool" created.
Logical volume docker-vg/docker-pool changed.
所有节点更改docker仓库地址
cat /etc/sysconfig/docker
# /etc/sysconfig/docker
# Modify these options if you want to change the way the docker daemon runs
# OPTIONS='--selinux-enabled --log-driver=journald --signature-verification=false'
OPTIONS='--selinux-enabled --log-driver=journald --registry-mirror=https://docker.mirrors.ustc.edu.cn'
Master节点更改epel源,并安装ansible
yum -y install https://dl.fedoraproject.org/pub/epel/7/x86_64/Packages/e/epel-release-7-11.noarch.rpm
sed -i -e "s/^enabled=1/enabled=0/" /etc/yum.repos.d/epel.repo
yum -y --enablerepo=epel install ansible pyOpenSSL
1.3 etcd集群安装
安装etcd集群(按需安装,不与openshift在同一集群)
所有节点关闭firewalld
[root@etcd1 ~]# systemctl stop firewalld
[root@etcd1 ~]# systemctl disable firewalld
Removed symlink /etc/systemd/system/multi-user.target.wants/firewalld.service.
Removed symlink /etc/systemd/system/dbus-org.fedoraproject.FirewallD1.service.
所有etcd节点开启iptables
[root@etcd1 ~]# systemctl start iptables
[root@etcd1 ~]# systemctl enable iptables
Created symlink from /etc/systemd/system/basic.target.wants/iptables.service to /usr/lib/systemd/system/iptables.service
所有etcd节点安装etcd,OpenShift高级安装模式无需自行配置etcd
yum install etcd -y
1.4 OpenShift高级安装
参考文档:https://docs.openshift.org/latest/install_config/install/advanced_install.html
在master1节点上
[root@master1 ~]# cat /etc/ansible/hosts
# Create an OSEv3 group that contains the masters, nodes, and etcd groups
[OSEv3:children]
masters
nodes
etcd
#lb
# Set variables common for all OSEv3 hosts
[OSEv3:vars]
# SSH user, this user should allow ssh based auth without requiring a password
ansible_ssh_user=root
ansible_become=yes
debug_level=2
openshift_deployment_type=origin
# If ansible_ssh_user is not root, ansible_become must be set to true
#ansible_become=true
openshift_repos_enable_testing=true
openshift_enable_service_catalog=false
template_service_broker_install=false
# uncomment the following to enable htpasswd authentication; defaults to DenyAllPasswordIdentityProvider
openshift_master_identity_providers=[{'name': 'htpasswd_auth', 'login': 'true', 'challenge': 'true', 'kind': 'HTPasswdPasswordIdentityProvider', 'filename': '/etc/origin/master/htpasswd'}]
openshift_disable_check=disk_availability,docker_storage,memory_availability,docker_image_availability
# config for metrics
openshift_release=3.6.1
openshift_clock_enabled=true
#openshift_master_cluster_method=native
#openshift_master_cluster_hostname=openshift.xxx.net
#openshift_master_cluster_public_hostname=openshift.xxx.net
#openshift_node_kubelet_args={'pods-per-core': ['10'], 'max-pods': ['250'], 'image-gc-high-threshold': ['90'], 'image-gc-low-threshold': ['80']}
# host group for masters
[masters]
master1.xxx.net
#master2.xxx.net
# host group for lb
#[lb]
#lb.xxx.net
# host group for etcd
[etcd]
etcd3.xxx.net
etcd5.xxx.net
etcd4.xxx.net
# host group for nodes, includes region info
[nodes]
master1.xxx.net
#master2.xxx.net
node1.xxx.net
node2.xxx.net openshift_node_labels="{'region': 'infra', 'zone': 'default'}"
node3.xxx.net openshift_node_labels="{'region': 'infra', 'zone': 'default'}"
node4.xxx.net
node5.xxx.net openshift_node_labels="{'region': 'infra', 'zone': 'default'}"
下载openshift-ansible:
wget https://github.com/openshift/openshift-ansible/archive/openshift-ansible-3.6.173.0.104-1.tar.gz
解压
执行安装:
ansible-playbook -i /etc/ansible/hosts openshift-ansible-openshift-ansible-3.6.173.0.104-1/playbooks/byo/config.yml
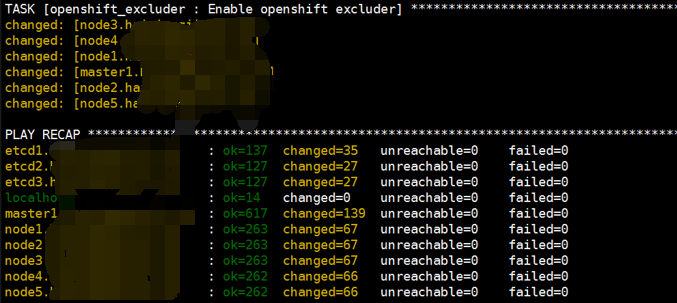
安装成功如下:
1.5 验证安装
Master1节点上验证node
[root@master1 ~]# oc get nodes
NAME STATUS AGE VERSION
master1.xxx.net Ready,SchedulingDisabled 38m v1.6.1+5115d708d7
node1.xxx.net Ready 38m v1.6.1+5115d708d7
node2.xxx.net Ready 38m v1.6.1+5115d708d7
node3.xxx.net Ready 38m v1.6.1+5115d708d7
node4.xxx.net Ready 38m v1.6.1+5115d708d7
node5.xxx.net Ready 38m v1.6.1+5115d708d7
Master1节点上验证etcd
[root@master1 ~]# yum install etcd -y
[root@master1 ~]# etcdctl -C https://etcd1.xxx.net:2379,https://etcd3.xxx.net:2379,https://etcd2.xxx.net:2379 --ca-file=/etc/origin/master/master.etcd-ca.crt --cert-file=/etc/origin/master/master.etcd-client.crt --key-file=/etc/origin/master/master.etcd-client.key cluster-health
member 17c82e7e21b639e7 is healthy: got healthy result from https://192.168.10.109:2379
member 3bd39337b17b1a4e is healthy: got healthy result from https://192.168.10.111:2379
member 62cacf31d21cfcd4 is healthy: got healthy result from https://192.168.10.115:2379
cluster is healthy
[root@master1 ~]# etcdctl -C https://etcd1.xxx.net:2379,https://etcd3.xxx.net:2379,https://etcd2.xxx.net:2379 --ca-file=/etc/origin/master/master.etcd-ca.crt --cert-file=/etc/origin/master/master.etcd-client.crt --key- file=/etc/origin/master/master.etcd-client.key member list
17c82e7e21b639e7: name=etcd1.xxx.net peerURLs=https://192.168.10.109:2380 clientURLs=https://192.168.10.109:2379 isLeader=false
3bd39337b17b1a4e: name=etcd2.xxx.net peerURLs=https://192.168.10.111:2380 clientURLs=https://192.168.10.111:2379 isLeader=false
62cacf31d21cfcd4: name=etcd3.xxx.net peerURLs=https://192.168.10.115:2380 clientURLs=https://192.168.10.115:2379 isLeader=true
1.6 访问控制台
高级安装模式下会安装router(安装在infra节点上)、registry、console
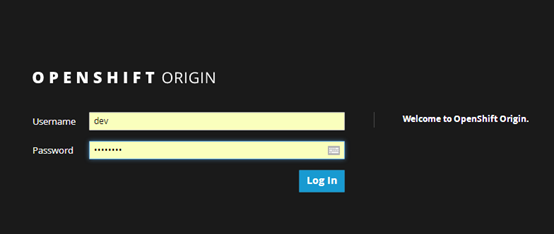
创建控制台账号Master节点
htpasswd -b /etc/origin/master/htpasswd dev dev2018
登录控制台:https://master1.xxx.net:8443
此地址需要解析到master主机上
搭建完成
OpenShift实战(一):OpenShift高级安装的更多相关文章
- oracle 11g高级 安装图解(摘自网络)
使用的高级安装 启动OUI后出现“选择安装方式”窗口,我们选择:高级安装 步骤3:出现“选择安装类型”窗口,选择我们需要安装的版本.我们在此肯定是选择企业版. 至于产品语言不用选择,它会根据当前系统的 ...
- 24.Mysql高级安装和升级
24.Mysql高级安装和升级24.1 Linux/Unix平台下的安装 24.1.1 安装包比较Linux下的Mysql安装包分为RPM包.二进制包.源码包3种.RPM包优点是安装简单,适合初学者: ...
- 用MXnet实战深度学习之一:安装GPU版mxnet并跑一个MNIST手写数字识别
用MXnet实战深度学习之一:安装GPU版mxnet并跑一个MNIST手写数字识别 http://phunter.farbox.com/post/mxnet-tutorial1 用MXnet实战深度学 ...
- Jmeter(五) - 从入门到精通 - 创建网络计划实战和创建高级Web测试计划(详解教程)
1.简介 上一篇中宏哥已经将其的理论知识介绍了一下,这一篇宏哥就带着大家一步一步的把上一篇介绍的理论知识实践一下,然后再说一下如何创建高级web测试计划. 2.网络计划实战 通过上一篇的学习,宏哥将其 ...
- Nmap在实战中的高级用法(详解)
@ 目录 Nmap在实战中的高级用法(详解) Nmap简单的扫描方式: 一.Nmap高级选项 1.查看本地路由与接口 2.指定网口与IP地址 3.定制探测包 二.Nmap扫描防火墙 1.SYN扫描 2 ...
- openshift云计算平台diy模式安装Python2.7+Flask
主要翻译了链接1)的教程,加上一些个人研究,步骤如下: 1) 在openshift.redhat.com申请账号,安装git for windows,然后安装gem install rhc,这些比较容 ...
- OpenShift实战(二):OpenShift节点扩容
1.新增节点信息 增加节点如下,请将xxx改为自己的域名 node6.xxx.net Node 192.168.8.90 8G 20G/60G 4C node7.xxx.net Node 192.16 ...
- OpenShift实战(五):OpenShift容器监控Metrics
1.创建持久化metric pv卷 [root@master1 pv]# cat metrics.json apiVersion: v1 kind: PersistentVolume metadata ...
- OpenShift实战(六):OpenShift日志监控EFK
1.镜像下载 为了防止安装过程中由于镜像下载缓慢导致自动部署失败,所以首先提前下载好EFK镜像. docker pull openshift/origin-logging-fluentd docker ...
随机推荐
- 【BZOJ1934】善意的投票(网络流)
[BZOJ1934]善意的投票(网络流) 题面 Description 幼儿园里有n个小朋友打算通过投票来决定睡不睡午觉.对他们来说,这个问题并不是很重要,于是他们决定发扬谦让精神.虽然每个人都有自己 ...
- [BZOJ4804]欧拉心算
题面戳我 题意:求 \[\sum_{i=1}^{n}\sum_{j=1}^{n}\phi(\gcd(i,j))\] 多组数据,\(n\le10^7\). sol SBT 单组数据\(O(\sqrt n ...
- [HNOI2010]CHORUS 合唱队
题面 Bzoj Sol 简单\(DP\) # include <bits/stdc++.h> # define IL inline # define RG register # defin ...
- 版本控制-Git对象
Git对象 版本控制在于文件的控制,git的控制方法在于为每个文件生成(key,object)的结构.git利用sha-1加密算法,对每一个文件生成一个唯一的字符序列(明文大小不超过2^64位,对于普 ...
- Django中下划线的用法介绍(一)
在Django中有相当多的操作是通过双下划线与动作连接起来使用,为了以后更加方便的查找和使用,现在总结以下Django中基本的双下划线操作 比较符:大于--gt 小于--lt 等于--eq 大于等 ...
- c++趣味之为变参模板的每个参数执行单独函数
对于c++11以后出现的可变参数模板,一般我们都统一处理所有的参数.而当需要为每个参数执行不同的操作或调用不同的函数时,语法上是没有直接支持的. 可变参数的模板语法: template<type ...
- PDF加密无法做笔记
尝试打印PDF,若无法打印,可以利用PDFescape(http://www.pdfescape.com/) PDFescape是一个可以在线修改.做笔记的网站,但是在线使用有上传PDF大小限制(小于 ...
- mybatis返回list
1 Model类 public class Vo { /** * this is used for receive data partly from table user_question_secti ...
- WinSock 异步I/O模型
如果你想在Windows平台上构建服务器应用,那么I/O模型是你必须考虑的. Windows操作系统提供了五种I/O模型,分别是选择(select)模型,异步选择(WSAAsyncSelect)模型, ...
- POJ-1256 next_permutation函数应用
字典序列: 在字典序中蕴含着一个点,就是大小的问题,谁先出现,谁后出现的问题.譬如a<b<c,出现顺序就是a,b,c. 本题中字符集是所有大小写字母,而题目中规定的谁大谁小已经不是按asc ...