pygame 笔记-7 生命值/血条处理
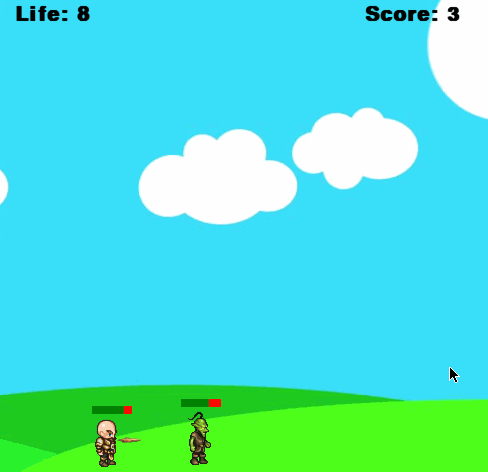
通常游戏中的角色都有所谓的生命值,而且头顶上会有一个血条显示。生命值无非就是一个属性而已,很容易在Player.py类中增加,头顶上的血条其实就是绘制二个矩形,叠加在一起。
以上节的Player.py为例:
import pygame

# 主角

class Player(object):

    def __init__(self, x, y, width, height, img_base_path):

        self.x = x

        self.y = y

        self.width = width

        self.height = height

        self.speed = 5

        self.left = False

        self.right = True

        self.isJump = False

        self.walkCount = 0

        self.t = 10

        self.speed = 5

        # 生命值

        self.life = 10

        self.char = pygame.image.load(img_base_path + 'standing.png')

        self.walkRight = [pygame.image.load(img_base_path + 'actor/R1.png'),

                          pygame.image.load(img_base_path + 'actor/R2.png'),

                          pygame.image.load(img_base_path + 'actor/R3.png'),

                          pygame.image.load(img_base_path + 'actor/R4.png'),

                          pygame.image.load(img_base_path + 'actor/R5.png'),

                          pygame.image.load(img_base_path + 'actor/R6.png'),

                          pygame.image.load(img_base_path + 'actor/R7.png'),

                          pygame.image.load(img_base_path + 'actor/R8.png'),

                          pygame.image.load(img_base_path + 'actor/R9.png')]

        self.walkLeft = [pygame.image.load(img_base_path + 'actor/L1.png'),

                         pygame.image.load(img_base_path + 'actor/L2.png'),

                         pygame.image.load(img_base_path + 'actor/L3.png'),

                         pygame.image.load(img_base_path + 'actor/L4.png'),

                         pygame.image.load(img_base_path + 'actor/L5.png'),

                         pygame.image.load(img_base_path + 'actor/L6.png'),

                         pygame.image.load(img_base_path + 'actor/L7.png'),

                         pygame.image.load(img_base_path + 'actor/L8.png'),

                         pygame.image.load(img_base_path + 'actor/L9.png')]

        self.hit_box = (self.x + 17, self.y + 11, 29, 52)

    def draw(self, win):

        if self.walkCount >= 9:

            self.walkCount = 0

        if self.left:

            win.blit(self.walkLeft[self.walkCount % 9], (self.x, self.y))

            self.walkCount += 1

        elif self.right:

            win.blit(self.walkRight[self.walkCount % 9], (self.x, self.y))

            self.walkCount += 1

        else:

            win.blit(self.char, (self.x, self.y))

        self.hit_box = (self.x + 17, self.y + 11, 29, 52)

        # 血条(头顶的绿色背景矩形)

        pygame.draw.rect(win, (0, 128, 0), (self.hit_box[0], self.hit_box[1] - 10, 40, 8))

        # 血条(头顶的红色背景矩形,即:消耗的血)

        pygame.draw.rect(win, (255, 0, 0),

                         (self.hit_box[0] + self.life * 4, self.hit_box[1] - 10, 40 - self.life * 4, 8))
敌人类Enemy.py也是类似处理:
import pygame

class Enemy(object):

    def __init__(self, x, y, width, height, end, img_base_path):

        self.x = x

        self.y = y

        self.width = width

        self.height = height

        self.path = [x, end]

        self.walkCount = 0

        self.vel = 3

        self.walkRight = [pygame.image.load(img_base_path + 'enemy/R1E.png'),

                          pygame.image.load(img_base_path + 'enemy/R2E.png'),

                          pygame.image.load(img_base_path + 'enemy/R3E.png'),

                          pygame.image.load(img_base_path + 'enemy/R4E.png'),

                          pygame.image.load(img_base_path + 'enemy/R5E.png'),

                          pygame.image.load(img_base_path + 'enemy/R6E.png'),

                          pygame.image.load(img_base_path + 'enemy/R7E.png'),

                          pygame.image.load(img_base_path + 'enemy/R8E.png'),

                          pygame.image.load(img_base_path + 'enemy/R9E.png'),

                          pygame.image.load(img_base_path + 'enemy/R10E.png'),

                          pygame.image.load(img_base_path + 'enemy/R11E.png')]

        self.walkLeft = [pygame.image.load(img_base_path + 'enemy/L1E.png'),

                         pygame.image.load(img_base_path + 'enemy/L2E.png'),

                         pygame.image.load(img_base_path + 'enemy/L3E.png'),

                         pygame.image.load(img_base_path + 'enemy/L4E.png'),

                         pygame.image.load(img_base_path + 'enemy/L5E.png'),

                         pygame.image.load(img_base_path + 'enemy/L6E.png'),

                         pygame.image.load(img_base_path + 'enemy/L7E.png'),

                         pygame.image.load(img_base_path + 'enemy/L8E.png'),

                         pygame.image.load(img_base_path + 'enemy/L9E.png'),

                         pygame.image.load(img_base_path + 'enemy/L10E.png'),

                         pygame.image.load(img_base_path + 'enemy/L11E.png')]

        self.hit_box = (self.x + 17, self.y + 2, 31, 57)

        #生命值

        self.life = 10

    def draw(self, win):

        if self.life > 0:

            self.move()

            if self.walkCount >= 11:

                self.walkCount = 0

            if self.vel > 0:

                win.blit(self.walkRight[self.walkCount % 11], (self.x, self.y))

                self.walkCount += 1

            else:

                win.blit(self.walkLeft[self.walkCount % 11], (self.x, self.y))

                self.walkCount += 1

            self.hit_box = (self.x + 17, self.y + 2, 31, 57)

            # 血条

            pygame.draw.rect(win, (0, 128, 0), (self.hit_box[0], self.hit_box[1] - 12, 40, 8))

            pygame.draw.rect(win, (255, 0, 0),

                             (self.hit_box[0] + self.life * 4, self.hit_box[1] - 12, 40 - self.life * 4, 8))

    def move(self):

        if self.vel > 0:

            if self.x < self.path[1] + self.vel:

                self.x += self.vel

            else:

                self.vel = self.vel * -1

                self.x += self.vel

                self.walkCount = 0

        else:

            if self.x > self.path[0] - self.vel:

                self.x += self.vel

            else:

                self.vel = self.vel * -1

                self.x += self.vel

                self.walkCount = 0
然后主类里,碰撞检测到后,将各自的生命值减1:
import os

from bullet import *

from player import *

from enemy import *

WIN_WIDTH, WIN_HEIGHT = 500, 500

pygame.init()

win = pygame.display.set_mode((WIN_WIDTH, WIN_HEIGHT))

pygame.display.set_caption("first game")

img_base_path = os.getcwd() + '/img/'

bg = pygame.image.load(img_base_path + 'bg.jpg')

clock = pygame.time.Clock()

def redraw_game_window():

    win.blit(bg, (0, 0))

    you_win = font.render('YOU WIN! ', 1, (0, 0, 255))

    you_lost = font.render('YOU LOST! ', 1, (255, 0, 0))

    # 敌人消灭,结束

    if enemy.life <= 0:

        win.blit(you_win, (200, 230))

        pygame.display.update()

        return

    # 主角被打死,结束

    if man.life <= 0:

        win.blit(you_lost, (200, 230))

        pygame.display.update()

        return

    # 主角的生命值

    life_text = font.render('Life: ' + str(man.life), 1, (0, 0, 0))

    win.blit(life_text, (20, 10))

    # 显示击中后的得分

    text = font.render('Score: ' + str(score), 1, (0, 0, 0))

    win.blit(text, (370, 10))

    man.draw(win)

    enemy.draw(win)

    for bullet in bullets:

        bullet.draw(win)

    pygame.display.update()

def collision_check(a, b):

    temp1 = (b.x <= a.x + a.width <= b.x + b.width)

    temp2 = (b.y <= a.y + a.height <= b.y + b.height)

    return temp1 and temp2

# main

font = pygame.font.SysFont('comicsans', 30, True)

man = Player(200, 410, 64, 64, img_base_path)

enemy = Enemy(100, 414, 64, 64, 400, img_base_path)

run = True

score = 0

bullets = []

while run:

    clock.tick(27)

    for event in pygame.event.get():

        if event.type == pygame.QUIT:

            run = False

    # 如果被敌人打到了,主角生命值-1

    if collision_check(man, enemy) or collision_check(enemy, man):

        man.life -= 1

        # 自动跳跃,防止血降得太快

        man.isJump = True

    for b in bullets:

        # 碰撞检测

        if collision_check(b, enemy) or collision_check(enemy, b):

            score += 1

            enemy.life -= 1

            bullets.pop(bullets.index(b))

        if WIN_WIDTH > b.x > 0:

            b.x += b.vel

        else:

            bullets.pop(bullets.index(b))

    keys = pygame.key.get_pressed()

    if keys[pygame.K_SPACE]:

        if man.left:

            direction = -1

        else:

            direction = 1

        if len(bullets) < 5:

            bullets.append(Bullet(man.x + man.width // 2, man.y + man.height // 2, direction, img_base_path))

    if keys[pygame.K_LEFT] and man.x > 0:

        man.x -= man.speed

        man.left = True

        man.right = False

    elif keys[pygame.K_RIGHT] and man.x < win.get_size()[0] - man.width:

        man.x += man.speed

        man.left = False

        man.right = True

    else:

        man.walkCount = 0

    if not man.isJump:

        if keys[pygame.K_UP]:

            man.isJump = True

            man.walkCount = 0

    else:

        if man.t >= -10:

            a = 1

            if man.t < 0:

                a = -1

            man.y -= 0.5 * a * (man.t ** 2)

            man.t -= 1

        else:

            man.isJump = False

            man.t = 10

    redraw_game_window()

pygame.quit()
源码下载: https://github.com/yjmyzz/pygame_tutorial
pygame 笔记-7 生命值/血条处理的更多相关文章
- 关于Unity中NGUI的3D角色血条的实现
首先要到Unity的Assets Store里面去下载一个扩展的Package叫NGUI HUD Text v1.13(81),注意如果没有安装NGUI就必须先安装NGUI插件,否则会用不了,因为HU ...
- unity3d-游戏实战突出重围,第二天 制作血条
using UnityEngine; using System.Collections; public class xt : MonoBehaviour { //红色血条 public Texture ...
- UI3D转2D平面显示UI3DTo2D血条显示
UI3D转2D平面显示UI3DTo2D血条显示: using UnityEngine; using System.Collections; public class UI3DTo2D : MonoBe ...
- Shader实例:NGUI制作网格样式血条
效果: 思路: 1.算出正确的uv去采样过滤图,上一篇文章说的很明白了.Shader实例:NGUI图集中的UISprite正确使用Shader的方法 2.用当前血量占总血量的百分比来设置shader中 ...
- UE4 使用UGM制作血条
声明:本文是自己做的项目,可能不是最好的方法,或有错误使用方式.各位不喜勿喷! HP进度 HP背景 将上面的资源拖到UE4中(使用UE4自带的颜色也可实现效果,具体参考官方教程 https://doc ...
- Unity3D人物头顶名称与血条更新与绘制
using UnityEngine; using System.Collections; public class NPC : MonoBehaviour { //主摄像机对象 private Cam ...
- unity如何显示血条(不使用NGUI)
用unity本身自带的功能,如何显示血条? 显示血条,从资源最小化的角度,只要把一个像素的色点放大成一个矩形就足够,三个不同颜色的矩形,分别显示前景色,背景色,填充色,这样会消耗最少的显存资源. un ...
- Unity UGUI HUD 怪物血条实现
首先做一个血条,创建一个名为Follow3DObject的脚本添加到血条控件上. Follow3DObject.cs的代码如下: using UnityEngine; using System.Col ...
- 使用 NGUI 实现头顶文字及血条
以下是 NGUI HUD Text 实现的: 基本原理: 1. 在角色头顶绑一个点 Pivot,用于对齐 2. 因为界面总是覆盖在人物头顶信息的上面,所以将 UIRoot 分为2个 Panel:1) ...
随机推荐
- Centos7防火墙常用命令及mask锁定不能添加端口问题
一.开放端口 sudo firewall-cmd --zone=public --add-port=3000/tcp --permanent sudo firewall-cmd --reload 二. ...
- Python_socketserver
socketserver ----->> 服务器端的开发 socketserver: 实现服务器端同时处理多个请求 通过两个主要的类来处理网络请求: 服务类 请求处理类 一.服务类 1 ...
- Python_xml
xml: 可扩展标记语言,用来标记数据,定义数据类型,主要用来传输和存储数据(和json差不多,不同语言或程序之间进行数据交换的协议) ET(xml.etree.ElementTree)中的几个类: ...
- Codeforces 1045B Space Isaac
Space Isaac 我们定义第一个集合为a, 第二个集合为b 先把a数组排序, 然后我们会以线段的形式得到b集合. 我们先用a[ 1 ]去和 b 中的元素结合, 只有size(a) 个数字未被覆盖 ...
- String类型的转型
字符串类型的转型在java中常用的方法有标题中的三种. 简单介绍: 1.toString,需要保证调用这个方法的类.方法.变量不为null,否则会报空指针. 2.String.valueOf.这个方法 ...
- systemd创建自定义服务(Ubuntu)
/lib/systemd/system下创建test.service文件 vim /lib/systemd/system/test.service [Unit] Description=test [S ...
- P1514 引水入城 DFS
题目描述 在一个遥远的国度,一侧是风景秀美的湖泊,另一侧则是漫无边际的沙漠.该国的行政区划十分特殊,刚好构成一个NN 行\times M×M 列的矩形,如上图所示,其中每个格子都代表一座城市,每座城市 ...
- P1433 吃奶酪 回溯法 优化
题目描述 房间里放着n块奶酪.一只小老鼠要把它们都吃掉,问至少要跑多少距离?老鼠一开始在(0,0)点处. 输入输出格式 输入格式: 第一行一个数n (n<=15) 接下来每行2个实数,表示第i块 ...
- JavaSE| 面向对象-类的五大成员
面向对象 面向对象只是其中一种编程思想,还有很多其他的编程思想:面向过程.面向切面.面向服务编程... 面向过程的思维方式:注重步骤.过程,面向过程强调的是功能行为: 面向对象的思维方式:关注的是“对 ...
- 爬虫3 requests之json 把json数据转化为字典
#json 将json数据转化为字典,方便操作数据 res = requests.get('http://httpbin.org/get') print(res.json()) #res.json() ...