Allure-pytest功能特性介绍
前言
Allure框架是一个灵活的轻量级多语言测试报告工具,它不仅以web的方式展示了简介的测试结果,而且允许参与开发过程的每个人从日常执行的测试中最大限度的提取有用信息
从dev/qa的角度来看,Allure报告简化了常见缺陷的统计:失败的测试可以分为bug和被中断的测试,还可以配置日志、步骤、fixture、附件、计时、执行历史以及与TMS和BUG管理系统集成,所以,通过以上配置,所有负责的开发人员和测试人员可以尽可能的掌握测试信息。
从管理者的角度来看,Allure提供了一个清晰的“大图”,其中包括已覆盖的特性、缺陷聚集的位置、执行时间轴的外观以及许多其他方便的事情。allure的模块化和可扩展性保证了您总是能够对某些东西进行微调,使Allure更适合您,那么今天我们就来说说如何使报告更加详细的显示我们需要的信息,以及allure与jenkins的集成
生成报告
pytest框架编写的项目如何生成测试报告,这里将不再讲解,具体过程可以参考:pytest进阶之html测试报告
注意:python使用的allure插件为allure-pytest
测试代码
为了大家能够快速的认识allure的所有功能特性,附上完整的测试代码
"""

------------------------------------

@Time : 2019/8/28 19:50

@Auth : linux超

@File : conftest.py

@IDE  : PyCharm

@Motto: Real warriors,dare to face the bleak warning,dare to face the incisive error!

@QQ   : 28174043@qq.com

@GROUP: 878565760

------------------------------------

"""

import pytest

import allure

@pytest.mark.hookwrapper

def pytest_runtest_makereport(item):

    outcome = yield

    report = outcome.get_result()

    report.nodeid = report.nodeid.encode("utf-8").decode("unicode_escape")  # 解决乱码

@allure.step("打开浏览器")

def fixture_step():

    pass

@pytest.fixture

def init_url():

    fixture_step()

    yield True
conftest.py
"""

------------------------------------

@Time : 2019/9/4 21:05

@Auth : linux超

@File : test_allure_feature.py

@IDE  : PyCharm

@Motto: Real warriors,dare to face the bleak warning,dare to face the incisive error!

@QQ   : 28174043@qq.com

@GROUP: 878565760

------------------------------------

"""

import pytest

import allure

import os

def login(username=None, password=None):

    """模拟登录"""

    user = "linux超"

    pwd = ""

    if user == username and pwd == password:

        return {"code": 1001, "msg": "登录成功", "data": None}

    elif "" == password or password is None and username:

        return {"code": 1002, "msg": "密码不能为空", "data": None}

    elif "" == username or username is None and password:

        return {"code": 1003, "msg": "用户名不能为空", "data": None}

    else:

        return {"code": 1004, "msg": "用户名或密码错误", "data": None}

@allure.step("输入用户名")

def input_username(user):

    print("输入用户名")

    return user

@allure.step("输入密码")

def input_password(pwd):

    print("输入密码")

    return pwd

login_success_data = [

    # 测试数据

    {

        "case": "用户名正确, 密码正确",

        "user": "linux超",

        "pwd": "",

        "expected": {"code": 1001, "msg": "登录成功", "data": None}

    }

]

login_fail_data = [

    {

        "case": "用户名正确, 密码为空",

        "user": "linux超",

        "pwd": "",

        "expected": {"code": 1002, "msg": "密码不能为空", "data": None}

    },

    {

        "case": "用户名为空, 密码正确",

        "user": "",

        "pwd": "linux超哥",

        "expected": {"code": 1003, "msg": "用户名不能为空", "data": None}

    },

    {

        "case": "用户名错误, 密码错误",

        "user": "linux",

        "pwd": "linux",

        "expected": {"code": 1004, "msg": "用户名或密码错误", "data": None}

    }

]

username_none = [

    {

        "case": "缺省用户名参数",

        "pwd": "",

        "expected": {"code": 1003, "msg": "用户名不能为空", "data": None}

    }

]

password_none = [

    {

        "case": "缺省密码参数",

        "user": "linux超",

        "expected": {"code": 1002, "msg": "密码不能为空", "data": None}

    }

]

# 改变输出结果

ids_login_success_data = [

    "测试{}用户名:{}密码{}期望值{}".

        format(data["case"], data["user"], data["pwd"], data["expected"]) for data in login_success_data

]

ids_login_fail_data = [

    "测试{}用户名:{}密码{}期望值{}".

        format(data["case"], data["user"], data["pwd"], data["expected"]) for data in login_fail_data

]

ids_username_none = [

    "测试{}密码{}期望值{}".

        format(data["case"], data["pwd"], data["expected"]) for data in username_none

]

ids_password_none = [

    "测试{}用户名:{}期望值{}".

        format(data["case"], data["user"], data["expected"]) for data in password_none

]

@allure.feature("登录模块")

class TestLogin(object):

    @allure.severity(allure.severity_level.BLOCKER)

    @allure.story("测试登录成功")

    @allure.title("登录成功场景-{data}")

    @pytest.mark.parametrize("data", login_success_data, ids=ids_login_success_data)

    def test_login_success(self, data):

        """测试登录成功"""

        user = input_username(data["user"])

        pwd = input_password(data["pwd"])

        result = login(user, pwd)

        assert result == data["expected"]

    @allure.severity(allure.severity_level.CRITICAL)

    @allure.story("测试登录失败")

    @pytest.mark.parametrize("data", login_fail_data, ids=ids_login_fail_data)

    def test_login_fail(self, data):

        """测试用户名或密码错误"""

        user = input_username(data["user"])

        pwd = input_password(data["pwd"])

        result = login(user, pwd)

        assert result == data["expected"]

    @allure.severity(allure.severity_level.MINOR)

    @allure.story("测试用户名参数缺失")

    @pytest.mark.parametrize("data", username_none, ids=ids_username_none)

    def test_username_none(self, data):

        """测试缺省用户名"""

        pwd = input_password(data["pwd"])

        result = login(password=pwd)

        assert result == data["expected"]

    @allure.severity(allure.severity_level.MINOR)

    @allure.story("测试密码参数缺失")

    @pytest.mark.parametrize("data", password_none, ids=ids_password_none)

    def test_password_none(self, data):

        """测试缺省密码"""

        user = input_username(data["user"])

        result = login(username=user)

        assert result == data["expected"]

    @allure.severity(allure.severity_level.MINOR)

    @allure.story("测试初始化地址")

    @allure.testcase("https://www.cnblogs.com/linuxchao/", "测试用例地址")

    def test_init_url(self, init_url):

        flag = init_url

        assert flag is True

    @allure.severity(allure.severity_level.NORMAL)

    @allure.story("测试失败用例与用例中添加附件")

    @allure.link("https://www.cnblogs.com/linuxchao/", name="bug链接")

    @allure.description("这是一个一直执行失败的测试用例")

    def test_failed(self):

        """你也可以在这里添加用例的描述信息,但是会被allure.description覆盖"""

        try:

            assert False

        except AssertionError as e:

            with open("attach.png", "rb") as f:

                context = f.read()

                allure.attach(context, "错误图片", attachment_type=allure.attachment_type.PNG)

            raise e

    @allure.severity(allure.severity_level.TRIVIAL)

    @allure.story("测试broken用例")

    @allure.issue("https://www.cnblogs.com/linuxchao/", "错误链接")

    def test_broken(self):

        """broken"""

        with open("broken.json", "r", encoding='utf8') as f:

            f.read()

    @allure.severity(allure.severity_level.TRIVIAL)

    @allure.story("测试无条件跳过测试用例")

    @pytest.mark.skip(reason="无条件跳过")

    def test_skip(self):

        """skip"""

        pass

if __name__ == '__main__':

    pytest.main(["-vsq",

                 "--alluredir", "./allure-results", ])

    os.system(r"allure generate --clean ./allure-results -o ./allure-report")
test_allure_feature.py
"""

------------------------------------

@Time : 2019/8/28 19:45

@Auth : linux超

@File : test_allure_fixture.py

@IDE  : PyCharm

@Motto: Real warriors,dare to face the bleak warning,dare to face the incisive error!

@QQ   : 28174043@qq.com

@GROUP: 878565760

------------------------------------

"""

import pytest

import os

import allure

def function_scope_step():

    print("function_scope_step")

def class_scope_step():

    print("class_scope_step")

def module_scope_step():

    print("module_scope_step")

def session_scope_step():

    print("session_scope_step")

def step_inside_test_body():

    print("step_inside_test_body")

@pytest.fixture(params=[True, False], ids=['param_true', 'param_false'])

def function_scope_fixture_with_finalizer(request):

    if request.param:

        print('True')

    else:

        print('False')

    def function_scope_finalizer():

        function_scope_step()

    request.addfinalizer(function_scope_finalizer)

@pytest.fixture(scope='class')

def class_scope_fixture_with_finalizer(request):

    def class_finalizer_fixture():

        class_scope_step()

    request.addfinalizer(class_finalizer_fixture)

@pytest.fixture(scope='module')

def module_scope_fixture_with_finalizer(request):

    def module_finalizer_fixture():

        module_scope_step()

    request.addfinalizer(module_finalizer_fixture)

@pytest.fixture(scope='session')

def session_scope_fixture_with_finalizer(request):

    def session_finalizer_fixture():

        session_scope_step()

    request.addfinalizer(session_finalizer_fixture)

@allure.severity(allure.severity_level.BLOCKER)

@allure.feature("fixture场景")

class TestClass(object):

    def test_with_scoped_finalizers(self,

                                    function_scope_fixture_with_finalizer,

                                    class_scope_fixture_with_finalizer,

                                    module_scope_fixture_with_finalizer,

                                    session_scope_fixture_with_finalizer):

        step_inside_test_body()

if __name__ == '__main__':

    pytest.main(["-vsq",

                 "--alluredir", "./allure-results", ])

    os.system(r"allure generate --clean ./allure-results -o ./allure-report")
test_allure_fixture.py
[

  {

    "name": "Ignored tests",

    "matchedStatuses": ["skipped"]

  },

  {

    "name": "Infrastructure problems",

    "matchedStatuses": ["broken", "failed"],

    "messageRegex": ".*bye-bye.*"

  },

  {

    "name": "Outdated tests",

    "matchedStatuses": ["broken"],

    "traceRegex": ".*FileNotFoundException.*"

  },

  {

    "name": "Product defects",

    "matchedStatuses": ["failed"]

  },

  {

    "name": "Test defects",

    "matchedStatuses": ["broken"]

  }

]
categories.json
Browser=Chrome

Browser.Version=63.0

Stand=Production

ApiUrl=127.0.0.1/login

python.Version=3.6
environment.properties
"""

------------------------------------

@Time : 2019/9/3 14:21

@Auth : linux超

@File : run.py

@IDE  : PyCharm

@Motto: Real warriors,dare to face the bleak warning,dare to face the incisive error!

@QQ   : 28174043@qq.com

@GROUP: 878565760

------------------------------------

"""

import pytest

import os

if __name__ == '__main__':

    pytest.main(["-sq",

                 "--alluredir", "./allure-results"])

    os.system(r"allure generate --clean allure-results -o allure-report")
run.py
目录结构
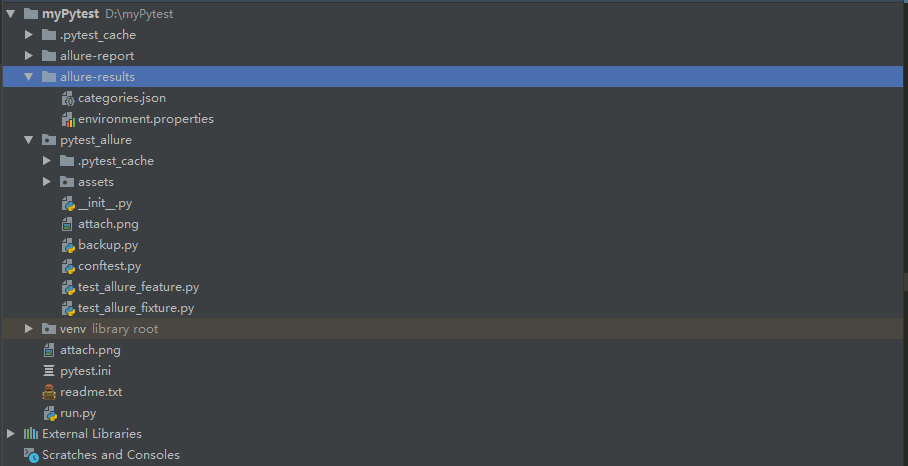
Allure特性
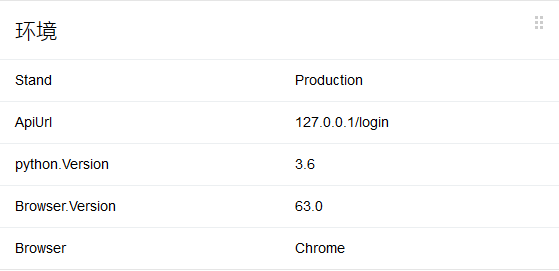
Environment
在Allure报告中添加环境信息,通过创建environment.properties或者environment.xml文件,并把文件存放到allure-results(这个目录是生成最后的html报告之前,生成依赖文件的目录)目录下
environment.properties
Browser=Chrome

Browser.Version=63.0

Stand=Production

ApiUrl=127.0.0.1/login

python.Version=3.6
或者
environment.xml
<environment>

    <parameter>

        <key>Browser</key>

        <value>Chrome</value>

    </parameter>

    <parameter>

        <key>Browser.Version</key>

        <value>63.0</value>

    </parameter>

    <parameter>

        <key>Stand</key>

        <value>Production</value>

    </parameter>

        <parameter>

        <key>ApiUrl</key>

        <value>127.0.0.1/login</value>

    </parameter>

        <parameter>

        <key>python.Version</key>

        <value>3.6</value>

    </parameter>

</environment>
执行run.py查看报告
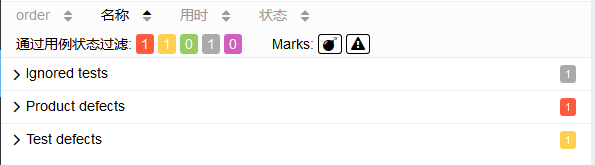
Categories
测试报告默认统计两种类型的测试用例结果,失败的用例和故障测试用例,我们可以自定义添加用例的统计类型,同样需要在allure-results目录下新建categories.json文件
[

  {

    "name": "Ignored tests",

    "matchedStatuses": ["skipped"]

  },

  {

    "name": "Infrastructure problems",

    "matchedStatuses": ["broken", "failed"],

    "messageRegex": ".*bye-bye.*"

  },

  {

    "name": "Outdated tests",

    "matchedStatuses": ["broken"],

    "traceRegex": ".*FileNotFoundException.*"

  },

  {

    "name": "Product defects",

    "matchedStatuses": ["failed"]

  },

  {

    "name": "Test defects",

    "matchedStatuses": ["broken"]

  }

]
执行run.py查看报告
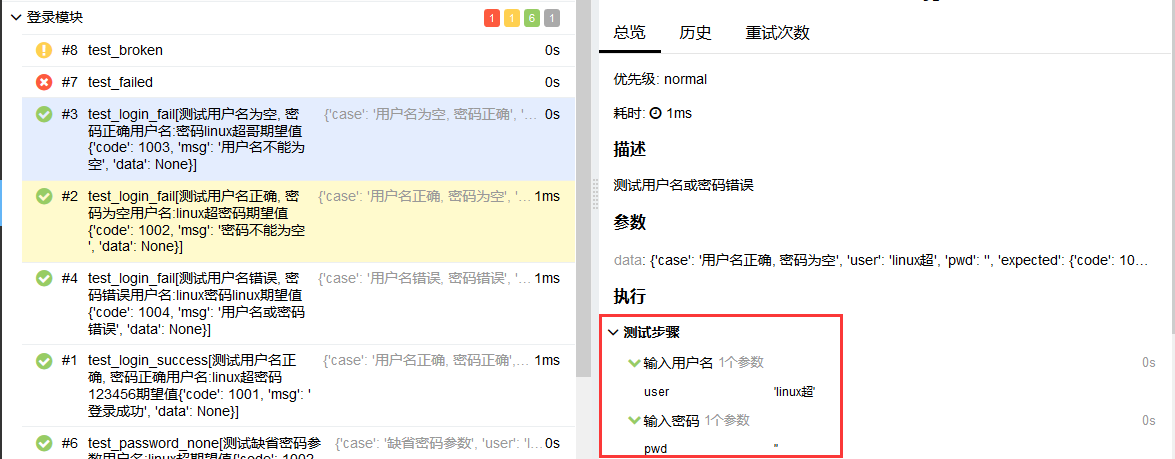
Fixtures and Finalizers
Fixtures和Finalizers是pytest在测试开始和测试结束调用的方法,allure会自动跟踪每一个fixture的调用,并且详细显示会调用哪些fixture和参数,而且会保留正确的调用顺数
测试代码
test_allure_html.py
def function_scope_step():

    print("function_scope_step")

def class_scope_step():

    print("class_scope_step")

def module_scope_step():

    print("module_scope_step")

def session_scope_step():

    print("session_scope_step")

def step_inside_test_body():

    print("step_inside_test_body")

@pytest.fixture(params=[True, False], ids=['param_true', 'param_false'])

def function_scope_fixture_with_finalizer(request):

    if request.param:

        print('True')

    else:

        print('False')

    def function_scope_finalizer():

        function_scope_step()

    request.addfinalizer(function_scope_finalizer)

@pytest.fixture(scope='class')

def class_scope_fixture_with_finalizer(request):

    def class_finalizer_fixture():

        class_scope_step()

    request.addfinalizer(class_finalizer_fixture)

@pytest.fixture(scope='module')

def module_scope_fixture_with_finalizer(request):

    def module_finalizer_fixture():

        module_scope_step()

    request.addfinalizer(module_finalizer_fixture)

@pytest.fixture(scope='session')

def session_scope_fixture_with_finalizer(request):

    def session_finalizer_fixture():

        session_scope_step()

    request.addfinalizer(session_finalizer_fixture)

class TestClass(object):

    def test_with_scoped_finalizers(self,

                                    function_scope_fixture_with_finalizer,

                                    class_scope_fixture_with_finalizer,

                                    module_scope_fixture_with_finalizer,

                                    session_scope_fixture_with_finalizer):

        step_inside_test_body()
执行run.py查看报告
@allure.step
pytest支持使用@allure.step修饰某些测试用例中需要的函数,使测试用例在allure报告中能够更加详细的显示测试过程
测试代码
test_allure_feature.py文件中修改如下代码
@allure.step("输入用户名")

def input_username():

    print("输入用户名")

@allure.step("输入密码")

def input_password():

    print("输入密码")
执行run.py查看报告
conftest.py
@allure.step修饰的测试步骤还支持在conftest.py文件中定义,作为fixture的步骤,现在我们在项目目录下新建conftest.py文件,写入如下代码
conftest.py
@allure.step("打开浏览器")

def fixture_step():

    pass

@pytest.fixture

def init_url():

    fixture_step()

    yield True
test_allure_feature.py文件中添加如下用例
    def test_init_url(self, init_url):

        flag = init_url

        assert flag == True
执行run.py查看报告

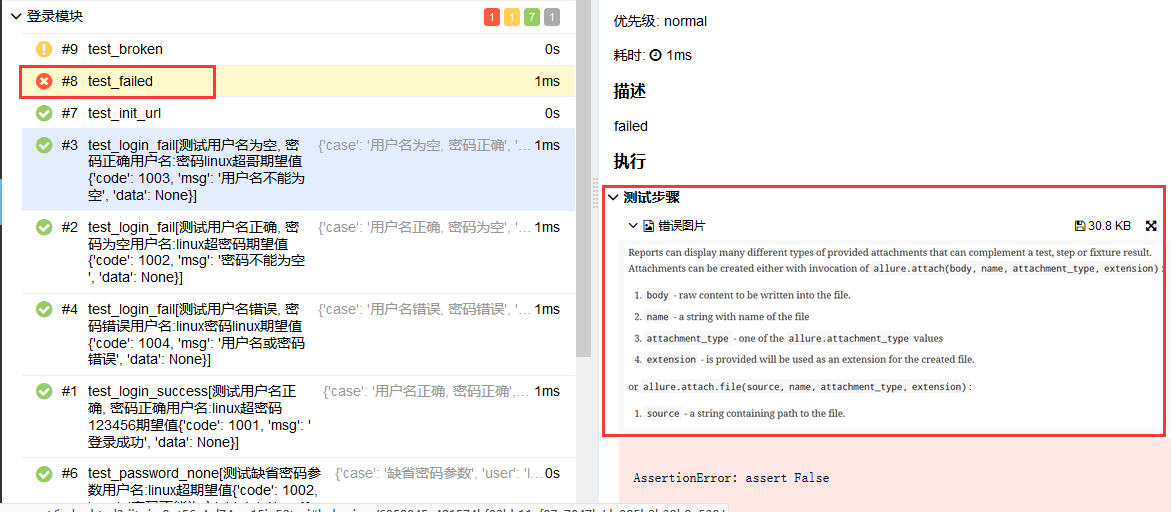
allure.attach
使用allure.attach可以给报告中添加文件,图片,log,html代码等等。 我们修改test_allure_feature.py中如下用例, 并在用例所在目录添加attach.png图片
    def test_failed(self):

        """failed"""

        try:

            assert False

        except AssertionError as e:

            with open("attach.png", "rb") as f:

                context = f.read()

                allure.attach(context, "错误图片", attachment_type=allure.attachment_type.PNG)

            raise e
执行run.py查看报告
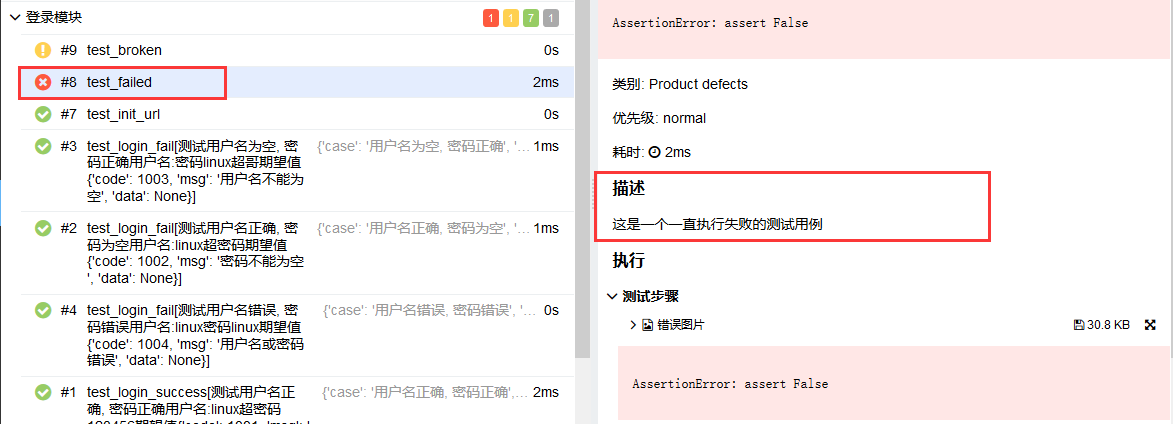
@allure.description
如果你想在报告中展示测试用例的描述信息,那么你可以使用@allure.description(string)或者@allure.description_html(html代码)修饰你的测试用例,test_allure_feature.py文件修改如下代码
    @allure.description("这是一个一直执行失败的测试用例")

    def test_failed(self):

        """你也可以在这里添加用例的描述信息,但是会被allure.description覆盖"""

        try:

            assert False

        except AssertionError as e:

            with open("attach.png", "rb") as f:

                context = f.read()

                allure.attach(context, "错误图片", attachment_type=allure.attachment_type.PNG)

            raise e
执行run.py查看报告
@allure.title
使用allure.title(title)可以重命名测试用例在allure报告中的名称,test_allure_feature.py文件修改如下代码
    @allure.title("登录成功场景-{data}")

    @pytest.mark.parametrize("data", login_success_data, ids=ids_login_success_data)

    def test_login_success(self, data):

        """测试登录成功"""

        user = input_username(data["user"])

        pwd = input_password(data["pwd"])

        result = login(user, pwd)

        assert result == data["expected"]

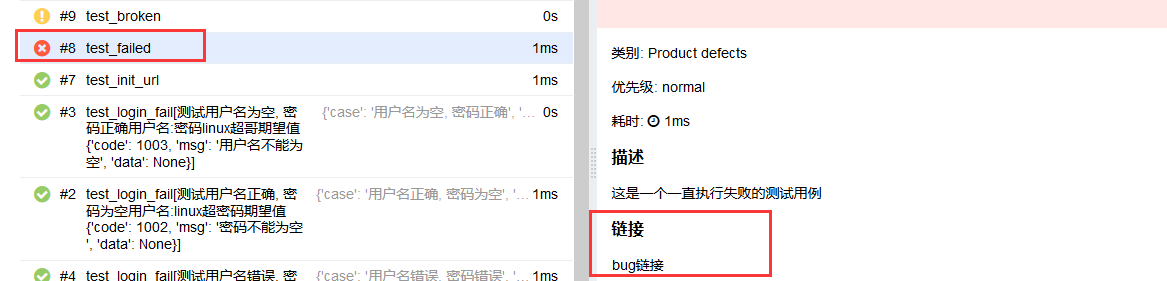
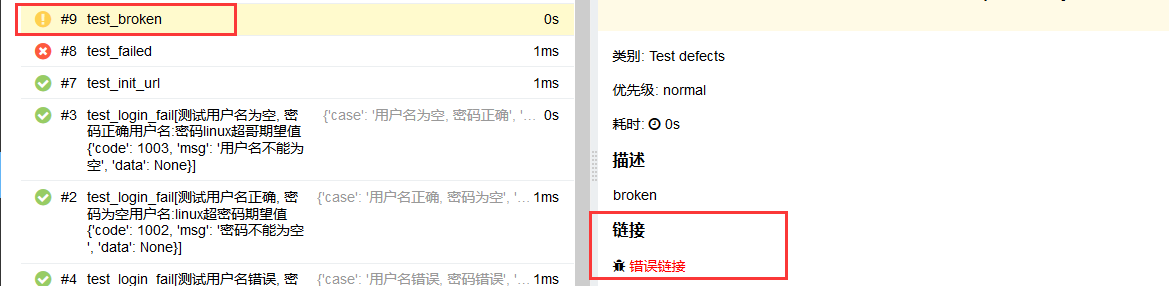
@allure.link
@allure.testcase
@allure.issue
这三种特性都可以给测试用例添加一个链接,test_allure_feature.py文件修改如下代码
    @allure.testcase("https://www.cnblogs.com/linuxchao/", "测试用例地址")

    def test_init_url(self, init_url):

        flag = init_url

        assert flag == True

    @allure.link("https://www.cnblogs.com/linuxchao/", name="bug链接")

    @allure.description("这是一个一直执行失败的测试用例")

    def test_failed(self):

        """你也可以在这里添加用例的描述信息,但是会被allure.description覆盖"""

        try:

            assert False

        except AssertionError as e:

            with open("attach.png", "rb") as f:

                context = f.read()

                allure.attach(context, "错误图片", attachment_type=allure.attachment_type.PNG)

            raise e

    @allure.issue("https://www.cnblogs.com/linuxchao/", "错误链接")

    def test_broken(self):

        """broken"""

        with open("broken.json", "r", encoding='utf8') as f:

            f.read()
执行run.py查看报告

@allure.feature
@allure.story
feature和story被称为行为驱动标记,因为使用这个两个标记,通过报告可以更加清楚的掌握每个测试用例的功能和每个测试用例的测试场景
在test_allure_feature.py文件中的测试类使用@allure.feature修饰, 测试方法使用@allure.story修饰
执行run.py查看报告
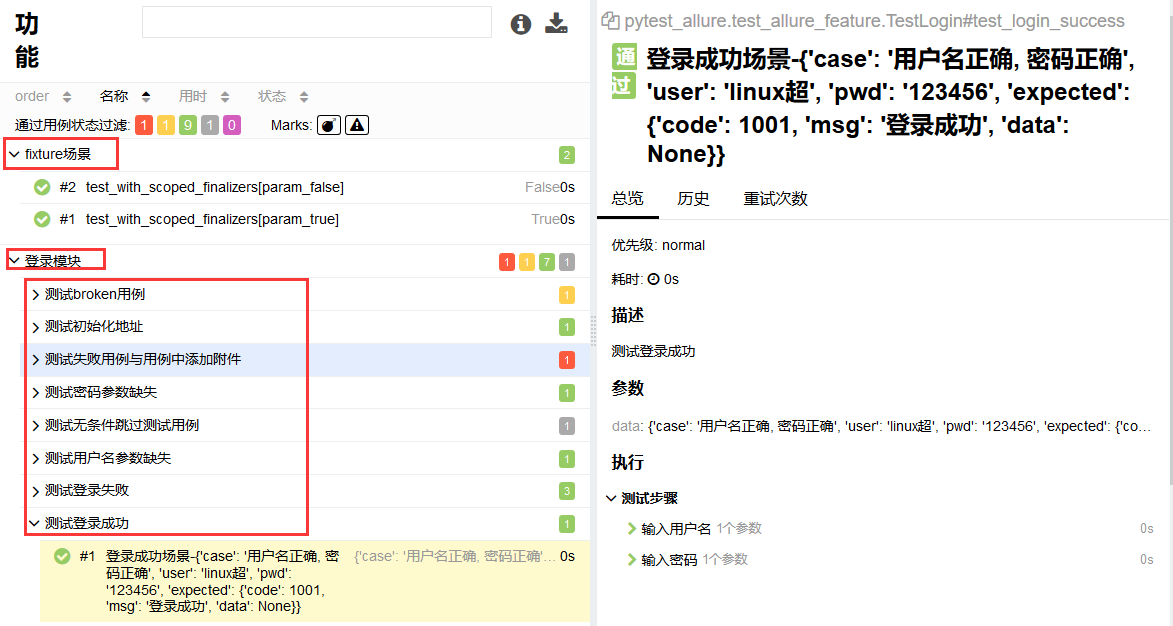
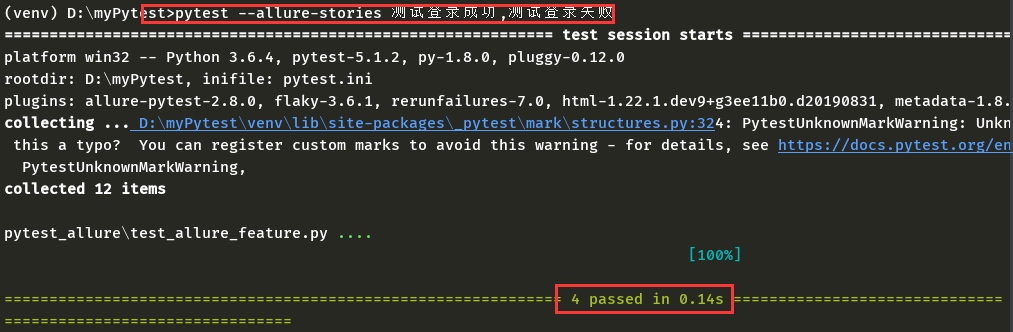
以上两种标记不仅仅能够在测试报告中显示,而且还可以使用命令执行指定的测试模块或者场景
@allure.severity
此标记用来标识测试用例或者测试类的级别,分为blocker,critical,normal,minor,trivial5个级别,下面们把测试用例按级别标记,并查看一下测试报告

总结
以上就是所有的allure-pytest插件在pytest中支持的大部分功能特性,也许整理的不是很详细,所以如果你想详细的了解具体的特性在报告中的效果,还需自己动手尝试一下,附上本文参考链接
https://docs.qameta.io/allure/
Allure-pytest功能特性介绍的更多相关文章
- Pytest框架介绍
Pytest框架介绍.安装 pytest是python测试框架,与python自带的unittest测试框架类似,但是比unittest框架使用起来更简洁,功能更强大 pytest特征 1:断言提示信 ...
- Allure+pytest 生成测试报告
简介: python 主流自动化测试报告插件有三个:HTMLTestRunner.BeautifulReport 和 Allure.HTMLTestRunner是一个比较古老的报告模板,界面也不是很好 ...
- try easy pytest 1tep介绍
『 tep is a testing tool to help you write pytest more easily. Try Easy Pytest! 』 tep前身 tep的前身是接口自动化测 ...
- pytest一:pytest 框架介绍
pytest 是 python 的一种单元测试框架,与python 自带的 unittest测试框架类似,但是比 unittest 框架使用起来更简洁,效率更高.根据pytest 的官方网站介绍,它具 ...
- Pytest安装介绍--使用(html报告)
Pytes是 一个单元测试框架,可以生成html报告. #卸载# pip uninstall pytest#安装# pip install -U pytest# 查看# pytest --versio ...
- pytest框架-介绍、Mark(打标签)、命令运行用例、用例执行顺序、
1.pytest介绍:基于unittest 之上的单元测试框架 1.1.自动发现测试模块和测试用例: unitest 需要添加用例,(泰斯特楼贷)加载器加载测试用例 pytest 只需要一条代码就可以 ...
- Pytest - 使用介绍
1. 概述 pytest是一个非常成熟的全功能的Python测试框架,主要特点有以下几点: 1.简单灵活,容易上手,文档丰富: 2.支持参数化,可以细粒度地控制要测试的测试用例: 3.能够支持简单的单 ...
- Pytest 学习(二十七)- Jenkins+Allure+Pytest的持续集成
一.配置 allure 环境变量 1.下载 allure是一个命令行工具,可以去 github 下载最新版:https://github.com/allure-framework/allure2/re ...
- 2012版辅助开发工具包(ADT)新功能特性介绍及安装使用
原文链接:http://android.eoe.cn/topic/android_sdk 2012年的Android辅助设备开发工具包(ADK)是Android开放设备协议(AOA)设备的最新参考实现 ...
随机推荐
- memCached的配置文件 配置
<?xml version="1.0" encoding="UTF-8"?> <beans xmlns="http://www.sp ...
- 手动编译PHP开发环境
目录 手动编译PHP开发环境 问题复盘 部署环境及配置 目标环境 安装部署环境开始 首先安装PHP 安装mysql 安装nginx 手动编译PHP开发环境 这是一篇来自深夜加班的手稿 问题复盘 你有没 ...
- 原生JavaScript(js)手把手教你写轮播图插件(banner)
---恢复内容开始--- 1.轮播图插件 1.什么是插件: 为已有的程序增加功能 2.插件的特点(为什么要做成一个插件)与注意事项: 1.通用性,可移植性强 2.兼容性:不会对其他代码产生影响 3.创 ...
- pdf.js跨域加载文件
pdf.js一个基于Html的工具类,熟悉pdf.js的朋友们很清楚,pdf.js帮助我们做了很多事.尤其金融类网站会产生很多的报表.需要在线预览.pdf.js绝对是我们的首选 本地预览 在pdf.j ...
- 【POJ - 3255】Roadblocks(次短路 Dijkstra算法)
Roadblocks 直接翻译了 Descriptions Bessie搬到了一个新的农场,有时候他会回去看他的老朋友.但是他不想很快的回去,他喜欢欣赏沿途的风景,所以他会选择次短路,因为她知道一定有 ...
- 「雕爷学编程」Arduino动手做(10)——敲击传感器模块
37款传感器和模块的提法,在网络上广泛流传,其实Arduino能够兼容的传感器模块肯定是不止37种的.鉴于本人手头积累了一些传感器与模块,依照实践出真知(动手试试)的理念,以学习和交流为目的,这里准备 ...
- go 学习笔记之数组还是切片都没什么不一样
上篇文章中详细介绍了 Go 的基础语言,指出了 Go 和其他主流的编程语言的差异性,比较侧重于语法细节,相信只要稍加记忆就能轻松从已有的编程语言切换到 Go 语言的编程习惯中,尽管这种切换可能并不是特 ...
- spring-boot-plus快速开始 Quick Start(一)
spring-boot-plus快速开始 Quick Start 1. clone项目到本地 shell script git clone git@github.com:geekidea/spring ...
- 《深入理解Java虚拟机》- JVM如何进行异常处理
一.Java异常 在程序中,错误可能产生于程序员没有预料到的各种情况,或者超出程序员可控范围的环境,例如用户的坏数据.试图打开一个不存在的文件等.为了能够及时有效地处理程序中的运行错误,Java 专门 ...
- MySQL数据库之表的增删改查
目录 MySQL数据库之表的增删改查 1 引言 2 创建表 3 删除表 4 修改表 5 查看表 6 复制表 MySQL数据库之表的增删改查 1 引言 1.MySQL数据库中,数据库database就是 ...