给iOS开发新手送点福利,简述UIAlertView的属性和用法
UIAlertView
1.Title
获取或设置UIAlertView上的标题。
2.Message
获取或设置UIAlertView上的消息
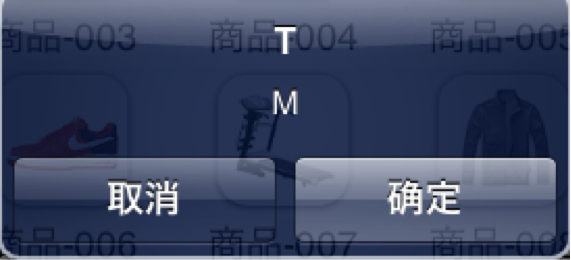
UIAlertView *alertView = [[UIAlertView alloc] initWithTitle:@"Title" message:@"message" delegate:self cancelButtonTitle:@"取消" otherButtonTitles:@"确定", nil];
alertView.title = @"T";
alertView.message = @"M";
[alertView show];
3.numberOfButtons (只读)
返回UIAlertView上有多少按钮.
UIAlertView *alertView = [[UIAlertView alloc] initWithTitle:@"Title" message:@"message" delegate:self cancelButtonTitle:@"取消" otherButtonTitles:@"确定", nil];
NSLog(@"%d",alertView.numberOfButtons);
[alertView show];

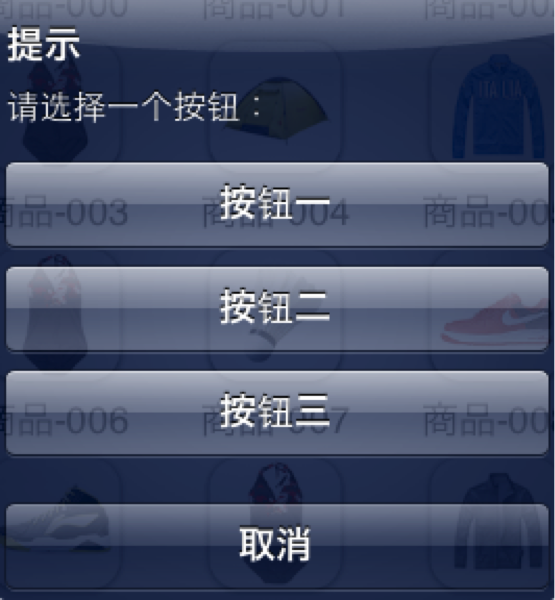
4.cancelButtonIndex
UIAlertView *alert = [[UIAlertView alloc]initWithTitle:@"提示" message:@"请选择一个按钮:" delegate:nil cancelButtonTitle:@"取消" otherButtonTitles:@"按钮一", @"按钮二", @"按钮三",nil];
[alert show];
NSLog(@"UIAlertView中取消按钮的角标是%d",alert.cancelButtonIndex);
效果:
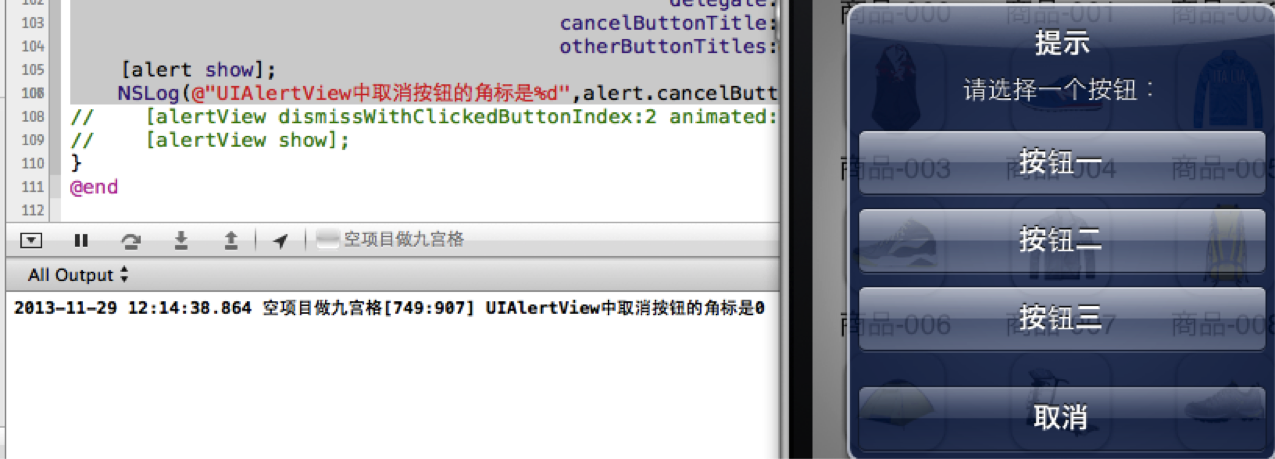
注意不要认为取消按钮的角标是4,“取消”,“按钮一”,“按钮二”,“按钮三”的索引buttonIndex分别是0,1,2,3
5. alertViewStyle
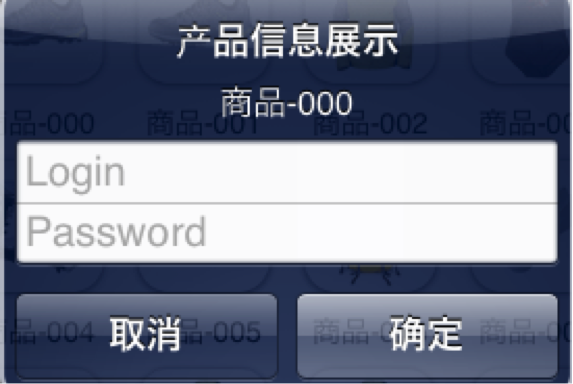
5.1 UIAlertViewStyleLoginAndPasswordInput
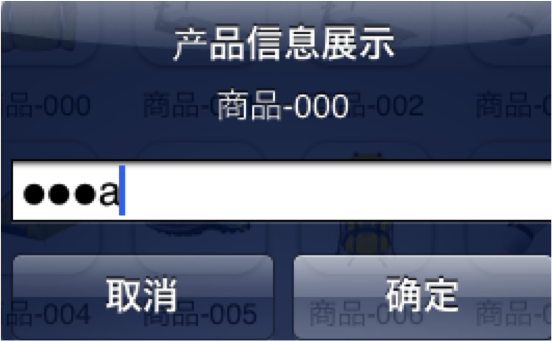
UIAlertView *alert = [[UIAlertView alloc] initWithTitle:@"产品信息展示" message:p.name delegate:nil cancelButtonTitle:@"取消" otherButtonTitles:@"确定", nil];
alert.alertViewStyle = UIAlertViewStyleLoginAndPasswordInput;
// 弹出UIAlertView
[alert show];
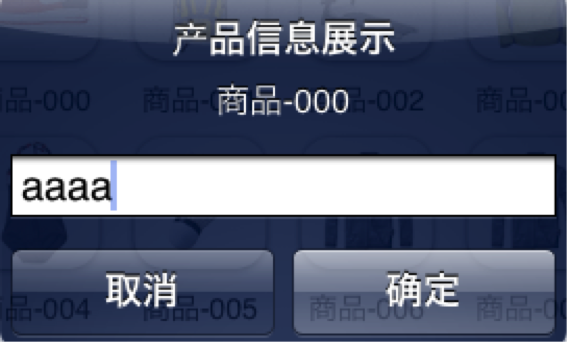
5.2 UIAlertViewStylePlainTextInput
UIAlertView *alert = [[UIAlertView alloc] initWithTitle:@"产品信息展示" message:p.name delegate:nil cancelButtonTitle:@"取消" otherButtonTitles:@"确定", nil];
alert.alertViewStyle = UIAlertViewStylePlainTextInput;
// 弹出UIAlertView
[alert show];
5.3 UIAlertViewStyleSecureTextInput
UIAlertView *alert = [[UIAlertView alloc] initWithTitle:@"产品信息展示" message:p.name delegate:nil cancelButtonTitle:@"取消" otherButtonTitles:@"确定", nil];
alert.alertViewStyle = UIAlertViewStyleSecureTextInput;
// 弹出UIAlertView
[alert show];
6. - (UITextField *)textFieldAtIndex:(NSInteger)textFieldIndex
返回textFieldIndex角标对应的文本框。
取出文本框文字
7.手动的取消对话框
[alert dismissWithClickedButtonIndex:0 animated:YES];
8. delegate
作为UIAlertView的代理,必须遵守UIAlertViewDelegate。
1.当点击UIAlertView上的按钮时,就会调用,并且当方法调完后,UIAlertView会自动消失。
- (void)alertView:(UIAlertView *)alertView clickedButtonAtIndex:(NSInteger)buttonIndex;
2.当UIAlertView即将出现的时候调用
- (void)willPresentAlertView:(UIAlertView *)alertView;
3. 当UIAlertView完全出现的时候调用
- (void)didPresentAlertView:(UIAlertView *)alertView;
4. 当UIAlertView即将消失的时候调用
- (void)alertView:(UIAlertView *)alertView willDismissWithButtonIndex:(NSInteger)buttonIndex;
5. 当UIAlertView完全消失的时候调用
- (void)alertView:(UIAlertView *)alertView didDismissWithButtonIndex:(NSInteger)buttonIndex;
9.注意UIAlertView调用show显示出来的时候,系统会自动强引用它,不会被释放。
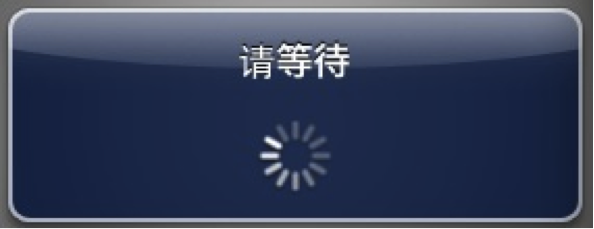
10. 为UIAlertView添加子视图
在为UIAlertView对象太添加子视图的过程中,有点是需要注意的地方,如果删除按钮,也就是取消UIAlerView视图中所有的按钮的时候,可能会导致整个显示结构失衡。按钮占用的空间不会消失,我们也可以理解为这些按钮没有真正的删除,仅仅是他不可见了而已。如果在UIAlertview对象中仅仅用来显示文本,那么,可以在消息的开头添加换行符(@"\n)有助于平衡按钮底部和顶部的空间。
下面的代码用来演示如何为UIAlertview对象添加子视图的方法。
UIAlertView*alert =
[[UIAlertView alloc]initWithTitle:@"请等待" message:nil delegate:nil cancelButtonTitle:nil otherButtonTitles:nil];
[alert show];
UIActivityIndicatorView*activeView =
[[UIActivityIndicatorView alloc]initWithActivityIndicatorStyle:UIActivityIndicatorViewStyleWhiteLarge];
activeView.center = CGPointMake(alert.bounds.size.width
/ 2.0f, alert.bounds.size.height - 40.0f);
[activeView startAnimating];
[alert addSubview:activeView];
11. UIAlertView小例子
UIAlertView默认情况下所有的text是居中对齐的。 那如果需要将文本向左对齐或者添加其他控件比如输入框时该怎么办呢?
不用担心, iPhone SDK还是很灵活的,
有很多delegate消息供调用程序使用。
所要做的就是在
- (void)willPresentAlertView:(UIAlertView *)alertView
中按照自己的需要修改或添加即可,
比如需要将消息文本左对齐,下面的代码即可实现:
-(void) willPresentAlertView:(UIAlertView *)alertView
{
for( UIView * view in alertView.subviews )
{
if(
[view isKindOfClass:[UILabel class]] )
{
UILabel*
label = (UILabel*) view;
label.textAlignment=UITextAlignmentLeft;
}
}
}
给iOS开发新手送点福利,简述UIAlertView的属性和用法的更多相关文章
- 给iOS开发新手送点福利,简述UIImagePickerController的属性和用法
1.+(BOOL)isSourceTypeAvailable:(UIImagePickerControllerSourceType)sourceType; // 检查指定源是否在设备上 ...
- 给iOS开发新手送点福利,简述UITableView的属性和用法
UITableView UITableView内置了两种样式:UITableViewStylePlain,UITableViewStyleGrouped <UITableViewDataSo ...
- 给iOS开发新手送点福利,简述UIView的属性和用法
UIView 1.alpha 设置视图的透明度.默认为1. // 完全透明 view.alpha = 0; // 不透明 view.alpha = 1; 2.clipsToBounds // 默认是N ...
- 给iOS开发新手送点福利,简述UITextField的属性和用法
UITextField属性 0. enablesReturnKeyAutomatically 默认为No,如果设置为Yes,文本框中没有输入任何字符的话,右下角的返回按钮是disabled的. ...
- 给iOS开发新手送点福利,简述UILabel的属性和用法
UILabel属性 1.text:设置标签显示文本. label.text = @"我是Label"; 2.attributedText:设置标签属性文本. NSString *t ...
- 给iOS开发新手送点福利,简述UIPikerView的属性和用法
1. numberOfComponents:返回UIPickerView当前的列数 NSInteger num = _pickerView.numberOfComponents; NSLog( @ ...
- 给iOS开发新手送点福利,简述UIScrollView的属性和用法
UIScrollView 1. contentOffset 默认CGPointZero,用来设置scrollView的滚动偏移量. // 设置scrollView的滚动偏移量 scrollView ...
- 给iOS开发新手送点福利,简述UIPageControl的属性和用法
UIPageControl 1. numberOfPages // 设置有多少页 默认为0 [pageControl setNumberOfPages:kImageCount]; 2. cur ...
- 给iOS开发新手送点福利,简述UISegment的属性和用法
UISegment属性 1.segmentedControlStyle 设置segment的显示样式. typedef NS_ENUM(NSInteger, UISegmentedControlSty ...
随机推荐
- RHEL6.5恢复root密码
1.开机上下键停留在如下界面,键盘输入小写e: 2.选择如下选项,并输入小写e: 3.输入1,回车进入单用户模式: 4.键盘输入小写b,进行启动: 5.进入到单用户模式: 6.修改root用户密码,并 ...
- 《F4+2 团队项目需求分析改进》
a.分析<动态的太阳系模型项目需求规格说明书>初稿的不足. 任务概述描述的有些不具体,功能的规定不详细,在此次作业进行了修改. b.参考<构建之法>8.5节功能的定位和优先级, ...
- php多站点配置以及Forbidden You don't have permission to access / on this server问题解决
php多站点配置以及Forbidden You don't have permission to access / on this server问题解决 一.总结 一句话总结:我的问题是php的版本问 ...
- Hystrix熔断机制原理剖析
一.前言 在分布式系统架构中多个系统之间通常是通过远程RPC调用进行通信,也就是 A 系统调用 B 系统服务,B 系统调用 C 系统的服务.当尾部应用 C 发生故障而系统 B 没有服务降级时候可能会导 ...
- ABP zero出现Default language is not defined!的错误的解决方法
打开程序包管理器控制台,把EntityFramework作为默认项目,并且执行Update-Database命令 再运行项目
- devdocs
https://devdocs.io/ docker run --rm -d --name devdocs -p 9292:9292 devdocs/devdocs
- uva-1636-概率
https://vjudge.net/problem/UVA-1636 给出一个左轮手枪的弹夹串,第一枪是空的,问是继续打还是转一转再打下一枪还为空的概率大.继续打为空的概率就是 '00'的个数比上' ...
- vue spn如何做seo优化
vue spn如何做seo优化 突然来了一个需求,对已有的项目做SEO优化,WHAT? 总所周知,spn对seo不够优化,因而官方考虑到直接使用ssr 一个不算解决办法的办法prerender-spa ...
- 无法安装64位版本的office因为在您的pc
无法安装64位版本的office因为在您的pcWindows Registry Editor Version 5.00 [HKEY_CLASSES_ROOT\Installer\Products\00 ...
- scrollTop和scrollLeft属性
外层元素的高度值是200px,内层元素的高度值是300px.很明显,“外层元素中的内容”高过了“外层元素”本身.当向下拖动滚动条时,有部分内容会隐没在“外层元素的上边界”之外,scrollTop就等于 ...