kaldi 运行voxforge例子
-------------------------------------------------------------------------------------------------------------------------------------------------------------
运行getdata.sh,下载voxforge语音库
修改cmd.sh queue.pl为run.pl.
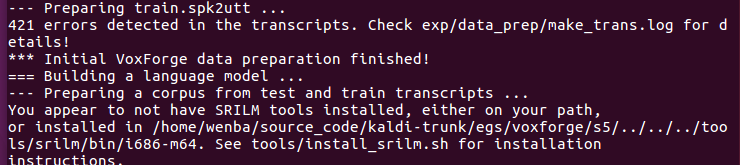
install_srilm.sh
执行该脚本

按照网址下载srilm.tgz,然后运行install_srilm.sh
提示安装
sudo ./install_sequitur.sh
sudo apt-get install swig
最后,修改run.sh njobs = 10(cpu核心数)
运行成功。
----------------------------------------------------------------------------------------------------------------------------------------------------------------------
默认模式离线文件解码, online_demo/run.sh
离线在线解码 , online_demo/run.sh --test-mode live
安装录音机,检查录音设备是否有问题
#!/bin/bash

# Copyright 2012 Vassil Panayotov

# Apache 2.0

# Note: you have to do 'make ext' in ../../../src/ before running this.

# Set the paths to the binaries and scripts needed

KALDI_ROOT=`pwd`/../../..

export PATH=$PWD/../s5/utils/:$KALDI_ROOT/src/onlinebin:$KALDI_ROOT/src/bin:$PATH

data_file="online-data"

data_url="http://sourceforge.net/projects/kaldi/files/online-data.tar.bz2"

# Change this to "tri2a" if you like to test using a ML-trained model

ac_model_type=tri2b_mmi

# Alignments and decoding results are saved in this directory(simulated decoding only)

decode_dir="./work"

# Change this to "live" either here or using command line switch like:

# --test-mode live

test_mode="simulated"

. parse_options.sh

ac_model=${data_file}/models/$ac_model_type

trans_matrix=""

audio=${data_file}/audio

if [ ! -s ${data_file}.tar.bz2 ]; then   #下载语音数据,用于仿真测试用

    echo "Downloading test models and data ..."

    wget -T 10 -t 3 $data_url;

    if [ ! -s ${data_file}.tar.bz2 ]; then

        echo "Download of $data_file has failed!"

        exit 1

    fi

fi

if [ ! -d $ac_model ]; then   #验证模型是否存在

    echo "Extracting the models and data ..."

    tar xf ${data_file}.tar.bz2

fi

if [ -s $ac_model/matrix ]; then   #设置转移矩阵

    trans_matrix=$ac_model/matrix

fi

case $test_mode in

    live)#实时在线解码模式

        echo

        echo -e "  LIVE DEMO MODE - you can use a microphone and say something\n"

        echo "  The (bigram) language model used to build the decoding graph was"

        echo "  estimated on an audio book's text. The text in question is"

        echo "  \"King Solomon's Mines\" (http://www.gutenberg.org/ebooks/2166)."

        echo "  You may want to read some sentences from this book first ..."

        echo

        online-gmm-decode-faster --rt-min=0.5 --rt-max=0.7 --max-active=4000 \

           --beam=12.0 --acoustic-scale=0.0769 $ac_model/model $ac_model/HCLG.fst \

           $ac_model/words.txt '1:2:3:4:5' $trans_matrix;;

    simulated)#离线文件识别

        echo

        echo -e "  SIMULATED ONLINE DECODING - pre-recorded audio is used\n"

        echo "  The (bigram) language model used to build the decoding graph was"

        echo "  estimated on an audio book's text. The text in question is"

        echo "  \"King Solomon's Mines\" (http://www.gutenberg.org/ebooks/2166)."

        echo "  The audio chunks to be decoded were taken from the audio book read"

        echo "  by John Nicholson(http://librivox.org/king-solomons-mines-by-haggard/)"

        echo

        echo "  NOTE: Using utterances from the book, on which the LM was estimated"

        echo "        is considered to be \"cheating\" and we are doing this only for"

        echo "        the purposes of the demo."

        echo

        echo "  You can type \"./run.sh --test-mode live\" to try it using your"

        echo "  own voice!"

        echo

        mkdir -p $decode_dir

        # make an input .scp file

        > $decode_dir/input.scp

        for f in $audio/*.wav; do

            bf=`basename $f`

            bf=${bf%.wav}

            echo $bf $f >> $decode_dir/input.scp

        done

        online-wav-gmm-decode-faster --verbose=1 --rt-min=0.8 --rt-max=0.85\

            --max-active=4000 --beam=12.0 --acoustic-scale=0.0769 \

            scp:$decode_dir/input.scp $ac_model/model $ac_model/HCLG.fst \

            $ac_model/words.txt '1:2:3:4:5' ark,t:$decode_dir/trans.txt \

            ark,t:$decode_dir/ali.txt $trans_matrix;;# ali.txt记录对齐的状态与帧之间关系   trans.txt记录解码结果的数字

    *)

        echo "Invalid test mode! Should be either \"live\" or \"simulated\"!";

        exit 1;;

esac

# Estimate the error rate for the simulated decoding

if [ $test_mode == "simulated" ]; then

    # Convert the reference transcripts from symbols to word IDs

    sym2int.pl -f 2- $ac_model/words.txt < $audio/trans.txt > $decode_dir/ref.txt #结合words.txt将trans.txt标记参考文本符号  转成   int符号

    # Compact the hypotheses belonging to the same test utterance

    cat $decode_dir/trans.txt |\

        sed -e 's/^\(test[0-9]\+\)\([^ ]\+\)\(.*\)/\1 \3/' |\

        gawk '{key=$1; $1=""; arr[key]=arr[key] " " $0; } END { for (k in arr) { print k " " arr[k]} }' > $decode_dir/hyp.txt
    #将trans.txt变成类似ref.txt的格式,便于对比分析

   # Finally compute WER

   compute-wer --mode=present ark,t:$decode_dir/ref.txt ark,t:$decode_dir/hyp.txt  #将ref.txt与hyp.txt做对比,计算wer率

fi
Usage: online-gmm-decode-faster [options] <model-in><fst-in> <word-symbol-table> <silence-phones> [<lda-matrix-in>]
                                          #模型      fst状态机      词符号表          静音音素          lda-矩阵

Example: online-gmm-decode-faster --rt-min=0.3 --rt-max=0.5 --max-active=4000 --beam=12.0 --acoustic-scale=0.0769 model HCLG.fst words.txt '1:2:3:4:5' lda-matrix

Options:

  --acoustic-scale            : Scaling factor for acoustic likelihoods (float, default = 0.1)      声学似然度 伸缩系数

  --batch-size                : Number of feature vectors processed w/o interruption (int, default = 27)  特征矢量batch数目设定

  --beam                      : Decoding beam.  Larger->slower, more accurate. (float, default = 16)     解码beam,beam越大,则越慢,越精确

  --beam-delta                : Increment used in decoder [obscure setting] (float, default = 0.5)   解码器中的增量

  --beam-update               : Beam update rate (float, default = 0.01)  beam更新速率

  --cmn-window                : Number of feat. vectors used in the running average CMN calculation (int, default = 600)   cmn的窗,决定了feat的数目

  --delta-order               : Order of delta computation (int, default = 2)  delta的阶数

  --delta-window              : Parameter controlling window for delta computation (actual window size for each delta order is 1 + 2*delta-window-size) (int, default = 2) #delta控制窗

  --hash-ratio                : Setting used in decoder to control hash behavior (float, default = 2) 解码器中控制hash的设置

  --inter-utt-sil             : Maximum # of silence frames to trigger new utterance (int, default = 50)  #slience最大帧数,超过这个就会激活新的发音

  --left-context              : Number of frames of left context (int, default = 4)#左边上下文的帧数

  --max-active                : Decoder max active states.  Larger->slower; more accurate (int, default = 2147483647) #解码器最大的有效状态,  越大,则越慢,越准确

  --max-beam-update           : Max beam update rate (float, default = 0.05) #最大的beam的更新率

  --max-utt-length            : If the utterance becomes longer than this number of frames, shorter silence is acceptable as an utterance separator (int, default = 1500)#如果发音超过这个帧数,短时静音是可接受的,作为分割符

  --min-active                : Decoder min active states (don't prune if #active less than this). (int, default = 20)#解码器的最小有效状态

  --min-cmn-window            : Minumum CMN window used at start of decoding (adds latency only at start) (int, default = 100) #最小CMN窗

  --num-tries                 : Number of successive repetitions of timeout before we terminate stream (int, default = 5)#再我们终止流时,超时连续重复的数目

  --right-context             : Number of frames of right context (int, default = 4) #右上下文帧数

  --rt-max                    : Approximate maximum decoding run time factor (float, default = 0.75)#近似最大解码动态时间系数

  --rt-min                    : Approximate minimum decoding run time factor (float, default = 0.7)#

  --update-interval           : Beam update interval in frames (int, default = 3)#beam更新间隔

Standard options:

  --config                    : Configuration file to read (this option may be repeated) (string, default = "")

  --help                      : Print out usage message (bool, default = false)

  --print-args                : Print the command line arguments (to stderr) (bool, default = true)

  --verbose                   : Verbose level (higher->more logging) (int, default = 0)
由于使用的是服务器主板,所以接入的是usb音频设备。
但是PortAudio没有检测成功。
所以重新安装了下新版的PortAudio,修改/install_portaduio.sh里面的版本,后来又成功了。
重新make ext.
1.首先检查linux系统录音功能是否可用:arecord命令,如arecord -d 10 test.wav,也可以使用arecord -l查看当前的录音设备,一般是都有的
2.检查portaudio是否安装成功。可以使用tools/install_portaduio.sh安装,如果之前安装过一遍,一定要先进入tools/portaudio,然后make clean,否则没有用。有些时候一些依赖没有也会安装,但是程序不可用,可以进入tools/portaudio,然后./configure,通常情况alsa显示no,通过sudo apt-get install libasound-dev可以解决
kaldi 运行voxforge例子的更多相关文章
- kaldi运行thchs30例子
首先,thchs30有两种数据库,kaldi运行的数据库最好是 thchs30-openslr. 修改run.sh里面的语音库路径 thchs30=... 修改nj线程数 等于CPU的核心数 修改c ...
- [Linux][Hadoop] 运行WordCount例子
紧接上篇,完成Hadoop的安装并跑起来之后,是该运行相关例子的时候了,而最简单最直接的例子就是HelloWorld式的WordCount例子. 参照博客进行运行:http://xiejiangl ...
- caffe简易上手指南(一)—— 运行cifar例子
简介 caffe是一个友好.易于上手的开源深度学习平台,主要用于图像的相关处理,可以支持CNN等多种深度学习网络. 基于caffe,开发者可以方便快速地开发简单的学习网络,用于分类.定位等任务,也可以 ...
- sparkR的一个运行的例子
在sparkR在配置完成的基础上,本例采用Spark on yarn模式,介绍sparkR运行的一个例子. 在spark的安装目录下,/examples/src/main/r,有一个dataframe ...
- (四)伪分布式下jdk1.6+Hadoop1.2.1+HBase0.94+Eclipse下运行wordCount例子
本篇先介绍HBase在伪分布式环境下的安装方式,然后将MapReduce编程和HBase结合起来使用,完成WordCount这个例子. HBase在伪分布环境下安装 一. 前提条件 已经成功地安装 ...
- RedHat 安装Hadoop并运行wordcount例子
1.安装 Red Hat 环境 2.安装JDK 3.下载hadoop2.8.0 http://mirrors.tuna.tsinghua.edu.cn/apache/hadoop/common/had ...
- 八、VTK安装并运行一个例子
一.版本 win10 VS2019 VTK8.2.0 其实vtk的安装过程和itk的安装过程很是类似,如果你对itk的安装很是熟悉(也就是我的博客一里面的内容,那么自己就可以安装.) 如果不放心,可以 ...
- 配置RHadoop与运行WordCount例子
1.安装R语言环境 su -c 'rpm -Uvh http://download.fedoraproject.org/pub/epel/6/i386/epel-release-6-8.noarch. ...
- JVM内存模型分析(一个程序运行的例子)
(.class字节码)类加载到内存之后,内存模型:(ps:.class文件可以通过javap 指令反编译成一个可读文件) 1.java栈,本地方法栈,程序计数器(每个线程私有) 看如下程序: 以该程序 ...
随机推荐
- springboot添加自定义注解
spring拦截器是基于动态代理,注解就是拦截器,所以关于动态代理需要注意的坑,注解同样要注意. 1.创建注解类 /** * @Target 此注解的作用目标,括号里METHOD的意思说明此注解只能加 ...
- easyui 传递参数报错(错误:uncaught SyntaxError: Unexpected identifier)
转自:https://www.cnblogs.com/javaboy2018/p/8733585.html 代码: 按钮事件: function formatOper(val, row, index) ...
- Selenium 汇总
- SpringMvc中Hashmap操作遇到 java.util.ConcurrentModificationException: null
代码按照网上修改为类似,还不能解决问题 for (Iterator<String> it = target.keySet().iterator(); it.hasNext(); ) { i ...
- Python+Selenium 自动化实现实例-处理分页(pagination)
场景 对分页来说,我们最感兴趣的是下面几个信息 总共有多少页 当前是第几页 是否可以上一页和下一页 代码 下面代码演示如何获取分页总数及当前页数.跳转到指定页数 #coding:utf-8 from ...
- python3下获取全局坐标
前段时间自己想用python写一个关于截屏翻译的小功能,所以首先需要获取鼠标的坐标动作有按下.拖拽.释放.查找了很多资料无非是pyhook或者用其他语言重写.但是自己用的是python3.65,第三方 ...
- Windows10开机pin界面循环重启解决办法
昨天电脑在开机时,进入pin界面,输入pin码之后系统没反应,也不显示登陆成功,大概一分钟之后自动重启,遂百度答案:大部分建议都是在开机显示win图标时强制关机,强制关机两次即自动进入疑难解答页面,以 ...
- 后台跨域(CORS)
解决跨域问题 一.为什么会有跨域问题? 是因为浏览器的同源策略是对ajax请求进行阻拦了,但是不是所有的请求都给做跨域,像是一般的href属性,a标签什么的都不拦截. 二.解决跨域问题的两种方式 JS ...
- zabbix3.0监控Windows服务器
我们下载后,解压开始有多个文件: conf目录存放是agent配置文件bin文件存放windows下32位和64位安装程序 找到conf下的配置文件 zabbix_agentd.win.conf ,修 ...
- 从知乎首页用户操作入口学习到的CSS技巧 - 合理利用伪元素实现一些装饰样式
最近在模仿做一个静态的PC版知乎,在模仿的过程中,从知乎工程师的方法中学到了不少知识,比如CSS方面的,以下介绍一个今天学到的伪元素的技巧. 示例 DOM结构为: <div class=&quo ...