iOS-布局-Masonry
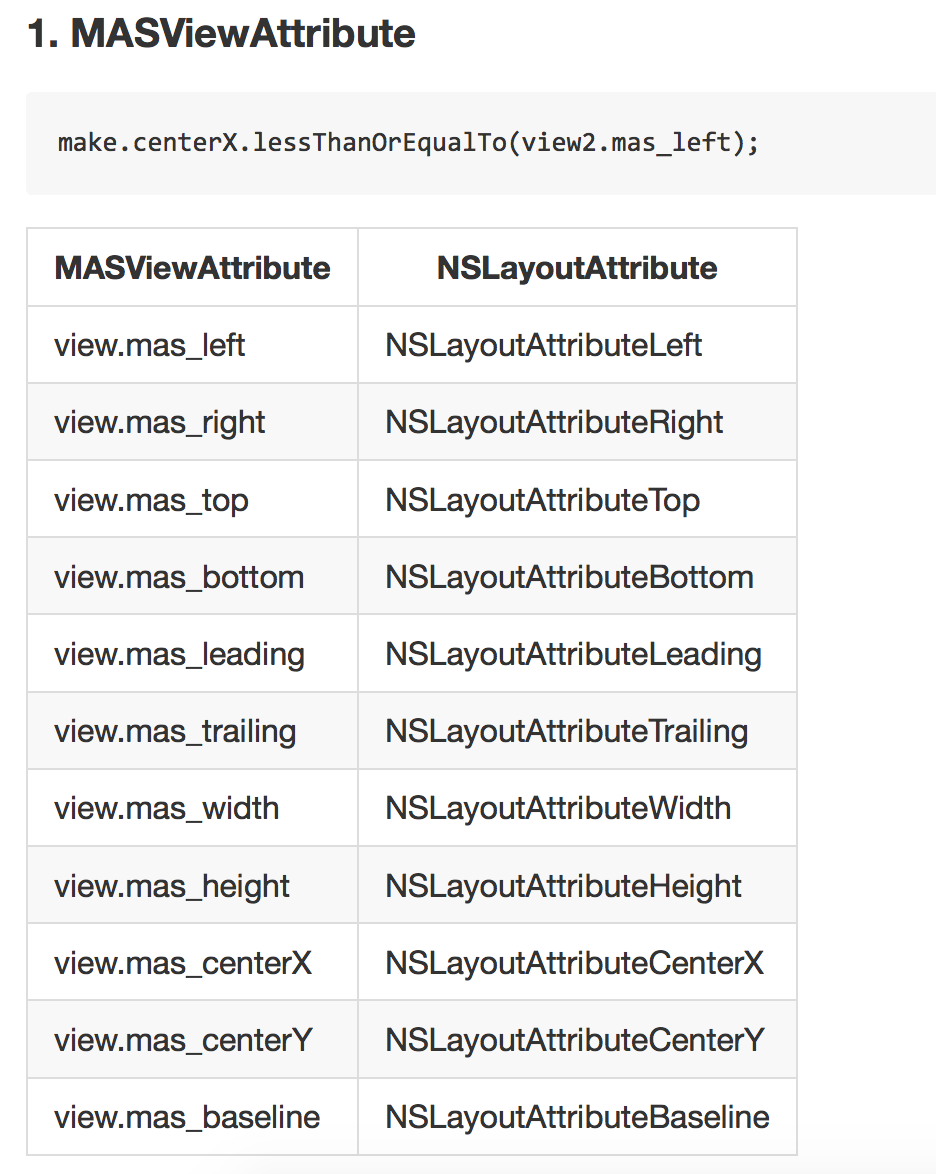
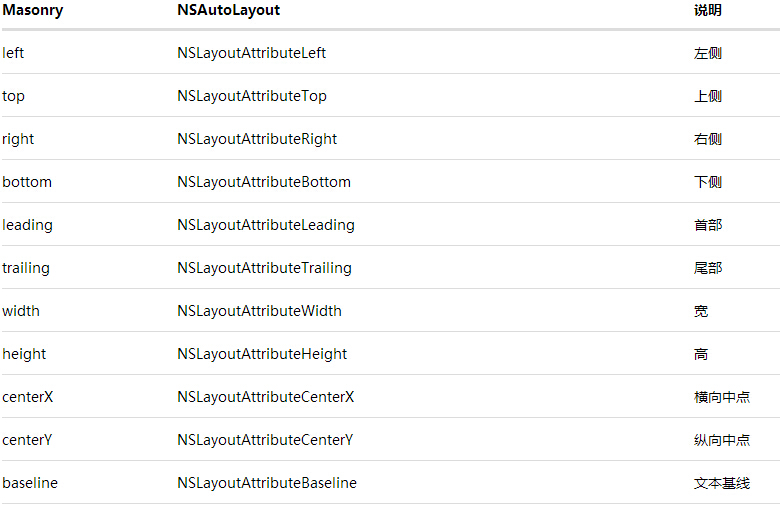
multipliedBy 倍数举例:make.width.equalTo(self.view.mas_width).multipliedBy(0.5);//设置宽度为self.view的一半,multipliedBy是倍数的意思,也就是,使宽度等于self.view宽度的0.5倍// 左侧
@property (nonatomic, strong, readonly) MASConstraint *left;
// 顶部
@property (nonatomic, strong, readonly) MASConstraint *top;
// 右侧
@property (nonatomic, strong, readonly) MASConstraint *right;
// 底部
@property (nonatomic, strong, readonly) MASConstraint *bottom;
// 首部
@property (nonatomic, strong, readonly) MASConstraint *leading;
// 尾部
@property (nonatomic, strong, readonly) MASConstraint *trailing;
// 宽
@property (nonatomic, strong, readonly) MASConstraint *width;
// 高
@property (nonatomic, strong, readonly) MASConstraint *height;
// 中心点x
@property (nonatomic, strong, readonly) MASConstraint *centerX;
// 中心点y
@property (nonatomic, strong, readonly) MASConstraint *centerY;
// 文本基线
@property (nonatomic, strong, readonly) MASConstraint *baseline;|
分类
|
含义
|
举例
|
|
size
|
尺寸,包含(wdith,height)
|
make.size.mas_equalTo(CGSizeMake(300, 300));
|
|
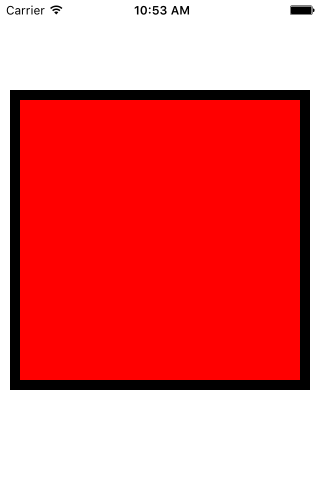
edges
|
边距,包含(top,left,right,bottom)
|
make.edges.equalTo(_blackView).with.insets(UIEdgeInsetsMake(10, 10, 10, 10));
可以写成
make.top.equalTo(_blackView).with.offset(10); make.left.equalTo(_blackView).with.offset(10); make.bottom.equalTo(_blackView).with.offset(-10); make.right.equalTo(_blackView).with.offset(-10);
或者 make.top.left.bottom.and.right.equalTo(_blackView).with.insets(UIEdgeInsetsMake(10, 10, 10, 10));
|
|
center
|
中心,包含(centerX,centerY)
|
make.center.equalTo(self.view);
|
#import "Masonry.h"
@interface ViewController ()
{
UIView *_blackView;
UIView *_redView;
UIView *_orangeView1;
UIView *_orangeView2;
UIScrollView *_scrolView;
}
@end
@implementation ViewController
- (void)viewDidLoad {
[super viewDidLoad];
[self addBlackView];
//[self addRedView];
//[self addTwoOrangeColorView];
//[self addMoreView];
[self addScrolView];
}
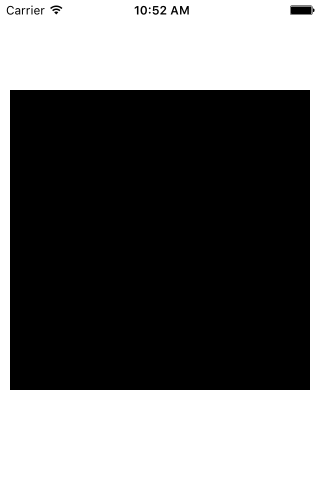
#pragma mark 添加黑色视图
- (void)addBlackView
{
_blackView = [UIView new];
_blackView.backgroundColor = [UIColor blackColor];
// 在做autoLayout 之前 一定要先将view添加到superView上, 否则会报错
[self.view addSubview:_blackView];
//mas_makeConstrains就是Masonry的autoLayout添加函数 将所需的约束添加到block中就行了
[_blackView mas_makeConstraints:^(MASConstraintMaker *make) {
//居中
make.center.equalTo(self.view);
//将size设置成(300,300);
make.size.mas_equalTo(CGSizeMake(300, 300));
}];
}
#pragma mark 添加红色视图
- (void)addRedView
{
_redView = [UIView new];
_redView.backgroundColor = [UIColor redColor];
[self.view addSubview:_redView];
[_redView mas_makeConstraints:^(MASConstraintMaker *make) {
//这三种方式等价
make.edges.equalTo(_blackView).with.insets(UIEdgeInsetsMake(10, 10, 10, 10));
// make.top.equalTo(_blackView).with.offset(10);
// make.left.equalTo(_blackView).with.offset(10);
// make.bottom.equalTo(_blackView).with.offset(-10);
// make.right.equalTo(_blackView).with.offset(-10);
// make.top.left.bottom.and.right.equalTo(_blackView).with.insets(UIEdgeInsetsMake(10, 10, 10, 10));
}];
}
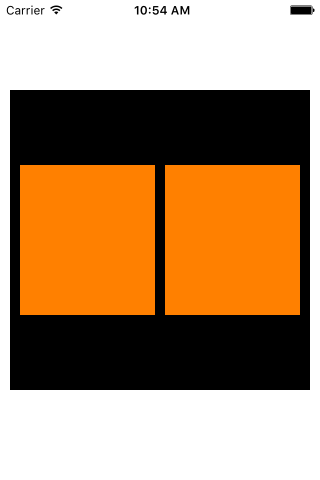
#pragma mark 添加俩橘色视图
- (void)addTwoOrangeColorView
{
//定义边距为10
int padding1 = 10;
_orangeView1 = [UIView new];
_orangeView1.backgroundColor = [UIColor orangeColor];
[self.view addSubview:_orangeView1];
_orangeView2 = [UIView new];
_orangeView2.backgroundColor = [UIColor orangeColor];
[self.view addSubview:_orangeView2];
[_orangeView1 mas_makeConstraints:^(MASConstraintMaker *make) {
make.centerY.mas_equalTo(_blackView.mas_centerY);
make.left.equalTo(_blackView.mas_left).with.offset(padding1);
make.right.equalTo(_orangeView2.mas_left).with.offset(-padding1);
make.height.mas_equalTo(@150);
make.width.equalTo(_orangeView2);
}];
[_orangeView2 mas_makeConstraints:^(MASConstraintMaker *make) {
make.centerY.mas_equalTo(_blackView.mas_centerY);
make.left.equalTo(_orangeView1.mas_right).with.offset(padding1);
make.right.equalTo(_blackView.mas_right).with.offset(-padding1);
make.height.mas_equalTo(@150);
make.width.equalTo(_orangeView1);
}];
}
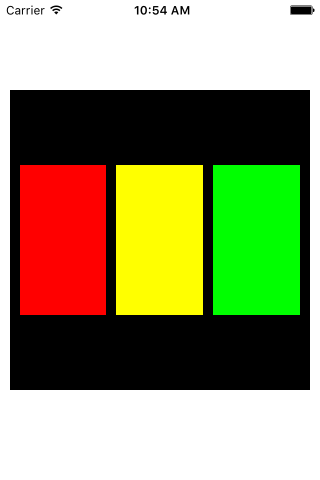
#pragma mark 添加多个等间距的视图
- (void)addMoreView
{
UIView *view1 = [[UIView alloc] init];
view1.backgroundColor = [UIColor redColor];
[_blackView addSubview:view1];
UIView *view2 = [[UIView alloc] init];
view2.backgroundColor = [UIColor yellowColor];
[_blackView addSubview:view2];
UIView *view3 = [[UIView alloc] init];
view3.backgroundColor = [UIColor greenColor];
[self.view addSubview:view3];
int padding = 10;
[view1 mas_makeConstraints:^(MASConstraintMaker *make) {
//设置竖直方向约束
// 设置view1的Y中心点
make.centerY.mas_equalTo(_blackView);
// 设置高度
make.height.mas_equalTo(@150);
//设置水平方向约束
// 设置左侧距离父视图10
make.left.equalTo(_blackView).with.offset(padding);
// 设置右侧距离和view2的左侧相隔10
make.right.equalTo(view2.mas_left).with.offset(-padding);
// 宽度设置和view2以及view3相同
make.width.equalTo(@[view2, view3]);
}];
[view2 mas_makeConstraints:^(MASConstraintMaker *make) {
make.centerY.mas_equalTo(_blackView);
make.height.mas_equalTo(view1);
make.width.equalTo(@[view1, view3]);
}];
[view3 mas_makeConstraints:^(MASConstraintMaker *make) {
make.centerY.mas_equalTo(_blackView);
make.left.equalTo(view2.mas_right).with.offset(padding);
make.right.equalTo(_blackView).with.offset(-padding);
make.height.mas_equalTo(view1);
make.width.equalTo(@[view2, view1]);
}];
}
#pragma mark 添加滑动视图
- (void)addScrolView
{
_scrolView = [UIScrollView new];
_scrolView.backgroundColor = [UIColor whiteColor];
[_blackView addSubview:_scrolView];
[_scrolView mas_makeConstraints:^(MASConstraintMaker *make) {
make.edges.equalTo(_blackView).with.insets(UIEdgeInsetsMake(5, 5, 5, 5));
}];
UIView * container = [UIView new];
[_scrolView addSubview:container];
[container mas_makeConstraints:^(MASConstraintMaker *make) {
make.edges.equalTo(_scrolView);
make.width.equalTo(_scrolView);
}];
int count = 10;
UIView * lastView = nil;
for (int i = 0; i <= count; i ++)
{
UIView * subView = [UIView new];
[container addSubview:subView];
subView.backgroundColor = [UIColor colorWithHue:(arc4random() % 156 / 256.0) saturation:(arc4random() % 128 / 256.0) brightness:(arc4random() % 128 / 256.0) alpha:1];
[subView mas_makeConstraints:^(MASConstraintMaker *make) {
make.left.and.right.equalTo(container);
make.height.equalTo(@(20*i));
if (lastView) {
make.top.mas_equalTo(lastView.mas_bottom);
}
else
{
make.top.mas_equalTo(container.mas_top);
}
}];
lastView = subView;
}
[container mas_makeConstraints:^(MASConstraintMaker *make) {
make.bottom.equalTo(lastView.mas_bottom);
}];
}
- (void)viewDidAppear:(BOOL)animated
{
[super viewDidAppear:animated];
NSLog(@"_blackView.frame: %@",NSStringFromCGRect(_blackView.frame));
NSLog(@"_blackView1.frame: %@",NSStringFromCGRect(_blackView.frame));
NSLog(@"_orangeView1.frame: %@",NSStringFromCGRect(_orangeView1.frame));
NSLog(@"_orangeView2.frame: %@",NSStringFromCGRect(_orangeView2.frame));
NSLog(@"_scrolView.frame: %@",NSStringFromCGRect(_scrolView.frame));
}
iOS-布局-Masonry的更多相关文章
- iOS开发-Masonry简易教程
关于iOS布局自动iPhone6之后就是AutoLayOut,AutoLayOut固然非常好用,不过有时候我们需要在页面手动进行页面布局,VFL算是一种选择,如果对VFL不是很熟悉可以参考iOS开发- ...
- jQuery插件实现瀑布留布局masonry + infinitescroll 图片高度处理
jQuery插件实现瀑布留布局masonry + infinitescroll . 使用官方的示例代码实际测试发现,当上传到服务器的时候,由于图片下载速度问题,导致图片高度不能被正确识别,从而造成层的 ...
- iOS - 布局重绘机制相关方法的研究
iOS View布局重绘机制相关方法 布局 - (void)layoutSubviews - (void)layoutIfNeeded- (void)setNeedsLayout —————————— ...
- iOS自动布局——Masonry详解
欢迎大家前往腾讯云+社区,获取更多腾讯海量技术实践干货哦~ 本文由鹅厂新鲜事儿发表于云+社区专栏 作者:oceanlong | 腾讯 移动客户端开发工程师 前言 UI布局是整个前端体系里不可或缺的一环 ...
- iOS 使用Masonry介绍与使用实践:快速上手Autolayout
介绍 Masonry 源码:https://github.com/Masonry/Masonry Masonry是一个轻量级的布局框架 拥有自己的描述语法 采用更优雅的链式语法封装自动布局 简洁明了 ...
- 第三方框架-纯代码布局:Masonry的简单使用
Masonry是一个对系统NSLayoutConstraint进行封装的第三方自动布局框架,采用链式编程的方式提供给开发者API.系统AutoLayout支持的操作,Masonry都支持,相比系统AP ...
- 几张图弄明白ios布局中的尺寸问题
背景 先说说逆向那事.各种曲折..各种技术过时,老老实实在啃看雪的帖子..更新会有的. 回正题,这里讨论的是在Masnory框架下的布局问题.像我这种游击队没师傅带,什么都得自己琢磨,一直没闹明白下面 ...
- iOS布局
1.Masonry 创建constraint来定义布局的方式: 1.1. mas_makeConstraints : 你可以使用局部变量后者属性来保存以便下次应用它 1.2. mas_updateCo ...
- Xcode iOS布局autolayout和sizeclass的使用
一.关于自动布局(Autolayout) 在Xcode中,自动布局看似是一个很复杂的系统,在真正使用它之前,我也是这么认为的,不过事实并非如此. 我们知道,一款iOS应用,其主要UI组件是由一个个相对 ...
- iOS - 布局NSLayoutConstraint动画的实现
抛出问题:为何在用到用到constraint的动画时以下代码无法实现动画的功能 ,没有动画直接刷新UI跳到80 - (void)touchesBegan:(NSSet<UITouch *> ...
随机推荐
- Category和Extension
转: http://blog.csdn.net/leikezhu1981/article/details/19091049 一.概述 类别是一种为现有的类添加新方法的方式. 利用Objective-C ...
- Javascript:常用函数封装
//cookie function setCookie(name, value, iDay) { if(iDay!==false) { var oDate=new Date(); oDate.setD ...
- hadoop集群全纪录
169namenode 170datanode 171datenode 1:部署JDK 获取jdk安装代码:jdk-7u21-linux-x64.gz tar -zxvf jdk-7u21-linux ...
- 一个批量移除BOM头的bash脚本
有时候我们的文件可能不需要BOM头,例如:我们公司的SVN服务器提供的代码都UTF8编码保存(不能有BOM头)否则代码提交不上去. 文件很多的时候就需要批量操作. 脚本使用方法:remove-bom. ...
- ECshop设置301最快捷最简单的方法
ECshop设置301最快捷最简单的方法 在 init.php中加入以下代码 if (strtolower($_SERVER['SERVER_NAME'])!='www.fz1688.com') { ...
- Retrofit
Retrofit 标签(空格分隔): 第三方&开源 Retrofit是一套RESTful架构的Android(Java)客户端实现,基于注解,提供JSON to POJO(Plain Ordi ...
- 水晶报表设置FiledObject支持HTML格式的数据
经常遇见把数据拼接成html格式后,然后在水晶报表中按照这种格式进行展现. 这就需要我们对次FiledObject设置成html文本: 设置方式: 格式编辑器->段落->文本解释,然后选择 ...
- sruts2:单个文件上传,多个文件上传(属性驱动)
文件上传功能在Struts2中得到了很好的封装,主要使用fileUpload上传组件. 1. 单个文件上传 1.1 创建上传单个文件的JSP页面.显示提交结果的JSP页面 uploadTest1.js ...
- sql 字符次数
FParentPath 查询字段 本条语句 条件是 , 查询 , 在这个字段出现了几次 1=没有 2=1次 3=2次(依次累加)
- 我也要学C语言-第十九章:命令行参数
C语言的语法规定main函数是带连个参数的,因为当初是考虑是在控制台下写程序.于是用户可以给参数微控程序.其实现在的WINDOWS程序也可以带参数.一般正规军写的应该程序一般都带命令行参数,帮助文档, ...