CSharpGL(35)用ViewPort实现类似3DMax那样的把一个场景渲染到4个视口
CSharpGL(35)用ViewPort实现类似3DMax那样的把一个场景渲染到4个视口
开始
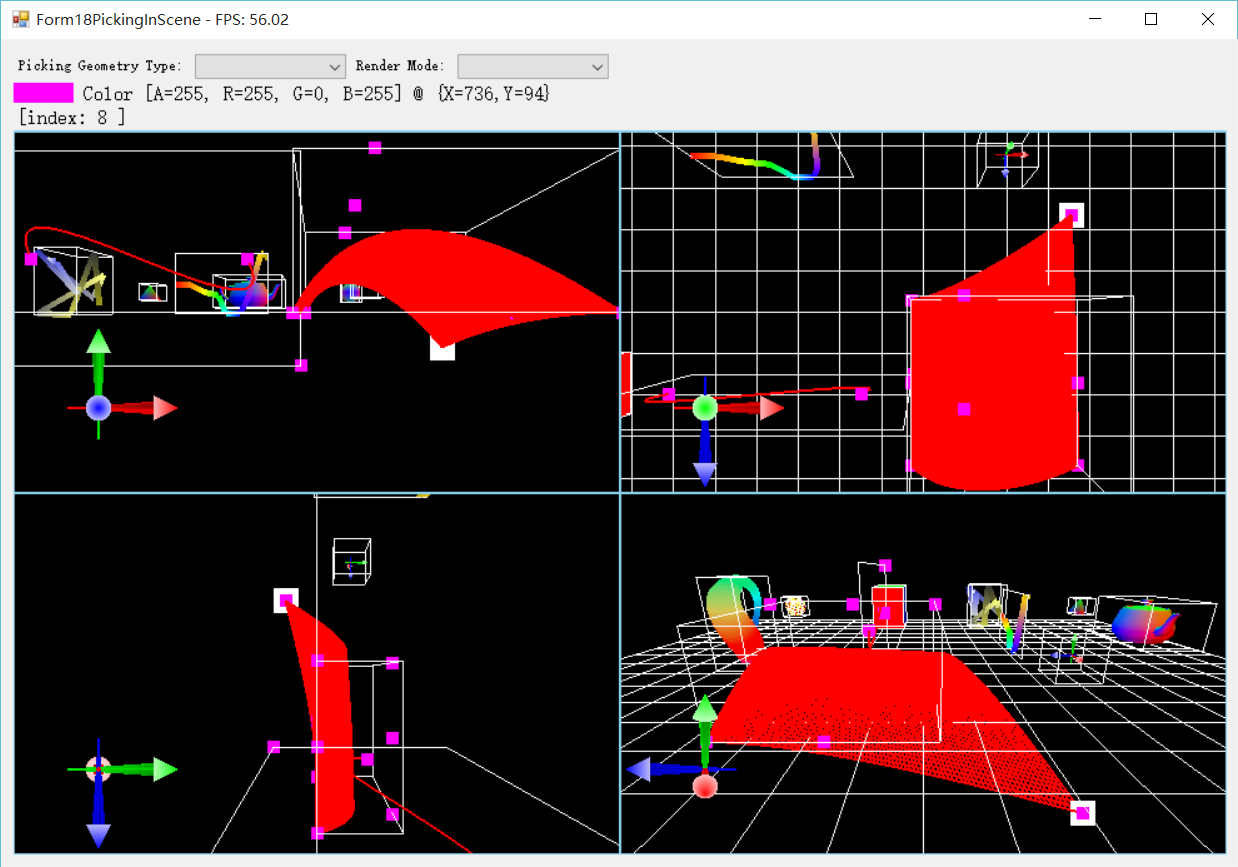
像下面这样的四个视口的功能是很常用的,所以我花了几天时间在CSharpGL中集成了这个功能。

在CSharpGL中的多视口效果如下。效果图是粗糙了些,但是已经实现了拖拽图元时4个视口同步更新的功能,算是一个3D模型编辑器的雏形了。
原理
ViewPort
多视口的任务,是在不同的区域用不同的摄像机渲染同一个场景。这个“区域”我们称其为 ViewPort 。(实际上 ViewPort 是强化版的 glViewport() ,它附带了摄像机等其他成员)
为了渲染多个视口,就应该有一个 ViewPort 列表,保存所有的视口。这就是 Scene 里新增的RootViewPort属性。
     public class Scene : IDisposable

     {

         /// <summary>

         /// Root object of all viewports to be rendered in the scene.

         /// </summary>

         [Category(strScene)]

         [Description("Root object of all viewports to be rendered in the scene.")]

         [Editor(typeof(PropertyGridEditor), typeof(UITypeEditor))]

         public ViewPort RootViewPort { get; private set; }

         // other stuff …

     }
为了让视口也能像UIRenderer那样使用ILayout接口的树型布局功能,我们也让ViewPort实现ILayout接口。
     public partial class ViewPort : ILayout<ViewPort>

     {

         private const string viewport = "View Port";

         /// <summary>

         ///

         /// </summary>

         [Category(viewport)]

         [Description("camera of the view port.")]

         [Editor(typeof(PropertyGridEditor), typeof(UITypeEditor))]

         public ICamera Camera { get; private set; }

         /// <summary>

         /// background color.

         /// </summary>

         [Category(viewport)]

         [Description("background color.")]

         public Color ClearColor { get; set; }

         /// <summary>

         /// Rectangle area of this view port.

         /// </summary>

         [Category(viewport)]

         [Description("Rectangle area of this view port.")]

         public Rectangle Rect { get { return new Rectangle(this.location, this.size); } }

         public ViewPort(ICamera camera, AnchorStyles anchor, Padding margin, Size size)

         {

             this.Children = new ChildList<ViewPort>(this);

             this.Camera = camera;

             this.Anchor = anchor;

             this.Margin = margin;

             this.Size = size;

         }

     }
有了这样的设计,CSharpGL在渲染上述效果图时就有了5个视口。如下图所示,其中根结点上的ViewPort.Visible属性为false,表示这个ViewPort不会参与渲染,即不会显示到最终的窗口上。而此根结点下属的4个子结点,各自代表一个ViewPort,他们分别以Top\Front\Left\Perspecitve的角度渲染了一次整个场景,并将渲染结果放置到自己的范围内。
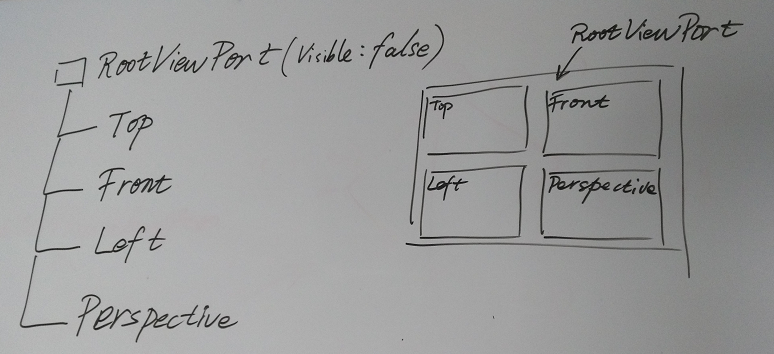
树型结构的ViewPort,其布局就和UIRenderer、Winform控件的布局方式是一样的。你可以像安排控件一样安排ViewPort的Location和Size。因此ViewPort是支持重叠、支持任意多个的。
渲染
有多少个ViewPort,就要渲染多少次。同时,ViewPort修改了glViewport()的值,这个情况也要反映到每个Renderer的渲染过程。
     public partial class Scene

     {

         private object synObj = new object();

         // Render this scene.

         public void Render(RenderModes renderMode,

             bool autoClear = true,

             GeometryType pickingGeometryType = GeometryType.Point)

         {

             lock (this.synObj)

             {

                 // update view port's location and size.

                 this.rootViewPort.Layout();

                 // render scene in every view port.

                 this.RenderViewPort(this.rootViewPort, this.Canvas.ClientRectangle, renderMode, autoClear, pickingGeometryType);

             }

         }

         // Render scene in every view port.

         private void RenderViewPort(ViewPort viewPort, Rectangle clientRectangle, RenderModes renderMode, bool autoClear, GeometryType pickingGeometryType)

         {

             if (viewPort.Enabled)

             {

                 // render in this view port.

                 if (viewPort.Visiable)

                 {

                     viewPort.On();// limit rendering area.

                     // render scene in this view port.

                     this.Render(viewPort, clientRectangle, renderMode, autoClear, pickingGeometryType);

                     viewPort.Off();// cancel limitation.

                 }

                 // render children viewport.

                 foreach (ViewPort item in viewPort.Children)

                 {

                     this.RenderViewPort(item, clientRectangle, renderMode, autoClear, pickingGeometryType);

                 }

             }

         }

     }
坐标系
再次强调一个问题,Winform的坐标系,是以左上角为(0, 0)原点的。OpenGL的窗口坐标系,是以左下角为(0, 0)原点的。
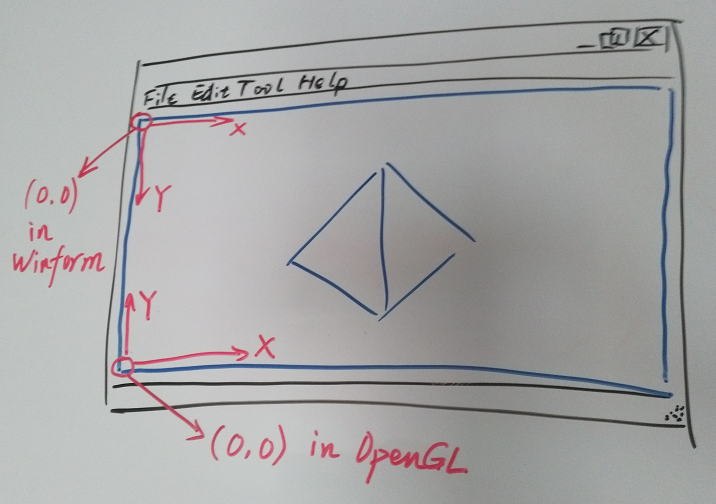
那么一个良好的习惯就是,通过Winform获取的鼠标坐标,应该第一时间转换为OpenGL下的坐标,然后再参与OpenGL的后续计算。等OpenGL部分的计算完毕时,应立即转换回Winform下的坐标。
保持这个好习惯,再遇到鼠标坐标时就不会有便秘的感觉了。
拾取
为了适应新出现的ViewPort功能,原有的Picking功能也要调整了。
之前没有ViewPort树的时候,其本质上是只有一个覆盖整个窗口的'ViewPort'。现在,新出现的ViewPort可能只覆盖窗口的一部分,那么拾取时也要修改为只在这部分内进行。
只在一个ViewPort内拾取
现在有了多个ViewPort。很显然,即使ViewPort之间有重叠,也只应在一个ViewPort内执行Picking操作。因为鼠标不会同时出现在2个地方。即使鼠标位于重叠的部分,也只应在最先(后序优先搜索顺序)接触到的ViewPort上执行Picking操作。
注意,这里先用 int y = clientRectangle.Height - mousePosition.Y - ; 得到了OpenGL坐标系下的鼠标位置,然后才开始OpenGL方面的计算。
     public partial class Scene

     {

         /// <summary>

         /// Get geometry at specified <paramref name="mousePosition"/> with specified <paramref name="pickingGeometryType"/>.

         /// <para>Returns null when <paramref name="mousePosition"/> is out of this scene's area or there's no active(visible and enabled) viewport.</para>

         /// </summary>

         /// <param name="mousePosition">mouse position in Windows coordinate system.(Left Up is (0, 0))</param>

         /// <param name="pickingGeometryType">target's geometry type.</param>

         /// <returns></returns>

         public List<Tuple<Point, PickedGeometry>> Pick(Point mousePosition, GeometryType pickingGeometryType)

         {

             Rectangle clientRectangle = this.Canvas.ClientRectangle;

             // if mouse is out of window's area, nothing picked.

             if (mousePosition.X <  || clientRectangle.Width <= mousePosition.X || mousePosition.Y <  || clientRectangle.Height <= mousePosition.Y) { return null; }

             int x = mousePosition.X;

             int y = clientRectangle.Height - mousePosition.Y - ;

             // now (x, y) is in OpenGL's window cooridnate system.

             Point position = new Point(x, y);

             List<Tuple<Point, PickedGeometry>> allPickedGeometrys = null;

             var pickingRect = new Rectangle(x, y, , );

             foreach (ViewPort viewPort in this.rootViewPort.DFSEnumerateRecursively())

             {

                 if (viewPort.Visiable && viewPort.Enabled && viewPort.Contains(position))

                 {

                     allPickedGeometrys = ColorCodedPicking(viewPort, pickingRect, clientRectangle, pickingGeometryType);

                     break;

                 }

             }

             return allPickedGeometrys;

         }

     }
Picking的过程
Picking的步骤比较长,分支情况也超级多。这里只大体认识一下即可。
首先,如果depth buffer在鼠标所在的像素点上的深度为1(最深),就说明鼠标没有点中任何东西,因此直接返回即可。
然后,我们在给定的 ViewPort 范围内,用color-coded方式渲染一遍整个场景。
然后,用 glReadPixels() 获取鼠标所在位置的颜色值。
最后,由于这个颜色值是与图元的编号一一对应的,我们就可以通过这个颜色值辨认出它到底是属于哪个Renderer里的哪个图元。
         /// <summary>

         /// Pick primitives in specified <paramref name="viewPort"/>.

         /// </summary>

         /// <param name="viewPort"></param>

         /// <param name="pickingRect">rect in OpenGL's window coordinate system.(Left Down is (0, 0)), size).</param>

         /// <param name="clientRectangle">whole canvas' rectangle.</param>

         /// <param name="pickingGeometryType"></param>

         /// <returns></returns>

         private List<Tuple<Point, PickedGeometry>> ColorCodedPicking(ViewPort viewPort, Rectangle pickingRect, Rectangle clientRectangle, GeometryType pickingGeometryType)

         {

             var result = new List<Tuple<Point, PickedGeometry>>();

             // if depth buffer is valid in specified rect, then maybe something is picked.

             if (DepthBufferValid(pickingRect))

             {

                 lock (this.synObj)

                 {

                     var arg = new RenderEventArgs(RenderModes.ColorCodedPicking, clientRectangle, viewPort, pickingGeometryType);

                     // Render all PickableRenderers for color-coded picking.

                     List<IColorCodedPicking> pickableRendererList = Render4Picking(arg);

                     // Read pixels in specified rect and get the VertexIds they represent.

                     List<Tuple<Point, uint>> stageVertexIdList = ReadPixels(pickingRect);

                     // Get all picked geometrys.

                     foreach (Tuple<Point, uint> tuple in stageVertexIdList)

                     {

                         int x = tuple.Item1.X;

                         int y = tuple.Item1.Y;

                         uint stageVertexId = tuple.Item2;

                         PickedGeometry pickedGeometry = GetPickGeometry(arg,

                            x, y, stageVertexId, pickableRendererList);

                         if (pickedGeometry != null)

                         {

                             result.Add(new Tuple<Point, PickedGeometry>(new Point(x, y), pickedGeometry));

                         }

                     }

                 }

             }

             return result;

         }
ColorCodedPicking in view port.
这其中包含了太多的细节,关键详情可参看这6篇介绍(这里,这里,这里,这里,这里,还有这里)
自定义布局方式
虽然ViewPort实现了ILayout接口,但是这难以完成按比例布局的功能。(即:当窗口Size改变时,Top\Front\Left\Perspective始终保持各占窗口1/4大小)
这时可以通过自定义布局的方式来实现这个功能。
具体方法就是自定义 ViewPort.BeforeLayout 和 ViewPort.AfterLayout 事件。
例如,对于Top,我们想让它始终保持在窗口的左上角,且占窗口1/4大小。
        private void Form_Load(object sender, EventArgs e)

        {

           // other stuff ...

           // ‘top’ view port

           var camera = new Camera(

           new vec3(, , ), new vec3(, , ), new vec3(, , ),

           CameraType.Perspecitive, this.glCanvas1.Width, this.glCanvas1.Height);

           ViewPort viewPort = new ViewPort(camera, AnchorStyles.None, new Padding(), new Size());

           viewPort.BeforeLayout += viewPort_BeforeLayout;

           viewPort.AfterLayout += topViewPort_AfterLayout;

           this.scene.RootViewPort.Children.Add(viewPort);

           // other stuff ...

        }

        private void viewPort_BeforeLayout(object sender, System.ComponentModel.CancelEventArgs e)

        {

            // cancel ILayout's layout action for this view port.

            e.Cancel = true;

        }

        private void topViewPort_AfterLayout(object sender, EventArgs e)

        {

            var viewPort = sender as ViewPort;

            ViewPort parent = viewPort.Parent;

            viewPort.Location = new Point( + , parent.Size.Height /  + );

            viewPort.Size = new Size(parent.Size.Width /  - , parent.Size.Height /  - );

        }
如果你查看一下实现了布局机制的 ILayoutHelper 的代码,会发现 e.Cancel = true; 这句话取消了 ILayout 对此 ViewPort 的布局操作。(我们要自定义布局操作,因此ILayout原有的布局操作就没有必要实施了。)
         public static void Layout<T>(this ILayout<T> node) where T : ILayout<T>

         {

             ILayout<T> parent = node.Parent;

             if (parent != null)

             {

                 bool cancelTreeLayout = false;

                 var layoutEvent = node.Self as ILayoutEvent;

                 if (layoutEvent != null)

                 { cancelTreeLayout = layoutEvent.DoBeforeLayout(); }

                 if (!cancelTreeLayout)

                 { NonRootNodeLayout(node, parent); }

                 if (layoutEvent != null)

                 { layoutEvent.DoAfterLayout(); }

             }

             foreach (T item in node.Children)

             {

                 item.Layout();

             }

             if (parent != null)

             {

                 node.ParentLastSize = parent.Size;

             }

         }
总结
ViewPort在Scene里是一个树型结构,支持ILayout布局和Before/AfterLayout自定义布局。有一个Visible的ViewPort,场景就要渲染一次。
CSharpGL(35)用ViewPort实现类似3DMax那样的把一个场景渲染到4个视口的更多相关文章
- VC++环境下单文档SDI与OpenGL多视图分割窗口的实现-类似3DMAX的主界面
本文主要讲述如何在VC++环境下实现单文档SDI与OpenGL多视图分割窗口,最终的界面类似3DMAX的主界面.首先给出我实现的效果图: 整个实现过程网络上有很多零散的博文,请各位自行搜索,在基于对话 ...
- CSharpGL(34)以从零编写一个KleinBottle渲染器为例学习如何使用CSharpGL
CSharpGL(34)以从零编写一个KleinBottle渲染器为例学习如何使用CSharpGL +BIT祝威+悄悄在此留下版了个权的信息说: 开始 本文用step by step的方式,讲述如何使 ...
- 如何使weblogic11g类似weblogic923一样统一使用一个boot.properties文件
如何使weblogic11g类似weblogic923一样 统一使用一个boot.properties文件 1.在weblogic域下创建文件boot.properties输入用户密码例如:usern ...
- 使用three.js加载3dmax资源,以及实现场景中的阴影效果
使用three.js可以方便的让我们在网页中做出各种不同的3D效果.如果希望2D绘图内容,建议使用canvas来进行.但很多小伙伴不清楚到底如何为我们绘制和导入的图形添加阴影效果,更是不清楚到底如何导 ...
- BIT祝威博客汇总(Blog Index)
+BIT祝威+悄悄在此留下版了个权的信息说: 关于硬件(Hardware) <穿越计算机的迷雾>笔记 继电器是如何成为CPU的(1) 继电器是如何成为CPU的(2) 关于操作系统(Oper ...
- 模拟Paxos算法及其简单学习总结
一.导读 Paxos算法的流程本身不算很难,但是其推导过程和证明比较难懂.在Paxos Made Simple[1]中虽然也用了尽量简化的流程来解释该算法,但其实还是比较抽象,而且有一些细节问题没有交 ...
- CSharpGL(2)设计和使用场景元素及常用接口
CSharpGL(2)设计和使用场景元素及常用接口 2016-08-13 由于CSharpGL一直在更新,现在这个教程已经不适用最新的代码了.CSharpGL源码中包含10多个独立的Demo,更适合入 ...
- CSharpGL(1)从最简单的例子开始使用CSharpGL
CSharpGL(1)从最简单的例子开始使用CSharpGL 2016-08-13 由于CSharpGL一直在更新,现在这个教程已经不适用最新的代码了.CSharpGL源码中包含10多个独立的Demo ...
- CSharpGL(53)漫反射辐照度
CSharpGL(53)漫反射辐照度 本系列将通过翻译(https://learnopengl.com)这个网站上关于PBR的内容来学习PBR(Physically Based Rendering). ...
随机推荐
- 关于.NET异常处理的思考
年关将至,对于大部分程序员来说,马上就可以闲下来一段时间了,然而在这个闲暇的时间里,唯有争论哪门语言更好可以消磨时光,估计最近会有很多关于java与.net的博文出现,我表示要作为一个吃瓜群众,静静的 ...
- 【.net 深呼吸】细说CodeDom(3):命名空间
在上一篇文章中,老周介绍了表达式和语句,尽管老周没有把所有的内容都讲一遍,但相信大伙至少已经掌握基本用法.在本文中,咱们继续探讨 CodeDom 方面的奥秘,这一次咱们聊聊命名空间. 在开始之前,老周 ...
- 9、 Struts2验证(声明式验证、自定义验证器)
1. 什么是Struts2 验证器 一个健壮的 web 应用程序必须确保用户输入是合法.有效的. Struts2 的输入验证 基于 XWork Validation Framework 的声明式验证: ...
- STM32F429 LCD程序移植
STM32F429自带LCD驱动器,这一具有功能给我等纠结于屏幕驱动的程序员带来了很大的福音.有经验的读者一定有过这样的经历,用FSMC驱动带由控制器的屏幕时候,一旦驱动芯片更换,则需要重新针对此驱动 ...
- iOS之开发中常用的颜色及其对应的RGB值
R G B 值 R G B 值 R G B 值 黑色 0 0 0 #000000 黄色 255 255 0 #FFFF00 浅灰蓝色 176 224 230 #B0E0E6 象牙黑 41 ...
- Atitit.研发团队的管理原则---立长不立贤与按资排辈原则
Atitit.研发团队的管理原则---立长不立贤与按资排辈原则 1. 组织任命原则概述1 2. 历史的角度看,大部分组织使用的立长不立贤原则1 3. 论资排辈 立长不立贤原则1 3.1. 资格和辈分是 ...
- mysql删除重复记录语句的方法
例如: id name value 1 a pp 2 a pp 3 b iii 4 b pp 5 b pp 6 c pp 7 c pp 8 c iii id是主键 要求得到这样的结果 id name ...
- MMORPG大型游戏设计与开发(攻击区域 扇形)
距离上次发布已经有了很长一段时间,期间由于各种原因没有更新这方面的技术分享,在这里深表遗憾.在MMO或其他的游戏中,会有针对各种形状的计算,通常在攻击区域里不会很复杂,常见的为矩形.圆形.扇形.今天分 ...
- 【python之路3】if 语句
1.if语句用法(if....else....) #!/usr/bin/env python # -*- coding:utf-8 -*- my_name = raw_input("plea ...
- MonoDevelop 4.2.2/Mono 3.4.0 in CentOS 6.5 安装笔记
MonoDevelop 4.2.2/Mono 3.4.0 in CentOS 6.5 安装笔记 说明 以root账户登录Linux操作系统,注意:本文中的所有命令行前面的 #> 表示命令行提示符 ...