
通过ldap验证svn服务
1、简单介绍:
这里需要介绍一点的就是svn服务器的验证是需要通过SASL机制的,那么SASL全称为(Simple Authentication and security Layer),是一种用来扩充C/S模式验证能力的机制。
SASL是一个胶合库,通过这个库把应用层与形式多样的认证系统整合在一起,这有点类似于PAM,但是后者是认证方式,决定什么人可以访问什么服务,而SASL是认证过程,侧重于信任建立过程,这个过程可以调用PAM来建立信任关系。
1.1、安装:
[root@ldap-server ~]# yum -y install sasl*  #安装sasl

[root@ldap-server ~]# rpm -qa |grep sasl   #查看安装的软件

saslwrapper-0.14-1.el6.x86_64

cyrus-sasl-lib-2.1.23-13.el6_3.1.x86_64

cyrus-sasl-2.1.23-13.el6_3.1.x86_64

cyrus-sasl-devel-2.1.23-13.el6_3.1.x86_64

saslwrapper-devel-0.14-1.el6.x86_64

cyrus-sasl-plain-2.1.23-13.el6_3.1.x86_64

[root@ldap-server ~]# saslauthd -v  #查看sasl支持的东西

saslauthd 2.1.23

authentication mechanisms: getpwent kerberos5 pam rimap shadow ldap

[root@ldap-server ~]# grep -i mech /etc/sysconfig/saslauthd  #过滤需要修改 的内容

# Mechanism to use when checking passwords.  Run "saslauthd -v" to get a list

# of which mechanism your installation was compiled with the ablity to use.

MECH=pam

# Options sent to the saslauthd. If the MECH is other than "pam" uncomment the next line.

[root@ldap-server ~]# sed -i "s#MECH=pam#MECH=shadow#g"  /etc/sysconfig/saslauthd   #修改需要的内容

[root@ldap-server ~]# grep -i mech /etc/sysconfig/saslauthd   #查看修改后的 结果

# Mechanism to use when checking passwords.  Run "saslauthd -v" to get a list

# of which mechanism your installation was compiled with the ablity to use.

MECH=shadow

# Options sent to the saslauthd. If the MECH is other than "pam" uncomment the next line.

[root@ldap-server ~]# /etc/init.d/saslauthd start   #启动sasl

Starting saslauthd:                      [  OK  ]

[root@ldap-server ~]# ps -ef|grep sasl   #查看启动后的进程

root      20549      1  0 09:35 ?        00:00:00 /usr/sbin/saslauthd -m /var/run/saslauthd -a shadow

root      20551  20549  0 09:35 ?        00:00:00 /usr/sbin/saslauthd -m /var/run/saslauthd -a shadow

root      20552  20549  0 09:35 ?        00:00:00 /usr/sbin/saslauthd -m /var/run/saslauthd -a shadow

root      20553  20549  0 09:35 ?        00:00:00 /usr/sbin/saslauthd -m /var/run/saslauthd -a shadow

root      20554  20549  0 09:35 ?        00:00:00 /usr/sbin/saslauthd -m /var/run/saslauthd -a shadow
1.2、测试认证系统用户(可以不用操作):
[root@ldap-server ~]# useradd xyyp  #创建系统用户

[root@ldap-server ~]# passwd xyyp   #设置密码

[root@ldap-server ~]# testsaslauthd -uxyyp -p123123   #认证用户

0: NO "authentication failed"   #这里明明创建了系统用户并且/etc/sysconfig/saslauthd里面的pam也改成了shadow,但还是认证失败,这里需要使用命令:setsebool -P allow_saslauthd_read_shadow 1

[root@ldap-server ~]# testsaslauthd -uxyyp -p123123  #再次认证用户

0: OK "Success."
1.3、切换成ldap认证:
[root@ldap-server ~]# sed -i "s#MECH=shadow#MECH=ldap#g" /etc/sysconfig/saslauthd    #把shadow改为ldap

[root@ldap-server ~]# /etc/init.d/saslauthd restart   #重启服务

Stopping saslauthd:                         [  OK  ]

Starting saslauthd:                         [  OK  ]

[root@ldap-server ~]# grep -i mech /etc/sysconfig/saslauthd   #查看结果

# Mechanism to use when checking passwords.  Run "saslauthd -v" to get a list

# of which mechanism your installation was compiled with the ablity to use.

MECH=ldap

# Options sent to the saslauthd. If the MECH is other than "pam" uncomment the next line.

[root@ldap-server ~]# vim /etc/saslauthd.conf   #编辑配置文件添加下面内容

ldap_sercers: ldap://xyanp.org/

#ldap_uri: ldap://ldap.xyp.xyanp.org/

#ldap_version: 3

#ldap_start_tls: 0

ldap_bind_dn: cn=admin,dc=xyanp,dc=org

ldap_bind_pw: xyp

ldap_search_base: ou=People,dc=xyanp,dc=org

ldap_filter: uid=%U

#ldap_filter: mail=%U@xyanp.org

ldap_password_attr: userPassword

#ldap_sasl: 0

"/etc/saslauthd.conf" 12L, 327C written

[root@ldap-server ~]# /etc/init.d/saslauthd restart   #重启服务

Stopping saslauthd:                         [  OK  ]

Starting saslauthd:                         [  OK  ]

[root@ldap-server ~]# testsaslauthd -uxyp -p123456   #测试认证ldap的用户

0: OK "Success."
搭建svn服务器,并保证能正常运行(不在详细赘述)。
用ldap的用户对svn进行测试:
[root@ldap-server svndata]# svn up svn://10.10.10.90/asdoc ./ --username=xyp --password=123456   #将svn账户换成ldap里的用户和密码

svn: warning: cannot set LC_CTYPE locale

svn: warning: environment variable LANG is EN

svn: warning: please check that your locale name is correct

Skipped 'svn://10.10.10.90/asdoc'

Authentication realm: <svn://10.10.10.90:3690> 5a20e44e-42c6-42cb-841a-590b02c4e94d

Username:    #会提示输入用户名和密码,证明ldap的用户是不好使的

[root@ldap-server svndata]# vim /etc/sasl2/svn.conf   #编辑一个配置文件,添加下面内容

pwcheck_method: saslauthd

mech_list: PLAIN LOGIN

[root@ldap-server asdoc]# cd /app/svndata/asdoc/conf/  #切换到svn的配置目录

[root@ldap-server conf]# sed -i "s/# use-sasl = true/use-sasl = true/g" svnserve.conf    #修改一个参数

[root@ldap-server conf]# grep use-sasl svnserve.conf   #查看修改结果

use-sasl = true

[root@ldap-server conf]# pkill svn  #杀掉svn

[root@ldap-server conf]# ps -ef|grep svn   #查看

root      20847   8217  0 11:03 pts/0    00:00:00 grep svn

[root@ldap-server conf]# svnserve -d -r /app/svndata/   #重新启动svn

[root@ldap-server conf]# ps -ef|grep svn   #查看结果

root      20849   1  0 11:03 ?   00:00:00 svnserve -d -r /app/svndata/

root      20851   8217  0 11:03 pts/0    00:00:00 grep svn

[root@ldap-server conf]# svn co svn://10.10.10.90/asdoc /svndata --username=xyp --password=123456    #使用ldap的用户名密码做同步

-----------------------------------------------------------------------

ATTENTION!  Your password for authentication realm:

   <svn://10.10.10.90:3690> 5a20e44e-42c6-42cb-841a-590b02c4e94d

can only be stored to disk unencrypted!  You are advised to configure

your system so that Subversion can store passwords encrypted, if

possible.  See the documentation for details.

You can avoid future appearances of this warning by setting the value

of the 'store-plaintext-passwords' option to either 'yes' or 'no' in

'/root/.subversion/servers'.

-----------------------------------------------------------------------

Store password unencrypted (yes/no)? yes    #提示让保存密码,表示成功
1.4、windows客户端测试:
新建一个文件夹,右键进行checkout,弹出下面对话框:
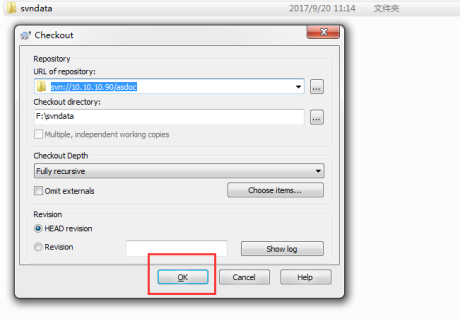
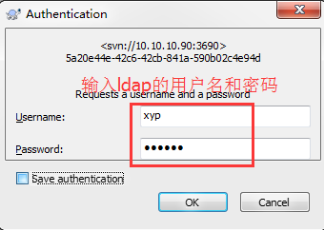
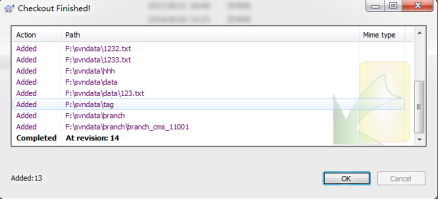
=================================================================================到此ldap验 证svn完成
1.5、备注:
虽然ldap认证成功了,但是svn的用户管理还是要在authz这个文件里面进行管理的,比如权限,如果再ldap上创建了一个用户,则需要在authz文件里面进行授权r或w权限,如果多个用户的话,则可以建个组,直接给组授权。
通过ldap验证svn服务的更多相关文章
- 管理员技术(五): 配置文档的访问权限、 配置附加权限、绑定到LDAP验证服务、配置LDAP家目录漫游
一.配置文档的访问权限 问题: 本例要求将文件 /etc/fstab 拷贝为 /var/tmp/fstab,并调整文件 /var/tmp/fstab的权限,满足以下要求: 1> 此文件的拥有者 ...
- Linux下搭建SVN服务
SVN有几种方式进行访问,比较常见的是通过自带协议访问(svn://),配置很简单,还有一种就是http协议访问,需要结合apache服务,配置相对繁琐. 安装svn yum -y install s ...
- CentOS(Linux) - SVN使用笔记(一) - 安装SVN过程及开启和关闭svn服务指令
1.安装: yum install httpd httpd-devel subversion mod_dav_svn mod_auth_mysql yum remove subversion 删除旧版 ...
- window、linux安装jdk,excel 导入oracle,WebService,window 端口查看,svn服务安装,oracle用户解锁
内存泄露分析插件http://download.eclipse.org/mat/1.3/update-site/birt插件http://download.eclipse.org//birt/upda ...
- 部署harbor1.2.0开启ldap验证
就harbor本身部署来说是非常简单的,之前写过详细步骤,这里不再重复. 这里主要是总结一下部署当中遇到的问题,以及如何开启ldap验证. harbor默认是通过http通信的,当然也支持https, ...
- 【SVN】Linux搭建SVN服务
1.yum安装svn yum install -y subversion 日志打印 Loaded plugins: fastestmirror Determining fastest mirrors ...
- 手动配置SVN服务
现在理论上是不用手动添加,娘的一路下一步总是有问题,备份一个. 1 安装svnservice(是一个服务) a 在Windows NT中本身包含了一个安装服务的工具"Service C ...
- svn服务,svnserve开机启动
在服务器(我的环境是centos6.5)上部署完svn之后,一般都希望每次重启的时候svn服务能够随着启动.上网搜索了一下,一般有两种做法: 一.启动脚本+/etc/rc.local启动 1. 在某个 ...
- Linux中如何安装配置Mysql和SVN服务端
目标Linux系统为centOS 一.安装登陆mysql 1.直接以root用户运行:yum install mysql 和yum install mysql-server等带安装完成. 2.安装 ...
随机推荐
- c++学习中的疑问
1.关于iostream头文件中的cout对象没有包含对string的<<操作符重载函数 测试代码: #include<iostream> using namespace st ...
- 多线程系列之自己实现一个 lock 锁
我们面试中经常会被问到多线程相关知识,这一块内容往浅了说大家都会,但是一问到底层实现原理,我们往往就一脸懵逼. 这段时间准备好好学习多线程,接下来会写一系列关于多线程的知识. 我们首先要了解线程,百度 ...
- 对C语言指针的理解
一个小程序引发对于C语言指针的思考: #include <bits/stdc++.h> using namespace std; void my_swap (int* a,int* b) ...
- HTML下标签之应用
<!doctype html><html lang="en"> <head> <meta charset="UTF-8" ...
- C# 中String.Join()方法
今天在工作中看到了组里一个大佬写的代码,感触颇多,同样实现一个需求,我写循环费了老大劲,代码又臭又长,大佬的代码简洁明了,三行搞定...不得不说,今天赚大了 简单总结一下今天赚到的知识 string里 ...
- Spock - Document -05 - Extensions
Extensions Peter Niederwieser, The Spock Framework TeamVersion 1.1 Spock comes with a powerful exten ...
- python 编写登陆接口
#!/usr/bin/env python#_*_ coding:utf-8 _*_dic={ 'yts':{'password':'123','count':0}, 'nick':{'passwor ...
- (转)python中函数参数中如果带有默认参数list的特殊情况
在python中函数参数中如果带有默认参数list遇到问题 先看一段代码 1 2 3 4 5 6 7 8 9 def f(x,l=[]): for i in range(x): ...
- 使用Websocket与服务器建立连接
handleMessage = () => { const url = '////'; //某url const token = getCookie('xnToken');//向后端发请求得登陆 ...
- VUE路由携带参数的三种方式
vue 通过路由在进行页面跳转时,会经常携带参数用于同步页面间的数据 路由中携带参数的方式总结如下: 路由定义示例: { name: 'list', path: '/list', component: ...