AspectJ用注解替换xml配置
AspectJ基于注解的使用
AspectJ简介
AspectJ是一个基于Java语言的AOP框架,一般
其主要用途:自定义开发
一般情况下spring自动生成代理,要配置aop,
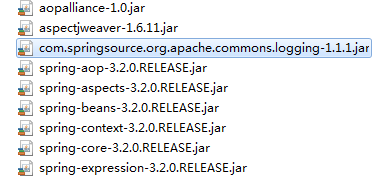
首先确定目标类,aspectj 切入点表达式,需要导入jar包
spring-framework-3.0.2.RELEASE-dependencies\org.aspectj\com.springsource.org.aspectj.weaver\1.6.8.RELEASE
除了以上这个关键包,还有spring所需的5个基础包,以及其他三个包,具体情况如下图:
在xml文件中需要配置扫描注解类
<?xml version="1.0" encoding="UTF-8"?>

<beans xmlns="http://www.springframework.org/schema/beans"

       xmlns:xsi="http://www.w3.org/2001/XMLSchema-instance"

       xmlns:aop="http://www.springframework.org/schema/aop"

       xmlns:context="http://www.springframework.org/schema/context"

       xsi:schemaLocation="http://www.springframework.org/schema/beans

                              http://www.springframework.org/schema/beans/spring-beans.xsd

                              http://www.springframework.org/schema/aop

                              http://www.springframework.org/schema/aop/spring-aop.xsd

                              http://www.springframework.org/schema/context

                              http://www.springframework.org/schema/context/spring-context.xsd">

        <!-- 1.扫描 注解类 -->

    <context:component-scan base-package="com.xk.proxy.aspectJ_zhujie"></context:component-scan>

</beans>
接着在service层用注解替换原先xml文件中的Bean
@Service("userServiceId")

public class UserServiceImpl implements UserService {

}
替换
<bean id="userServiceId" class="xxx.xxx.UserServiceImpl"></bean>
在切面类中用注解替换相应Bean
@Component

public class MyAspect {

    }
替换
<bean id="myAspectId" class="xxx.xxx.xxx.aspectJ.MyAspect"></bean>
接着必须要进行aspectj 自动代理配置,否则即使声明了切面,也无法获取切面类中的方法
<!-- 1.扫描 注解类 -->

<context:component-scan base-package="xxx.xxx.xxx.aspectJ_zhujie"></context:component-scan>
添加注解@Aspect ,声明切面,以获取切面方法
@Component

@Aspect

public class MyAspect {

    }
注解@Aspect替换了
<aop:aspect ref="myAspectId">
<aop:aspect> 将切面类 声明“切面”,从而获得通知(方法) ref 切面类引用
接着替换 公共切入点
<aop:pointcut expression="execution(* xxx.xxx.proxy.aspectJ.UserServiceImpl.*(..))" id="myPointCut"/>
这里涉及到了切入点表达式
execution()用于描述方法
语法:execution(修饰符 返回值 包.类.方法名(参数) throws异常)
修饰符,一般省略
返回值,不能省略,
方法名,不能省略
‘ * ’表示任意
(参数)
() 表示无参
(..) 表示参数任意
用注解替换为
//声明公共切入点

@Pointcut("execution(* xxx.xxx.proxy.aspectJ.UserServiceImpl.*(..))")

private void myPointCut(){

}
这里我用的是环绕通知类型,所以替换环绕
<aop:around method="myAround" pointcut-ref="myPointCut"/>
@Around(value = "myPointCut()")

public Object myAround(ProceedingJoinPoint joinPoint) throws Throwable{

        System.out.println("前");

        //手动执行目标方法

        Object obj = joinPoint.proceed();

        System.out.println("后");

        return obj;

    }
最后替换抛出异常
<aop:after-throwing method="myAfterThrowing" pointcut="execution(* xxx.xxx.UserServiceImpl.*(..))" throwing="e"/>
@AfterThrowing(value="execution(* xxx.xxx.UserServiceImpl.*(..))" ,throwing="e")

public void myAfterThrowing(JoinPoint joinPoint,Throwable e){

    System.out.println("抛出异常通知 : " + e.getMessage());

  }
最终切面类:
/**

 * 切面类,可含有多个通知

 */

@Component

@Aspect

public class MyAspect {

    //切入点当前有效

    //@Before("execution(*xxx.xxx.UserServiceImpl.*(..))")

    public void myBefore(JoinPoint joinPoint){

        System.out.println("前置通知 : " + joinPoint.getSignature().getName());

    }

    //声明公共切入点

    @Pointcut("execution(*xxx.xxx.UserServiceImpl.*(..))")

    private void myPointCut(){

    }

//  @AfterReturning(value="myPointCut()" ,returning="ret")

    public void myAfterReturning(JoinPoint joinPoint,Object ret){

        System.out.println("后置通知 : " + joinPoint.getSignature().getName() + " , -->" + ret);

    }

//  @Around(value = "myPointCut()")

    public Object myAround(ProceedingJoinPoint joinPoint) throws Throwable{

        System.out.println("前");

        //手动执行目标方法

        Object obj = joinPoint.proceed();

        System.out.println("后");

        return obj;

    }

//  @AfterThrowing(value="execution(* xxx.xxx.UserServiceImpl.*(..))" ,throwing="e")

    public void myAfterThrowing(JoinPoint joinPoint,Throwable e){

        System.out.println("抛出异常通知 : " + e.getMessage());

    }

    @After("myPointCut()")

    public void myAfter(JoinPoint joinPoint){

        System.out.println("最终通知");

    }

}
最终spring配置:
<!-- 1.扫描 注解类 -->

<context:component-scan base-package="com.xk.proxy.aspectJ_zhujie"></context:component-scan>

<!-- 2.确定 aop注解生效 -->

<aop:aspectj-autoproxy></aop:aspectj-autoproxy>
aop注解总结:
@Aspect 声明切面,修饰切面类,从而获得 通知。
通知
@Before 前置
@AfterReturning 后置
@Around 环绕
@AfterThrowing 抛出异常
@After 最终
切入点
@PointCut ,修饰方法 private void xxx(){} 之后通过“方法名”获得切入点引用
AspectJ用注解替换xml配置的更多相关文章
- Spring使用AspectJ注解和XML配置实现AOP
本文演示的是Spring中使用AspectJ注解和XML配置两种方式实现AOP 下面是使用AspectJ注解实现AOP的Java Project首先是位于classpath下的applicationC ...
- @ComponentScan注解及其XML配置
开发中会经常使用包扫描,只要标注了@Controller.@Service.@Repository,@Component 注解的类会自动加入到容器中,ComponentScan有注解和xml配置两种方 ...
- [spring]Bean注入——使用注解代替xml配置
使用注解编程,主要是为了替代xml文件,使开发更加快速. 一.使用注解前提: <?xml version="1.0" encoding="UTF-8"?& ...
- mybatis使用注解替代xml配置,动态生成Sql
mybatis使用注解替代xml配置时,遇到判断条件是否为null或者为空时,@Select很难搞定,不知道怎么办? mybatis3中增加了使用注解来配置Mapper的新特性,使用 SelectPr ...
- Spring基础篇——通过Java注解和XML配置装配bean
自动化装配的确有很大的便利性,但是却并不能适用在所有的应用场景,比如需要装配的组件类不是由自己的应用程序维护,而是引用了第三方的类库,这个时候自动装配便无法实现,Spring对此也提供了相应的解决方案 ...
- 注解 和 xml 配置的优缺点【转】
java annotation(注解) 的优点缺点 Annotation和xml各自作为配置项的优点与缺点. Annotation 一.Annotation 的优点 1.保存在 class 文件中,降 ...
- Spring_Task初探(注解,XML配置)
这几天想写一个动态添加任务项目找了找Spring下的自带定时功能发现还真有,然后网上找了找资料写了个demo 写了两种方式来执行定时的任务(XML配置和注解) 先建两个普通的任务类(XML配置调用的任 ...
- Spring基础篇——通过Java注解和XML配置装配bean(转载)
作者:陈本布衣 出处:http://www.cnblogs.com/chenbenbuyi 本文版权归作者和博客园共有,欢迎转载分享,但必须保留此段声明,且在文章页面明显位置给出原文链接,否则保留 ...
- 【SSH网上商城项目实战02】基本增删查改、Service和Action的抽取以及使用注解替换xml
转自:https://blog.csdn.net/eson_15/article/details/51297698 上一节我们搭建好了Struts2.Hibernate和Spring的开发环境,并成功 ...
随机推荐
- socket.setSoTimeout(1000);
这个用来设置与socket的inputStream相关的read操作阻塞的等待时间,超过设置的时间了,假如还是阻塞状态,会抛出异常java.net.SocketTimeoutException: Re ...
- 转://云和恩墨的两道Oracle面试题
真题1. 对于一个NUMBER(1)的列,如果查询中的WHERE条件分别是大于3和大于等于4,那么这二者是否等价? 答案:首先对于查询结果而言,二者没有任何区别.从这一点上讲无论是指定大于3还是指定大 ...
- 微信硬件平台(八) 3 ESP8266向微信服务器请求设备绑定的用户
https://api.weixin.qq.com/device/get_openid?access_token=自己申请微信token&device_type=gh_e93c1b3098b9 ...
- pg安装入门
1.下载源码安装包 [root@test2019030517 ~]# wget https://ftp.postgresql.org/pub/source/v10.5/postgresql-10.5. ...
- appium-基本操作的再次封装(加上文件路径、log、截图、异常处理)
一:日志 二:文件路径 三:截图 四:异常处理(对基本操作,例如:等待元素出现.点击.按键灯进行封装.加上截图和日志记录)
- day08--文件操作(2)
一.with open(): 形式:with open('文件路径(文件名)','文件操作方式','字符编码方式')as 文件别名: with open操作可以将文件的内存释放交给with 管理,wi ...
- 《Python神经网络编程》中文版PDF+英文版PDF+源代码,业界良心书
下载:https://pan.baidu.com/s/1hI6wMPq4UFvEmpgF3ZV1jg 关于内容 这本书主要揭示神经网络背后的概念,并介绍如何通过Python实现神经网络.全书主要讲了三 ...
- 立足中国,走向世界(Made in China, Go to World)
FineUI一路走来已经历经 9 年的风风雨雨,拥有国内最为广泛的捐赠群体(1500多位),和众多企业客户的青睐(200多家). 今天,我们很高兴的宣布:FineUI英文版上线了! FineUI英文版 ...
- iOS开发简记(6):storyboard的使用
从xib到storyboard,iOS界面开发的方式在变化. 这里记录怎么使用storyboard来完成简单的界面开发,比如实现一个“我”的简单界面. (1)新建storyboard 在新建文件向导中 ...
- A short Glimpse to Spectral Sequences 快速入坑谱序列(英文)
In this short paper with a few of page (but a lot of language mistake), I want to introduce the theo ...