
spring-boot-2.0.3启动源码篇五 - run方法(四)之prepareContext
前言
此系列是针对springboot的启动,旨在于和大家一起来看看springboot启动的过程中到底做了一些什么事。如果大家对springboot的源码有所研究,可以挑些自己感兴趣或者对自己有帮助的看;但是如果大家没有研究过springboot的源码,不知道springboot在启动过程中做了些什么,那么我建议大家从头开始一篇一篇按顺序读该系列,不至于从中途插入,看的有些懵懂。当然,文中讲的不对的地方也欢迎大家指出,有待改善的地方也希望大家不吝赐教。老规矩:一周至少一更,中途会不定期的更新一些其他的博客,可能是springboot的源码,也可能是其他的源码解析,也有可能是其他的。
路漫漫其修远兮,吾将上下而求索!
github:https://github.com/youzhibing
码云(gitee):https://gitee.com/youzhibing
前情回顾
大家还记得上篇博文讲了什么吗,或者说大家知道上篇博文讲了什么吗。这里帮大家做个简单回顾:
创建web应用上下文,对其部分属性:reader、scanner、beanFactory进行了实例化;reader中实例化了属性conditionEvaluator;scanner中添加了两个AnnotationTypeFilter:一个针对@Component,一个针对@ManagedBean;beanFactory中注册了8个注解配置处理器的Bean。应用上下文类型实际上是AnnotationConfigServletWebServerApplicationContext,beanFactory的类型是DefaultListableBeanFactory,这两个类型的类图大家重点看下,既是上篇博文的重点,也是接下来系列博客的基点。创建上下文的过程其实还创建了environment,本文中会涉及到environment,大家请留意。
通过createApplicationContext方法之后,context的包含的主要内容如下:

prepareContext
先欣赏下我们的战绩,看看我们对run方法完成了多少的源码解读
/**

 * Run the Spring application, creating and refreshing a new

 * {@link ApplicationContext}.

 * @param args the application arguments (usually passed from a Java main method)

 * @return a running {@link ApplicationContext}

 */

public ConfigurableApplicationContext run(String... args) {

    // 秒表,用于记录启动时间;记录每个任务的时间,最后会输出每个任务的总费时

    StopWatch stopWatch = new StopWatch();

    stopWatch.start();

    // spring应用上下文,也就是我们所说的spring根容器

    ConfigurableApplicationContext context = null;

    // 自定义SpringApplication启动错误的回调接口

    Collection<SpringBootExceptionReporter> exceptionReporters = new ArrayList<>();

    // 设置jdk系统属性java.awt.headless,默认情况为true即开启

    configureHeadlessProperty();

    // 获取启动时监听器(EventPublishingRunListener实例)

    SpringApplicationRunListeners listeners = getRunListeners(args)

    // 触发ApplicationStartingEvent事件,启动监听器会被调用,一共5个监听器被调用,但只有两个监听器在此时做了事

    listeners.starting();

    try {

        // 参数封装,也就是在命令行下启动应用带的参数,如--server.port=9000

        ApplicationArguments applicationArguments = new DefaultApplicationArguments(

                args);

        // 准备环境:1、加载外部化配置的资源到environment;2、触发ApplicationEnvironmentPreparedEvent事件

        ConfigurableEnvironment environment = prepareEnvironment(listeners,

                applicationArguments);

        // 配置spring.beaninfo.ignore,并添加到名叫systemProperties的PropertySource中;默认为true即开启

        configureIgnoreBeanInfo(environment);

        // 打印banner图

        Banner printedBanner = printBanner(environment);

        // 创建应用上下文,并实例化了其三个属性:reader、scanner和beanFactory

        context = createApplicationContext();

        // 获取异常报道器,即加载spring.factories中的SpringBootExceptionReporter实现类

        exceptionReporters = getSpringFactoriesInstances(

                SpringBootExceptionReporter.class,

                new Class[] { ConfigurableApplicationContext.class }, context);

        // 准备上下文,本文重点

        prepareContext(context, environment, listeners, applicationArguments,

                printedBanner);

        refreshContext(context);

        afterRefresh(context, applicationArguments);

        stopWatch.stop();

        if (this.logStartupInfo) {

            new StartupInfoLogger(this.mainApplicationClass)

                    .logStarted(getApplicationLog(), stopWatch);

        }

        listeners.started(context);

        callRunners(context, applicationArguments);

    }

    catch (Throwable ex) {

        handleRunFailure(context, ex, exceptionReporters, listeners);

        throw new IllegalStateException(ex);

    }

    try {

        listeners.running(context);

    }

    catch (Throwable ex) {

        handleRunFailure(context, ex, exceptionReporters, null);

        throw new IllegalStateException(ex);

    }

    return context;

}
前菜
exceptionReporters = getSpringFactoriesInstances(SpringBootExceptionReporter.class,new Class[] { ConfigurableApplicationContext.class }, context);
getSpringFactoriesInstances这个方法在之前已经讲过,就是加载META-INF/spring.factories中指定类型的bean集合。如下图
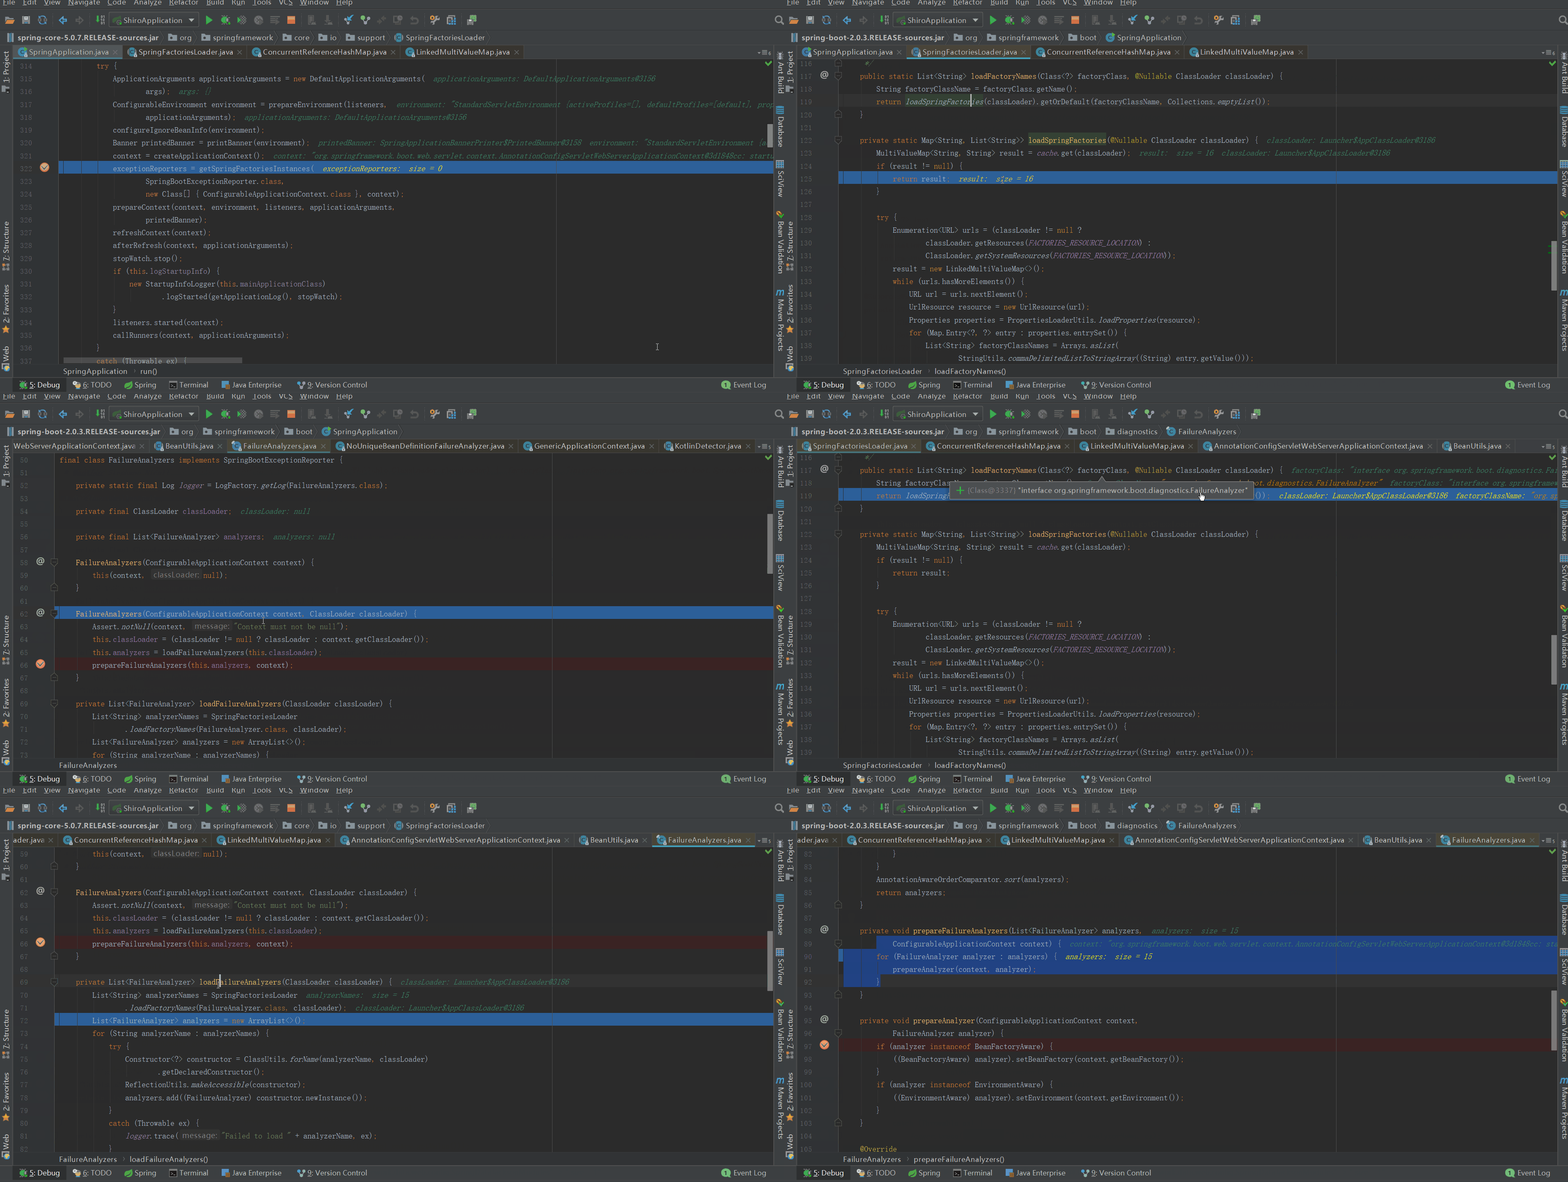
SpringBootExceptionReporter是一个回调接口,用于支持对SpringApplication启动错误的自定义报告。
先根据SpringBootExceptionReporter获取FailureAnalyzers的全限定类名,实例化FailureAnalyzers的时候,再次调用SpringFactoriesLoader.loadFactoryNames方法获取类型为FailureAnalyzer的名称列表,然后再根据名称列表实例化bean列表。
bean列表创建好之后,设置bean列表中满足条件的bean的beanFactory和environment,同时也将部分bean应用到context的environment和beanFactory中,代码如下
private void prepareFailureAnalyzers(List<FailureAnalyzer> analyzers,

        ConfigurableApplicationContext context) {

    for (FailureAnalyzer analyzer : analyzers) {

        prepareAnalyzer(context, analyzer);

    }

}

private void prepareAnalyzer(ConfigurableApplicationContext context,

        FailureAnalyzer analyzer) {

    if (analyzer instanceof BeanFactoryAware) {

        ((BeanFactoryAware) analyzer).setBeanFactory(context.getBeanFactory());

    }

    if (analyzer instanceof EnvironmentAware) {

        ((EnvironmentAware) analyzer).setEnvironment(context.getEnvironment());

    }

}
其中NoSuchBeanDefinitionFailureAnalyer bean的setBeanFactory方法
@Override

public void setBeanFactory(BeanFactory beanFactory) throws BeansException {

    Assert.isInstanceOf(ConfigurableListableBeanFactory.class, beanFactory);

    this.beanFactory = (ConfigurableListableBeanFactory) beanFactory;

    this.metadataReaderFactory = new CachingMetadataReaderFactory(

            this.beanFactory.getBeanClassLoader());

    // Get early as won't be accessible once context has failed to start

    this.report = ConditionEvaluationReport.get(this.beanFactory);        // 往beanFactory中注册autoConfigurationReport

}
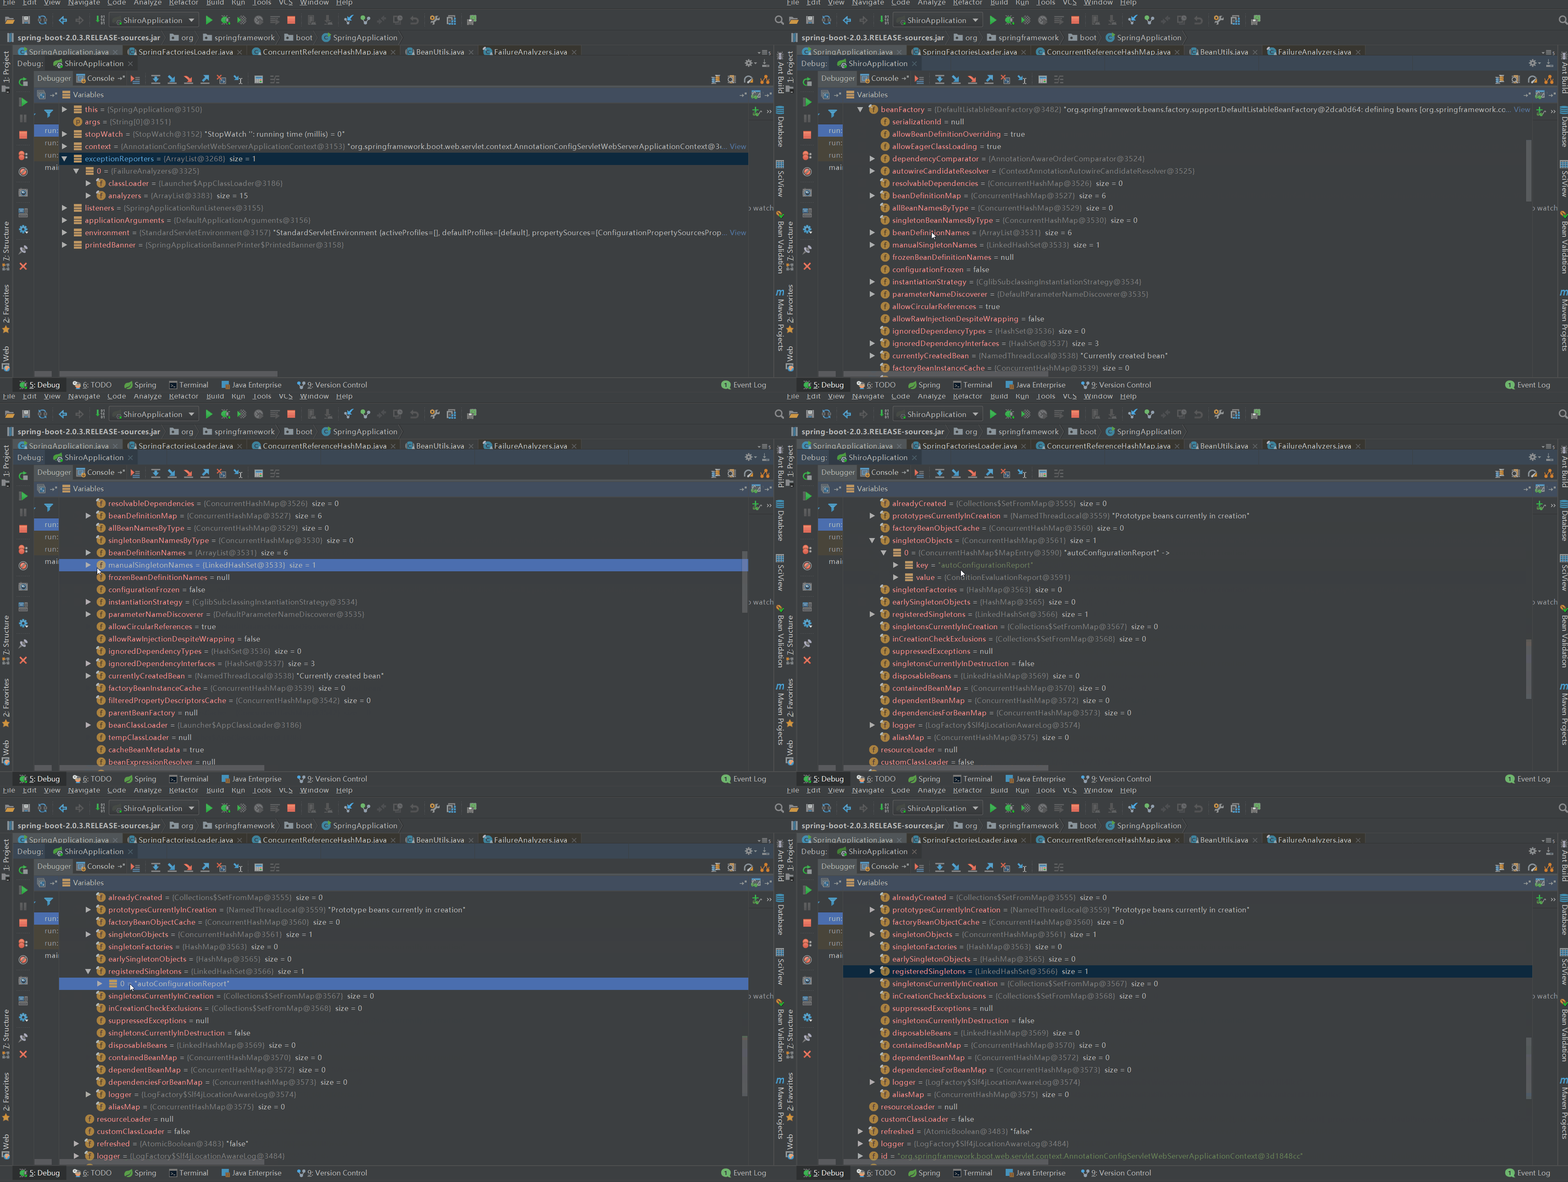
往beanFactory中注册一个名叫autoConfigurationReport的单例bean(类型是ConditionEvaluationReport),这个bean用于后面自动配置条件评估的详情报告与日志记录。
exceptionReporters 获取成功后,我们来看看beanFactory的变化
正餐
prepareContext内容不多,源代码如下
private void prepareContext(ConfigurableApplicationContext context,

        ConfigurableEnvironment environment, SpringApplicationRunListeners listeners,

        ApplicationArguments applicationArguments, Banner printedBanner) {

    // 设置上下文的environment

    context.setEnvironment(environment);

    // 应用上下文后处理

    postProcessApplicationContext(context);

    // 在context refresh之前,对其应用ApplicationContextInitializer

    applyInitializers(context);

    // 上下文准备(目前是空实现,可用于拓展)

    listeners.contextPrepared(context);

    // 打印启动日志和启动应用的Profile

    if (this.logStartupInfo) {

        logStartupInfo(context.getParent() == null);

        logStartupProfileInfo(context);

    }

    // Add boot specific singleton beans

    context.getBeanFactory().registerSingleton("springApplicationArguments",

            applicationArguments);                                // 向beanFactory注册单例bean:命令行参数bean

    if (printedBanner != null) {

        // 向beanFactory注册单例bean:banner bean

        context.getBeanFactory().registerSingleton("springBootBanner", printedBanner);

    }

    // Load the sources

    Set<Object> sources = getAllSources();                        // 获取全部资源,其实就一个:SpringApplication的primarySources属性

    Assert.notEmpty(sources, "Sources must not be empty");        // 断言资源是否为空

    // 将bean加载到应用上下文中

    load(context, sources.toArray(new Object[0]));

    // 向上下文中添加ApplicationListener,并广播ApplicationPreparedEvent事件

    listeners.contextLoaded(context);

}
我们逐个方法来看
context.setEnvironment(environment)
/**

 * {@inheritDoc}

 * <p>

 * Delegates given environment to underlying {@link AnnotatedBeanDefinitionReader} and

 * {@link ClassPathBeanDefinitionScanner} members.

 */

@Override

public void setEnvironment(ConfigurableEnvironment environment) {

    super.setEnvironment(environment);            // 设置context的environment

    this.reader.setEnvironment(environment);    // 实例化context的reader属性的conditionEvaluator属性

    this.scanner.setEnvironment(environment);    // 设置context的scanner属性的environment属性

}
将context中相关的environment全部替换成SpringApplication中创建的environment。还记得这篇中的疑问吗,引申下就是:之前我们的应用中有两个environment,一个在context中,一个在SpringApplication中。经过此方法后,就只会存在SpringApplication中的environment了,而context中的原environment会被回收。
postProcessApplicationContext(context);
/**

 * Apply any relevant post processing the {@link ApplicationContext}. Subclasses can

 * apply additional processing as required.

 * @param context the application context

 */

protected void postProcessApplicationContext(ConfigurableApplicationContext context) {

    if (this.beanNameGenerator != null) {

        context.getBeanFactory().registerSingleton(

                AnnotationConfigUtils.CONFIGURATION_BEAN_NAME_GENERATOR,

                this.beanNameGenerator);

    }

    if (this.resourceLoader != null) {

        if (context instanceof GenericApplicationContext) {

            ((GenericApplicationContext) context)

                    .setResourceLoader(this.resourceLoader);

        }

        if (context instanceof DefaultResourceLoader) {

            ((DefaultResourceLoader) context)

                    .setClassLoader(this.resourceLoader.getClassLoader());

        }

    }

}
上下文后处理。SpringApplication子类可以根据需要应用其他处理。
由于当前SpringApplication实例的属性:beanNameGenerator和resourceLoader都为null,所以此方法目前相当于什么也没做。此方法可能是我们定制SpringApplication所用。
applyInitializers(context);
/**

 * Apply any {@link ApplicationContextInitializer}s to the context before it is

 * refreshed.

 * @param context the configured ApplicationContext (not refreshed yet)

 * @see ConfigurableApplicationContext#refresh()

 */

@SuppressWarnings({ "rawtypes", "unchecked" })

protected void applyInitializers(ConfigurableApplicationContext context) {

    for (ApplicationContextInitializer initializer : getInitializers()) {

        // 解析当前initializer实现的ApplicationContextInitializer的泛型参数

        Class<?> requiredType = GenericTypeResolver.resolveTypeArgument(

                initializer.getClass(), ApplicationContextInitializer.class);

        // 断言context是否是requiredType的实例

        Assert.isInstanceOf(requiredType, context, "Unable to call initializer.");

        // 向context应用初始化器

        initializer.initialize(context);

    }

}
在context refresh之前应用ApplicationContextInitializer到context中。还记得SpringApplication的属性initializers吗,不记得的可以点这里。

一共6个initializer,他们的initialize方法都被调用,源代码就不跟了,上图中已经进行了展示,我们总结下
DelegatingApplicationContextInitializer
environment没有context.initializer.classes配置项,所以相当于没有做任何事。
如果配置了context.initializer.classes,获取其值(逗号分隔的initializer列表字符串),转换成class列表,根据classes列表进行实例化获取initializer实例列表,再对每个initializer实例调用initialize方法。
DelegatingApplicationContextInitializer相当于context.initializer.classes的代理,最终还是会执行到被代理的initializer的initialize方法。
ContextIdApplicationContextInitializer
设置application id:从environment中获取spring.application.name配置项的值,并把设置成application id,若没有配置spring.application.name,则取默认值application;
将application id封装成ContextId对象,注册到beanFactory中。
ConfigurationWarningsApplicationContextInitializer
向上下文注册了一个BeanFactoryPostProcessor:ConfigurationWarningsPostProcessor实例;
实例化ConfigurationWarningsPostProcessor的时候,也实例化了它的属性Check[] checks,check中只有一个类型是ComponentScanPackageCheck的实例。
ServerPortInfoApplicationContextInitializer
向上下文注册了一个ApplicationListener:ServerPortInfoApplicationContextInitializer对象自己;
ServerPortInfoApplicationContextInitializer实现了ApplicationListener<WebServerInitializedEvent>,所以他本身就是一个ApplicationListener。
SharedMetadataReaderFactoryContextInitializer
向context注册了一个BeanFactoryPostProcessor:CachingMetadataReaderFactoryPostProcessor实例。
ConditionEvaluationReportLoggingListener
将上下文赋值给自己的属性applicationContext;
向上下文注册了一个ApplicationListener:ConditionEvaluationReportListener实例;
从beanFactory中获取名为autoConfigurationReport的bean赋值给自己的属性report。
listeners.contextPrepared(context);
还记得SpringApplicationRunListeners中listeners属性吗,没错,里面就一个EventPublishingRunListener对象。
调用EventPublishingRunListener的contextPrepared,发现其是空实现。
也就是相当于啥事也没做。
load(context, sources.toArray(new Object[0]));
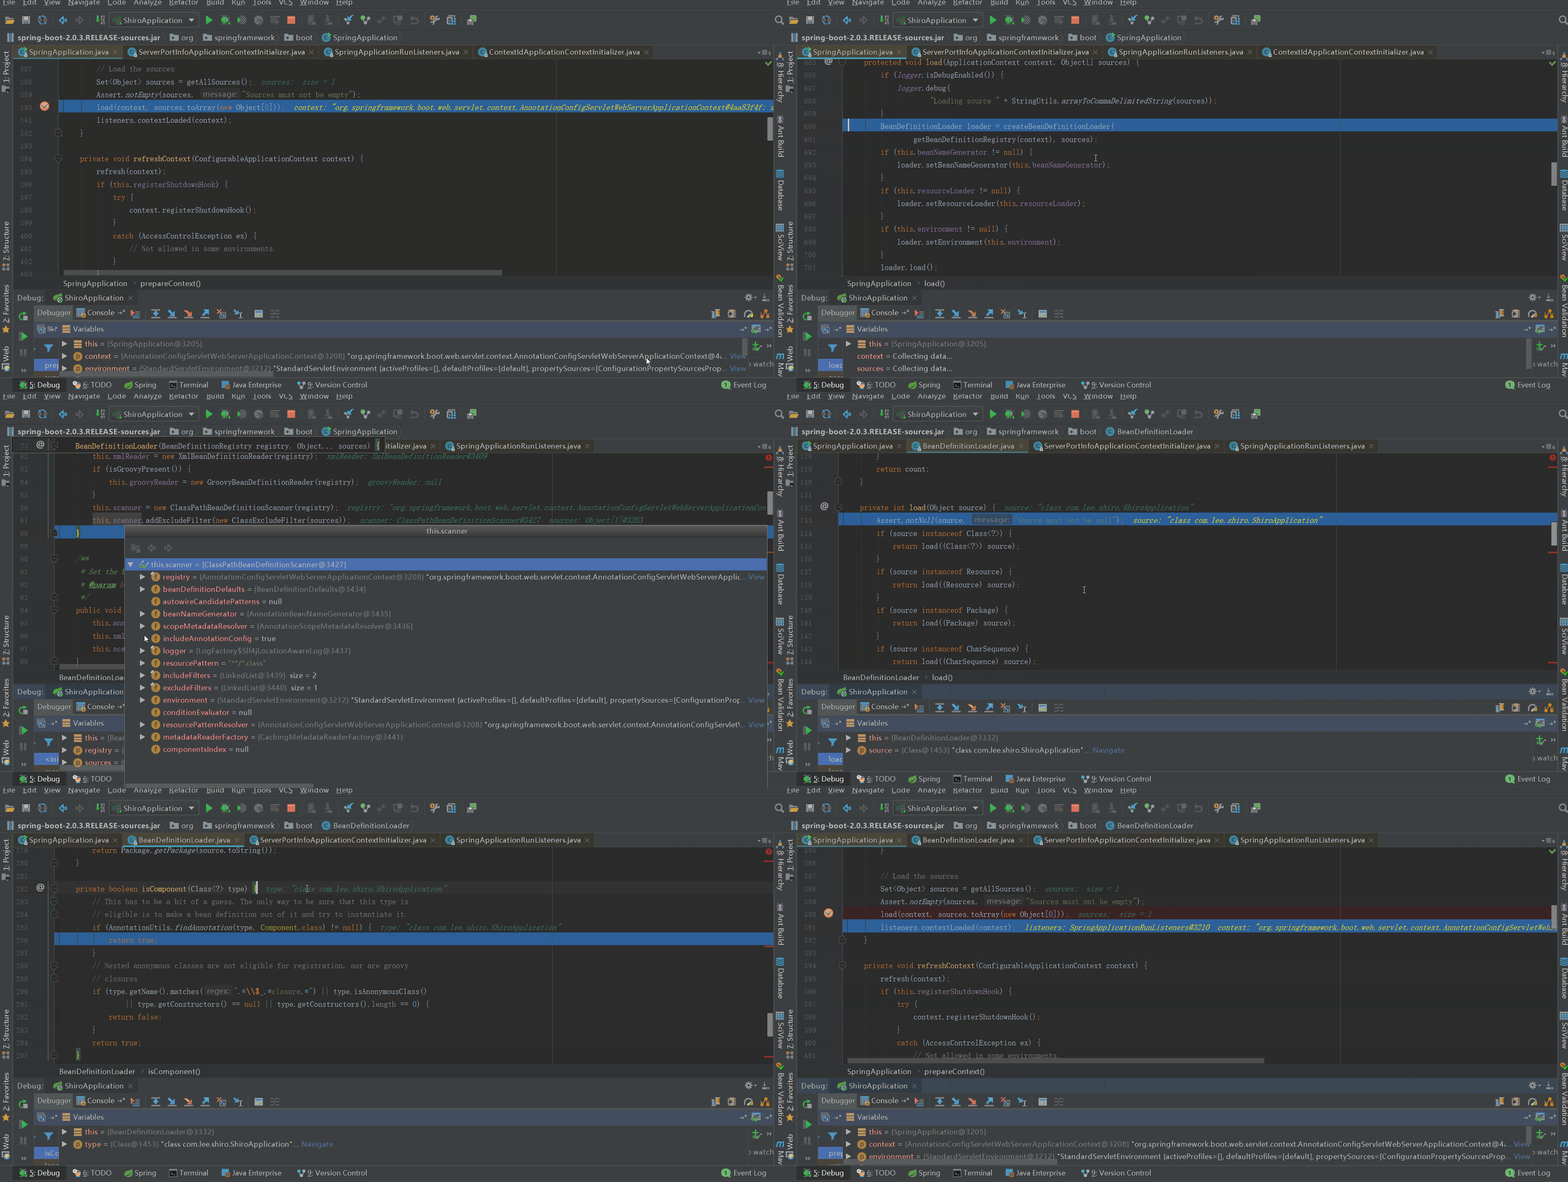
创建了一个BeanDefinitionLoader对象;BeanDefinitionLoader作为AnnotatedBeanDefinitionReader,XmlBeanDefinitionReader和ClassPathBeanDefinitionScanner的门面,从底层源加载bean定义,包括XML和JavaConfig;
能被加载的source类型包括:Class、Resource、Package和CharSequence四种,每种类型的加载方式也不一样,Class用AnnotatedBeanDefinitionReader处理、Resource用XmlBeanDefinitionReader处理、Package用ClassPathBeanDefinitionScanner,而CharSequence则比较特殊了,它按Class、Resource、Package的顺序处理,哪种处理成功就按哪种处理(CharSequence方式貌似很少用,反正我还没用过);
而目前我们的source只有一个:class com.lee.shiro.ShiroApplication,是class类型;先判断ShiroApplication是否有被component注解修饰,很显然是(SpringBootApplication注解中包含component注解),那么AnnotatedBeanDefinitionReader来处理:将com.lee.shiro.ShiroApplication封装成一个名叫ShiroApplication的BeanDefinition对象,并将其注册到了beanFactory的BeanDefinitionMap中。
listeners.contextLoaded(context);

还记得SpringApplication的属性listeners吗,不记得的可以点这里。将这些ApplicationListener注册到了上下文中,具体包括ConfigFileApplicationListener,AnsiOutputApplicationListener,LoggingApplicationListener,ClasspathLoggingApplicationListener,BackgroundPreinitializer,DelegatingApplicationListener,ParentContextCloserApplicationListener(实现了ApplicationContextAware接口;将上下文赋值给了属性context,相当于有了上下文的引用),ClearCachesApplicationListener,FileEncodingApplicationListener,LiquibaseServiceLocatorApplicationListener,EnableEncryptablePropertiesBeanFactoryPostProcessor。
广播ApplicationPreparedEvent事件,并触发对应的事件。过滤出匹配事件的监听器可以查看这里,一共过滤出5个监听器,他们的onApplicationEvent方法会被调用,具体做了如下事情:
ConfigFileApplicationListener
向context注册了一个BeanFactoryPostProcessor:PropertySourceOrderingPostProcessor实例;该实例后面会对我们的property sources进行重排序,另外该实例拥有上下文的引用。
LoggingApplicationListener
向beanFactory中注册了一个名叫springBootLoggingSystem的单例bean,也就是我们的日志系统bean。
BackgroundPreinitializer
目前什么也没做
DelegatingApplicationListener
目前什么也没做
EnableEncryptablePropertiesBeanFactoryPostProcessor
仅仅打印了一句debug日志,相当于什么也没做
甜点
一开始还以为本文内容不会多,但分析分析着,发现内容不少。不管我们是吃撑了还是没吃饱,都来点甜点收尾。
一般一个单例对象注册到beanFactory中,beanFactory会有2个属性都添加此单例对象信息:singletonObjects、registeredSingletons
Map<String, Object> singletonObjects = new ConcurrentHashMap<>(),key是bean name,value是单例对象
Set<String> registeredSingletons = new LinkedHashSet<>(),存放的是bean name
一般一个bean定义注册到beanFactory中是,beanFactory也会有2个属相会添加此bean定义信息:beanDefinitionMap、beanDefinitionNames
List<String> beanDefinitionNames = new ArrayList<>(),beanDefinition的名称列表
Map<String, BeanDefinition> beanDefinitionMap = new ConcurrentHashMap<>(),key是beanDefinition的名称,value是beanDefinition对象
另外beanFactory中Set<String> manualSingletonNames = new LinkedHashSet<>,按注册顺序存放手动注册的单例的名称。
load方法,我会放到另一篇博文中重点分析;load负责加载bean定义资源,应该是挺重要的,而本文却讲的比较粗糙,我们一起期待吧。
有时候,不是对手有多强大,只是我们不敢去尝试;勇敢踏出第一步,你会发现自己比想象中更优秀!诚如海因斯第一次跑进人类10s大关时所说:上帝啊,原来那扇门是虚掩着的!
总结
1、上文中的load
就是加载bean定义资源,支持4种方式:Class、Resource、Package和CharSequence。
Class:注解形式的Bean定义;AnnotatedBeanDefinitionReader负责处理。
Resource:一般而言指的是xml bean配置文件,也就是我们在spring中常用的xml配置。xml的加载大家可以去阅读《Spring源码深度解析》。说的简单点就是:将xml的bean定义封装成BeanDefinition并注册到beanFactory的BeanDefinitionMap中;XmlBeanDefinitionReader负责处理。
Package:以扫包的方式扫描bean定义; ClassPathBeanDefinitionScanner负责处理。
CharSequence:以先后顺序进行匹配Class、Resource或Package进行加载,谁匹配上了就用谁的处理方式处理。
当然还支持Groovy形式的Bean定义,有兴趣的朋友可以自行去跟下源代码。
springboot鼓励用java类实现java bean定义,所以springboot应用中,我们一般只需要关注Class方式、Package方式即可。
2、prepareContext到底做了什么
1、将context中的environment替换成SpringApplication中创建的environment
2、将SpringApplication中的initializers应用到context中
设置application id,并将application id封装成ContextId对象,注册到beanFactory中
向context的beanFactoryPostProcessors中注册了一个ConfigurationWarningsPostProcessor实例
向context的applicationListeners中注册了一个ServerPortInfoApplicationContextInitializer实例
向context的beanFactoryPostProcessors中注册了一个CachingMetadataReaderFactoryPostProcessor实例
向context的applicationListeners中注册了一个ConditionEvaluationReportListener实例
3、加载两个单例bean到beanFactory中
向beanFactory中注册了一个名叫springApplicationArguments的单例bean,该bean封装了我们的命令行参数;
向beanFactory中注册了一个名叫springBootBanner的单例bean。
4、加载bean定义资源
资源文件只有SpringApplication的primarySources集合,里面就一个资源类:com.lee.shiro.ShiroApplication;
将该资源封装成了名叫ShiroApplication的BeanDefinition对象,并将其注册到了beanFactory的BeanDefinitionMap中。
5、将SpringApplication中的listeners注册到context中,并广播ApplicationPreparedEvent事件
总共11个ApplicationListener注册到了context的applicationListeners中;
ApplicationPreparedEvent事件的监听器一共做了两件事
向context的beanFactoryPostProcessors中注册了一个PropertySourceOrderingPostProcessor实例
向beanFactory中注册了一个名叫springBootLoggingSystem的单例bean,也就是我们的日志系统bean
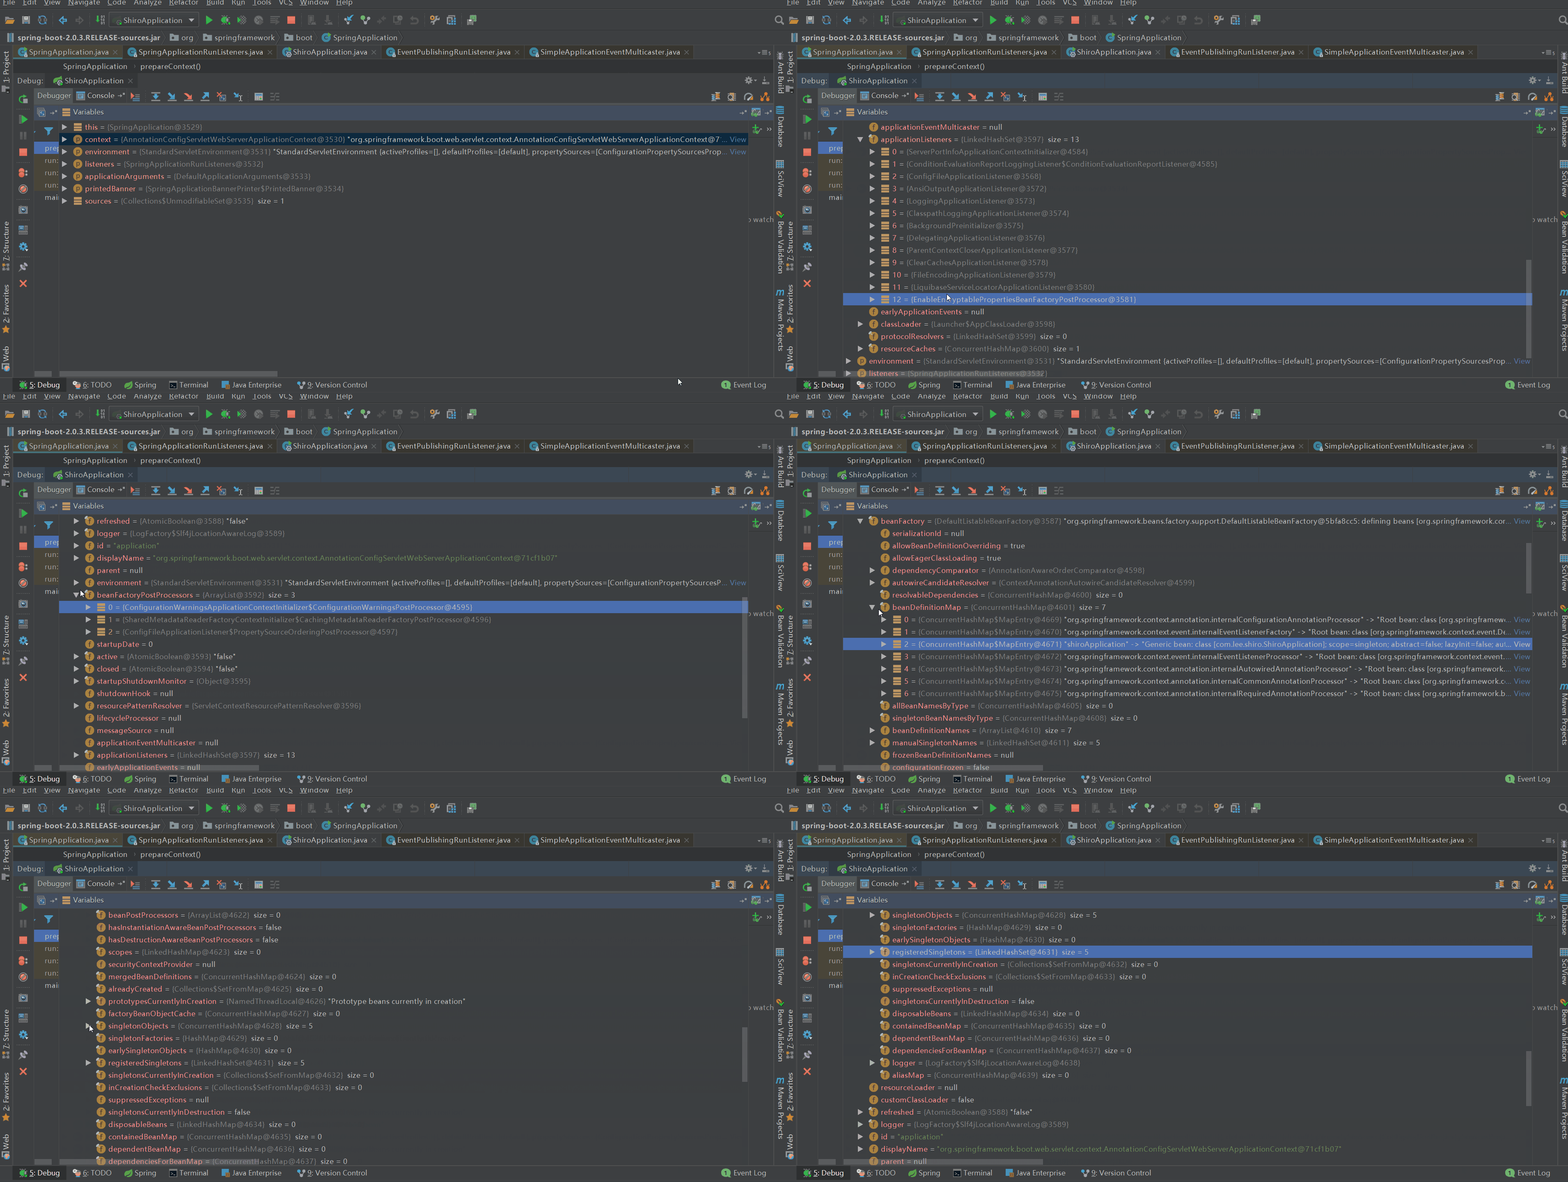
context中主要是三个属性增加了内容:beanFactory、beanFactoryPostProcessors和applicationListeners,到目前为止,context的内容如下
参考
《Spring源码深度解析》
Spring boot 源码
spring-boot-2.0.3启动源码篇五 - run方法(四)之prepareContext的更多相关文章
- spring-boot-2.0.3启动源码篇二 - run方法(一)之SpringApplicationRunListener
前言 Springboot启动源码系列还只写了一篇,已经过去一周,又到了每周一更的时间了(是不是很熟悉?),大家有没有很期待了?我会尽量保证启动源码系列每周一更,争取不让大家每周的期望落空.一周之中可 ...
- spring-boot-2.0.3启动源码篇三 - run方法(二)之prepareEnvironment
前言 此系列是针对springboot的启动,旨在于和大家一起来看看springboot启动的过程中到底做了一些什么事.如果大家对springboot的源码有所研究,可以挑些自己感兴趣或者对自己有帮助 ...
- spring-boot-2.0.3启动源码篇 - 阶段总结
前言 开心一刻 朋友喜欢去按摩,第一次推门进来的是一个学生美眉,感觉还不错:后来经常去,有时是护士,有时是空姐,有时候是教师.昨天晚上推门进去的是一个女警察,长得贼好看,身材也很好,朋友嗷的一声就扑上 ...
- spring-boot-2.0.3启动源码篇一 - SpringApplication构造方法
前言 spring-boot-2.0.3应用篇 - shiro集成,实现了spring-boot与shiro的整合,效果大家也看到了,工程确实集成了shiro的认证与授权功能.如果大家能正确搭建起来, ...
- spring-boot-2.0.3启动源码篇四 - run方法(三)之createApplicationContext
前言 此系列是针对springboot的启动,旨在于和大家一起来看看springboot启动的过程中到底做了一些什么事.如果大家对springboot的源码有所研究,可以挑些自己感兴趣或者对自己有帮助 ...
- Spring Boot REST(二)源码分析
Spring Boot REST(二)源码分析 Spring 系列目录(https://www.cnblogs.com/binarylei/p/10117436.html) SpringBoot RE ...
- SpringBoot 源码解析 (五)----- Spring Boot的核心能力 - 自动配置源码解析
在上一篇博客中分析了springBoot启动流程,大体的轮廓只是冰山一角.今天就来看一下springBoot的亮点功能:自动化装配功能. 先从@SpringBootApplication开始.在启动流 ...
- Spring Boot Dubbo 应用启停源码分析
作者:张乎兴 来源:Dubbo官方博客 背景介绍 Dubbo Spring Boot 工程致力于简化 Dubbo | grep tid | grep -v "daemon" tid ...
- Spring Boot 2.0 WebFlux 教程 (一) | 入门篇
目录 一.什么是 Spring WebFlux 二.WebFlux 的优势&提升性能? 三.WebFlux 应用场景 四.选 WebFlux 还是 Spring MVC? 五.异同点 六.简单 ...
随机推荐
- HDU 3666.THE MATRIX PROBLEM 差分约束系统
THE MATRIX PROBLEM Time Limit: 4000/2000 MS (Java/Others) Memory Limit: 32768/32768 K (Java/Other ...
- druid + spring 事务 + removeAbandonedTimeout 超时回收导致的问题
今天使用上述组合 做项目.. 在做一个需要较长时间使用数据库的 请求时,项目日志没有任何报错,但是数据库也没有插入代码. 初步猜测是 数据库连接超过 removeAbandonedTimeout 时间 ...
- C++顺序容器之deque初探
C++顺序容器之deque初探 deque是双端队列,与vector非常相似,是顺序容器,不同的是,deque可以在数组开头和末尾插入和删除数据.支持快速随机访问. #include<iostr ...
- st-link调试和下载程序(待写)
st-link调试只用三根线 GND SWCLK SWDIO
- Alpha冲刺 (2/10)
Part.1 开篇 队名:彳艮彳亍团队 组长博客:戳我进入 作业博客:班级博客本次作业的链接 Part.2 成员汇报 组员1(组长)柯奇豪 过去两天完成了哪些任务 学习并配置了ssm框架(用于前后端交 ...
- 我知道的nginx配置
1.nginx配置文件 2.配置访问域名 #京淘商品管理系统 server { listen 80; server_name manage.jt.com; location / { proxy_pas ...
- Android精通教程-第一节Android入门简介
前言 大家好,给大家带来Android精通教程-第一节Android入门简介的概述,希望你们喜欢 每日一句 If life were predictable it would cease to be ...
- spring框架学习笔记6:JDBC模板
JDBC模板:Spring中对数据库的操作. 这一部分对熟悉DBUtils的QueryRunner的开发者来说,非常简单 这是以前我简单写的dbutils的知识: http://www.cnblogs ...
- Shell-5--位置参数变量
- Shell-2--输入输出重定向
自己写一下吧,免得又忘了,被人问到,被鄙视 0 表示标准输入, 1 表示标准输出 , 2 表示标准错误输出 一个 > 表示已覆盖的方式把命令的正确执行重定向到文件 两个 >> 表示是 ...