
Nginx Linux安装与部署
 Nginx (engine x) 是一个高性能的HTTP和反向代理服务,也是一款轻量级的Web 服务器/反向代理服务器及电子邮件(IMAP/POP3)代理服务器,并在一个BSD-like 协议下发行。其特点是占有内存少,并发能力强,事实上nginx的并发能力确实在同类型的网页服务器中表现较好,在高连接并发的情况下,Nginx是Apache服务器不错的替代品,同时占用的资源很少,并兼容unix,linux,windows平台。中国大陆使用nginx网站用户有:百度、京东、新浪、网易、腾讯、淘宝等。
系统环境:cat /etc/redhat-release
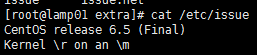
1.安装编译工具及库文件
yum -y install make zlib zlib-devel gcc-c++ libtool openssl openssl-devel
2.首先要安装 PCRE(PCRE 作用是让 Nginx 支持 Rewrite 功能)
yum install pcre pcre-devel -y
rpm -qa pcre pcre-devel
3.建立nginx管理用户:
groupadd -r nginx
useradd –s /sbin/nologin -g nginx –M nginx
id nginx
4.下载nginx软件并解压源码安装
mkdir –p /home/bqh/tools
cd /home/bqh/tools
wget –q http://nginx.org/download/nginx-1.6.3.tar.gz
tar zxf nginx-1.6.3.tar.gz
./configure --prefix=/application/nginx-1.6.3 --user=nginx --group=nginx --with-http_ssl_module --with-http_stub_status_module
若执行上面命令提示:
./configure: error: SSL modules require the OpenSSL library.
You can either do not enable the modules, or install the OpenSSL library
into the system, or build the OpenSSL library statically from the source
with nginx by using --with-openssl=<path> option.
解决方法:
yum -y install openssl openssl-devel
再执行./configure命令....
Configuration summary
+ using system PCRE library
+ using system OpenSSL library
+ md5: using OpenSSL library
+ sha1: using OpenSSL library
+ using system zlib library
nginx path prefix: "/application/nginx-1.6.3"
nginx binary file: "/application/nginx-1.6.3/sbin/nginx"
nginx configuration prefix: "/application/nginx-1.6.3/conf"
nginx configuration file: "/application/nginx-1.6.3/conf/nginx.conf"
nginx pid file: "/application/nginx-1.6.3/logs/nginx.pid"
nginx error log file: "/application/nginx-1.6.3/logs/error.log"
nginx http access log file: "/application/nginx-1.6.3/logs/access.log"
nginx http client request body temporary files: "client_body_temp"
nginx http proxy temporary files: "proxy_temp"
nginx http fastcgi temporary files: "fastcgi_temp"
nginx http uwsgi temporary files: "uwsgi_temp"
nginx http scgi temporary files: "scgi_temp"
出现以上结果代表ok的,接着我们执行:
make && make install
如果执行make这一步的时候只提示:make[1]: Leaving directory `/home/bqh/tools/nginx-1.6.3'不用管它,继续执行make install 即可。
注意:此方法只针对报错一行,如果你安装nginx走到make这一步的时候,报错了很多行的make解决办法就不一样了,比如说:有时候安装nginx需要指定 pcre 的源码目录等。
介绍:
--prefix=软件安装到哪里
--user=用户 (默认nobody)
--group=用户组 (默认nobody)
--with-http_ssl_module 加密模块
--with-http_stub_status_module 状态模块
cd ..
ln -s /application/nginx-1.6.3/ /application/nginx 做个软连接(快捷方式)隐藏版本
安装完nginx后,并不能直接对外提供服务,需要先启动nginx才行。
如果Ngnix软件不是本人装的,那么我们可以用以下命令查看安装路径及参数信息:
/application/nginx/sbin/nginx –V

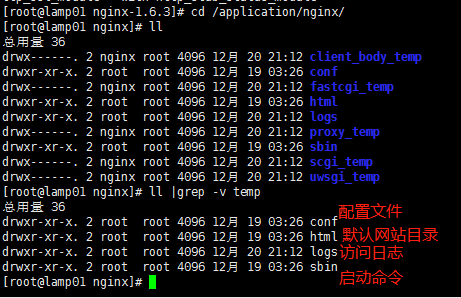
启动nginx :
启动前检查配置文件语法:/application/nginx/sbin/nginx -t

/application/nginx/sbin/nginx 启动nginx
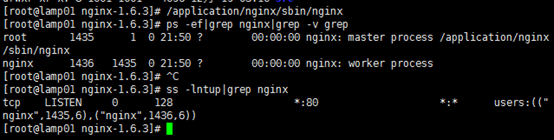
ps -ef|grep nginx|grep -v grep 检查是否启动了
ss -lntup|grep nginx 检查是否启动了
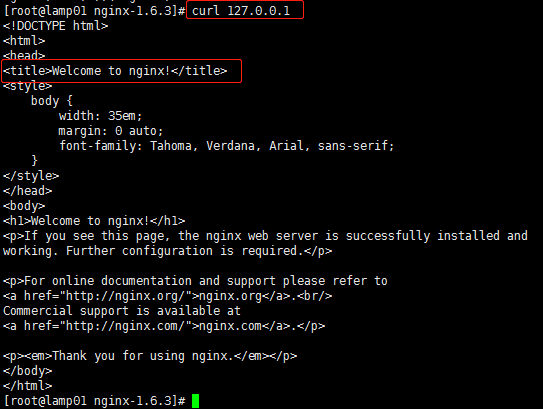
我们在本地用curl 127.0.0.1 检查nginx启动的实际效果如下:
在windows下通过浏览器检测的方式如下:
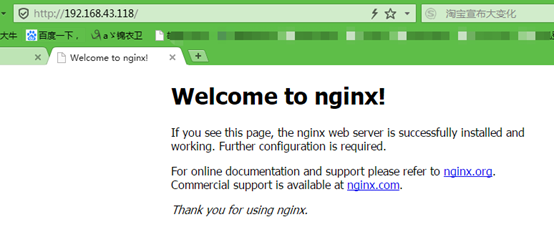
到这里,nginx服务已经完成搭建了。若搭建静态网站,我们可以把静态网页放到/application/nginx/html/下即可。
例如:
下面我们进入安装nginxd的目录下:/application/nginx-1.6.3/conf
我们去除掉默认配置文件里的注释和空行并重定向到nginx.conf文件里,同时我们需要配置如下:
egrep -v "#|^$" nginx.conf.default >nginx.conf //去掉包含#号和空行的内容
nginx.conf具体配置如下:
[root@lamp01 conf]# vim nginx.conf

[root@lamp01 conf]# cat nginx.conf

worker_processes  1;   #worker进程的数量

events {               #事件区块开始

    worker_connections  1024; #每个worker进程支持的最大连接数

}          #事件区块结束

http {     #http区块开始

    include       mime.types;  #nginx支持的媒体类型库文件包含

    default_type  application/octet-stream; #默认的媒体类型

    sendfile        on; #开启高效传输模式

    keepalive_timeout  65; #连接超时

    server { #第一个server区块开始,表示一个独立的虚拟主机站点

        listen       80; #提供的服务的端口,默认80

        server_name  www.test.com; #提供服务的域名主机名

        location / { #第一个location区块开始

            root   html; #站点的根目录,相对于nginx安装目录

            index  index.html index.htm; #默认的首页文件,多个用空格分开

           }

        error_page   500 502 503 504  /50x.html; #出现对应的http状态码使用50x.html回应

     }

}
在/application/nginx/html目录下一个静态文件 index.html
[root@lamp01 html]# pwd

/application/nginx/html

[root@lamp01 html]# vim index.html

<!DOCTYPE html>

<html lang="zh">

<head>

<meta charset="UTF-8">

<title>第一个静态文件</title>

</head>

<body>

Hello world!欢迎来到锦衣卫博客!

</body>

</html>
我们通过hosts来解析

我们首先刷新配置,从本地访问www.test.com看是否成功。
/application/nginx/sbin/nginx -t
/application/nginx/sbin/nginx -s reload
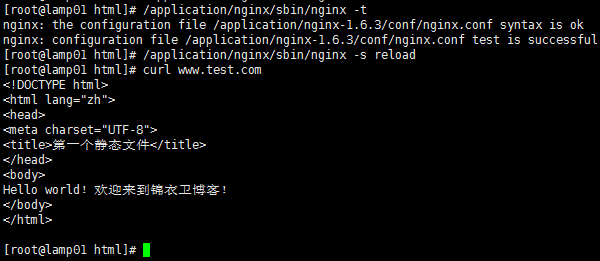
同样在windows系统,配置一下host在“C:\Windows\System32\drivers\etc”下的hosts中配置一下域名解析

然后cmd再ping一下这个域名是否正确指向了这个IP上

正确指向后在telnet一下80端口看一下是否可以与端口通信(如果telnet提示没有此命令是没有安装客户端,在启用或禁用windows功能处安装后再操作即可)

出现下界面及表示通信成功。
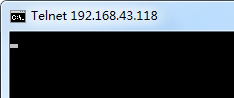
打开浏览器,输入www.test.com会得到以下结果,就说明外网访问成功

测试都成功,ok!
++++++++++++++++++++++++++++++++++++++++++++++++++++++++++++++
nginx常用命令:
/application/nginx/sbin/nginx -t 启动前检查配置文件语法
/application/nginx/sbin/nginx 启动nginx
/application/nginx/sbin/nginx –V 查看安装路径及参数信息
/application/nginx/sbin/nginx -s reload 重新载入配置文件
/application/nginx/sbin/nginx -s reopen 重启 Nginx
/application/nginx/sbin/nginx -s stop 停止 Nginx
nginx软件功能模块说明:
nginx http功能模块:
ngx_http_core_module //包括一些核心的http参数配置,对应nginx的配置为http区块部分
ngx_http_access_module //访问控制模块,用来控制网站用户对nginx的访问
ngx_http_gzip_module //压缩模块,对nginx返回的数据压缩,属于性能优化模块
ngx_http_fastcgi_module //fastcgi模块,和动态应用相关的模块,例如php
ngx_http_proxy_module //代理模块
ngx_http_upstream_module //负载均衡模块,实现网站的负载均衡功能及节点的健康检查
ngx_http_rewrite_module //url地址重写模块
ngx_http_limit_conn_module //限制用户并发连接数及请求数模块
ngx_http_limit_req_module //限制nginx request processing rate 根据定义的key
ngx_http_log_module //访问日志模块,以指定的格式记录nginx客户访问日志等信息
ngx_http_auth_basic_module //web认证模块,设置web用户通过账号密码访问nginx
ngx_http_ssl_module //ssl模块,用于加密的http连接,如https
ngx_http_stub_status_module //记录nginx基本访问状态信息等的模块
Nginx Linux安装与部署的更多相关文章
- nginx linux 安装
nginx linux 安装 进入http://nginx.org/en/download.html 下载 n gcc 安装nginx需要先将官网下载的源码进行编译,编译依赖gcc环境,如果没有gc ...
- SonarQube系列一、Linux安装与部署
[前言] 随着项目团队规模日益壮大,项目代码量也越来越多.且不说团队成员编码水平层次不齐,即便是老手,也难免因为代码量的增加和任务的繁重而忽略代码的质量,最终的问题便是bug的增多和代码债务的堆积.因 ...
- CentOs Linux 对于Django uwsgi + Nginx 的安装与部署
Django Nginx+uWSGI 安装配置 链接:
- Nginx 2.安装与部署配置
转 https://www.cnblogs.com/wcwnina/p/8728430.html > 下载 官方网站:https://nginx.org/en/download.html Win ...
- Nginx的安装和部署
Nginx简介 Nginx是一款轻量级的Web 服务器/反向代理服务器及电子邮件(IMAP/POP3)代理服务器,在BSD-like 协议下发行.其特点是占有内存少,并发能力强,事实上nginx的并发 ...
- CentOS Nginx的安装与部署
安装工具包 wget.vim和gcc yum install -y wget yum install -y vim-enhanced yum install -y make cmake gcc gcc ...
- nginx~linux下的部署
一些概念 Nginx ("engine x") 是一个高性能的HTTP和反向代理服务器,也是一个IMAP/POP3/SMTP服务器.Nginx是由Igor Sysoev为俄 ...
- linux安装tomcat部署web项目
我用的是如下图的两个软件,连接linux服务器. 其中WinSCp是传输文件用的,SecureCRT是用来输入命令的. 1.复制tomcat到指定目录(可复制到你想要的目录下),命令如下: cp /路 ...
- Nginx的安装与部署
1:安装工具包 wget.vim和gcc yum install -y wget yum install -y vim-enhanced yum install -y make cmake gcc g ...
随机推荐
- Python:SQLMAP参数中文解释
#HiRoot's BlogOptions(选项):--version 显示程序的版本号并退出-h, --help 显示此帮助消息并退出-v VERBOSE 详细级别:0-6(默认为1) Target ...
- 【Java基本功】聊聊抽象类和接口的区别
1 抽象类一般会实现一部分操作,并且留一些抽象方法让子类自己实现,比如Stringbuffer和Stringbuilder的父类abstractStringbuilder. 2 接口一般指一种规定,比 ...
- SSH, 整合分页功能,连带DAO经典封装
任何一个封装讲究的是,使用,多状态.Action: 任何一个Action继承分页有关参数类PageManage,自然考虑的到分页效果,我们必须定义下几个分页的参数.并根据这个参数进行查值. 然 ...
- 【学习笔记】深入理解async/await
参考资料:理解javaScript中的async/await,感谢原文作者的总结,本文在理解的基础上做了一点小小的修改,主要为了加深自己的知识点掌握 学完了Promise,我们知道可以用then链来解 ...
- Python和Java分别实现冒泡排序
1.基本思想 冒泡排序的基本思想是对比相邻的元素值.相邻元素值比较,如果满足条件两者就交换,把较小的移动到前面,把较大的移动到后面,这样较小的元素就像气泡一样浮上来了.可以看出,冒泡排序的每一次循环都 ...
- Make 输出重定向到文件
系统的输入与输出: 方式 描述符 含义 stdin 0 标准输入 stdout 1 标准输出 stderr 2 标准错误输出 把 make 输出的全部信息重定向到某个文件中: make <xxx ...
- 安装Eclipse时遇到”java was started but returned exit code = 13“如何解决?
有的时候运行开发工具时会出现java was started but returned exit code = 13......的提示,绝大多数的问题都是版本问题: 我们可以打开命令行工具cmd 输入 ...
- MVC 的 Razor引擎显示代码表达式与隐式代码表达式
隐式代码表达式 就是一个标识符,之后可以跟任意数量的方法调用("()").索引表达式("[]")及成员访问表达式(".").但是,除了在&q ...
- dotnet core 编程规范
本文实际只是翻译 .NET Core foundational libraries 官方文档的编码风格 在 .NET Core foundational libraries项目使用的编程规范默认就是 ...
- 编写计算器程序学习JS责任链模式
设计模式中的责任链模式能够很好的处理程序过程的逻辑判断,提高程序可读性. 责任链模式的核心在于责任链上的元素判断能够处理该数据,不能处理的话直接交给它的后继者. 计算器的基本样式: 通过div+css ...