
springboot读取properties和yml配置文件
一、新建maven工程:springboot-configfile-demo,完整工程如下:
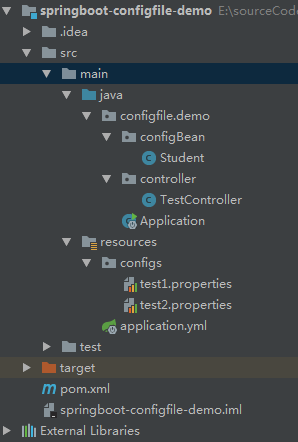
pom.xml
<?xml version="1.0" encoding="UTF-8"?>

<project xmlns="http://maven.apache.org/POM/4.0.0"

         xmlns:xsi="http://www.w3.org/2001/XMLSchema-instance"

         xsi:schemaLocation="http://maven.apache.org/POM/4.0.0 http://maven.apache.org/xsd/maven-4.0.0.xsd">

    <modelVersion>4.0.0</modelVersion>

    <groupId>springboot.configfile.demo</groupId>

    <artifactId>springboot-configfile-demo</artifactId>

    <version>1.0-SNAPSHOT</version>

    <parent>

        <groupId>org.springframework.boot</groupId>

        <artifactId>spring-boot-starter-parent</artifactId>

        <version>1.4.1.RELEASE</version>

    </parent>

    <dependencies>

        <dependency>

            <groupId>org.springframework.boot</groupId>

            <artifactId>spring-boot-starter-web</artifactId>

        </dependency>

    </dependencies>

</project>
二、新建三个配置文件
1、主配置文件application.yml(程序默认从该文件读取配置信息,放在该配置文件的配置,可以直接在代码通过@Value读取)
server:

  port: 8083

  context-path: /

teacher:

  name: boshen

  password: 123456
2、自定义配置文件1,configs/test1.properties(没有前缀)
doctor_name=zhangsan

doctor_age=35
3、自定义配置文件2,configs/test2.properties(有前缀,后面通过一个Student类来接收信息)
student.name=lishi

student.sex=man

student.bookList[0]=english

student.bookList[1]=history

student.scoreMap[english]=95

student.scoreMap[history]=98
三、新建类Student
package configfile.demo.configBean;

import org.springframework.boot.context.properties.ConfigurationProperties;

import org.springframework.context.annotation.Configuration;

import org.springframework.context.annotation.PropertySource;

import org.springframework.stereotype.Component;

import java.io.Serializable;

import java.util.List;

import java.util.Map;

/**

 * @author Administrator

 * @date 2019/02/15

 */

@Configuration

@ConfigurationProperties(prefix = "student")

@PropertySource("classpath:configs/test2.properties")

@Component

public class Student implements Serializable{

    private String name;

    private String sex;

    private List<String> bookList;

    private Map<String,String> scoreMap;

    public String getName() {

        return name;

    }

    public void setName(String name) {

        this.name = name;

    }

    public String getSex() {

        return sex;

    }

    public void setSex(String sex) {

        this.sex = sex;

    }

    public List<String> getBookList() {

        return bookList;

    }

    public void setBookList(List<String> bookList) {

        this.bookList = bookList;

    }

    public Map<String, String> getScoreMap() {

        return scoreMap;

    }

    public void setScoreMap(Map<String, String> scoreMap) {

        this.scoreMap = scoreMap;

    }

    @Override

    public String toString() {

        return "Student{" +

                "name='" + name + '\'' +

                ", sex='" + sex + '\'' +

                ", bookList=" + bookList +

                ", scoreMap=" + scoreMap +

                '}';

    }

}
四、新建controller类,进行测试
package configfile.demo.controller;

import configfile.demo.configBean.Student;

import org.springframework.beans.factory.annotation.Autowired;

import org.springframework.beans.factory.annotation.Value;

import org.springframework.web.bind.annotation.RequestMapping;

import org.springframework.web.bind.annotation.RequestMethod;

import org.springframework.web.bind.annotation.RestController;

/**

 * @author Administrator

 * @date 2019/02/15

 */

@RestController

@RequestMapping("/config-test")

public class TestController {

    @Value("${teacher.name}")

    private String teacherName;

    @Value("${teacher.password}")

    private String teacherPassword;

    @Value("${doctor_name}")

    private String doctorName;

    @Value("${doctor_age}")

    private Integer doctorAge;

    @Autowired

    private Student student;

    @RequestMapping(value = "/read",method = RequestMethod.GET)

    public void postTest(){

        System.out.println("以下是默认的application.yml的配置:==========");

        System.out.println("teacher.name:"+teacherName);

        System.out.println("teacher.password:"+teacherPassword);

        System.out.println("以下是configs/test1.properties的配置:==========");

        System.out.println("doctor_namee:"+doctorName);

        System.out.println("doctor_age:"+doctorAge);

        System.out.println("以下是configs/test2.properties的配置:==========");

        System.out.println(student.toString());

    }

}
五、新建springboot启动类
package configfile.demo;

import org.springframework.boot.SpringApplication;

import org.springframework.boot.autoconfigure.EnableAutoConfiguration;

import org.springframework.boot.autoconfigure.SpringBootApplication;

import org.springframework.context.annotation.ComponentScan;

import org.springframework.context.annotation.Configuration;

import org.springframework.context.annotation.PropertySource;

/**

 * @author Administrator

 * @date 2019/02/15

 */

@SpringBootApplication

@Configuration

@ComponentScan

@EnableAutoConfiguration

@PropertySource(value = "classpath:/configs/test1.properties", ignoreResourceNotFound = true)

public class Application {

    public static void main(String[] args){

        SpringApplication.run(Application.class, args);

    }

}
六,启动程序,在postman测试,并查看控制台输出


springboot读取properties和yml配置文件的更多相关文章
- springboot读取properties(yml)的几种常用方式
boot项目中一些秘钥等不常变动的信息大多存储在配置文件中,那么我们怎么获取配置文件中的属性呢? 以获取server端口号为例讲解几种方法:配置信息如下 一:使用@Value注解 @Value(&qu ...
- SpringBoot使用注解(@value)读取properties(yml)文件中 配置信息
为了简化读取properties文件中的配置值,spring支持@value注解的方式来获取,这种方式大大简化了项目配置,提高业务中的灵活性. 1. 两种使用方法1)@Value("#{co ...
- 使用IDEA开发SpringBoot不加载application.yml配置文件的解决方案
1.如果启动项目不加载application.yml配置文件,那么请确认下是否应用了Resources为项目资源文件夹 2.如果项目起初是可以正常使用的,突然不知道改了什么,然后进行启动项目的时候不加 ...
- Springboot .properties或.yml配置文件读取pom.xml文件值
有时候配置文件需要读取pom文件配置<properties></properties>中间自定义属性值的时候可以用@@获取 例:@package.parameter@ 然后还需 ...
- Springboot读取properties配置文件数据
一.使用@ConfigurationProperties来读取 1.Coffer entity @Configuration @ConfigurationProperties(prefix = &qu ...
- springboot动态读取properties 和yml的配置
properties使用PropertiesLoaderUtils,yml使用YamlPropertySourceLoader application.properties microsoft.def ...
- SpringBoot 读取properties配置文件 @Value使用 中文乱码问题
一,idea中配置文件中文乱码问题 使用idea开发,读取properites配置文件 配置: #app 菜单 #没有限制,所有人都可访问的菜单 menu.unlimited=订单审批,现场尽调,合作 ...
- springboot读取自己定义的配置文件的方式以及使用joda_time来处理时间日期
总的来说呢,有两种方式,一种是原始的方式,即使用PropertiesUtils来读取配置文件. 第二种就是使用springboot的注解的方式来读取配置文件. 1.原始方式处理属性和时间日期: 工具类 ...
- spring读取properties和其他配置文件的几种方式
1.因为spring容器的一些机制,在读取配置文件进行数据库的配置等等是很有必要的,所以我们要考虑配置文件的的读取方式以及各个方式的实用性 2.配置文件的读取方式我这里介绍2种,目的是掌握这2种就可以 ...
随机推荐
- html/css/js-个人容易忘的一些属性
1.当div里面的文字超过给定div给定的宽度,div里面的文字自动换行 word-break:break-all:会截断该行最后的单词 word-wrap:break-word:不会截断,该行长度最 ...
- 异步启动solidworks
两种方法: SldWorks App = new SldWorks(); App.Visible = true; //SldWorks.Application.24是2016 // App = (Sl ...
- HDFS知识点总结
学习完Hadoop权威指南有一段时间了,现在再回顾和总结一下HDFS的知识点. 1.HDFS的设计 HDFS是什么:HDFS即Hadoop分布式文件系统(Hadoop Distributed File ...
- postgresql数据库备份
一.工具备份数据 打开windows下的命令窗口:开始->cmd->安装数据库的目录->进入bin目录: 导出命令:pg_dump –h localhost –U postgres ...
- Android 梯形进度条、下载进度条;
额,Gif有点卡: 梯形.矩形.圆角.背景色.前景色.进度条中的文字都可以改: <?xml version="1.0" encoding="utf-8"? ...
- Sqlserver 2016 R Service环境安装的各种错误(坑)解决办法
相信很多朋友都会慕名Sqlserver 2016的R语言功能,将自己的数据库升级到Sqlserver 2016,但是当你安装完Sqlserver 2016的R语言组件之后,你会发现并不能直接使用,比如 ...
- atnodes命令使用方法
一条命令可以同时执行多台机器,结果会输出列表. atnodes -L 'grep -c "查询订单列表,userId=bing.wang03" /home/w/www/order- ...
- CSV文件乱码展示(编码格式问题)
最开始mac上打开CSV文件乱码,是这样的:CSV文件编码格式为UTF-8 解决办法一:将excel文件同样的转换编码格式为utf-8,具体操作如下: 去掉tab,勾选comma 最后,将文件另存为u ...
- WebService . Schema约束
1. namespace 相当于schema文件的id 2. targetNamespace属性 用来指定schema文件的namespace的值 3. xmlns属性 引入一个约束, 它的值是一个s ...
- bootstrap-table初使用
<table id="table"></table> $('#table').bootstrapTable({ url: 'json/data1.json' ...