
关于elementUI如何在表格循环列表里分别新增Tag的设计使用
话不多说,直接上代码。想要实现的目的是这样的,想要在表格里单独添加每一个tag
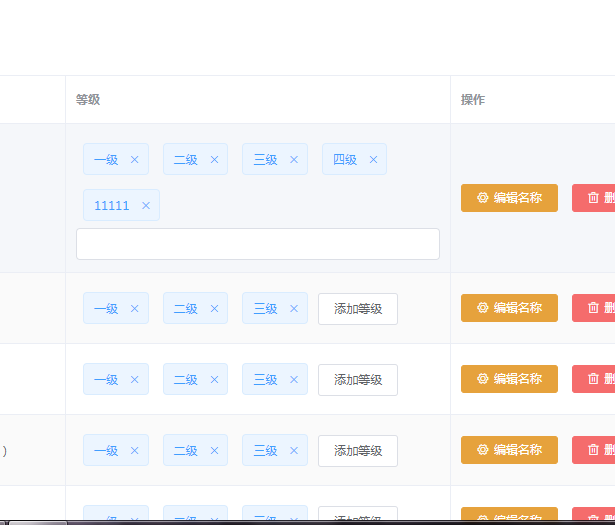
那么,需要解决的问题就是如何定义这每一个插槽里的输入框,把每个输入框以及里面插入的数据区分开。
研究了很久,最后选择了对象数组。下面上代码
<template>

  <div>

    <!-- 面包屑导航区域 -->

    <el-breadcrumb separator-class="el-icon-arrow-right">

      <el-breadcrumb-item :to="{ path: '/home' }">首页</el-breadcrumb-item>

      <el-breadcrumb-item>招标管理</el-breadcrumb-item>

      <el-breadcrumb-item>一键评标</el-breadcrumb-item>

    </el-breadcrumb>

    <!-- 卡片视图区域 -->

    <el-card>

      <!-- 添加角色按钮 -->

      <el-row>

        <el-col

          ><el-button type="primary" @click="addDialogVisible = true"

            >添加资质</el-button

          ></el-col

        >

      </el-row>

      <!-- 角色列表区域 -->

      <el-table :data="roleList" style="width: 100%" border stripe>

        <el-table-column type="index"></el-table-column>

        <el-table-column label="资质名称" prop="certiName"></el-table-column>

        <el-table-column label="等级" prop="level">

          <template slot-scope="scope">

            <el-tag

              v-for="item in scope.row.levels"

              :key="item.certiLevelId"

              closable

              :disable-transitions="false"

              @close="handleClose(item)"

            >

              {{ item.certiLevelName }}

            </el-tag>

            <el-input

              class="input-new-tag"

              v-if="inputParams[scope.$index].visible"

              v-model="inputParams[scope.$index].value"

              ref="saveTagInput"

              size="small"

              @keyup.enter.native="handleInputConfirm(scope.$index)"

              @blur="handleInputConfirm(scope.$index)"

            >

            </el-input>

            <el-button

              v-else

              class="button-new-tag"

              size="small"

              @click="showInput(scope.$index)"

              >添加资质</el-button

            >

          </template>

        </el-table-column>

        <el-table-column label="操作" width="250px">

          <template slot-scope="scope">

            <el-button

              size="mini"

              type="warning"

              icon="el-icon-setting"

              @click="showEditDialog(scope.row.bidId)"

              >编辑名称</el-button

            >

            <el-button size="mini" type="danger" icon="el-icon-delete"

              >删除</el-button

            >

          </template>

        </el-table-column>

      </el-table>

      <!-- 分页区域 -->

      <el-pagination

        @size-change="handleSizeChange"

        @current-change="handleCurrentChange"

        :current-page="queryInfo.currentPage"

        :page-sizes="[1, 2, 5, 10]"

        :page-size="queryInfo.pageSize"

        layout="total, sizes, prev, pager, next, jumper"

        :total="total"

      >

      </el-pagination>

    </el-card>

    <!-- 添加角色列表对话框 -->

    <el-dialog

      title="添加项目"

      :visible.sync="addDialogVisible"

      width="50%"

      @close="addRoleDialogClosed"

    >

      <el-form

        ref="addRoleFormRef"

        :model="addRoleForm"

        :rules="addRoleFormRoles"

        width="50%"

      >

        <el-form-item label="资质名称" prop="bidName">

          <el-input v-model="addRoleForm.bidName"></el-input>

        </el-form-item>

      </el-form>

      <span slot="footer" class="dialog-footer">

        <el-button @click="addDialogVisible = false">取 消</el-button>

        <el-button type="primary" @click="addRole">确 定</el-button>

      </span>

    </el-dialog>

    <!-- 修改资质的对话框 -->

    <el-dialog

      title="修改资质名称"

      :visible.sync="editDialogVisible"

      width="50%"

      @close="editDialogclosed"

    >

      <el-form

        ref="editFormRef"

        :model="editForm"

        :rules="editFormRoles"

        width="50%"

      >

        <el-form-item label="资质名称" prop="bidName">

          <el-input v-model="editRoleForm.bidName"></el-input>

        </el-form-item>

      </el-form>

      <span slot="footer" class="dialog-footer">

        <el-button @click="editDialogVisible = false">取 消</el-button>

        <el-button type="primary">确 定</el-button>

      </span>

    </el-dialog>

    <!-- 修改等级的对话框 -->

    <el-dialog

      title="修改资质等级"

      :visible.sync="levelDialogVisible"

      width="50%"

      @close="levelDialogclosed"

    >

      <span slot="footer" class="dialog-footer">

        <el-button @click="levelDialogVisible = false">取 消</el-button>

        <el-button type="primary">确 定</el-button>

      </span>

    </el-dialog>

  </div>

</template>

<script>

export default {

  data() {

    return {

      levelDialogVisible: false,

      editDialogVisible: false,

      addDialogVisible: false,

      total: 1,

      queryInfo: {

        currentPage: 1,

        pageSize: 10

      },

      inputVisible: {},

      editData: {},

      // 所有权限数据

      scoreList: [],

      roleList: [

        {

          certiName: '资质名称',

          levels: [

            {

              certiLevelId: 1,

              certiLevelName: '111'

            }

          ]

        },

        {

          certiName: '资质名称1',

          levels: [

            {

              certiLevelId: 1,

              certiLevelName: '111'

            }

          ]

        }

      ],

      roleForm: {},

      bidId: '',

      addRoleForm: {

        bidName: '',

        crtUserId: 1

        // roleDesc: ''

      },

      editRoleForm: {

        bidName: '',

        crtUserId: 1

      },

      levelRoleForm: {

        bidName: '',

        crtUserId: 1

      },

      editForm: {},

      levelForm: {},

      addRoleFormRoles: {

        bidName: [

          // 验证项目名称是否合法

          { required: true, message: '请输入项目名称', trigger: 'blur' }

        ]

        // roleDesc: [

        //   // 验证创建人是否合法

        //   { required: true, message: '请输入创建人', trigger: 'blur' }

        // ]

      },

      editFormRoles: {

        bidName: [

          // 验证项目名称是否合法

          { required: true, message: '请输入项目名称', trigger: 'blur' }

        ]

      },

      levelFormRoles: {

        bidName: [

          // 验证项目名称是否合法

          { required: true, message: '请输入项目等级', trigger: 'blur' }

        ]

      },

      // input

      inputParams: [

        {

          value: '',

          visible: false

        },

        {

          value: '',

          visible: false

        }

      ]

    }

  },

  created() {

    // this.getRoleList()

  },

  methods: {

    handleClose(item) {

      // item.certiLevelName.splice(

      //   item.certiLevelName.indexOf(item.index),

      //   1

      // )

    },

    showInput(index) {

      this.inputParams[index].visible = true

      // console.log(

      //   'this.inputVisible',

      //   this.inputVisible['visible' + row.index],

      //   row.index

      // )

      // this.inputVisible = true

      // this.$nextTick(_ => {

      //   // this.$refs.saveTagInput.$refs.input.focus()

      //   this.$refs.saveTagInput.focus()

      // })

    },

    handleInputConfirm(index) {

      console.log(this.inputParams[index].value)

      this.roleList[index].levels.push({

        certiLevelId: Date.parse(new Date()) + '',

        certiLevelName: this.inputParams[index].value

      })

      this.inputParams[index].value = ''

      this.inputParams[index].visible = false

      // console.log('hhh', this.editData['input' + row.index])

      // let inputValue = this.editData['input' + row.index]

      // if (inputValue) {

      //   row.levels.push(inputValue)

      // }

      // this.editData['input' + row.index] = ''

      // this.inputVisible['visible' + row.index] = false

    },

    showLevelDialog() {

      this.levelDialogVisible = true

    },

    editDialogclosed() {

      this.$refs.editFormRef.resetFields()

    },

    addRoleDialogClosed() {

      this.$refs.addRoleFormRef.resetFields()

    },

    levelDialogclosed() {

      this.$refs.levelFormRef.resetFields()

    },

    async showEditDialog(bidId) {

      // const { data: res } = await this.$http.get(`users/${id}`)

      // // const { data: res } = await this.$http.get('users/' + id)

      // if (res.meta.status !== 200) {

      //   return this.$message.error('查询用户资料失败')

      // }

      // console.log(res.data)

      // this.editForm = res.data

      this.editDialogVisible = true

    },

    addRole() {

      this.$refs.addRoleFormRef.validate(async valid => {

        if (!valid) return

        const res = await this.$http.post('/bid', this.addRoleForm)

        console.log('增加', res)

        // 隐藏对话框

        this.addDialogVisible = false

        // 刷新列表

        this.getRoleList()

      })

    },

    handleSizeChange(newSize) {

      // console.log(newSize)

      this.queryInfo.pageSize = newSize

      this.getRoleList()

    },

    // 监听当前页改变的事件

    handleCurrentChange(newPage) {

      console.log(newPage)

      this.getUserList()

    },

    goBack() {

      this.$router.go(-1)

    },

    // 查询

    async getRoleList() {

      const { data: res } = await this.$http.get('/certi', {

        params: this.queryInfo

      })

      if (res.code !== 200) {

        return this.$message.console.error('查询资质失败')

      }

      console.log('查询资质', res)

      this.roleList = res.data.records

      this.roleList.forEach((item, index) => {

        item.index = index

        console.log('item.index,', item.index)

        this.editData['input' + item.index] = ''

        this.inputVisible['visible' + item.index] = false

      })

      this.total = res.data.total

      console.log(this.roleList)

    }

  }

}

</script>

<style lang="scss" scoped>

.el-tag {

  margin: 7px;

}

.bd_top {

  border-top: 1px solid #eee;

}

.bd_buttom {

  border-bottom: 1px solid #eee;

}

.vcenter {

  display: flex;

  align-items: center;

}

// .distributeDialog {

//   // height: 700px;

// }

</style>
关于elementUI如何在表格循环列表里分别新增Tag的设计使用的更多相关文章
- 在循环列表的富文本里摘出每个item的img标签内容(适合vue渲染)
昨天在做公司项目的社区动态内容.后台接口返回的数据是数组套对象,对象里有富文本,然后需要摘出富文本里的img标签在列表里分开渲染(即图片九宫格样式).最终效果如图: 这个是后盾接口返回的json数据 ...
- Cocos2d-x3.0下实现循环列表
本文的实现是參照我之前在做iOS时实现的一个能够循环的列表这里用C++重写一遍. 效果: 原文地址:http://blog.csdn.net/qqmcy/article/details/2739301 ...
- 微信小程序循环列表点击每一个单独添加动画
首先,咱们看一下微信小程序动画怎么实现,我首先想到的是anime.js,但是引入之后用不了,微信小程序内的css也无法做到循环的动态,我就去找官方文档看看有没有相应的方法,哎,还真有 点击这里查看 微 ...
- Unity-UGUI-无限循环列表
前言:项目准备新增一个竞技场排行榜,策划规定只显示0-400名的玩家.我一想,生成四百个游戏物体,怕不是得把手机给卡死?回想原来在GitHub上看到过一个实现思路就是无限循环列表,所以就想自己试试.公 ...
- 第 18 章 CSS 表格与列表
学习要点: 1.表格样式 2.列表样式 3.其他功能 主讲教师:李炎恢 本章主要探讨 HTML5 中 CSS 表格和列表,通过表格和列表的样式设置,让表格和列表显示更加多元化. 一.表格样式 表格有五 ...
- 循环列表的Java实现,解决约瑟夫环问题
import java.util.Scanner; /** * 循环列表的Java实现,解决约瑟夫环问题 * * @author LIU * */ public class LinkedList { ...
- 第七十五节,CSS表格与列表
CSS表格与列表 学习要点: 1.表格样式 2.列表样式 3.其他功能 一.表格样式 表格有五种独有样式,样式表如下: 属性 值 ...
- 微信小程序实现给循环列表点击添加类(单项和多项)
在微信小程序里面没有DOM对象, 不能操作DOM. 所有的操作通过数据来实现,下面主要实现了给循环列表点击添加类的操作 一.单项 目标需求:实现下图,给点击的view增加类,每次只能选择一个. 主要思 ...
- 页面中php传值后循环列表js获取点击的id
页面中php传值后循环列表js获取点击的id值进行js操作 <script type="text/javascript" src="__PUBLIC__/js/jq ...
随机推荐
- 发送POST请求(HTTP),K-V形式
/** * 发送POST请求(HTTP),K-V形式 * @param url * @param params * @author Charlie.chen ...
- 初识python(2)
目录 引言 数据类型 字典 集合 元组 布尔值 用户交互 格式化输出 运算符 增量赋值 链式赋值 交叉赋值 解压赋值 逻辑运算符 成员运算符 身份运算符 引言 小伙伴们昨天已经讲了一点python的数 ...
- aria2 源码解析专题—— (一)基础架构
此文章是这个专题的开篇,由于初入 C++ 的大门,所以想着拿个项目来看看,凑巧有点基础,又想学习一下在unix上的编程,所以就找了 aria2 这个库来看看源码,希望能学到一些东西. 言归正传,今天把 ...
- thinkphp 框架自带搜索+分页+搜索标红
..........控制器方法 public function index() { //接受搜索关键字 $word=input('word'); $where=[]; if (!empty($word ...
- Laravel自定义错误提示,自定义异常类提示,自定义错误返回信息,自定义错误页面
方法一 新增CustomException.php文件 App\Exceptions\CustomException.php <?php namespace App\Exceptions; us ...
- VS Code配置Python环境
Visual Studio Code配置Python环境 目录 Visual Studio Code配置Python环境 1.安装Python环境 2.安装VS Code 2.1 下载 2.2 配置中 ...
- Java GUI 实现发送邮件以及附件
实现代码: 注意点: 需要的jar包:JavaMail API 和Java Activation Framework (JAF) ,下载可参考菜鸟教程 默认使用QQ邮箱发送,需要设置授权,设置--&g ...
- rest-framework之视图和源码解析
视图和源码解析 通过使用mixin类编写视图: from rest_framework import mixins from rest_framework import generics class ...
- 内网渗透----域环境搭建(server 2012)
先确定两台服务器相通 1.配置静态IP与DNS 2.配置域服务 点击服务器管理器-添加角色和功能-下一步-添加AD域服务: 3.提升为域控制器 安装完成后,可在旗帜处选择提升为域控制器 添加新林 添加 ...
- 加速度传感器(MPA1064A)实测---LOTO虚拟示波器
加速度传感器(MPA1064A)实测---LOTO虚拟示波器 客户提供了一个加速度传感器,型号是MPA1064A,我们帮助客户测试下是否能测到传感器的输出,验证下测试方案.传感器很小巧,带了一根很长的 ...