
mnist识别优化——使用新的fashion mnist进行模型训练
今天通过论坛偶然知道,在mnist之后,还出现了一个旨在代替经典mnist数据集的Fashion MNIST,同mnist一样,它也是被用作深度学习程序的“hello world”,而且也是由70k张28*28的图片组成的,它们也被分为10类,有60k被用作训练,10k被用作测试。唯一的区别就是,fashion mnist的十种类别由手写数字换成了服装。这十种类别如下:
'T-shirt/top', 'Trouser', 'Pullover', 'Dress', 'Coat','Sandal', 'Shirt', 'Sneaker', 'Bag', 'Ankle boot'
设计流程如下:
· 首先获取数据集,tensorflow获取fashion mnist的方法和mnist类似,使用keras.datasets.fashion_mnist.load_data()即可
· 将数据集划分为训练集和测试集
· 由于图片像素值范围是0-255,将数据集进行预处理,把像素值缩放到0到1的范围(即除以255)
· 搭建网络模型 (784→128(relu)→10(softmax)),全连接
· 编译模型,设计损失函数(对数损失)、优化器(adam)以及训练指标(accuracy)
· 训练模型
· 评估准确性(测试数据使用matplotlib进行可视化)
关于Adam优化器的来源和特点请参考:https://www.jianshu.com/p/aebcaf8af76e
关于matplotlib数据可视化请参考:https://blog.csdn.net/xHibiki/article/details/84866887
训练集部分数据可视化如下:

一共做了50轮训练,训练开始时的损失和精度如下:
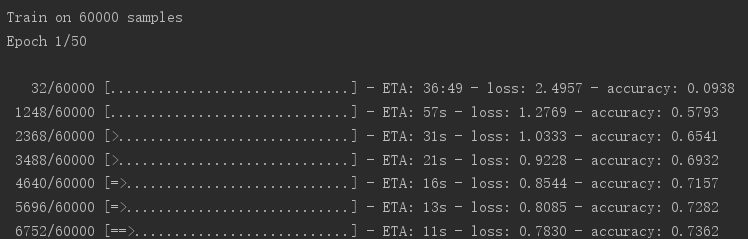
训练完成时的损失和精度如下:

模型在测试集上的表现如下:

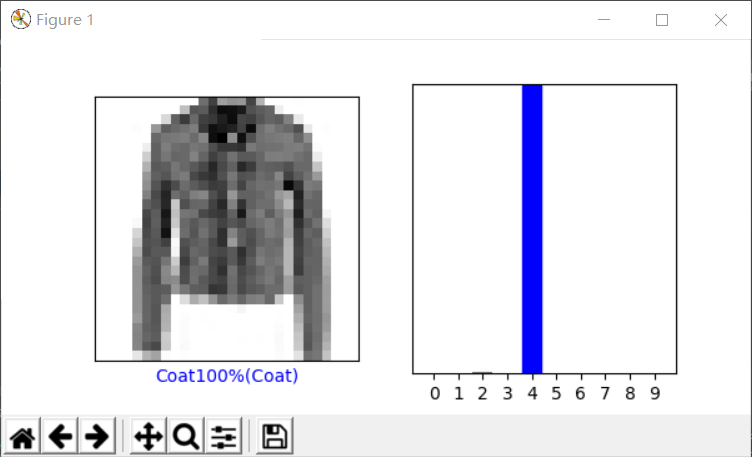
选择测试集某张图片的预测可视化结果如下:
程序代码如下:
 import tensorflow as tf

 from tensorflow import keras

 import numpy as np

 import matplotlib.pyplot as plt

 # 导入fashion mnist数据集

 fashion_mnist = keras.datasets.fashion_mnist

 (train_images,train_labels),(test_images,test_labels) = fashion_mnist.load_data()

 # 衣服类别

 class_names = ['T-shirt/top','Trouser','Pullover','Dress','Coat','Sandal',

                'Shirt','Sneaker','Bag','Ankle boot']

 print(train_images.shape,len(train_labels))

 print(test_images.shape,len(test_labels))

 # 查看图片

 plt.figure()

 plt.imshow(train_images[0])

 plt.colorbar()

 plt.grid(False)

 plt.show()

 # 预处理数据,将像素值除以255,使其缩放到0到1的范围

 train_images = train_images / 255.0

 test_images = test_images / 255.0

 # 验证数据格式的正确性,显示训练集前25张图像并注明类别

 plt.figure(figsize=(10,10))

 for i in range(25):

     plt.subplot(5,5,i+1)

     plt.xticks([])

     plt.yticks([])

     plt.grid(False)

     plt.imshow(train_images[i],cmap=plt.cm.binary)

     plt.xlabel(class_names[train_labels[i]])

 plt.show()

 # 搭建网络结构

 model = keras.Sequential([

     keras.layers.Flatten(input_shape=(28,28)),

     keras.layers.Dense(128,activation='relu'),

     keras.layers.Dense(10,activation='softmax')

 ])

 # 设置损失函数、优化器及训练指标

 model.compile(

     optimizer='adam',

     loss='sparse_categorical_crossentropy',

     metrics=['accuracy']

 )

 # 训练模型

 model.fit(train_images,train_labels,epochs=50)

 # 模型评估

 test_loss,test_acc=model.evaluate(test_images,test_labels,verbose=2)

 print('/nTest accuracy:',test_acc)

 # 选择测试集中的图像进行预测

 predictions=model.predict(test_images)

 # 查看第一个预测

 print("预测结果:",np.argmax(predictions[0]))

 # 将正确标签打印出来和预测结果对比

 print("真实结果:",test_labels[0])

 # 以图形方式查看完整的十个类的预测

 def plot_image(i,predictions_array,true_label,img):

     predictions_array,true_label,img=predictions_array,true_label[i],img[i]

     plt.grid(False)

     plt.xticks([])

     plt.yticks([])

     plt.imshow(img,cmap=plt.cm.binary)

     predicted_label=np.argmax(predictions_array)

     if predicted_label==true_label:

         color='blue'

     else:

         color='red'

     plt.xlabel("{}{:2.0f}%({})".format(class_names[predicted_label],

                                        100*np.max(predictions_array),

                                        class_names[true_label]),

                                        color=color)

 def plot_value_array(i,predictions_array,true_label):

     predictions_array,true_label=predictions_array,true_label[i]

     plt.grid(False)

     plt.xticks(range(10))

     plt.yticks([])

     thisplot=plt.bar(range(10),predictions_array,color="#777777")

     plt.ylim([0,1])

     predicted_label=np.argmax(predictions_array)

     thisplot[predicted_label].set_color('red')

     thisplot[true_label].set_color('blue')

 i=10

 plt.figure(figsize=(6,3))

 plt.subplot(1,2,1)

 plot_image(i,predictions[i],test_labels,test_images)

 plt.subplot(1,2,2)

 plot_value_array(i,predictions[i],test_labels)

 plt.show()
mnist识别优化——使用新的fashion mnist进行模型训练的更多相关文章
- 人脸检测及识别python实现系列(3)——为模型训练准备人脸数据
人脸检测及识别python实现系列(3)——为模型训练准备人脸数据 机器学习最本质的地方就是基于海量数据统计的学习,说白了,机器学习其实就是在模拟人类儿童的学习行为.举一个简单的例子,成年人并没有主动 ...
- 用标准3层神经网络实现MNIST识别
一.MINIST数据集下载 1.https://pjreddie.com/projects/mnist-in-csv/ 此网站提供了mnist_train.csv和mnist_test.cs ...
- fashion MNIST识别(Tensorflow + Keras + NN)
Fashion MNIST https://www.kaggle.com/zalando-research/fashionmnist Fashion-MNIST is a dataset of Zal ...
- 深度学习常用数据集 API(包括 Fashion MNIST)
基准数据集 深度学习中经常会使用一些基准数据集进行一些测试.其中 MNIST, Cifar 10, cifar100, Fashion-MNIST 数据集常常被人们拿来当作练手的数据集.为了方便,诸如 ...
- NO.3:自学tensorflow之路------MNIST识别,神经网络拓展
引言 最近自学GRU神经网络,感觉真的不简单.为了能够快速跑完程序,给我的渣渣笔记本(GT650M)也安装了一个GPU版的tensorflow.顺便也更新了版本到了tensorflow-gpu 1.7 ...
- 莫烦大大keras学习Mnist识别(4)-----RNN
一.步骤: 导入包以及读取数据 设置参数 数据预处理 构建模型 编译模型 训练以及测试模型 二.代码: 1.导入包以及读取数据 #导入包 import numpy as np np.random.se ...
- TensorFlow+实战Google深度学习框架学习笔记(12)------Mnist识别和卷积神经网络LeNet
一.卷积神经网络的简述 卷积神经网络将一个图像变窄变长.原本[长和宽较大,高较小]变成[长和宽较小,高增加] 卷积过程需要用到卷积核[二维的滑动窗口][过滤器],每个卷积核由n*m(长*宽)个小格组成 ...
- Windows下mnist数据集caffemodel分类模型训练及测试
1. MNIST数据集介绍 MNIST是一个手写数字数据库,样本收集的是美国中学生手写样本,比较符合实际情况,大体上样本是这样的: MNIST数据库有以下特性: 包含了60000个训练样本集和1000 ...
- 吴裕雄 python 神经网络——TensorFlow实现回归模型训练预测MNIST手写数据集
import tensorflow as tf from tensorflow.examples.tutorials.mnist import input_data mnist = input_dat ...
随机推荐
- HDU_3038_并查集
http://acm.hdu.edu.cn/showproblem.php?pid=3038 并查集的应用,选择哪个点作为根结点都没关系,多了一个sum数组保存每个点到根节点的和,注意刚开始a减了1, ...
- shellcode 反汇编,模拟运行以及调试方法
onlinedisassembler https://onlinedisassembler.com 在线反汇编工具,类似于lda.功能比较单一. Any.run 等平台在线分析 将shellcode保 ...
- maven mvn 安装介绍
maven是什么? Maven是基于项目对象模型(POM project object model),可以通过一小段描述信息(配置)来管理项目的构建,报告和文档的软件项目管理工具 Maven 除了以程 ...
- rsync命令 SCP命令
快速查询scp: scp 各种参数 源地址文件 目的地址文件 从本地复制到远程: scp [[user@]host1:]file1 ... [[user@]h ...
- Linux运维---磁盘存储-2. RAID
随着单块磁盘在数据安全.性能.容量上呈现出的局限,磁盘阵列(Redundant Arrays of Inexpensive/Independent Disks,RAID)出现了,RAID把多块独立的磁 ...
- pyhton项目和晋江文学城数据分析项目
1.图书管理系统 图1.图书管理系统(作者信息列表页面) 图2.图书管理系统(作者信息修改页面) 2.个人博客网页设计 图3.博客(我的日记-->个人日记)页面 图4.博客(关于我--> ...
- Apache Solr JMX服务 RCE 漏洞复现
Apache Solr JMX服务 RCE 漏洞复现 ps:Apache Solr8.2.0下载有点慢,需要的话评论加好友我私发你 0X00漏洞简介 该漏洞源于默认配置文件solr.in.sh中的EN ...
- Java工作流系统jflow从表功能介绍一
关键词:工作流快速开发平台 工作流流设计 业务流程管理 asp.net 开源工作流 bpm工作流系统 java工作流主流框架 自定义工作流引擎 表单设计器 流程设计器 从表也叫明细表, ...
- oo第三次作业--jml
1.首先我们应该了解什么是jml,jml是java modeling language的缩写,是一种为java规格化设计的标识语言,简单来说,就是描述“干什么”的标准语言(跟注释差不多,但是是标准化注 ...
- 传智播客C++视频学习笔记(1)
下载Visual Studio Community版本, #include<iostream> using namespace std; int main() { cout << ...