nextcloud私有云盘的部署
nextcloud在centos系统下搭建自己的私有云盘
搭建一套自己的私有云盘,让数据存储更加方便、可靠。自己搭建的云存储,首先没有什么容量、下载速度的限制,而且本地访问速度很快。一开始以为Nextcloud只是一个网盘云存储,后来看到Nextcloud内置了Office文档、图片相册、日历联系人、两步验证、文件管理、RSS阅读等丰富的应用,我发现Nextcloud已经仅仅可以用作个人或者团队存储与共享,还可以打造成为一个个人办公平台,几乎相当于一个个人的Dropbox了。
自己搭建私有云其实很简单,首先需要一台主机,然后需要选择一个私有云软件(比如ownCloud、nextCloud、seafile)。以下内容将介绍如何在 CentOS 7 服务器中安装和配置Nextcloud,并且会通过 Nginx 和 PHP7-FPM 来运行 Nextcloud,同时使用 MariaDB 数据库系统。具体部署方法如下:
一 . 部署环境的系统是Centos7版本
[root@nextcloud ~]# cat /etc/redhat-release
CentOS Linux release 7.1.1503 (Core)
二. 安装并配置Nginx和php-fpm
[root@nextcloud ~]# yum -y install epel-release
[root@nextcloud ~]# yum -y install nginx
添加一个yum源来安装php-fpm
rpm -Uvh https://mirror.webtatic.com/yum/el7/webtatic-release.rpm
安装相关组件
yum -y install php70w-fpm php70w-cli php70w-gd php70w-mcrypt php70w-mysql php70w-pear php70w-xml php70w-mbstring php70w-pdo php70w-json php70w-pecl-apcu php70w-pecl-apcu-devel
完成后,检查一下php-fpm是否已正常安装
[root@nextcloud ~]# php -v
PHP 7.0.27 (cli) (built: Jan 14 2018 09:00:22) ( NTS )
Copyright (c) 1997-2017 The PHP Group
Zend Engine v3.0.0, Copyright (c) 1998-2017 Zend Technologies
配置php-fpmvim /etc/php-fpm.d/www.conf.....user = nginx //将用户和组都改为nginxgroup = nginx.....listen = 127.0.0.1:9000 //php-fpm所监听的端口为9000......env[HOSTNAME] = $HOSTNAME //去掉下面几行注释env[PATH] = /usr/local/bin:/usr/bin:/binenv[TMP] = /tmpenv[TMPDIR] = /tmpenv[TEMP] = /tmp在/var/lib目录下为session路径创建一个新的文件夹,并将用户名和组设为nginxmkdir -p /var/lib/php/sessionchown nginx:nginx -R /var/lib/php/session/ 启动Nginx和php-fpm服务,并添加开机启动systemctl start php-fpmsystemctl start nginxsystemctl enable php-fpmsystemctl enable nginx三. 安装并配置MariaDB 或 mysql使用MaraiDB作为Nextcloud数据库。yum安装MaraiDB服务yum -y install mariadb mariadb-server启动MariaDB服务并添加开机启动systemctl start mariadbsystemctl enable mariadbMariaDB [(none)]> create database nextcloud; MariaDB [(none)]> create user nextcloud@localhost identified by '123456';MariaDB [(none)]> grant all privileges on nextcloud.* to nextcloud@localhost identified by '123456';MariaDB [(none)]> flush privileges;四. 配置Nextcloud生成自签名SSL证书
先为SSL证书创建一个新的文件夹:cd /etc/nginx/cert/penssl req -new -x509 -days 365 -nodes -out /etc/nginx/cert/nextcloud.crt -keyout /etc/nginx/cert/nextcloud.key.....Country Name (2 letter code) [XX]:cn //国家State or Province Name (full name) []:beijing //省份Locality Name (eg, city) [Default City]:beijing //地区名字Organization Name (eg, company) [Default Company Ltd]:lxplwh //公司名Organizational Unit Name (eg, section) []:Technology //部门Common Name (eg, your name or your server's hostname) []:lxplwh //CA主机名Email Address []:lxplwh@126.com 然后将证书文件的权限设置为660chmod 700 /etc/nginx/certchmod 600 /etc/nginx/cert/*五. 下载并安装Nextcloudwget https://download.nextcloud.com/server/releases/nextcloud-12.0.4.zipunzip nextcloud-12.0.4.zipmv nextcloud /usr/share/nginx/html/ 并为Nextcloud创建data目录,将Nextcloud的用户和组修改为nginxmkdir -p nextcloud/data/chown nginx:nginx -R nextcloud/ 六. 配置Nginx虚拟主机#user nobody;
worker_processes 1;
events {
worker_connections 1024;
}
http {
include mime.types;
default_type application/octet-stream;
sendfile on;
keepalive_timeout 65;
upstream php-handler {
server 127.0.0.1:9000;
}
server {
listen 80;
server_name nextcloud.lxplwh.com;
return 301 https://$server_name$request_uri;
}
server {
listen 443 ssl;
server_name nextcloud.lxplwh.com;
ssl_certificate /etc/nginx/cert/nextcloud.crt;
ssl_certificate_key /etc/nginx/cert/nextcloud.key;
add_header Strict-Transport-Security "max-age=15768000;
includeSubDomains; preload;";
add_header X-Content-Type-Options nosniff;
add_header X-Frame-Options "SAMEORIGIN";
add_header X-XSS-Protection "1; mode=block";
add_header X-Robots-Tag none;
add_header X-Download-Options noopen;
add_header X-Permitted-Cross-Domain-Policies none;
root /usr/share/nginx/html/nextcloud/;
location = /robots.txt {
allow all;
log_not_found off;
access_log off;
}
location = /.well-known/carddav {
return 301 $scheme://$host/remote.php/dav;
}
location = /.well-known/caldav {
return 301 $scheme://$host/remote.php/dav;
}
client_max_body_size 512M;
fastcgi_buffers 64 4K;
gzip off;
error_page 403 /core/templates/403.php;
error_page 404 /core/templates/404.php;
location / {
rewrite ^ /index.php$uri;
}
location ~ ^/(?:build|tests|config|lib|3rdparty|templates|data)/ {
deny all;
}
location ~ ^/(?:\.|autotest|occ|issue|indie|db_|console) {
deny all;
}
location ~ ^/(?:index|remote|public|cron|core/ajax/update|status|ocs/v[12]|updater/.+|ocs-provider/.+|core/templates/40[34])\.php(?:$|/) {
include fastcgi_params;
fastcgi_split_path_info ^(.+\.php)(/.*)$;
fastcgi_param SCRIPT_FILENAME $document_root$fastcgi_script_name;
fastcgi_param PATH_INFO $fastcgi_path_info;
fastcgi_param HTTPS on;
fastcgi_param modHeadersAvailable true;
fastcgi_param front_controller_active true;
fastcgi_pass php-handler;
fastcgi_intercept_errors on;
fastcgi_request_buffering off;
}
location ~ ^/(?:updater|ocs-provider)(?:$|/) {
try_files $uri/ =404;
index index.php;
}
location ~* \.(?:css|js)$ {
try_files $uri /index.php$uri$is_args$args;
add_header Cache-Control "public, max-age=7200";
add_header Strict-Transport-Security "max-age=15768000;includeSubDomains; preload;";
add_header X-Content-Type-Options nosniff;
add_header X-Frame-Options "SAMEORIGIN";
add_header X-XSS-Protection "1; mode=block";
add_header X-Robots-Tag none;
add_header X-Download-Options noopen;
add_header X-Permitted-Cross-Domain-Policies none;
access_log off;
}
location ~* \.(?:svg|gif|png|html|ttf|woff|ico|jpg|jpeg)$ {
try_files $uri /index.php$uri$is_args$args;
access_log off;
}
}
确保没有问题后重启Nginx服务[root@nextcloud ~]# nginx -t
nginx: the configuration file /etc/nginx/nginx.conf syntax is ok
nginx: configuration file /etc/nginx/nginx.conf test is successful
解析上面nginx中配置的域名nextcloud.lxplwh.com,邦定hosts. 访问http://nextcloud.lxplwh.com进行Nextcloud界面安装.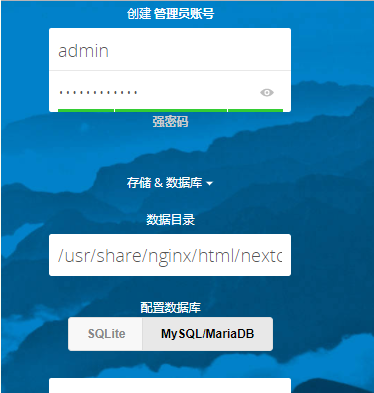
设置帐号密码,以及数据库的连接信息。如果不报错,即可安装完成,进入。

到此安装完成。
下面进行一些安全与性能优化
为了您服务的安全和性能, 请将所有设置配置正确. 我们将会进行一些自动化检查以帮助您完成这项工作. 详情请查看 "小提示" 部分及相关文档.
- HTTP 请求头 "X-Frame-Options" 没有配置为 "SAMEORIGIN". 这是一个潜在的安全或隐私风险, 我们建议您调整这项设置.
修改程序目录下的config目录中的config.php文件,在配置文件中添加多个Memcached实例,也可以添加一个:
'memcache.local' => '\OC\Memcache\APCu','memcache.distributed' => '\OC\Memcache\Memcached','memcached_servers' => array( array('localhost', 11211), array('server1.example.com', 11211), array('server2.example.com', 11211), ),在配置文件中添加如下,这个是通过TCP连接的:
'memcache.local' => '\OC\Memcache\Redis','redis' => array( 'host' => 'localhost', 'port' => 6379, ),还有性能更好的UNIX连接:'memcache.local' => '\OC\Memcache\Redis','redis' => array( 'host' => '/var/run/redis/redis.sock', 'port' => 0, 'dbindex' => 0, 'password' => 'secret', 'timeout' => 1.5, ),同时,官方还推荐加入如下,来用于存储文件锁:'memcache.locking' => '\OC\Memcache\Redis',Nextcloud的邮件发信设置
使用管理员账号登陆Nextcloud。点击右上角的设置图标里的"管理"-"其他设置"
转载自:https://www.cnblogs.com/lxplwh/p/8398522.html
nextcloud私有云盘的部署的更多相关文章
- linux下使用URLOS搭建nextcloud私有云盘系统
Nextcloud是一个免费专业的私有云存储网盘开源项目,可以让你简单快速地在个人/公司电脑.服务器甚至是树莓派等设备上架设一套属于自己或团队专属的云同步网盘,从而实现跨平台跨设备文件同步.共享.版本 ...
- Nextcloud私有云盘在Centos7下的部署笔记
搭建个人云存储一般会想到ownCloud,堪称是自建云存储服务的经典.而Nextcloud是ownCloud原开发团队打造的号称是“下一代”存储.初一看觉得“口气”不小,刚推出来就重新“定义”了Clo ...
- 政务私有云盘系统建设的工具 – Mobox私有云盘
序言 这几年,智慧政务已经成为了政府行业IT建设发展的重要进程.传统办公方式信息传递速度慢.共享程度低.查询利用难,早已成为政府机关获取和利用信息的严重制约因素.建立文档分享共用机制,加强数据整合,避 ...
- Docker部署Nextcloud私有网盘
对于国内某度的网盘限速行为大家有目共睹,不过对于商业化的产品模式这样也无可厚非,毕竟企业也是盈利为目的.如果想享受互联网技术带来的便利,刚好也懂一点技术的话可以尝试搭建属于私有的网盘.个人比较推荐的是 ...
- 5分钟快速部署ownCloud私有云盘存储系统
ownCloud 是一个开源免费专业的私有云存储项目,它能帮你快速在个人电脑或服务器上架设一套专属的私有云文件同步网盘,可以像 Dropbox 那样实现文件跨平台同步.共享.版本控制.团队协作等等.o ...
- docker 搭建私有云盘 Seafile
缘起 现如今各种云存储服务其实挺多的,国外有经典的DropBox.Google Drive.微软的OneDrive等,国内也有可以免费使用的各种云. 那么为什么想要搭建私有云存储呢?主要是本着“自己的 ...
- 极客DIY:使用树莓派制作一套“NAS+私有云盘+下载机”
原创作者:HackLiu 0×00 前言 如果你家里有多台设备需要联网需要娱乐,你一定会或多或少遇到设备碎片化带来的烦恼.当然,已经有很多厂商包括新晋的小米.360在内的互联网公司做了这个事情 ...
- Nextcloud13私有云盘安装指南
一.环境说明: ※操作系统版本CentOS 7.5 Minimal-1804 ※操作系统版本已经使用163 YUM源 ※ Nextcloud版本 13.05 ※ 数据库使用MariaDB,安装在同一台 ...
- 使用树莓派制作一套“NAS+私有云盘+下载机”
原创作者:HackLiu 0×00 前言 如果你家里有多台设备需要联网需要娱乐,你一定会或多或少遇到设备碎片化带来的烦恼.当然,已经有很多厂商包括新晋的小米.360在内的互联网公司 ...
随机推荐
- Atitit 转移特效attilax总结
Atitit 转移特效attilax总结 总结一般从按钮,转移到大点的方框上回比较好看点.. <!--jq ui--> <style type="text/css" ...
- ios block一定会犯的几个错误
贴几段斯坦福大学关于gcd的代码,这段代码逐步演示了如何修正错误,其中用到的既是串行队列 1.这个是原始代码 - (void)viewWillAppear:(BOOL)animated { NSD ...
- centos 7 忘记密码
修改rd.lvm.lv=cl/swap(我的是虚似机如果是实体机的话应该是ro_rd.lvm.lv=centos/swap)改成 rw init=/sysroot/bin/sh 注意上图rw init ...
- 菜鸟教程之工具使用(四)——借助JRebel使Tomcat支持热部署
JRebel是一个J2EE热部署的工具.使用它可以减少浪费8-18%的开发时间在项目的构建和部署上.虽然Java也提供了HotSpot的JVM,但是如果你修改的类中有方法名称变动的话,HotSpot就 ...
- Ctex中WinEdt经常弹出注册小窗口 解决办法
使用WinEdt 7避免跳出“注册对话框” 在options菜单下点options…,在advanced configuration => Event Handlers 下点Exit, 在 ...
- (转)CTP: 平昨仓与平今仓,log轻轻告诉你.......
转自:http://blog.csdn.net/wowotuo/article/details/43242663 CTP的相关文档告诉我们,中金所和三大商品交易所中,只有上期所区分平今仓和平昨仓.也就 ...
- Linux命令格式及帮助命令详解
昨天看了一个教程,关于Linux命令的,本来以为当是复习随便看看的,结果看了不禁汗颜,这个真挺有学问的,很多东西都是我还不知道的,故此做总结,此文适合于对Linux命令有一定了解但又不是很深入的孩子, ...
- [Java]随记--HttpClient发送put请求
http://blog.csdn.net/u010989191/article/details/52852155 ******************************************* ...
- zabbix_agentd在windows上安装
zabbix_agentd在Windows环境内客户端的安装与管理 1) 在目标机器上C:\windows目录下新建一个目录,如zabbix_agent: 2) 将zabbix_agent软件 ...
- 好用的vim插件
# 好用的vim插件 ### 简介------------------------------ 记录vim好用的插件 ### vimcdoc vim中文帮助文档-------------------- ...