Heartbeat+HAProxy+MySQL半复制高可用架构
目录
- 一 基础环境
- 二 架构设计
- 三 安装MySQL
- 3.1 安装MySQL
- 3.2 初始化MySQL
- 四 配置MySQL半同步
- 4.1 加载插件
- 4.2 配置半同步复制
- 4.3 master创建账号并授权
- 4.4 slave创建账号并授权
- 4.4 启动同步
- 五 安装HAProxy
- 5.1 下载及安装
- 5.2 创建HAProxy相关配置文件
- 六 配置HAProxy
- 6.1 配置master的HAProxy
- 6.2 配置slave的HAProxy
- 七 安装Heartbeat
- 八 配置Heartbeat
- 8.1 配置authkeys
- 8.2 配置Heartbeat
- 8.3 配置主备切换
- 8.4 添加MySQL健康检查
- 8.5 配置haresources
- 九 启动服务
- 9.1 启动Heartbeat
- 十 验证服务
- 10.1 验证VIP
- 10.2 验证进程
- 十一 功能测试
- 11.1 验证3307端口的读负载均衡转发策略
- 11.2 验证3308端口的读负载均衡转发策略
- 11.3 模拟从库crash
- 11.4 模拟主库crash
- 附录一:半同步复制概念
一 基础环境
|
节点
|
系统版本
|
MySQL版本
|
业务IP
|
心跳IP
|
|
Master
|
CentOS 7.5
|
MySQL 5.6
|
192.168.88.100
|
192.168.77.100
|
|
Slave
|
CentOS 7.5
|
MySQL 5.6
|
192.168.88.101
|
192.168.77.101
|
|
VIP
|
192.168.88.88
|
|||
二 架构设计
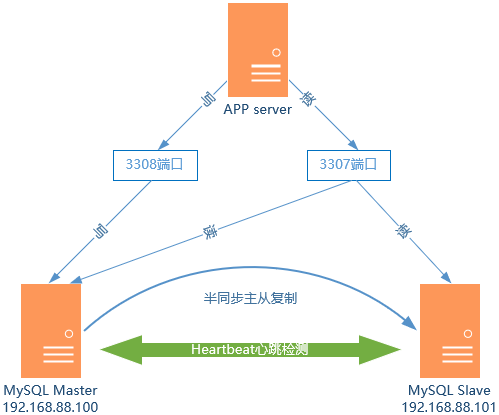
- (1)VIP漂移到主机Slave上;
- (2)重置Slave的MySQL Slave角色,使之切换为Master;
- (3)启动Slave上的haproxy,继续接收应用的请求。
三 安装MySQL
3.1 安装MySQL
  1 [root@master ~]# yum list installed | grep mysql	#查看是否存在其他MySQL组件

  2 [root@master ~]# yum -y remove mysql*			#为避免冲突引,卸载已存在的组件

  3 [root@master ~]# yum -y install mariadb mariadb-server

  4 [root@master ~]# systemctl start mariadb.service
3.2 初始化MySQL
  1 [root@master ~]# mysql_secure_installation		#设置root密码

  2 [root@master ~]# systemctl restart mariadb.service
四 配置MySQL半同步
4.1 加载插件

  1 [root@master ~]# ll /usr/lib64/mysql/plugin/		#查看插件

  2 [root@master ~]# mysql -uroot -p

  3 Enter password:

  4 MariaDB [(none)]> install plugin rpl_semi_sync_master soname 'semisync_master.so';

  5 MariaDB [(none)]> install plugin rpl_semi_sync_slave soname 'semisync_slave.so';
1 MariaDB [(none)]> select * from information_schema.plugins where plugin_name like '%semi%'\G #查看加载情况

4.2 配置半同步复制
4.2.1 master my.cf配置
  1 [root@master ~]# vi /etc/my.cnf

  2 [mysqld]

  3 ……

  4 server-id=1				#设置主服务器master的id

  5 log-bin=mysql-bin			#配置二进制变更日志命名格式

  6 plugin-load=rpl_semi_sync_master=semisync_master.so

  7 rpl_semi_sync_master_enabled=1

  8 rpl_semi_sync_master_timeout=1000
4.2.2 slave my.cf配置
  1 [root@slave ~]# vi /etc/my.cnf

  2 [mysqld]

  3 ……

  4 server-id=2				#设置本服务器slave的id

  5 log-bin=mysql-bin			#配置二进制变更日志命名格式

  6 plugin-load=rpl_semi_sync_master=semisync_master.so

  7 rpl_semi_sync_master_enabled=1

  8

  9 read-only				#设为只读模式,只能从master同步,不能直接写入
4.3 master创建账号并授权
1 [root@master ~] mysql -uroot -p
2 Enter password:
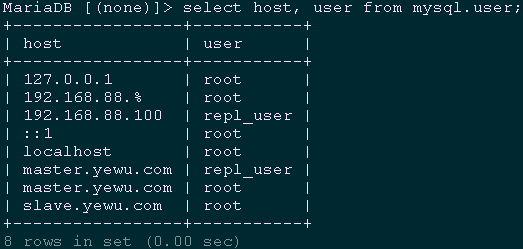
3 MariaDB [(none)]> grant replication slave on *.* to 'repl_user'@'192.168.88.101' identified by 'x12345678';
4 MariaDB [(none)]> grant replication slave on *.* to 'repl_user'@'slave.yewu.com' identified by 'x12345678';
5 MariaDB [(none)]> grant all privileges on *.* to 'root'@'192.168.88.%' identified by 'x120952576' with grant option;
6 MariaDB [(none)]> grant all privileges on *.* to 'root'@'slave.yewu.com' identified by 'x120952576';
7 MariaDB [(none)]> flush privileges;
8 MariaDB [(none)]> select host, user from mysql.user; #查看权限
  1 [root@master ~]# systemctl restart mariadb.service

  2 [root@master ~]# mysql -uroot -p

  3 Enter password:

  4 MariaDB [(none)]> show master status;
4.4 slave创建账号并授权
1 [root@slave ~] mysql -uroot -p
2 Enter password:
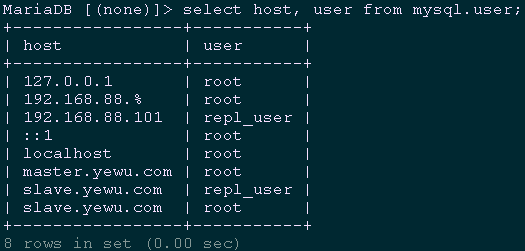
3 MariaDB [(none)]> grant replication slave on *.* to 'repl_user'@'192.168.88.100' identified by 'x12345678';
4 MariaDB [(none)]> grant replication slave on *.* to 'repl_user'@'master.yewu.com' identified by 'x12345678';
5 MariaDB [(none)]> grant all privileges on *.* to 'root'@'192.168.88.%' identified by 'x120952576' with grant option;
6 MariaDB [(none)]> grant all privileges on *.* to 'root'@'master.yewu.com' identified by 'x120952576' with grant option;
7 MariaDB [(none)]> select host, user from mysql.user; #查看权限
  1 [root@master ~]# systemctl restart mariadb.service

  2 [root@master ~]# mysql -uroot -p

  3 Enter password:

  4 MariaDB [(none)]> show master status;
4.4 启动同步
1 [root@slave ~]# systemctl restart mariadb.service
2 [root@slave ~]# mysql -uroot -p
3 Enter password:
4 MariaDB [(none)]> change master to master_host='192.168.88.100',
5 master_user='repl_user',
6 master_password='x12345678',
7 master_log_file='mysql-bin.000001',
8 master_port=3306,
9 master_log_pos=245;
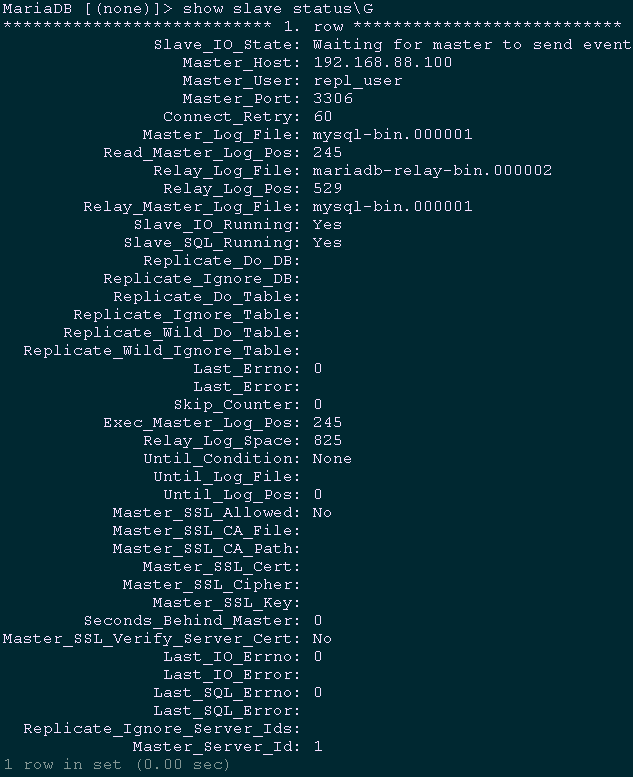
10 MariaDB [(none)]> start slave;
11 MariaDB [(none)]> show slave status\G #查看slave状态
五 安装HAProxy
5.1 下载及安装
  1 [root@master ~]# wget http://www.haproxy.org/download/1.9/src/haproxy-1.9.0.tar.gz

  2 [root@master ~]# tar -zxvf haproxy-1.9.0.tar.gz

  3 [root@master ~]# cd haproxy-1.9.0/

  4 [root@master haproxy-1.9.0]# make TARGET=linux3100 CPU=x86_64 PREFIX=/usr/local/haprpxy

  5 #编译uname -r #查看系统内核版本号

  6 [root@master haproxy-1.9.0]# make install PREFIX=/usr/local/haproxy
5.2 创建HAProxy相关配置文件
  1 [root@master ~]# mkdir /usr/local/haproxy/conf				#创建配置文件目录

  2 [root@master ~]# mkdir -p /etc/haproxy					#创建配置文件目录

  3 [root@master ~]# touch /usr/local/haproxy/haproxy.cfg			#创建配置文件

  4 [root@master ~]# ln -s /usr/local/haproxy/conf/haproxy.cfg /etc/haproxy/haproxy.cfg		 #添加配置文件软连接

  5 [root@master ~]# cp -r /root/haproxy-1.9.0/examples/errorfiles /usr/local/haproxy/errorfiles #拷贝错误页面

  6 [root@master ~]# ln -s /usr/local/haproxy/errorfiles /etc/haproxy/errorfiles

  7 #添加软连接

  8 [root@master ~]# mkdir -p  /usr/local/haproxy/log			#创建日志文件目录

  9 [root@master ~]# touch /usr/local/haproxy/log/haproxy.log		#创建日志文件目录

 10 [root@master ~]# ln -s /usr/local/haproxy/log/haproxy.log /var/log/haproxy.log

 11 #添加软连接

 12 [root@master ~]# cp /usr/local/haproxy/sbin/haproxy /usr/sbin/	#拷贝HAProxy命令

 13 [root@master ~]# cp /root/haproxy-1.7.9/examples/haproxy.init /etc/rc.d/init.d/haproxy

 14 #拷贝开机启动文件

 15 [root@master ~]# chmod u+x /etc/rc.d/init.d/haproxy			#添加脚本执行权限

 16 [root@master ~]# chkconfig haproxy on				#设置开机启动
六 配置HAProxy
6.1 配置master的HAProxy
  1 [root@master ~]# vi /etc/haproxy/haproxy.cfg

  2 global

  3     log         127.0.0.1 local2        # 日志定义级别

  4     chroot      /usr/local/haproxy      # 当前工作目录

  5     pidfile     /var/run/haproxy.pid    # 进程id

  6     maxconn     4000                    # 最大连接数

  7     user        haproxy                 # 运行改程序的用户

  8     group       haproxy

  9     daemon                              # 后台形式运行

 10     stats socket /usr/local/haproxy/stats

 11

 12 defaults

 13     mode                    tcp         # haproxy运行模式(http | tcp | health)

 14     log                     global      # 采用全局定义的日志

 15     option                  dontlognull # 不记录健康检查的日志信息

 16     option                  redispatch  # serverId对应的服务器挂掉后,强制定向到其他健康的服务器

 17     retries                 3           # 三次连接失败则服务器不用

 18     timeout http-request    10s

 19     timeout queue           1m

 20     timeout client          1m          # 客户端超时

 21     timeout server          1m          # 服务器超时

 22     timeout http-keep-alive 10s

 23     timeout check           10s         # 心跳检测

 24     maxconn                 600         # 最大连接数

 25

 26 listen stats                            # 配置haproxy状态页(用来查看的页面)

 27     mode http

 28     bind 0.0.0.0:8888

 29     stats enable

 30     stats refresh 30s                   #设置统计页面自动刷新的时间

 31     stats uri /stats                    #设置统计页面url

 32     stats realm Haproxy Manager         #设置登录HAProxy统计页面密码框上提示文本

 33     stats auth admin:admin              #设置登录HAProxy统计页面用户名和密码设置

 34     #stats hide-version                 #隐藏统计页面上HAProxy的版本信息

 35 frontend  read

 36     bind *:3307                         # 监听前端3307端口(表示任何ip访问3307端口都会将数据轮番转发到mysql服务器群组中)

 37     default_backend        mysql_read   # 后端服务器组名

 38

 39 backend mysql_read

 40     balance     roundrobin              # 使用轮询方式调度

 41     server mysql1 192.168.88.100:3306 check port 3306 maxconn 300

 42     server mysql2 192.168.88.101:3306 check port 3306 maxconn 300

 43

 44 frontend  write

 45     bind *:3308                         # 监听前端3308端口(表示任何ip访问3308端口都会将数据轮番转发到mysql服务器群组中)

 46     default_backend        mysql_write  # 后端服务器组名

 47

 48 backend mysql_write

 49     server mysql1 192.168.88.100:3306 check port 3306 maxconn 300
6.2 配置slave的HAProxy
  1 [root@slave ~]# vi /etc/haproxy/haproxy.cfg

  2 global

  3     log         127.0.0.1 local2        # 日志定义级别

  4     chroot      /usr/local/haproxy      # 当前工作目录

  5     pidfile     /var/run/haproxy.pid    # 进程id

  6     maxconn     4000                    # 最大连接数

  7     user        haproxy                 # 运行改程序的用户

  8     group       haproxy

  9     daemon                              # 后台形式运行

 10     stats socket /usr/local/haproxy/stats

 11

 12 defaults

 13     mode                    tcp         # haproxy运行模式(http | tcp | health)

 14     log                     global      # 采用全局定义的日志

 15     option                  dontlognull # 不记录健康检查的日志信息

 16     option                  redispatch  # serverId对应的服务器挂掉后,强制定向到其他健康的服务器

 17     retries                 3           # 三次连接失败则服务器不用

 18     timeout http-request    10s

 19     timeout queue           1m

 20     timeout client          1m          # 客户端超时

 21     timeout server          1m          # 服务器超时

 22     timeout http-keep-alive 10s

 23     timeout check           10s         # 心跳检测

 24     maxconn                 600         # 最大连接数

 25

 26 listen stats                            # 配置haproxy状态页(用来查看的页面)

 27     mode http

 28     bind 0.0.0.0:8888

 29     stats enable

 30     stats refresh 30s                   #设置统计页面自动刷新的时间

 31     stats uri /stats                    #设置统计页面url

 32     stats realm Haproxy Manager         #设置登录HAProxy统计页面密码框上提示文本

 33     stats auth admin:admin              #设置登录HAProxy统计页面用户名和密码设置

 34     #stats hide-version                 #隐藏统计页面上HAProxy的版本信息

 35 frontend  read

 36     bind *:3307                         # 监听前端3307端口(表示任何ip访问3307端口都会将数据轮番转发到mysql服务器群组中)

 37     default_backend        mysql_read   # 后端服务器组名

 38

 39 backend mysql_read

 40     balance     roundrobin              # 使用轮询方式调度

 41     server mysql1 192.168.88.100:3306 check port 3306 maxconn 300

 42     server mysql2 192.168.88.101:3306 check port 3306 maxconn 300

 43

 44 frontend  write

 45     bind *:3308                         # 监听前端3308端口(表示任何ip访问3308端口都会将数据轮番转发到mysql服务器群组中)

 46     default_backend        mysql_write  # 后端服务器组名

 47

 48 backend mysql_write

 49     server mysql1 192.168.88.101:3306 check port 3306 maxconn 300
七 安装Heartbeat
八 配置Heartbeat
8.1 配置authkeys
  1 [root@master ~]# vi /usr/local/heartbeat/etc/ha.d/authkeys

  2 auth 3

  3 3 md5 Yes!
8.2 配置Heartbeat
  1 [root@master ~]# vi /usr/local/heartbeat/etc/ha.d/ha.cf

  2 logfile /var/log/ha-log			#记录Heartbeat其他相关日志信息

  3 logfacility     local0			#设置heartbeat的日志,这里用的是系统日志

  4 keepalive 2				#设定心跳(监测)时间间隔为2秒

  5 deadtime 15				#宣告死亡时间

  6 warntime 10				#心跳延时时间

  7 initdead 60				#初始化时间

  8 udpport 694				#用于通信的UDP端口

  9 bcast   eth1				#接受广播心跳的网卡接口

 10 ucast eth1 192.168.77.101		#置对方机器心跳检测的IP

 11 auto_failback off			#关闭自动切回恢复正常的主节点

 12 node master.yewu.com			#集群节点的名称,必须匹配uname -n的结果。

 13 node slave.yewu.com

 14 ping 192.168.88.1

 15 respawn hacluster /usr/local/heartbeat/libexec/heartbeat/ipfail
8.3 配置主备切换
  1 [root@master ~]# vi /root/remove_slave.sh

  2 #!/bin/sh

  3 #****************************************************************#

  4 # ScriptName: remove_slave.sh

  5 # Author: xhy

  6 # Create Date: 2018-12-22 09:58

  7 # Modify Author: xhy

  8 # Modify Date: 2018-12-22 09:58

  9 # Version:

 10 #***************************************************************#

 11 user=root

 12 password=x120952576

 13 log=/var/log/mariadb/remove_slave.log

 14 echo "`date`" >> $log

 15 rm -rf /tmp/kill.sql

 16 mysql -u$user -p$password -e "select * into outfile '/tmp/kill.sql' from (select concat('kill ',id,';') from information_schema.processlist where command='sleep' union all select 'set global read_o

 17 nly=OFF;' union all select 'stop slave;' union all select 'reset slave all;') t;"

 18 mysql -u$user -p$password < /tmp/kill.sql >> $log

 19  /bin/sed -i 's#read-only#\#read-only#' /etc/my.cnf
  1 # vi /usr/lib/systemd/system/mariadb.service

  2 #PrivateTmp=true

  3 PrivateTmp=false

  4 # systemctl daemon-reload

  5 # systemctl restart mariadb.service
  1 [root@master ~]# chmod 755 /root/remove_slave.sh

  2 [root@master ~]# scp /root/remove_slave.sh root@192.168.88.101:/root/
8.4 添加MySQL健康检查
  1 [root@master ~]# vi mysql_check.sh

  2 #!/bin/sh

  3 #****************************************************************#

  4 # ScriptName: mysql_check.sh

  5 # Author: xhy

  6 # Create Date: 2018-12-20 16:40

  7 # Modify Author: xhy

  8 # Modify Date: 2018-12-20 16:40

  9 # Version:

 10 #***************************************************************#

 11 MYSQL=/usr/bin/mysql

 12 MYSQL_HOST=localhost

 13 MYSQL_USER=root

 14 MYSQL_PASSWORD=x120952576

 15 date=`date +%y%m%d-%H:%M:`

 16 echo $date

 17 $MYSQL -h $MYSQL_HOST -u $MYSQL_USER -p$MYSQL_PASSWORD -e "show status;" >/dev/null 2>&1

 18 #$mysqlclient --host=$host --port=$port--user=$user --password=$password  -e"show databases;" > /dev/null 2>&1

 19 if [ $? == 0 ]

 20 then

 21    echo " $host mysql login successfully "

 22    exit 0

 23 else

 24    echo " $host mysql login faild"

 25    /etc/init.d/heartbeat stop

 26    exit 2

 27 fi

 28 [root@master ~]# chmod 755 /root/mysql_check.sh

 29 [root@master ~]# scp /root/mysql_check.sh root@192.168.88.101:/root/

 30 [root@master ~]# crontab -e			#定时任务

 31 */1 * * * * /root/mysql_check.sh >>/var/log/mariadb/check_mysql.log

 32 [root@slave ~]# crontab -e			#定时任务

 33 */1 * * * * /root/mysql_check.sh >>/var/log/mariadb/check_mysql.log
8.5 配置haresources
  1 root@master ~]# vi /usr/local/heartbeat/etc/ha.d/resource.d/changemysql

  2 /root/remove_slave.sh

  3 /etc/init.d/haproxy restart

  4 [root@master ~]# chmod 755 /usr/local/heartbeat/etc/ha.d/resource.d/changemysql

  5 [root@master ~]# ll /usr/local/heartbeat/etc/ha.d/resource.d/	#查看现有资源类型

  6 [root@master ~]# vi /usr/local/heartbeat/etc/ha.d/haresources

  7 master.yewu.com IPaddr::192.168.88.88/24/eth0 mariadb changemysql

  8 [root@master ~]# scp /usr/local/heartbeat/etc/ha.d/{ha.cf,haresources,authkeys} 192.168.88.101:/usr/local/heartbeat/etc/ha.d/		#将所有配置复制至slave节点

  9 [root@master ~]# scp /usr/local/heartbeat/etc/ha.d/resource.d/changemysql root@192.168.88.101:/usr/local/heartbeat/etc/ha.d/resource.d/

 10 [root@slave ~]# vi /usr/local/heartbeat/etc/ha.d/ha.cf

 11 ucast eth1 192.168.77.100		#置对方机器心跳检测的IP
九 启动服务
9.1 启动Heartbeat
  1 [root@slave ~]# systemctl start heartbeat.service

  2 [root@slave ~]# systemctl enable heartbeat.service

  3 [root@master ~]# service haproxy start

  4 [root@master ~]# systemctl start heartbeat.service

  5 [root@master ~]# systemctl enable heartbeat.service
十 验证服务
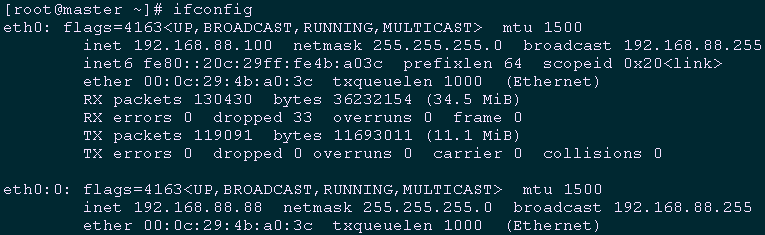
10.1 验证VIP
1 [root@master ~]# ifconfig
10.2 验证进程
1 [root@master ~]# ps -ef | grep -E 'heartbeat|haproxy' | grep -v grep

1 [root@slave ~]# ps -ef | grep -E 'heartbeat|haproxy' | grep -v grep

十一 功能测试
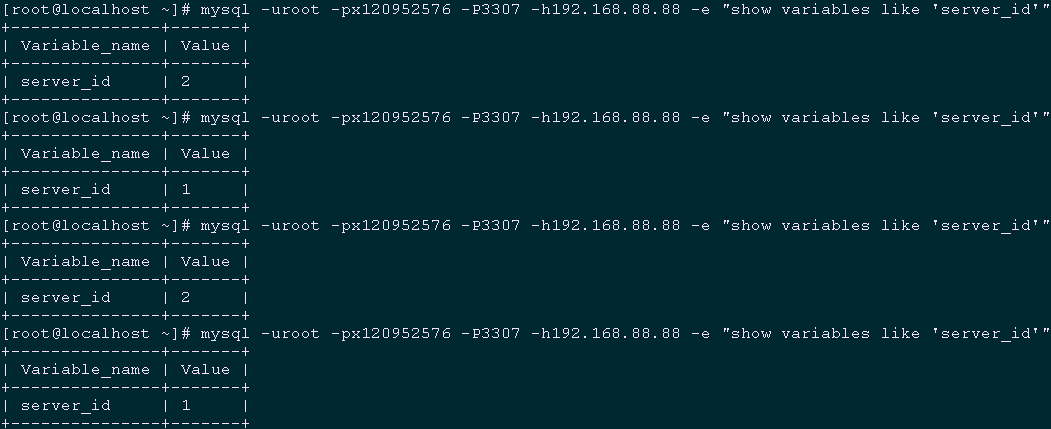
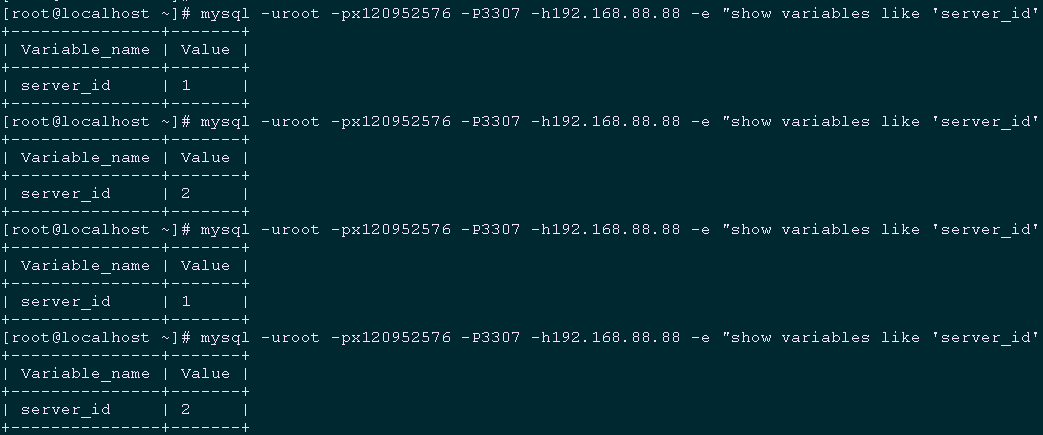
11.1 验证3307端口的读负载均衡转发策略
1 [root@localhost ~]# mysql -uroot -px120952576 -P3307 -h192.168.88.88 -e "show variables like 'server_id'"
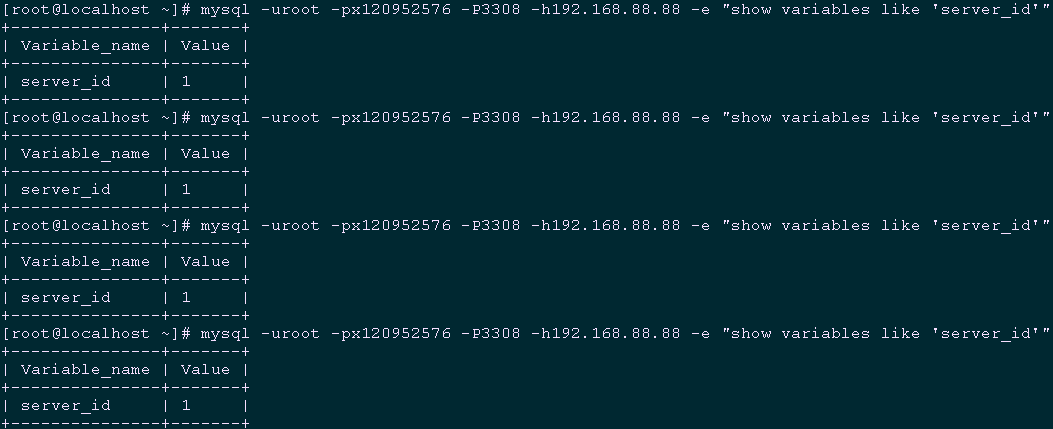
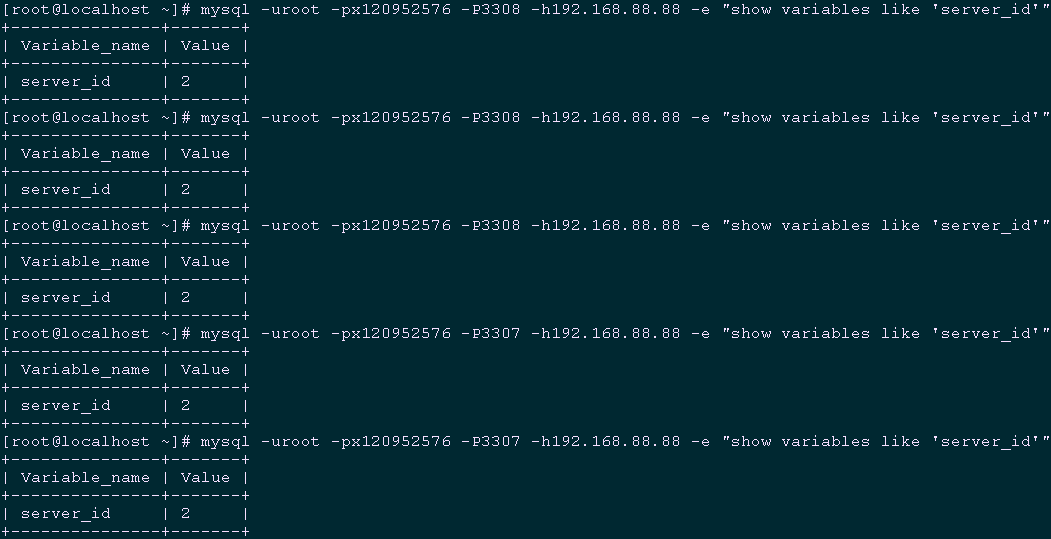
11.2 验证3308端口的读负载均衡转发策略
1 [root@localhost ~]# mysql -uroot -px120952576 -P3308 -h192.168.88.88 -e "show variables like 'server_id'"
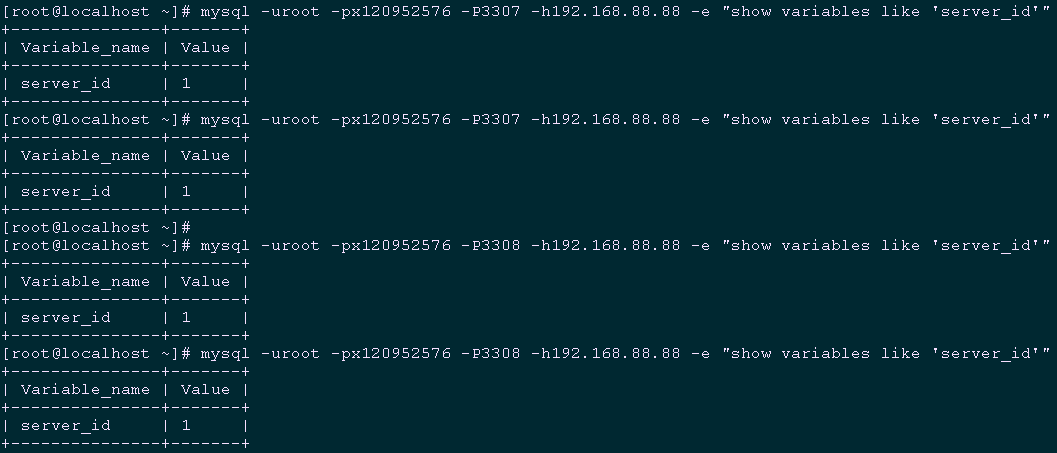
11.3 模拟从库crash
  1 [root@slave ~]# pkill -9 mysqld

  2 [root@localhost ~]# mysql -uroot -px120952576 -P3307 -h192.168.88.88 -e "show variables like 'server_id'"

  3 [root@localhost ~]# mysql -uroot -px120952576 -P3308 -h192.168.88.88 -e "show variables like 'server_id'"
  1 [root@slave ~]# systemctl start mariadb.service		#重启从库

  2 [root@localhost ~]# mysql -uroot -px120952576 -P3307 -h192.168.88.88 -e "show variables like 'server_id'"    #再次验证3307端口的读负载均衡转发策略
11.4 模拟主库crash
  1 [root@master ~]# pkill -9 mysqld

  2 [root@localhost ~]# mysql -uroot -px120952576 -P3308 -h192.168.88.88 -e "show variables like 'server_id'"

  3 [root@localhost ~]# mysql -uroot -px120952576 -P3307 -h192.168.88.88 -e "show variables like 'server_id'"
附录一:半同步复制概念
Heartbeat+HAProxy+MySQL半复制高可用架构的更多相关文章
- 004.Heartbeat+HAProxy+MySQL半复制高可用架构
一 基础环境 节点 系统版本 MySQL版本 业务IP 心跳IP Master CentOS 7.5 MySQL 5.6 192.168.88.100 192.168.77.100 Slave Cen ...
- MySQL数据库的优化(下)MySQL数据库的高可用架构方案
MySQL数据库的优化(下)MySQL数据库的高可用架构方案 2011-03-09 08:53 抚琴煮酒 51CTO 字号:T | T 在上一篇MySQL数据库的优化中,我们跟随笔者学习了单机MySQ ...
- MySQL系列:高可用架构之MHA
前言 从11年毕业到现在,工作也好些年头,入坑mysql也有近四年的时间,也捣鼓过像mongodb.redis.cassandra.neo4j等Nosql数据库.其实一直想写博客分享下工作上的零零碎碎 ...
- 实现基于Haproxy+Keepalived负载均衡高可用架构
1.项目介绍: 上上期我们实现了keepalived主从高可用集群网站架构,随着公司业务的发展,公司负载均衡服务已经实现四层负载均衡,但业务的复杂程度提升,公司要求把mobile手机站点作为单独的服务 ...
- Windows 环境搭建 PostgreSQL 逻辑复制高可用架构数据库服务
本文主要介绍 Windows 环境下搭建 PostgreSQL 的主从逻辑复制,关于 PostgreSQl 的相关运维文章,网络上大多都是 Linux 环境下的操作,鲜有在 Windows 环境下配置 ...
- Windows 环境搭建 PostgreSQL 物理复制高可用架构数据库服务
PostgreSQL 高可用数据库的常见搭建方式主要有两种,逻辑复制和物理复制,上周已经写过了关于在Windows环境搭建PostgreSQL逻辑复制的教程,这周来记录一下 物理复制的搭建方法. 首先 ...
- mysql复制(高可用架构方案的基础)
mysql复制:把一个数据库实例上所有改变复制到另外一个数据库库服务器实例的过程特点:1.没有改变就无所谓复制 ;改变是复制的根本与数据源2.所有的改变:是指可以复制全部改变,也可以复制部分改变 可以 ...
- 浅谈MySQL集群高可用架构
前言 高可用架构对于互联网服务基本是标配,无论是应用服务还是数据库服务都需要做到高可用.对于一个系统而言,可能包含很多模块,比如前端应用,缓存,数据库,搜索,消息队列等,每个模块都需要做到高可用,才能 ...
- mysql集群高可用架构
前言 高可用架构对于互联网服务基本是标配,无论是应用服务还是数据库服务都需要做到高可用.对于一个系统而言,可能包含很多模块,比如前端应用,缓存,数据库,搜索,消息队列等,每个模块都需要做到高可用,才能 ...
随机推荐
- ASP.NET中<%=%>、<%%>、<%@%>、<%#%>的用法与区别
1.<%= %> 里面放变量名,获取后台的变量值,直接输入变量到页面上,里面放的变量名,未经过encode eg: 后台: seession["ab"]=ab; 前台: ...
- Windows API 简介
操作系统的作用之一就是屏蔽一些复杂的直接对硬件操作,并提供给用户一个简单明确的应用接口,类外对于一些基本的或常用的操作也以API的形式提供给用户,比如内存管理.文件管理等. 消息传递机制 消息循环是一 ...
- 论文笔记:(ICCV2019)KPConv: Flexible and Deformable Convolution for Point Clouds
目录 摘要 一.引言 二.相关工作 投影网络 图卷积网络 逐点多层感知器网络 点卷积网络 三.核点卷积 3.1由点定义的核函数 3.2刚性的或可变形的核 3.3核点网络层 3.4核点网络架构 四.实验 ...
- Python小白的数学建模课-10.微分方程边值问题
小白往往听到微分方程就觉得害怕,其实数学建模中的微分方程模型不仅没那么复杂,而且很容易写出高水平的数模论文. 本文介绍微分方程模型边值问题的建模与求解,不涉及算法推导和编程,只探讨如何使用 Pytho ...
- 20初识前端HTML(1)
1 .HTML 1.1 网页的组成 文字 图片 链接 等元素构成.除了这些元素之外 网页中还可以包含音频 视频 等 1.2 WEB前端开发的流程 现在主流的开发流程: 前后端分离的开发模式. 美工:p ...
- 制作Java桌面程序的一键安装包
一.简介 这个打包程序主要包含了对Java程序的普通打包.对程序的管理员权限设置.因为自己打包的时候要求程序在32位操作系统和64位操作系统下都能使用,所以有些打包步骤和设置都不相同.打包过程中主要使 ...
- git基本命令-直接上手使用
git基本命令-直接上手使用 此篇为直接是使用git,如果想了解其原理和其他详细信息,请关注我,看其它相关文章 git创建仓库(初始化仓库) 使用当前目录作为仓库 git init // 执行该目录后 ...
- 遗传算法 TSP(Python代码)
该代码是本人根据B站up主侯昶曦的代码所修改的. 原代码github地址:https://github.com/Houchangxi/heuristic-algorithm/blob/master/T ...
- Git出错:“Please make sure you have the correct access rights and the repository exists.”
此问题是需要重置ssh密钥 解决步骤如下: 1.重置用户名和邮箱: 打开Git Bash 进入Git命令,输入以下命令 git config --global user.name "你的用户 ...
- awk-07-IO和printf语句
IO语句 1.getline 2.getline var 把a文件的行,追加到b文件的结尾 把 a 文件的行替换 b 文件的指定字段 把 a 文件的行替换 b 文件的对应字段 3.command | ...