
nim_duilib(9)之RichEdit
introduction
- 更多控件用法,请参考 here 和 源码。
- 本文的代码基于这里
- RichEdit的更多用法,请参考源码中RichEdit.h提供的函数,RichEdit控件,可以定制为多种多样的形式,其公开的函数很多,本文仅演示密码和只读。
xml文件添加代码
基于上一篇, 继续向basic.xml中添加下面关于RichEdit的代码。 xml完整源码在文末。
<!--第二行控件开始-->

<!--第二行控件开始-->

<HBox height="85">

	<VBox>

		<HBox>

		<RichEdit class="simple input" name="rich_edit_1" text="输入演示" height="30" margin="0,3" padding="6,6,6" promptmode="true" prompttext="Single line text control" promptcolor="lightcolor"/>

		<CheckBox class="checkbox_font12" name="rich_edit_readonly" text="read only" margin="0,5,0,10"/>

		</HBox>

	</VBox>

</HBox>
这里,创建了一个RichEdit控件和一个CheckBox按钮。
代码中关联
BasicForm.h
- 打开BasicForm.h,类中添加下面的代码用于关联界面控件。
	// rich edit

	ui::RichEdit* prichedit_;

	ui::CheckBox* prichedit_cb_;
监听选择子项事件
类中继续添加下面的代码,用于监听checkbox选择状态变化
	// 监听将richedit设置为只读

	bool OnRichEditSetReadOnly(ui::EventArgs* msg);
BasicForm.cpp
InitWindow函数
- 转到BasicForm.cpp,找到 InitWindow 函数,向其增加下面的代码
void BasicForm::InitWindow()

{

  	......

	// 8.关联richedit控件

	//----------------------------------------------------------------------------------------

	prichedit_ = dynamic_cast<ui::RichEdit*>(FindControl(L"rich_edit_1"));

	prichedit_cb_ = dynamic_cast<ui::CheckBox*>(FindControl(L"rich_edit_readonly"));

	if (prichedit_cb_)

	{

		// 监听选中和没有选中事件

		prichedit_cb_->AttachSelect(nbase::Bind(&BasicForm::OnRichEditSetReadOnly, this, std::placeholders::_1));

		prichedit_cb_->AttachUnSelect(nbase::Bind(&BasicForm::OnRichEditSetReadOnly, this, std::placeholders::_1));

	}

}
OnRichEditSetReadOnly
OnRichEditSetReadOnly函数源码如下:
bool BasicForm::OnRichEditSetReadOnly(ui::EventArgs* msg)

{

	if (prichedit_cb_ && prichedit_)

	{

		// 获取当前选中状态

		bool is_checked = prichedit_cb_->IsSelected();

		// 设置只读

		prichedit_->SetReadOnly(is_checked);

		// 设置是否为密码属性

		prichedit_->SetPassword(is_checked);

	}

	return false;

}
运行结果
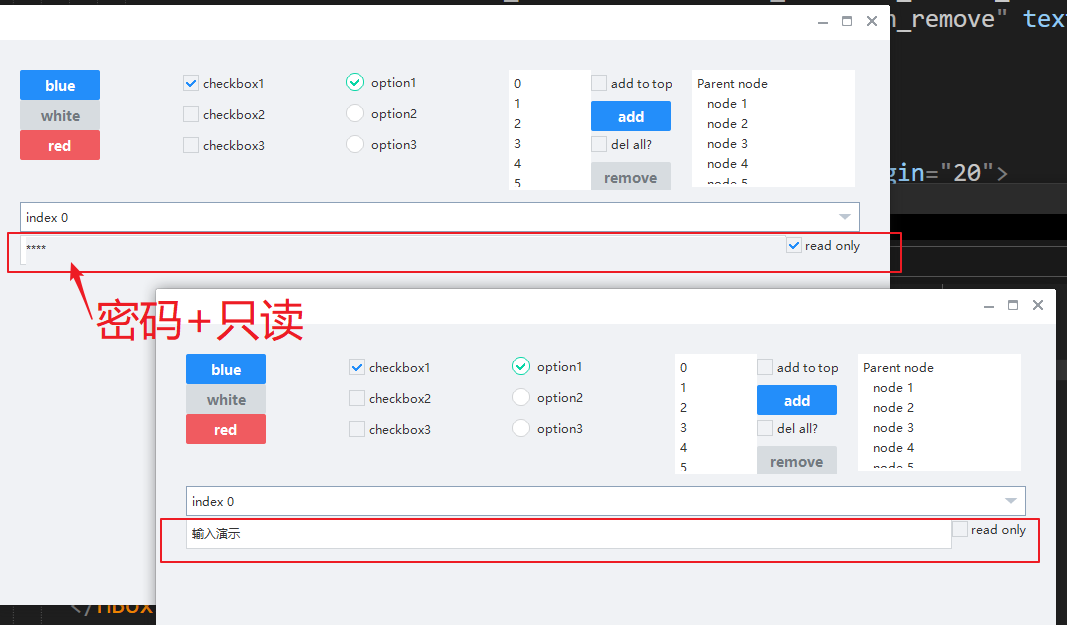
xml完整源码
<?xml version="1.0" encoding="UTF-8"?>

<Window size="900,600" caption="0,0,0,35">

  <VBox bkcolor="bk_wnd_darkcolor">

    <HBox width="stretch" height="35" bkcolor="bk_wnd_lightcolor">

      <Control />

        <Button class="btn_wnd_min" name="minbtn" margin="4,6,0,0" />

        <Box width="21" margin="4,6,0,0">

          <Button class="btn_wnd_max" name="maxbtn"/>

          <Button class="btn_wnd_restore" name="restorebtn" visible="false"/>

        </Box>

      <Button class="btn_wnd_close" name="closebtn" margin="4,6,8,0"/>

    </HBox>

    <!--下面是中间的控件-->

    <VBox padding="30, 30, 30, 30" >

      <HBox height="120">

        <VBox>

          <!-- Buttons -->

          <Button class="btn_global_blue_80x30" name="btn_blue" text="blue" />

          <Button class="btn_global_white_80x30" name="btn_white" text="white"/>

          <Button class="btn_global_red_80x30" name="btn_red" text="red"/>

        </VBox>

        <!--checkbox-->

        <VBox>

          <CheckBox class="checkbox_font12" name="checkbox1" text="checkbox1" margin="0,5,0,10" selected="true"/>

          <CheckBox class="checkbox_font12" name="checkbox2" text="checkbox2" margin="0,5,0,10"/>

          <CheckBox class="checkbox_font12" name="checkbox3" text="checkbox3" margin="0,5,0,10"/>

        </VBox>

        <!-- option-->

        <VBox>

          <Option class="circle_option_2" name="option1" group="option_group" text="option1" margin="0,3,0,10" selected="true"/>

          <Option class="circle_option_2" name="option2" group="option_group" text="option2" margin="0,3,0,10"/>

          <Option class="circle_option_2" name="option3" group="option_group" text="option3" margin="0,3,0,10"/>

        </VBox>

        <HBox>

          <!-- List -->

          <VListBox class="list" name="list" padding="5,3,5,3">

          </VListBox>

          <VBox>

            <!-- Buttons -->

            <CheckBox class="checkbox_font12" name="list_checkbox_add_to_top" text="add to top" margin="0,5,0,10"/>

            <Button class="btn_global_blue_80x30" name="list_btn_add" text="add" />

            <CheckBox class="checkbox_font12" name="list_checkbox_remove_all" text="del all?" margin="0,5,0,10"/>

            <Button class="btn_global_white_80x30" name="list_btn_remove" text="remove"/>

          </VBox>

        </HBox>

        <!-- TreeView -->

        <TreeView class="list" name="tree" padding="5,3,5,3" margin="20">

        </TreeView>

      </HBox>

      <!--第二行控件开始-->

      <HBox height="85">

        <VBox>

          <!--combobox-->

          <Combo class="list" name="combo" height="30" margin="0,12,0,0" padding="6" bkimage="file='../public/combo/normal.png' corner='5,5,30,5'"/>

          <HBox>

            <RichEdit class="simple input" name="rich_edit_1" text="输入演示" height="30" margin="0,3" padding="6,6,6" promptmode="true" prompttext="Single line text control" promptcolor="lightcolor"/>

            <CheckBox class="checkbox_font12" name="rich_edit_readonly" text="read only" margin="0,5,0,10"/>

          </HBox>

        </VBox>

      </HBox>

    </VBox> <!--下面是中间的控件 结束-->

  </VBox>

</Window>
nim_duilib(9)之RichEdit的更多相关文章
- nim_duilib(20)之即刻(1)
note 一个基于nim_duilib仿wechat的IM. 主界面 样式 美工差了. 布局 整体为水平布局,左边的深灰色区域(frame_left),右侧的light white区域(frame_r ...
- nim_duilib(13)之添加fmt库
introduction 习惯使用fmt库做字符串的格式化操作.尽管nim_duilib提供了类似的函数. 故项目demo_xml引入了外部库fmt framework.h中添加下面的以便使用fmt库 ...
- 不注册COM在Richedit中使OLE支持复制粘贴
正常情况下在Richedit中使用OLE,如果需要OLE支持复制粘贴,那么这个OLE对象必须是已经注册的COM对象. 注册COM很简单,关键问题在于注册时需要管理员权限,这样一来,如果希望APP做成绿 ...
- RichEdit 追加 RTF
下面实现追加RTF 到 RichEdit 的功能其本质是:EM_STREAMIN 消息,详细查看 MSDN//--------------------------------------------- ...
- windows sdk编程 richedit创建,像十六进制编辑器一样显示文件
编译环境 :windows 7 64位 vs2010,工程创建选择"win32项目" 注意添加几个头文件 #include <WinBase.h> #include & ...
- 一种快速刷新richedit中内嵌动画的方法的实现
在IM中使用动画表情是一种非常有趣的方式,然而选择一种合适的方式来实现却并不容易. 一般来说,除了自己去实现一个富文本控件,目前主要的解决方案有3种: 1.使用浏览器做容器. 2.使用QT提供的Ric ...
- 实现一种快速查找Richedit中可见区域内OLE对象的方法
Richedit是一个OLE容器,使用Richedit来显示IM聊天内容时,通常使用OLE对象来实现在Richedit中播放表情动画. 触发表情的绘制有两种途径: 1.来自Richedit的刷新消息. ...
- RichEdit
RichEdit 设置字符颜色 ; ; this->RichEdit1->SelAttributes->Color=clRed; 行间距字符间距 void __fastcall TF ...
- BCB中获得RichEdit 默认行间距
首先,这些功能支持RichEdit2.0 以上功能: 其次,用常规的方法是无法获得LineSpace 的: 你使用 EM_GETPARAFORMAT也得不到,你会发现dyLineSpacing 的值永 ...
随机推荐
- GWAS数据分析常见的202个问题?
生信其实很简单,就是用别人的工具调参就行了.生信也很折腾,哪一步都可能遇到问题,随时让你疯掉(老辩证法了~).但是,你遇到的问题大部分人也都经历过.这时,检索技能就显得很重要了.平时Biostar和S ...
- SpringBoot整合Shiro 三:整合Mybatis
搭建环境见: SpringBoot整合Shiro 一:搭建环境 shiro配置类见: SpringBoot整合Shiro 二:Shiro配置类 整合Mybatis 添加Maven依赖 mysql.dr ...
- javaSE中级篇3——集合体系(另外一种存储容器)——更新完毕
集合还是一种工具,所以它们的包都在java.util包下 1.集合的整个体系结构(是需要掌握的体系,完全体系不是这样) 对图中所说的 序和重复 这两词的说明: 序:指的是添加进去的元素和取出来的元素 ...
- C语言中的指针与整数相加的值计算
以下分三种情况: 1. 指针 + 整数值 2. 整数 + 整数 3. 指针强制转换为另一个类型后(指针或者是整数) + 整数 测试例子: 1 struct AAA{ int a; char b[ ...
- mysql-centos8下安装
参考文章 1.下载安装包 客服端与服务端 依赖包 2.linux下检查是否安装 rpm -qa | grep -i mysql 安装过会显示软件名称,没安装过就是空的 3.安装包传到虚拟机 先需要把安 ...
- adjective
形容词用来描述名词或代词:副词用来描述剩下的(动词.形容词.副词和整句).adverb: to word. Adjectives are used almost exclusively to modi ...
- jenkins之邮箱设置
- vue中vuex的五个属性和基本用法
VueX 是一个专门为 Vue.js 应用设计的状态管理构架,统一管理和维护各个vue组件的可变化状态(你可以理解成 vue 组件里的某些 data ). Vuex有五个核心概念: state, ge ...
- 【Linux】【Services】【Docker】Docker File
Docker Images: docker commit Dockerfile:文本文件,镜像文件构建脚本: Dockerfile:由一系列用于根据基础镜像构建新的镜像文件的专用指令序列组成: 指令: ...
- Spring Cloud中,如何解决Feign整合Hystrix第一次请求失败的问题
Spring Cloud中,Feign和Ribbon在整合了Hystrix后,可能会出现首次调用失败的问题,要如何解决该问题呢? 造成该问题的原因 Hystrix默认的超时时间是1秒,如果超过这个时间 ...