ShardingSphere学习
1 基本概念
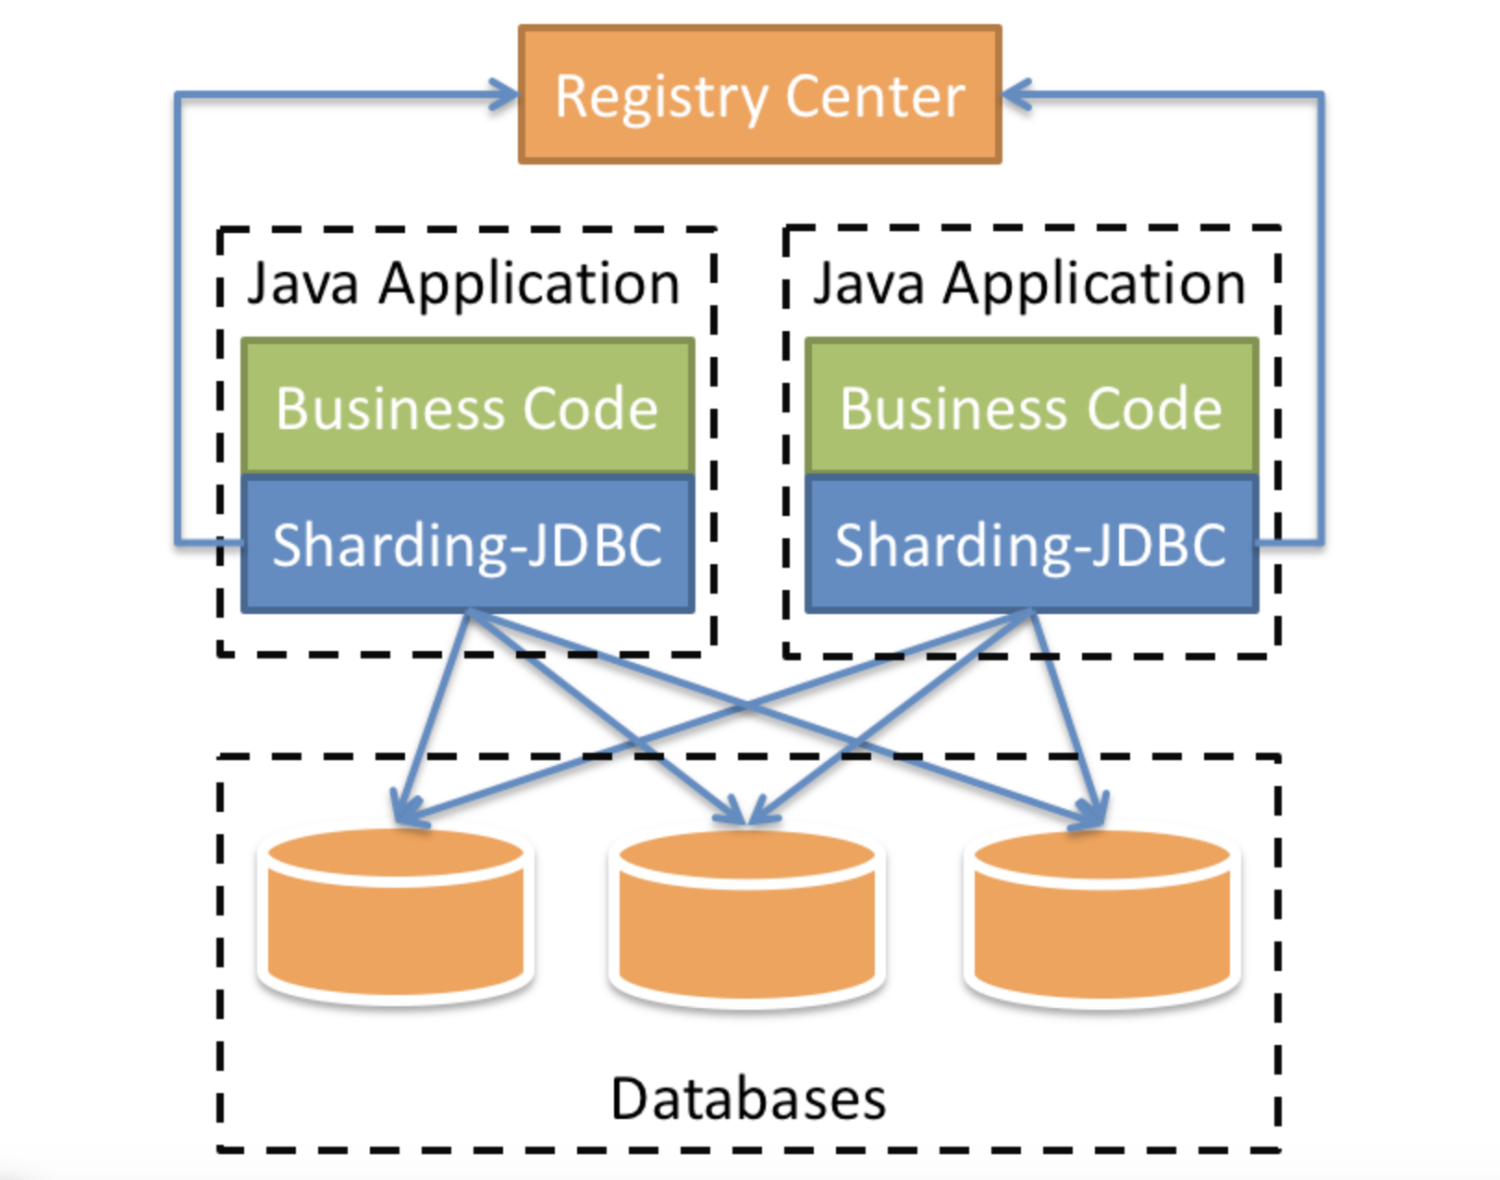
1.1 ShardingSphere概述
官网:https://shardingsphere.apache.org/index_zh.html
1.2 分库分表概述
分库分表是为了解决由于数据量过大而导致数据库性能降低的问题,将原来独立的数据库拆分成若干数据库组成 ,将数据大表拆分成若干数据表组成,使得单一数据库、单一数据表的数据量变小,从而达到提升数据库性能的目的。
● 水平分表
将一个表的数据按一定规则拆分到多个表结构相同的表中。
● 垂直分表
将一个表按照字段拆分成多个表,每个表存储其中一部分字段。
● 水平分库
同一个表的数据按一定规则拆到不同的数据库中,每个库可以放在不同的服务器上。
● 垂直分库
按照业务将表分布到不同的数据库上,达到专库专用。
2 简单使用
第一步:创建数据库,执行脚本;
第二步:创建springboot工程,引入依赖;
    <!-- sharding-jdbc依赖 -->

    <dependency>

        <groupId>org.apache.shardingsphere</groupId>

        <artifactId>sharding-jdbc-spring-boot-starter</artifactId>

        <version>4.0.0-RC1</version>

    </dependency>
第三步:编写测试相关代码;
第四步:编写配置文件,测试。
2.1 水平分表
策略:cid为偶数数据添加到course_db的course_0表,cid为奇数数据添加到course_db的course_1表。
配置:
# sharding-jdbc 水平分表

# 一个实体类对应两张表,覆盖

spring.main.allow-bean-definition-overriding=true

# 配置数据源,给数据源起名

spring.shardingsphere.datasource.names=ds

# 配置数据

spring.shardingsphere.datasource.ds.type=com.alibaba.druid.pool.DruidDataSource

spring.shardingsphere.datasource.ds.driver-class-name=com.mysql.cj.jdbc.Driver

spring.shardingsphere.datasource.ds.url=jdbc:mysql://localhost:3306/course_db?serverTimezone=GMT%2B8

spring.shardingsphere.datasource.ds.username=root

spring.shardingsphere.datasource.ds.password=1234

# 指定course表分布情况,配置表在哪个数据库里面,表名称都是什么  ds.course_0  ds.course_1

spring.shardingsphere.sharding.tables.course.actual-data-nodes=ds.course_$->{0..1}

# 指定表分片策略

# cid为偶数数据添加到ds(course_db)的course_0表,cid为奇数数据添加到ds(course_db)的course_1表

spring.shardingsphere.sharding.tables.course.table-strategy.inline.sharding-column=cid

spring.shardingsphere.sharding.tables.course.table-strategy.inline.algorithm-expression=course_$->{cid % 2}

# 指定course表里面主键cid生成策略

spring.shardingsphere.sharding.tables.course.key-generator.column=cid

spring.shardingsphere.sharding.tables.course.key-generator.type=SNOWFLAKE

# 打开sql输出日志

spring.shardingsphere.props.sql.show=true
2.2 垂直分表
可直接手动拆分表实现。
2.3 水平分库
策略:sid是偶数数据添加到course_db_0的course表,sid是奇数数据添加到course_db_1的course表。
配置:
# sharding-jdbc 水平分库

# 一个实体类对应两张表,覆盖

spring.main.allow-bean-definition-overriding=true

# 配置数据源,给数据源起名

spring.shardingsphere.datasource.names=ds0,ds1

# 配置第一个数据源

spring.shardingsphere.datasource.ds0.type=com.alibaba.druid.pool.DruidDataSource

spring.shardingsphere.datasource.ds0.driver-class-name=com.mysql.cj.jdbc.Driver

spring.shardingsphere.datasource.ds0.url=jdbc:mysql://localhost:3306/course_db_0?serverTimezone=GMT%2B8

spring.shardingsphere.datasource.ds0.username=root

spring.shardingsphere.datasource.ds0.password=1234

# 配置第二个数据源

spring.shardingsphere.datasource.ds1.type=com.alibaba.druid.pool.DruidDataSource

spring.shardingsphere.datasource.ds1.driver-class-name=com.mysql.cj.jdbc.Driver

spring.shardingsphere.datasource.ds1.url=jdbc:mysql://localhost:3306/course_db_1?serverTimezone=GMT%2B8

spring.shardingsphere.datasource.ds1.username=root

spring.shardingsphere.datasource.ds1.password=1234

# 指定course表分布情况,配置表在哪个数据库里面,表名称都是什么  ds0.course  d1.course

spring.shardingsphere.sharding.tables.course.actual-data-nodes=ds$->{0..1}.course

# 指定数据库分片策略

# sid是偶数数据添加到ds0(course_db_0)的course表,sid是奇数数据添加到ds1(course_db_1)的course表

spring.shardingsphere.sharding.tables.course.database-strategy.inline..sharding-column=cid

spring.shardingsphere.sharding.tables.course.database-strategy.inline.algorithm-expression=ds$->{cid % 2}

#spring.shardingsphere.sharding.default-database-strategy.inline.sharding-column=cid

#spring.shardingsphere.sharding.default-database-strategy.inline.algorithm-expression=ds$->{cid % 2}

# 指定course表里面主键cid生成策略

spring.shardingsphere.sharding.tables.course.key-generator.column=cid

spring.shardingsphere.sharding.tables.course.key-generator.type=SNOWFLAKE

# 打开sql输出日志

spring.shardingsphere.props.sql.show=true
2.4 垂直分库
策略:操作course表调用course_db,操作student表调用student_db。
配置:
# sharding-jdbc 垂直分库

# 一个实体类对应两张表,覆盖

spring.main.allow-bean-definition-overriding=true

# 配置数据源,给数据源起名

spring.shardingsphere.datasource.names=m0,m1

# 配置第一个数据源

spring.shardingsphere.datasource.m0.type=com.alibaba.druid.pool.DruidDataSource

spring.shardingsphere.datasource.m0.driver-class-name=com.mysql.cj.jdbc.Driver

spring.shardingsphere.datasource.m0.url=jdbc:mysql://localhost:3306/course_db?serverTimezone=GMT%2B8

spring.shardingsphere.datasource.m0.username=root

spring.shardingsphere.datasource.m0.password=1234

# 配置第二个数据源

spring.shardingsphere.datasource.m1.type=com.alibaba.druid.pool.DruidDataSource

spring.shardingsphere.datasource.m1.driver-class-name=com.mysql.cj.jdbc.Driver

spring.shardingsphere.datasource.m1.url=jdbc:mysql://localhost:3306/student_db?serverTimezone=GMT%2B8

spring.shardingsphere.datasource.m1.username=root

spring.shardingsphere.datasource.m1.password=1234

# 操作course表调用m0(course_db),操作student表调用m1(student_db)

# 配置student表分布情况

spring.shardingsphere.sharding.tables.course.actual-data-nodes=m0.course

# 指定student表里面主键sid生成策略

spring.shardingsphere.sharding.tables.course.key-generator.column=cid

spring.shardingsphere.sharding.tables.course.key-generator.type=SNOWFLAKE

# 配置student表分布情况

spring.shardingsphere.sharding.tables.student.actual-data-nodes=m1.student

# 指定student表里面主键sid生成策略

spring.shardingsphere.sharding.tables.student.key-generator.column=sid

spring.shardingsphere.sharding.tables.student.key-generator.type=SNOWFLAKE

# 打开sql输出日志

spring.shardingsphere.props.sql.show=true
2.5 广播表
策略:添加、删除dictionary表数据时,同时操作course_db中dictionary表与student_db中dictionary表。
配置:
# sharding-jdbc 操作广播表

# 一个实体类对应两张表,覆盖

spring.main.allow-bean-definition-overriding=true

# 配置数据源,给数据源起名

spring.shardingsphere.datasource.names=m0,m1

# 配置第一个数据源

spring.shardingsphere.datasource.m0.type=com.alibaba.druid.pool.DruidDataSource

spring.shardingsphere.datasource.m0.driver-class-name=com.mysql.cj.jdbc.Driver

spring.shardingsphere.datasource.m0.url=jdbc:mysql://localhost:3306/course_db?serverTimezone=GMT%2B8

spring.shardingsphere.datasource.m0.username=root

spring.shardingsphere.datasource.m0.password=1234

# 配置第二个数据源

spring.shardingsphere.datasource.m1.type=com.alibaba.druid.pool.DruidDataSource

spring.shardingsphere.datasource.m1.driver-class-name=com.mysql.cj.jdbc.Driver

spring.shardingsphere.datasource.m1.url=jdbc:mysql://localhost:3306/student_db?serverTimezone=GMT%2B8

spring.shardingsphere.datasource.m1.username=root

spring.shardingsphere.datasource.m1.password=1234

# 配置course表分布情况

spring.shardingsphere.sharding.tables.course.actual-data-nodes=m0.course

# 指定course表里面主键cid生成策略

spring.shardingsphere.sharding.tables.course.key-generator.column=cid

spring.shardingsphere.sharding.tables.course.key-generator.type=SNOWFLAKE

# 配置student表分布情况

spring.shardingsphere.sharding.tables.student.actual-data-nodes=m1.student

# 指定student表里面主键sid生成策略

spring.shardingsphere.sharding.tables.student.key-generator.column=sid

spring.shardingsphere.sharding.tables.student.key-generator.type=SNOWFLAKE

# 配置广播表

# 添加、删除dictionary表数据时,同时操作m0(course_db)中dictionary表与m1(student_db)中dictionary表

spring.shardingsphere.sharding.broadcast-tables=dictionary

spring.shardingsphere.sharding.tables.dictionary.key-generator.column=id

spring.shardingsphere.sharding.tables.dictionary.key-generator.type=SNOWFLAKE

# 打开sql输出日志

spring.shardingsphere.props.sql.show=true
2.6 读写分离
主从复制通过MySQL自身配置实现,Sharding-JDBC通过对SQL语义的分析,将写操作与读操作分别路由至主库与从库实现读写分离。
策略:写操作course_db(127.0.0.1)从库中course表,读操作course_db(192.168.1.107)主库中course表。
配置:
# sharding-jdbc 读写分离

# 一个实体类对应两张表,覆盖

spring.main.allow-bean-definition-overriding=true

# 配置数据源,给数据源起名

spring.shardingsphere.datasource.names=s0,s1

# 配置主库数据源

spring.shardingsphere.datasource.s0.type=com.alibaba.druid.pool.DruidDataSource

spring.shardingsphere.datasource.s0.driver-class-name=com.mysql.cj.jdbc.Driver

spring.shardingsphere.datasource.s0.url=jdbc:mysql://localhost:3306/course_db?serverTimezone=GMT%2B8

spring.shardingsphere.datasource.s0.username=root

spring.shardingsphere.datasource.s0.password=1234

# 配置从库数据源

spring.shardingsphere.datasource.s1.type=com.alibaba.druid.pool.DruidDataSource

spring.shardingsphere.datasource.s1.driver-class-name=com.mysql.cj.jdbc.Driver

spring.shardingsphere.datasource.s1.url=jdbc:mysql://192.168.1.107:3306/course_db?serverTimezone=GMT%2B8

spring.shardingsphere.datasource.s1.username=root

spring.shardingsphere.datasource.s1.password=root

# 主库从库逻辑数据源定义

# 写操作s0(course_db)主库中course表,读操作s1(course_db)从库中course表

spring.shardingsphere.sharding.master-slave-rules.ds0.master-data-source-name=s0

spring.shardingsphere.sharding.master-slave-rules.ds0.slave-data-source-names=s1

# 配置course表分布情况

spring.shardingsphere.sharding.tables.course.actual-data-nodes=ds0.course

# 指定course表里面主键cid生成策略

spring.shardingsphere.sharding.tables.course.key-generator.column=cid

spring.shardingsphere.sharding.tables.course.key-generator.type=SNOWFLAKE

# 打开sql输出日志

spring.shardingsphere.props.sql.show=true
ShardingSphere学习的更多相关文章
- 【ShardingSphere】ShardingSphere学习(三)-数据分片-分片
分片键 分片算法 分片策略 SQL Hint 分片键 用于分片的数据库字段,是将数据库(表)水平拆分的关键字段.例:将订单表中的订单主键的尾数取模分片,则订单主键为分片字段. SQL中如果无分片字段, ...
- 【ShardingSphere】ShardingSphere学习(二)-核心概念-SQL
逻辑表 水平拆分的数据库(表)的相同逻辑和数据结构表的总称. 例:订单数据根据主键尾数拆分为10张表,分别是t_order_0到t_order_9,他们的逻辑表名为t_order. 真实表 在分片的数 ...
- 【ShardingSphere】ShardingSphere学习(一)
参考官方文档:http://shardingsphere.apache.org/ ShardingSphere是一套开源的分布式数据库中间件解决方案组成的生态圈,它由Sharding-JDBC.Sha ...
- 分库分表框架ShardingSphere入门学习1
背景 传统的将数据集中存储至单一数据节点的解决方案,在性能.可用性和运维成本这三方面已经难于满足互联网的海量数据场景. 从性能方面来说,由于关系型数据库大多采用 B+ 树类型的索引,在数据量超过阈值的 ...
- 分库分表利器——sharding-sphere
背景 得不到的东西让你彻夜难眠,没有尝试过的技术让我跃跃欲试. 本着杀鸡焉用牛刀的准则,我们倡导够用就行,不跟风,不盲从. 所以,结果就是我们一直没有真正使用分库分表.曾经好几次,感觉没有分库分表(起 ...
- springboot + sharding-jdbc 学习
官网地址:http://shardingsphere.io/document/current/cn/overview/ sharding-jdbc事务:https://blog.csdn.net/ya ...
- Sharding-JDBC 学习资料
学习资料 网站 官网 https://shardingsphere.apache.org/document/current/cn/manual/sharding-jdbc/ 基于 Docker 的 M ...
- sharding-JDBC学习笔记
sharding-JDBC学习笔记 ShardingSphere ShardingSphere是一套开源的分布式数据库中间件解决方案组成的生态圈,它由Sharding-JDBC.Sharding-Pr ...
- JAVA全栈工程师学习线路(建议收藏)
互联网技术,更新迭代迅速,用日新月异来说也不为过,所以,面对这这种大环境,对于码农尤其是那些对于初入职场的新手来说,该如何自我学习升级,往方向发展,这一点是大家都经常困惑的. 大部分人,刚开始学习的J ...
随机推荐
- vue element-ui 组件上传图片 之后 对上传按钮 进行隐藏,删除之后重新显示
注:如果在当前的 vue 文件里 写了 style 样式,得 去除 scoped [私有属性必须去除,不能保留](这个是重点,不去除不生效), template 部分 <el-upload ...
- K8s配置。--未完成
配置K8s ##################################################################################### # 配置 --- ...
- 第18章-x86指令集之常用指令
x86的指令集可分为以下4种: 通用指令 x87 FPU指令,浮点数运算的指令 SIMD指令,就是SSE指令 系统指令,写OS内核时使用的特殊指令 下面介绍一些通用的指令.指令由标识命令种类的助记符( ...
- 我的第一个npm包:wechat-menu-editor 基于Vue的微信自定义菜单编辑器
wechat-menu-editor 微信自定义菜单编辑器 前言 在做微信公众号相关开发时,基本上会去开发的功能就是微信自定义菜单设置的功能,本着不重复造轮子的原则,于是基于Vue封装的一个微信自定义 ...
- Linux下SSH以及SSH秘钥
一.基于秘钥方式实现远程连接 第一步:创建密钥对(在管理端服务器上操作) 中间的输入项可以直接回车 ssh-keygen -t dsa 第二步:分发公钥(在管理端服务器执行) 这个步骤需要输入一个ye ...
- SQL语句之高级使用
1.select top select top 用于规定要返回的数据的数目 注意:并非所有的数据库系统都支持 SELECT TOP 语句. MySQL 支持 LIMIT 语句来选取指定的条数数据, ...
- 1.深入TiDB:初见TiDB
转载请声明出处哦~,本篇文章发布于luozhiyun的博客:https://www.luozhiyun.com/archives/584 本篇文章应该是我研究的 TiDB 的第一篇文章,主要是介绍整个 ...
- Intel® QAT加速卡之逻辑实例
Intel QAT加速卡逻辑实例 1. QAT相关的名词组织关系 在本手册中描述的平台上,处理器可以连接到一个或多个英特尔通信芯片组8925至8955系列(PCH)设备. 从软件角度来看,每个PCH设 ...
- Solon 1.5.29 发布,轻量级 Java 基础开发框架
本次版本主要变化: 增加 captcha-solon-plugin 插件(提供滑块验证与选文字验证能力) 插件 sa-token-solon-plugin,升级 sa-token 为 1.26.0 插 ...
- Tars | 第8篇 TarsJava Subset最终代码的执行流程与原理分析
目录 前言 1. SubsetConf配置项的结构 1.1 SubsetConf 1.2 RatioConfig 1.3 KeyConfig 1.4 KeyRoute 1.5 SubsetConf的结 ...