
hexo部署Github博客
例子:https://aquarius1993.github.io/blog/
仓库:https://github.com/Aquarius1993/blog
(前提是已经安装Xcode和git)
1. 安装
npm install -g hexo
2. 创建项目
hexo init nodejsHexoBlog
3. 进入项目,创建新笔记
hexo new 'Mac 前端环境配置'
4. 启动,在 localhost:4000 打开
hexo server
5. 发布到Github
1). 静态化处理
hexo generate || hexo g
2). 发布
(1). 在Github上新建一个项目(同名)
(2). 编辑全局配置文件: _config.yml,找到url,设置url和root,deploy部分,设置Github的项目地址
url: https://github.com/Aquarius1993/nodeHexoBlog.github.io

root: /nodeHexoBlog.github.io

deploy:

type: git

repo: git@github.com:Aquarius1993/nodeHexoBlog.github.io.git
(3). 安装hexo-deployer-git插件
npm install hexo-deployer-git --save
(4). 进行命令行部署
hexo deploy || hexo d
3). 发布之后的修改只需
hexo clean

hexo g

hexo d
6. 更换主题(以pacman为例)
1. 下载主题
git clone https://github.com/A-limon/pacman.git themes/pacman
2. 更改项目根目录下的_config.yml文件
theme: pacman
3. 更新pacman主题
cd themes/pacman

git pull
4. 更改pacman的_partial/layout/pacman/header.ejs,不然导航栏的链接地址错误
<nav class="animated">

<ul>

<% for (var i in theme.menu){ %>

<li>

<a href="<%- url_for(theme.menu[i]) %>"><%= i %></a></li>

<% } %>

<li>

........
5. 加评论功能,修改pacman的_config.yml文件
duoshuo:

enable: true ## duoshuo.com

short_name: ## duoshuo short name.
7. 使用swiftype插件实现搜索
1. [注册swiftype](https://app.swiftype.com/users/sign_up)
2. create a search engine
3. install Search ----> Search Field,修改保存,复制一下框里的代码,待会用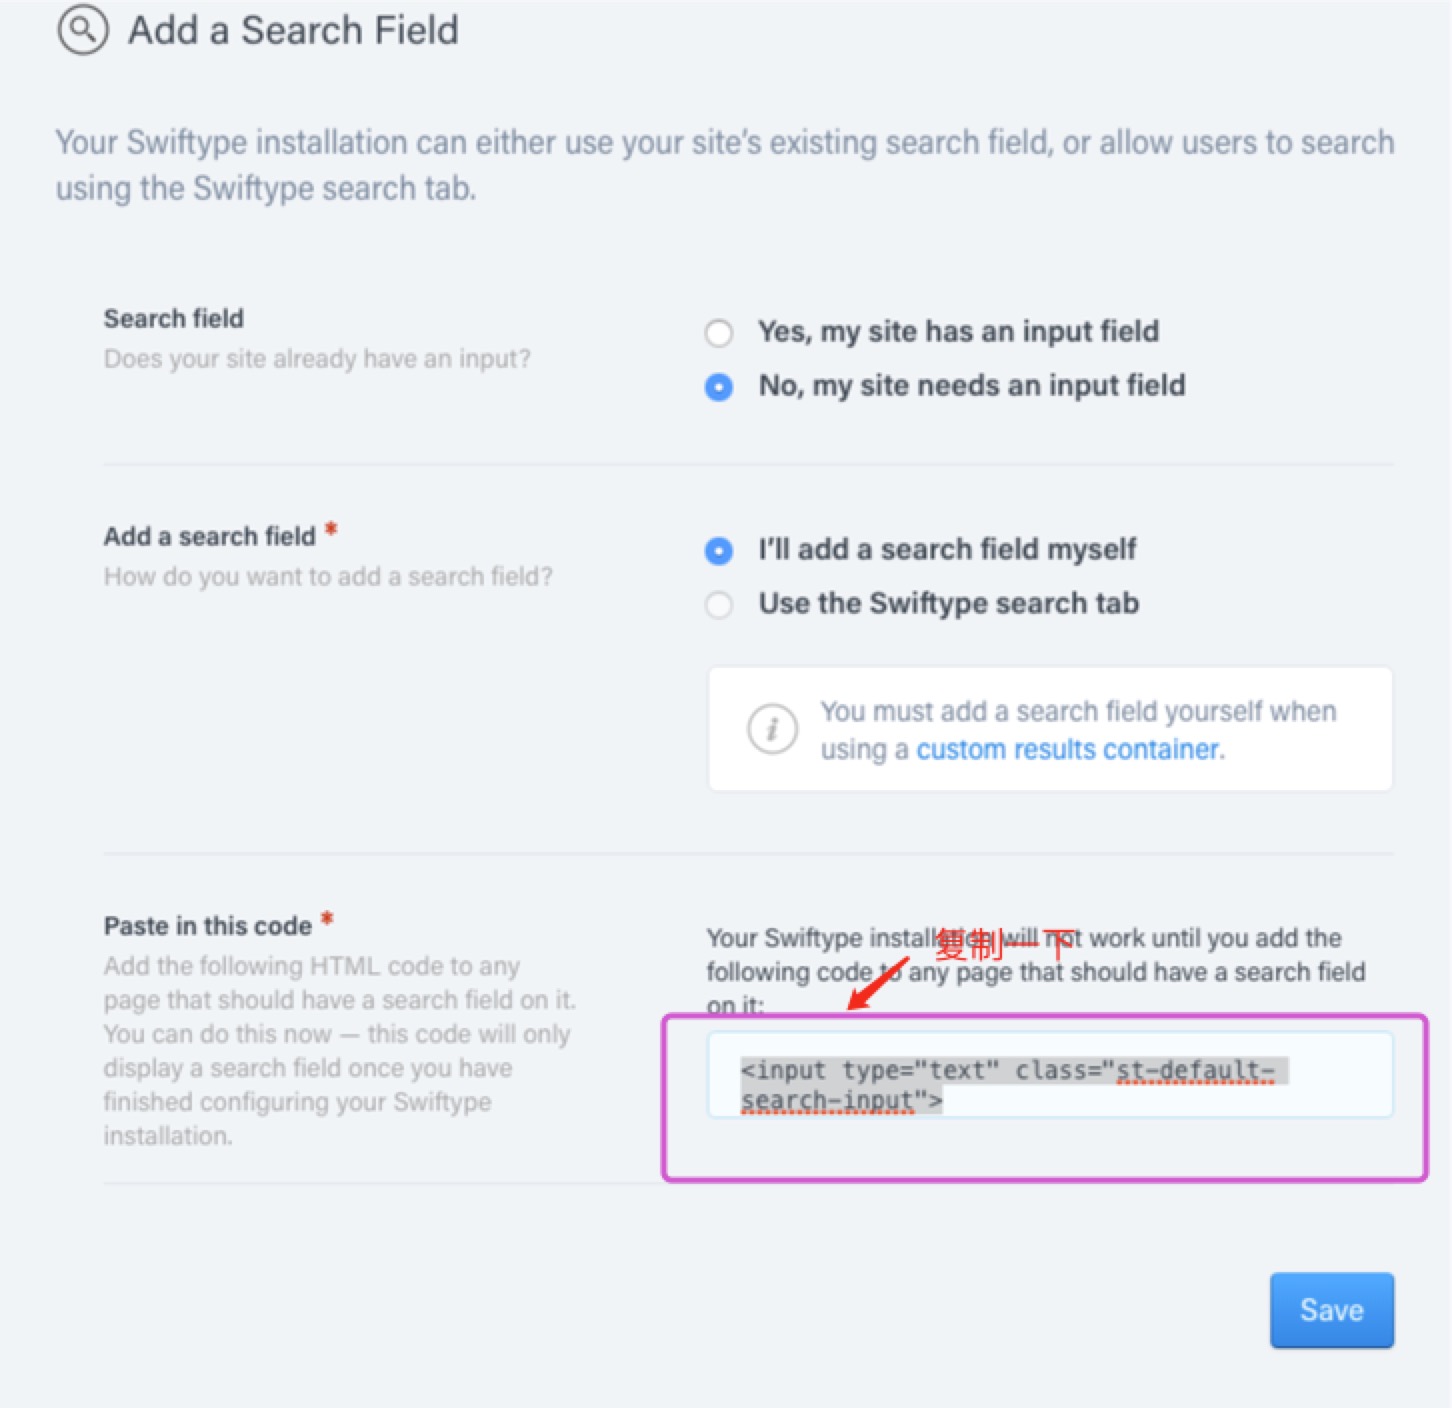
4. 返回install Search,点击 Active Swiftype,复制一下框里的代码,待会用
5. pacman主题下的_config.yml文件在末尾添加如下代码:
swift_search:

enable: true
6. 在项目的source目录下建立一个search文件夹,里面新建一个index.md,再写上如下代码
layout: search

title: search

----
7. 在pacman\layout\_partial目录下的header.ejs的
<% if	(theme.google_cse&&theme.google_cse.enable){ %>

<form class="search" action="<%- config.root %>search/index.html" method="get" accept-charset="utf-8">

<label>Search</label>

<input type="text" id="search" autocomplete="off" name="q" maxlength="20" placeholder="<%= __('search') %>" />

</form>
和
<% } else { %>

<form class="search" action="//google.com/search" method="get" accept-charset="utf-8">

<label>Search</label>

<input type="text" id="search" name="q" autocomplete="off" maxlength="20" placeholder="<%= __('search') %>" />

<input type="hidden" name="q" value="site:<%- config.url.replace(/^https?:\/\//, '') %>">

</form>

<% } %>
之间添加
<% }else if	(theme.swift_search&&theme.swift_search.enable){ %>

<form class="search" action="<%- config.root %>search/index.html" method="get" accept-charset="utf-8">

<label>Search</label>

图一中复制的代码

8. 用以下代码覆盖pacman\layout\_partial目录下的search.ejs
<% if(theme.swift_search.enable) { %>

<div id="container" class="page">

<div id="st-results-container" style="width:80%">正在加载搜索结果,请稍等。</div>

<style>.st-result-text {

background: #fafafa;

display: block;

border-left: 0.5em solid #ccc;

-webkit-transition: border-left 0.45s;

-moz-transition: border-left 0.45s;

-o-transition: border-left 0.45s;

-ms-transition: border-left 0.45s;

transition: border-left 0.45s;

padding: 0.5em;

}

@media only screen and (min-width: 768px) {

.st-result-text {

padding: 1em;

}

}

.st-result-text:hover {

border-left: 0.5em solid #ea6753;

}

.st-result-text h3 a{

color: #2ca6cb;

line-height: 1.5;

font-size: 22px;

}

.st-snippet em {

font-weight: bold;

color: #ea6753;

}</style>

图二复制的代码

<% }

%>
9. 打开pacman\layout\_partial目录下的footer.ejs,在script标签结束之前添加一开始拷贝图二复制的代码.
hexo部署Github博客的更多相关文章
- 使用Hexo搭建github博客步骤,超简便
categories: 工具 tags: git Windows 搭建博客 你只需要node环境和一个github账号就可以开工啦! 本教程适合于Windows环境,Mac教程也大同小异 利用hexo ...
- 使用Hexo搭建GitHub博客(2018年Mac版)
关于本文 本文仅记录自己学习搭建Hexo博客之时,搭建过程中掉坑的历程总结,对零基础起步的观众朋友可能缺乏某些基础技术的指导,请优先食用下述两篇优质教程: [2018更新]小白独立搭建博客-Githu ...
- ubuntu上部署github博客,利用hexo
安装Node.js三种安装方法,前两种是我安装过的,后一种是 Google 到的. #####①:apt-get 安装在 终端 输入 nodejs 或者 npm ,如果没有安装会提示你进行安装,命令如 ...
- Linux下使用Hexo搭建github博客
找到一篇靠谱的博客,备份一下: ---------以下原文------------------ Nodejs安装 因为hexo是基于nodejs的应用,所以要先安装nodejs才可以.我这里以Ubun ...
- 使用hexo创建github博客
前言 前面说过,之前用wordpress辛辛苦苦搭建的博客,因为服务器和域名的问题挂掉了.后来发现github也能够搭建自己的博客,不需要去关心主机域名的问题,而且还能使用Markdown来写博客,就 ...
- 转:20分钟教你使用hexo搭建github博客
注册Github账号 这里我们就不多讲了,小伙伴们可以点击这里,进入官网进行注册. 创建仓库 图片来自Github 登录账号后,在Github页面的右上方选择New repository进行仓库的创建 ...
- 使用hexo搭建github博客
Win7系统已经安装了node.js和npm npm install -g hexo-cli 全局安装hexo客户端 hexo init blog 在喜欢的位置初始化blog目录 cd blog np ...
- 基于Hexo搭建个人博客网站
## 准备工作 首先下载[nodejs](https://nodejs.org/en/download/),一路next安装即可.验证是否安装成功: ```bash node -v # 输出 v1 ...
- 使用Hexo搭建个人博客并部署到GitHub或码云上全过程
一.前言 如上图所示:GitHub有Github Pages,而码云也有码云 Pages 1.Github Pages或Gitee Pages是什么呢? Github Pages或者Gitee Pag ...
随机推荐
- NAT模式下远程连接centos6虚拟机与虚拟机网络配置
最近装了centos,但是没有网络,也无法远程连接.关键是虚拟机中没有ip地址. 网上方法很多,但是每个人情况不一样,所以不尽适用. 1.解决这个问题,首先保证你的vmware的dhcp服务和net服 ...
- Mac下配置Hadoop环境
下载Hadoop(我下载的是2.8.0版本) 点击此处下载 下载后,使用 tar -zxvf tar包名 解压tar包,解压完成后有这样一个文件出现 修改Hadoop的配置文件 需要修改的配置文件在H ...
- 第六篇:Spark SQL Catalyst源码分析之Physical Plan
/** Spark SQL源码分析系列文章*/ 前面几篇文章主要介绍的是spark sql包里的的spark sql执行流程,以及Catalyst包内的SqlParser,Analyzer和Optim ...
- 通过ajax提交到url路由
$regBoxform.find('button').on('click', function(){ /*通过ajax提交请求*/ $.ajax({ type:'post', /*用post 方式提交 ...
- 百度编辑器(ueditor)@功能之获取坐标
//获取百度编辑器的工具类 var domUtils = UE.dom.domUtils; //获取编辑器的坐标 var $ueditor_offset = $("#ueditor_0&qu ...
- CentOS查看CPU、内存、版本等系统信息
CentOS查看系统信息 一:查看CPU more /proc/cpuinfo | grep "model name" grep "model name" /p ...
- AngularJS 教程 - CodePreject
http://www.codeproject.com/Articles/1065838/AngularJS-Tutorial Article Series Tutorial 1: Angular JS ...
- vim 的寄存器
If you've been following my series on Vim, it should be clear now that Vim has a pretty clear philos ...
- S.O.L.I.D 是面向对象设计(OOD)和面向对象编程(OOP)中的几个重要编码原则
注:以下图片均来自<如何向妻子解释OOD>译文链接:http://www.cnblogs.com/niyw/archive/2011/01/25/1940603.html < ...
- Linux命令详解-pwd
Linux中用 pwd 命令来查看"当前工作目录"的完整路径. 简单得说,每当你在终端进行操作时,你都会有一个当前工作目录. 在不太确定当前位置时,就会使用pwd来判定当前目录在文 ...