
React Native 之createDrawerNavigator和createSwitchNavigator
其他代码接上篇文章
createDrawerNavigator 抽屉
createSwitchNavigator 模拟登录=>主界面
index.js
/**

 * @format

 */

import {AppRegistry} from 'react-native';

import {createAppContainer} from 'react-navigation';

import App from './navigators/AppNavigators';

import {name as appName} from './app.json';

AppRegistry.registerComponent(appName, () => App);
AppNavigators.js
import React from 'react'; //只要在页面中使用了基础组件 都需要导入这句话 不然会报错

import {Button,Platform,ScrollView,SafeAreaView} from 'react-native';

import { createStackNavigator,

  createAppContainer,

  createBottomTabNavigator,

  createMaterialTopTabNavigator,

  createDrawerNavigator,

  DrawerItems,

  createSwitchNavigator,

 } from 'react-navigation';

import HomePage from '../pages/HomePage';

import Page1 from '../pages/Page1';

import Page2 from '../pages/Page2';

import Page3 from '../pages/Page3';

import Page4 from '../pages/Page4';

import Page5 from '../pages/Page5';

import Login from '../pages/Login';

import Ionicons from 'react-native-vector-icons/Ionicons'

import MaterialIcons from 'react-native-vector-icons/MaterialIcons'

const DrawerNav=createDrawerNavigator(

  {

  Page4:{

    screen:Page4,

    navigationOptions:{

      drawerLabel:'Page4',

      drawerIcon:({tintColor})=>(

        <MaterialIcons

          name={'drafts'}

          size={24}

          style={{color:tintColor}}

        />

      )

    }

  },

  Page5:{

    screen:Page5,

    navigationOptions:{

      drawerLabel:'Page5',

      drawerIcon:({tintColor})=>(

        <MaterialIcons

          name={'move-to-inbox'}

          size={24}

          style={{color:tintColor}}

        />

      )

    }

  }

},

{

  initialRouteName:'Page4',

  contentOptions:{

    activeTintColor:'#e91e63',

  },

  contentComponent:(props)=>(

    <ScrollView style={{backgroundColor:'#789',flex:1}}>

      <SafeAreaView forceInset={{top:'always',horizontal:'never'}}>

        <DrawerItems {...props}/>

      </SafeAreaView>

    </ScrollView>

  )

}

);

const AppTopNavigator=createMaterialTopTabNavigator(

  {

  Page1:{

     screen:Page1,

     navigationOptions:{

       tabBarLabel: 'All'

     }

  },

  Page2:{

     screen:Page2,

     navigationOptions:{

       tabBarLabel: 'iOS'

     }

  },

  Page3:{

     screen:Page3,

     navigationOptions:{

       tabBarLabel: 'Android'

     }

  },

  Page4:{

     screen:Page4,

     navigationOptions:{

       tabBarLabel: 'React-Native'

     }

  },

},

  {

  tabBarOptions:{

    tabStyle:{mindWidth: 50},

    upperCaseLabel:false,//是否使标签大写 默认true

    scrollEndabled:true,//是否支持选项卡滚动 默认false

    style:{

      backgroundColor:'#678'//TabBar背景色

    },

    indicatorStyle:{

      height:2,

      backgroundColor:'white'

    },//标签指示器样式

    labelStyle:{

      fontSize:13,

      marginTop:6,

      marginBottom:6

    },// 文字的样式

  }

}

);

const AppBottomNavigator=createBottomTabNavigator(

  {

    Page1:{

       screen:Page1,

       navigationOptions:{

         tabBarLabel: '最热',

         tabBarIcon:({tintColor,focused})=>(<Ionicons

            name={'ios-home'}

            size={26}

            style={{color:tintColor}}

         />)

       }

    },

    Page2:{

       screen:Page2,

       navigationOptions:{

         tabBarLabel: '趋势',

         tabBarIcon:({tintColor,focused})=>(<Ionicons

            name={'ios-appstore'} // 全部小写

            size={26}

            style={{color:tintColor}}

         />)

       }

    },

    Page3:{

       screen:Page3,

       navigationOptions:{

         tabBarLabel: '收藏',

         tabBarIcon:({tintColor,focused})=>(<Ionicons

            name={'ios-people'}

            size={26}

            style={{color:tintColor}}

         />)

       }

    },

    Page4:{

       screen:Page4,

       navigationOptions:{

         tabBarLabel: '我的',

         tabBarIcon:({tintColor,focused})=>(<Ionicons

            name={'ios-aperture'}

            size={26}

            style={{color:tintColor}}

         />)

       }

    },

  },

  {

    tabBarOptions:{

      activeTintColor: Platform.OS === 'ios' ? '#e91e63' : '#fff',

    }

  }

);

const AppStack = createStackNavigator({

    Home: {

        screen: HomePage

    },

    Page1: {

        screen: Page1

    },

    Page2: {

        screen: Page2,

        navigationOptions: {//在这里定义每个页面的导航属性,静态配置

            title: "This is Page2.",

        }

    },

    Page3: {

        screen: Page3,

        navigationOptions: (props) => {//在这里定义每个页面的导航属性,动态配置

            const {navigation} = props;

            const {state, setParams} = navigation;

            const {params} = state;

            return {

                title: params.title ? params.title : 'This is Page3',

                headerRight: (

                    <Button

                        title={params.mode === 'edit' ? '保存' : '编辑'}

                        onPress={()=>{setParams({mode: params.mode === 'edit' ? '' : 'edit'})}

                            }

                    />

                ),

            }

        }

    },

    Bottom:{

      screen:AppBottomNavigator,

      navigationOptions:{

        title:'BottomNavigator'

      }

    },

    Top:{

      screen:AppTopNavigator,

      navigationOptions:{

        title:'TopNavigator'

      }

    },

    DrawerNav:{

      screen:DrawerNav,

      navigationOptions:{

        title:'This is DrawNavigator',

      }

    }

},

 {

    defaultNavigationOptions: {

        // header: null,// 可以通过将header设为null 来禁用StackNavigator的Navigation Bar

    }

  }

);

const AuthStack = createStackNavigator({

    Login: {

        screen: Login

    },

},{

    navigationOptions: {

        // header: null,// 可以通过将header设为null 来禁用StackNavigator的Navigation Bar

    }

});

const AppStackNavigator = createSwitchNavigator(

    {

        Auth: AuthStack,

        App: AppStack,

    },

    {

        initialRouteName: 'Auth',

    }

);

const App = createAppContainer(AppStackNavigator)

export default App
Login.js
/**

 * Sample React Native App

 * https://github.com/facebook/react-native

 *

 * @format

 * @flow

 */

 import React, {Fragment,Component} from 'react';

 import {

   StyleSheet,

   View,

   Text,

   Button,

 } from 'react-native';

 export default class Login extends Component {

   render(){

     const {navigation}=this.props;

     return (

       <View style={styles.container}>

         <Text style={styles.welcome}>欢迎来到Login</Text>

         <Button

           title={'Go App'}

           onPress={()=>{

             navigation.navigate('App');

           }}

         />

       </View>

       );

   }

 }

 const styles=StyleSheet.create({

   container:{

     flex:1,

   },

   welcome:{

     fontSize:20,

     textAlign: 'center',

   }

 });
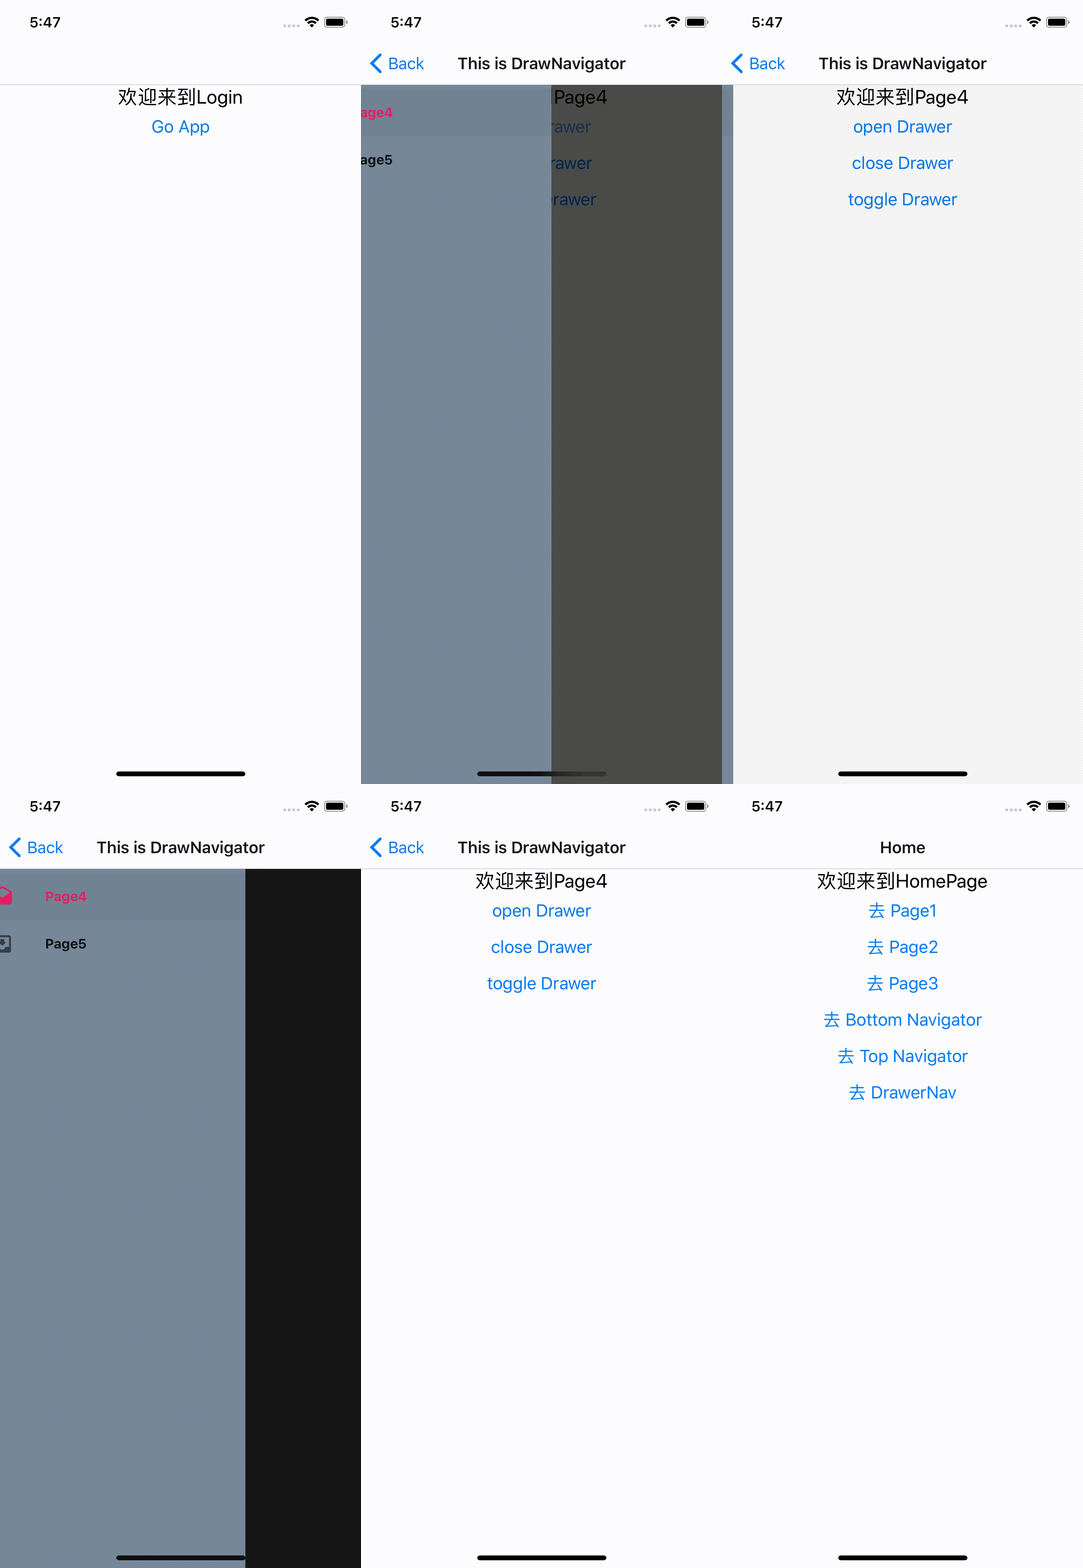
效果图
React Native 之createDrawerNavigator和createSwitchNavigator的更多相关文章
- React Native 之 Text的使用
前言 学习本系列内容需要具备一定 HTML 开发基础,没有基础的朋友可以先转至 HTML快速入门(一) 学习 本人接触 React Native 时间并不是特别长,所以对其中的内容和性质了解可能会有所 ...
- React Native环境配置之Windows版本搭建
接近年底了,回想这一年都做了啥,学习了啥,然后突然发现,这一年买了不少书,看是看了,就没有完整看完的.悲催. 然后,最近项目也不是很紧了,所以抽空学习了H5.自学啃书还是很无趣的,虽然Head Fir ...
- 史上最全Windows版本搭建安装React Native环境配置
史上最全Windows版本搭建安装React Native环境配置 配置过React Native 环境的都知道,在Windows React Native环境配置有很多坑要跳,为了帮助新手快速无误的 ...
- 【腾讯Bugly干货分享】React Native项目实战总结
本文来自于腾讯bugly开发者社区,非经作者同意,请勿转载,原文地址:http://dev.qq.com/topic/577e16a7640ad7b4682c64a7 “8小时内拼工作,8小时外拼成长 ...
- React Native环境搭建以及几个基础控件的使用
之前写了几篇博客,但是没有从最基础的开始写,现在想了想感觉不太合适,所以现在把基础的一些东西给补上,也算是我从零开始学习RN的经验吧! 一.环境搭建 首先声明一下,本人现在用的编辑器是SublimeT ...
- React Native组件介绍
1.React Native目前已有的组件 ActivityIndicatorIOS:标准的旋转进度轮; DatePickerIOS:日期选择器: Image:图片控件: ListView:列表控件: ...
- React Native图片控件的使用
首先定义组件 import { AppRegistry, StyleSheet, Text, View, Image,} from 'react-native'; 然后将render返回中的模版增加I ...
- react-native学习笔记--史上最详细Windows版本搭建安装React Native环境配置
参考:http://www.lcode.org/react-native/ React native中文网:http://reactnative.cn/docs/0.23/android-setup. ...
- windows 7下React Native环境配置
React Native 是 Facebook 推出的一个用 Java 语言就能同时编写 ios,android,以及后台的一项技术,它可以做到实时热更新 .FaceBook 也号称这们技术是 “Le ...
随机推荐
- oracle expdp/impdp/可传输表空间
oracle expdp/impdp/可传输表空间/及一些参数 Oracle data pump 导出操作能够将表.索引.约束.权限.PLSQL包.同义词等对象从数据库导出,并将它们保存在一种非文本格 ...
- php7.2 下安装swoole扩展
git clone git@github.com:swoole/swoole-src.git phpize ./configure make && make test make ins ...
- Lesson 5 The facts
go to extremes走极端 provide... with...向..提供.. go to press付印 suspicious,adj. 可疑的:怀疑的:多疑的 fired---同义词--- ...
- python调用java代码 java虚拟机(jvm)
1.新建com文件夹,在里面新建 fibnq.java package com; public class fibnq { public fibnq(){} public int fb(int n){ ...
- 网络通讯数据.传输json(java<==>C#)
ZC:主要是测试解决 时间转成JSON不一样的问题 ZC:java中转换时间格式的关键是“JSONUtils.getMorpherRegistry().registerMorpher(new Date ...
- MySql 性能优化之 Explain
MySQL 之 Explain 输出分析 背景 前面的文章写过 MySQL 的事务和锁,这篇文章我们来聊聊 MySQL 的 Explain,估计大家在工作或者面试中多多少少都会接触过这个.可能工作中实 ...
- python 并发编程 多进程 Process对象的其他属性方法 terminate与is_alive name pid 函数
进程对象的其他方法一: terminate与is_alive is_alive() 立刻查看的子进程结果 是否存活 from multiprocessing import Process impor ...
- 五、Zabbix-自动注册
一.Zabbix Serber 1.进入动作界面 配置—>动作—>事件源—>自动注册—>创建动作 2.配置自动注册动作 1.配置动作 2.配置操作 Next step 添加成功 ...
- 重写select
select 模拟 目前仿写select的方式 给tableIndex 来使 div(无法获取焦点的元素)来获取元素,这样便可以在失去焦点时,是否将下拉框收回 通过 document的点击,来判断是否 ...
- 小程序中页面兼容h5标签的解析
有时候当小程序向后台拿数据是一篇html标签的文章时,把它放进小程序会发现很多标签就不兼容,如果要一个个改又很麻烦,有没有方法可以很快地兼容html标签呢? 有个工具可以做到:wxParse 下载了它 ...