同网页的WebRTC实现与源码分析
- 基本按照Real time communication with WebRTC搭建(下面简称该网站为官方tutorial)
- 本文重视WebRTC的基于同页面通信的代码实现,主要讲述顺序是WebRTC的三大API顺序,一些原理、拓展的部分在链接和后续中
基本环境搭建
已有环境
- Mac OS 10 & Windows 10 & Ubuntu 18.04 (均实现,WebRTC支持跨平台)
- Chrome 76 & Firefox
- Webstorm IDE
搭建需要环境
下载源码
git clone https://github.com/googlecodelabs/webrtc-web
getUserMedia
- 源码的Step01跑一下,浏览器获取前置摄像头就能成功,不展示具体效果了,看看源码和一些其他的应用
源码分析
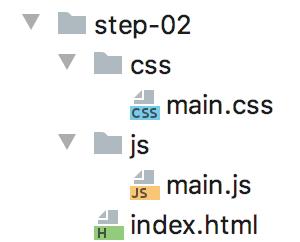
- 源码项目所给的代码结构,多是如下图,所以常会看到
js/main.jscss/main.css这种src
- 分析源码关键调用部分
<!-- core src code of index.html -->

<head>

  <title>Realtime communication with WebRTC</title>

  <link rel="stylesheet" href="css/main.css" />

</head>

<body>

  <h1>Realtime communication with WebRTC</h1>

<!-- add video and script element in this .html file -->

  <video autoplay playsinline></video>

  <script src="js/main.js"></script>

</body>
/* core src code of main.css */

body {

  font-family: sans-serif;

}

video {

  max-width: 100%;

  width: 800px;

}
htmlcss作为标记型语言,了解其基本语法特征与调用(我是通过阅读DOM Sripting的前三章后比较清楚的,阅读这部分还有一个好处是,把我不理解的简洁代码到页面奇幻效果的转化,推锅给了DOM和浏览器厂商~),上面的两个代码就不难理解,着重分析下面js代码
'use strict';

// On this codelab, you will be streaming only video (video: true).

const mediaStreamConstraints = {

  video: true,

};

// Video element where stream will be placed.

const localVideo = document.querySelector('video');

// Local stream that will be reproduced on the video.

let localStream;

// Handles success by adding the MediaStream to the video element.

function gotLocalMediaStream(mediaStream) {

  localStream = mediaStream;

  localVideo.srcObject = mediaStream;

}

// Handles error by logging a message to the console with the error message.

function handleLocalMediaStreamError(error) {

  console.log('navigator.getUserMedia error: ', error);

}

// Initializes media stream.

navigator.mediaDevices.getUserMedia(mediaStreamConstraints)

  .then(gotLocalMediaStream).catch(handleLocalMediaStreamError);
在官方的tutorial中,对于代码第一行就有解释ECMAScript 5 Strict Mode, JSON, and More,可以认为是一种语法、异常检查更严格的模式
对于第3行之后的代码部分,功能上可以看作
- 一个constraint只读变量
gotLocalMediaStream()处理视频流函数handleLocalMediaStreamError()异常处理函数getUserMedia()调用
看MediaDevices.getUserMedia()的API调用规则,也就大体明白了上面接近30行代码的架构
navigator.mediaDevices.getUserMedia(constraints)

/* produces a MediaStream */

.then(function(stream) {

  /* use the stream */

})

.catch(function(err) {

  /* handle the error */

});
在看第14-18行,how to use the mediaStream?
- 先看
mediaStream的相关API
The MediaStream interface represents a stream of media content. A stream consists of several tracks such as video or audio tracks. Each track is specified as an instance of MediaStreamTrack
看代码,从整个
main.js文件中,我没有看出let localStream有什么特殊的用途,这一行注释掉对网页也没有什么影响(也许在之后的源码中有用)但17行的代码就相当关键了(可以把这一行的代码注释看看是个什么效果~获取了媒体流,但是网页上没有视频显示)
从第9行的
const localVideo = document.querySelector('video')说起const只读变量- Document.querySelector() 理解这个函数,需要对DOM有一些认识
- DOM(Document Object Model),既然是model就会有一定的逻辑表达形式,DOM文档的表示就是一棵家谱树
querySelector(selectors)也正是基于树形数据结构,来对document中的object进行深度优先的前序遍历,来获取document中符合selectors的HTMLElement并返回
The matching is done using depth-first pre-order traversal of the document's nodes starting with the first element in the document's markup and iterating through sequential nodes by order of the number of child nodes.
17行的HTMLMediaElement.srcObject 则是对
'video'流媒体的赋值,使页面显示video
- 先看
getUserMedia()++
- 在step01的demo里,前置摄像头的调用非常成功,但要刨根问底,step01中的代码并没有说明要调什么摄像头,什么类型的视频流(constraints里面只要求
video: true) - 在官方tutorial里面有Bonus points,回答理解这些问题来加深对
getUserMedia()的理解 - 由于不想把这篇博文写的太长,上面两个问题,都会在基于浏览器的WebRTC的getUserMedia()相关补充中补充说明
RTCPeerConnection
- Let's move on to Step-02
源码分析
HTML
<body>

  <h1>Realtime communication with WebRTC</h1>

  <video id="localVideo" autoplay playsinline></video>

  <video id="remoteVideo" autoplay playsinline></video>

  <div>

    <button id="startButton">Start</button>

    <button id="callButton">Call</button>

    <button id="hangupButton">Hang Up</button>

  </div>

  <script src="https://webrtc.github.io/adapter/adapter-latest.js"></script>

  <script src="js/main.js"></script>

</body>
- 在HTML文档中
<head>以及调用main.css的部分和Step-01相比几乎没有改变 - 新加入的
videobuttonscript其id&src命名都有很好的解释说明效果,在下文对main.js的分析中,相关内容会有更清楚的解释 - 代码接近300行的样子,按页面的操作顺序,分析一下相关代码
三个button
- 从三个
button开始,这是代码183-192行
// Define and add behavior to buttons.

// Define action buttons.

const startButton = document.getElementById('startButton');

const callButton = document.getElementById('callButton');

const hangupButton = document.getElementById('hangupButton');

// Set up initial action buttons status: disable call and hangup.

callButton.disabled = true;

hangupButton.disabled = true;
- 上面的代码和
querySelector()有类似功能,比较清晰 - 代码259-262行
// Add click event handlers for buttons.

startButton.addEventListener('click', startAction);

callButton.addEventListener('click', callAction);

hangupButton.addEventListener('click', hangupAction);
- EventTarget.addEventListener()熟悉API之后,就来看看
startAction()callAction()hangupAction()这三个函数
startAction()
- 从
startAction开始
// Handles start button action: creates local MediaStream.

function startAction() {

  startButton.disabled = true;

  navigator.mediaDevices.getUserMedia(mediaStreamConstraints)

    .then(gotLocalMediaStream).catch(handleLocalMediaStreamError);

  trace('Requesting local stream.');

}
- 一经页面开启
startButton只能click一次,之后获取getUserMedia() mediaStreamConstraints()函数几乎没有变化,gotLocalMediaStream()&handleLocalMediaStreamError()有些许变化,在19-43部分行
// Define peer connections, streams and video elements.

const localVideo = document.getElementById('localVideo');

const remoteVideo = document.getElementById('remoteVideo');

let localStream;

let remoteStream;

// Define MediaStreams callbacks.

// Sets the MediaStream as the video element src.

function gotLocalMediaStream(mediaStream) {

  localVideo.srcObject = mediaStream;

  localStream = mediaStream;

  trace('Received local stream.');

  callButton.disabled = false;  // Enable call button.

}

// Handles error by logging a message to the console.

function handleLocalMediaStreamError(error) {

  trace(`navigator.getUserMedia error: ${error.toString()}.`);

}
- 代码的整体逻辑非常清晰,唯独新加入的
trace()函数比较新颖,看看
// Logs an action (text) and the time when it happened on the console.

function trace(text) {

  text = text.trim();

  const now = (window.performance.now() / 1000).toFixed(3);

  console.log(now, text);

}
- 几个API调用String.prototype.trim() console.log() 可以在各种浏览器的控制台查看(Chrome的是开发者工具的console),以及performance.now(),总体来说,这是一个控制台信息输出函数
callAction()
- 再看
callAction(),代码203-246行
// Code from line 16-17

// Define initial start time of the call (defined as connection between peers).

let startTime = null;

// Code from line19-27

// Define peer connections

let localPeerConnection;

let remotePeerConnection;

// Handles call button action: creates peer connection.

function callAction() {

  callButton.disabled = true;	// disenable call button

  hangupButton.disabled = false;	// enable hangup button

  trace('Starting call.');

  startTime = window.performance.now();	// assign startTime with concrete time

  // Get local media stream tracks.

  const videoTracks = localStream.getVideoTracks();

  const audioTracks = localStream.getAudioTracks();

  if (videoTracks.length > 0) {

    trace(`Using video device: ${videoTracks[0].label}.`);

  }

  if (audioTracks.length > 0) {

    trace(`Using audio device: ${audioTracks[0].label}.`);

  }

  const servers = null;  // Allows for RTC server configuration.

  // Create peer connections and add behavior.

  localPeerConnection = new RTCPeerConnection(servers);

  trace('Created local peer connection object localPeerConnection.');

  localPeerConnection.addEventListener('icecandidate', handleConnection);

  localPeerConnection.addEventListener(

    'iceconnectionstatechange', handleConnectionChange);

  remotePeerConnection = new RTCPeerConnection(servers);

  trace('Created remote peer connection object remotePeerConnection.');

  remotePeerConnection.addEventListener('icecandidate', handleConnection);

  remotePeerConnection.addEventListener(

    'iceconnectionstatechange', handleConnectionChange);

  remotePeerConnection.addEventListener('addstream', gotRemoteMediaStream);

  // Add local stream to connection and create offer to connect.

  localPeerConnection.addStream(localStream);

  trace('Added local stream to localPeerConnection.');

  trace('localPeerConnection createOffer start.');

  localPeerConnection.createOffer(offerOptions)

    .then(createdOffer).catch(setSessionDescriptionError);

}
- 按上文代码的函数,从第28行开始,就是极其关键的
RTCPeerConnection,解析下面所说的三个步骤,以建立连接时序展开
Setting up a call between WebRTC peers involves three tasks:
- Create a RTCPeerConnection for each end of the call and, at each end, add the local stream from getUserMedia().
- Get and share network information: potential connection endpoints are known as ICE candidates.
- Get and share local and remote descriptions: metadata about local media in SDP format.
RTCPeerConnection关键部分——Local & Remote peer建立
getUserMedia()部分,不再赘述
  let localPeerConnection;

  const servers = null;  // Allows for RTC server configuration. This is where you could specify STUN and TURN servers.

  // Create peer connections and add behavior.

  localPeerConnection = new RTCPeerConnection(servers);

  remotePeerConnection = new RTCPeerConnection(servers);
- 关于servers,官网tutorial给了一篇说明WebRTC in the real world: STUN, TURN and signaling,这个我也会在随着项目系统通信搭建的深入,学习实践到servers层面再记录
- 可以认为在上述代码之后,一个RTCPeerConnection的端就实例化成功了
// Add local stream to connection and create offer to connect.

  localPeerConnection.addStream(localStream);

  trace('Added local stream to localPeerConnection.');
- 在
addStream()之后,可以认为Local & Remote Peer已经全部建好(RTCPeerConnection实例化成功,media传输也可以开始进行)
RTCPeerConnection关键部分——ICE candidate建立
  localPeerConnection.addEventListener('icecandidate', handleConnection);

  localPeerConnection.addEventListener(

    'iceconnectionstatechange', handleConnectionChange);
addEventListener()method在button相关中已经了解,关于'icecandidate'Event,看RTCPeerConnection: icecandidate event,而其中的setLocalDescription()在下面一个section中有介绍- 这一部分,需要对计算机网络有一些了解,以及对WebRTC signaling的过程烂熟于心,我初学是非常费解的,探索后其中内容解释在WebRTC的RTCPeerConnection()原理探析(链接中文章重原理,这篇重视基础的代码实现)
- 同样Remote Peer的建立也是类似
  remotePeerConnection.addEventListener('icecandidate', handleConnection);

  remotePeerConnection.addEventListener(

    'iceconnectionstatechange', handleConnectionChange);

  remotePeerConnection.addEventListener('addstream', gotRemoteMediaStream);
- 继续看ICE candidate建立过程中用到的三个函数
// Connects with new peer candidate.

function handleConnection(event) {

  const peerConnection = event.target;

  const iceCandidate = event.candidate;

  if (iceCandidate) {

    const newIceCandidate = new RTCIceCandidate(iceCandidate);

    const otherPeer = getOtherPeer(peerConnection);

    otherPeer.addIceCandidate(newIceCandidate)

      .then(() => {

        handleConnectionSuccess(peerConnection);

      }).catch((error) => {

        handleConnectionFailure(peerConnection, error);

      });

    trace(`${getPeerName(peerConnection)} ICE candidate:\n` +

          `${event.candidate.candidate}.`);

  }

}

// Logs changes to the connection state.

function handleConnectionChange(event) {

  const peerConnection = event.target;

  console.log('ICE state change event: ', event);

  trace(`${getPeerName(peerConnection)} ICE state: ` +

        `${peerConnection.iceConnectionState}.`);

}

// Handles remote MediaStream success by adding it as the remoteVideo src.

function gotRemoteMediaStream(event) {

  const mediaStream = event.stream;

  remoteVideo.srcObject = mediaStream;

  remoteStream = mediaStream;

  trace('Remote peer connection received remote stream.');

}
- 我猜测前两个函数,是针对于本机连本机的特殊应用搭建的,不具有普遍性,所以不具体分析
gotRemoteMediaStream()函数,最终将Local Peer的addStream()显示- 还有一个API值得看一下,就是RTCPeerConnection.addIceCandidate()
RTCPeerConnection关键部分——Get and share local and remote descriptions
- 开启一个SDP offer,以进行远程连接
  trace('localPeerConnection createOffer start.');

  localPeerConnection.createOffer(offerOptions)

    .then(createdOffer).catch(setSessionDescriptionError);
- RTCPeerConnection.createOffer()的API,看完就在源码里面找到了
offerOptionscreatedOffer()setSessionDescriptionError()这三个对应内容
// Set up to exchange only video.
const offerOptions = {
offerToReceiveVideo: 1,
};
// Logs offer creation and sets peer connection session descriptions.
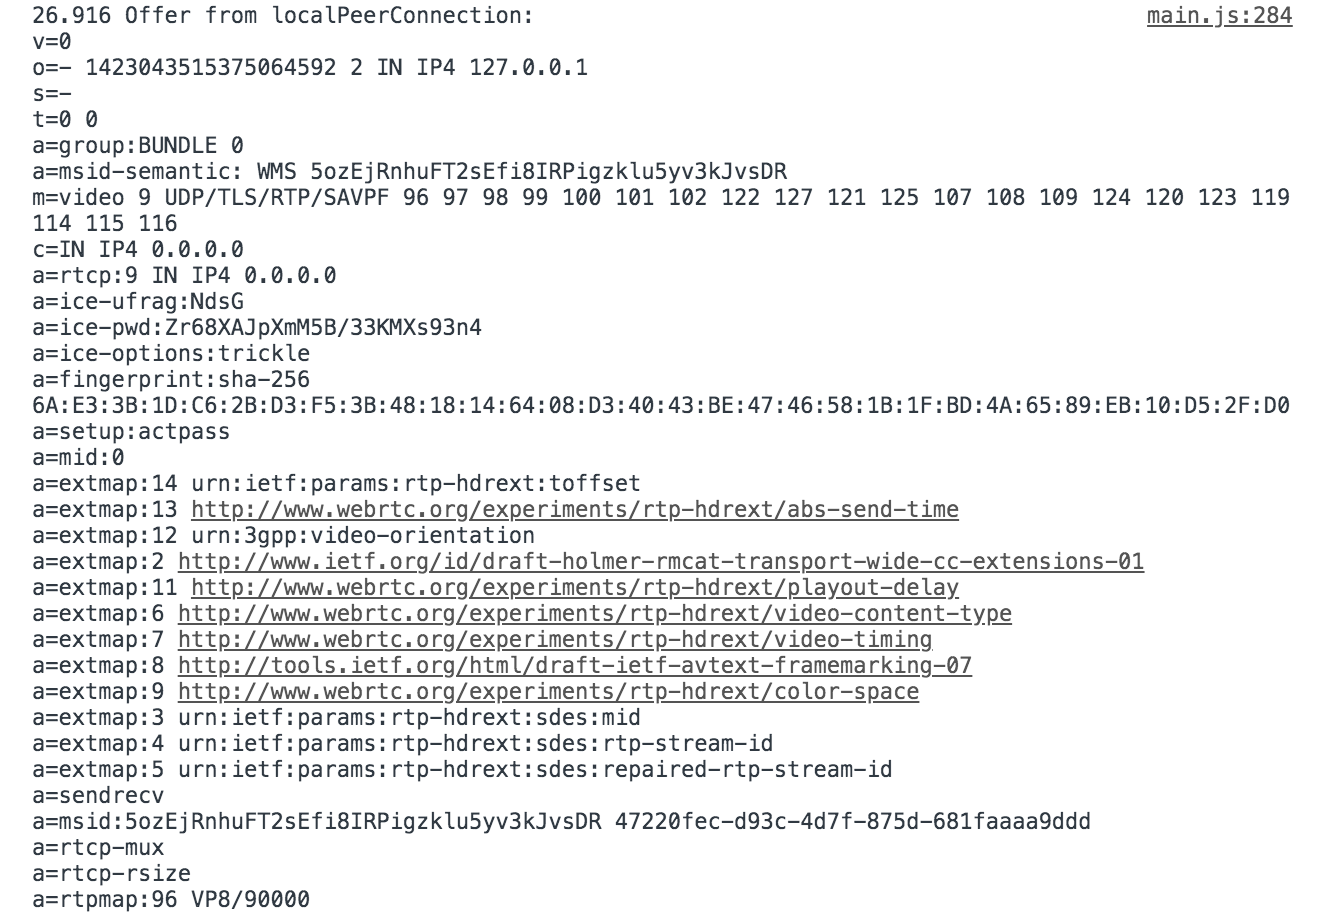
function createdOffer(description) {
trace(`Offer from localPeerConnection:\n${description.sdp}`);
trace('localPeerConnection setLocalDescription start.');
localPeerConnection.setLocalDescription(description)
.then(() => { // The parameter list for a function with no parameters should be written with a pair of parentheses.
setLocalDescriptionSuccess(localPeerConnection);
// just logs successful info on the console
}).catch(setSessionDescriptionError);
}
// Logs error when setting session description fails.
function setSessionDescriptionError(error) {
trace(`Failed to create session description: ${error.toString()}.`);
}
- 解释一下
createOffer()函数 - 先看
setLocalDescription,API中也没有讲的特别清楚,简单的说,可以认为这个函数经过调用后,Local Peer的offer就发送成功(可参见RTCPeerConnection.signalingState),但实际上发送的信息是什么、向谁发...等一系列问题,都是在官方教程中的源码里面未涉及的,这部分我写在了WebRTC的RTCPeerConnection()原理探析中 - Local Peer已经提供了offer,来而不往非礼也,下面就是Remote Peer的回应了
  trace('remotePeerConnection setRemoteDescription start.');

  remotePeerConnection.setRemoteDescription(description)

    .then(() => {

      setRemoteDescriptionSuccess(remotePeerConnection);

    }).catch(setSessionDescriptionError);

  trace('remotePeerConnection createAnswer start.');

  remotePeerConnection.createAnswer()

    .then(createdAnswer)

    .catch(setSessionDescriptionError);

function createdAnswer(description) {

  trace(`Answer from remotePeerConnection:\n${description.sdp}.`);

  trace('remotePeerConnection setLocalDescription start.');

  remotePeerConnection.setLocalDescription(description)

    .then(() => {

      setLocalDescriptionSuccess(remotePeerConnection);

    }).catch(setSessionDescriptionError);

    trace('localPeerConnection setRemoteDescription start.');

  localPeerConnection.setRemoteDescription(description)

    .then(() => {

      setRemoteDescriptionSuccess(localPeerConnection);

    }).catch(setSessionDescriptionError);

}
- Remote Peer的createAnswer()的API以及
setRemoteDescription的API,Local Peer与Remote Peer之间的互相通信基本建立了 - 在Google Dev Tools Console里面截取了一张SDP的图片,感觉比较复杂,之前有做WebRTC底层优化的准备,现在觉得...可能在十分十分需要的时候才会去做QAQ
hangupAction()
- 最后来看
hangupbutton对应什么函数
// Handles hangup action: ends up call, closes connections and resets peers.

function hangupAction() {

  localPeerConnection.close();

  remotePeerConnection.close();

  localPeerConnection = null;

  remotePeerConnection = null;

  hangupButton.disabled = true;

  callButton.disabled = false;

  trace('Ending call.');

}
- 非常清晰易懂,不解释
如何PC 2 PC
- 源码分析终于分析完了~
- 但还有一些问题,源码中的网页本地P2P通信如何改为PC 2 PC的通信?这个我记录在原理一文中
RTCDataChannel
- RTCPeerConnection部分需要写的实在太多了,到这里,全文长度已经超过3000.orz...这部分脚步代码量略少一些,也尽量写的简洁一点,其余拓展见补充
- 还是从源码分析开始
源码分析
HTML
- HTML代码部分较RTCPeerConnection部分,增加了两个文本区
  <textarea id="dataChannelSend" disabled

    placeholder="Press Start, enter some text, then press Send."></textarea>

  <textarea id="dataChannelReceive" disabled></textarea>
- 标记性语言,语法、效果非常容易理解,可见
- 在HTML语言中,我们也看到了和上一节类似的三个button,还是按button顺序来分析
三个button
- 这次三个button的写法较上一节的有比较新奇的改变
var startButton = document.querySelector('button#startButton');

var sendButton = document.querySelector('button#sendButton');

var closeButton = document.querySelector('button#closeButton');

startButton.onclick = createConnection;

sendButton.onclick = sendData;

closeButton.onclick = closeDataChannels;
startButton
var localConnection;

var remoteConnection;

var sendChannel;

var dataConstraint;

var dataChannelSend = document.querySelector('textarea#dataChannelSend');

// Offerer side

function createConnection() {

  dataChannelSend.placeholder = '';

  var servers = null;

  pcConstraint = null;

  dataConstraint = null;

  trace('Using SCTP based data channels');

  // For SCTP, reliable and ordered delivery is true by default.

  // Add localConnection to global scope to make it visible

  // from the browser console.

  window.localConnection = localConnection =

      new RTCPeerConnection(servers, pcConstraint);	// constructor

  trace('Created local peer connection object localConnection');

  sendChannel = localConnection.createDataChannel('sendDataChannel',

      dataConstraint);

  trace('Created send data channel');

  localConnection.onicecandidate = iceCallback1;

  sendChannel.onopen = onSendChannelStateChange;

  sendChannel.onclose = onSendChannelStateChange;

  // Add remoteConnection to global scope to make it visible

  // from the browser console.

  window.remoteConnection = remoteConnection =

      new RTCPeerConnection(servers, pcConstraint);

  trace('Created remote peer connection object remoteConnection');

  remoteConnection.onicecandidate = iceCallback2;

  remoteConnection.ondatachannel = receiveChannelCallback;

  localConnection.createOffer().then(

    gotDescription1,

    onCreateSessionDescriptionError

  );

  startButton.disabled = true;

  closeButton.disabled = false;

}

function iceCallback1(event) {

  trace('local ice callback');

  if (event.candidate) {

    remoteConnection.addIceCandidate(

      event.candidate

    ).then(

      onAddIceCandidateSuccess,

      onAddIceCandidateError

    );

    trace('Local ICE candidate: \n' + event.candidate.candidate);

  }

}

function iceCallback2(event) {

  trace('remote ice callback');

  if (event.candidate) {

    localConnection.addIceCandidate(

      event.candidate

    ).then(

    	// print out info on the console

      onAddIceCandidateSuccess,

      onAddIceCandidateError

    );

    trace('Remote ICE candidate: \n ' + event.candidate.candidate);

  }

}

function onSendChannelStateChange() {

  var readyState = sendChannel.readyState;

  trace('Send channel state is: ' + readyState);

  if (readyState === 'open') {

    dataChannelSend.disabled = false;

    dataChannelSend.focus();

    sendButton.disabled = false;

    closeButton.disabled = false;

  } else {

    dataChannelSend.disabled = true;

    sendButton.disabled = true;

    closeButton.disabled = true;

  }

}
The createDataChannel() method on the RTCPeerConnection interface creates a new channel linked with the remote peer, over which any kind of data may be transmitted. This can be useful for back-channel content such as images, file transfer, text chat, game update packets, and so forth.
This happens whenever the local ICE agent needs to deliver a message to the other peer through the signaling server. This lets the ICE agent perform negotiation with the remote peer without the browser itself needing to know any specifics about the technology being used for signaling; simply implement this method to use whatever messaging technology you choose to send the ICE candidate to the remote peer.
The read-only property candidate on the RTCIceCandidate interface returns a DOMString describing the candidate in detail. Most of the other properties of RTCIceCandidate are actually extracted from this string.
When a web site or app using RTCPeerConnection receives a new ICE candidate from the remote peer over its signaling channel, it delivers the newly-received candidate to the browser's ICE agent by calling RTCPeerConnection.addIceCandidate(). This adds this new remote candidate to the RTCPeerConnection's remote description, which describes the state of the remote end of the connection.
The RTCDataChannel.onopen property is an EventHandler which specifies a function to be called when the open event is fired; this is a simple Event which is sent when the data channel's underlying data transport—the link over which the RTCDataChannel's messages flow—is established or re-established.
- HTMLElement.focus(),这个功能比我想的有趣,而且我们在平时使用浏览器的时候,遇见的特别多~但是,有一点问题,就是基于DOM的Web前端开发太“高级”了,以至于我看不到底层的实现...
The HTMLElement.focus() method sets focus on the specified element, if it can be focused. The focused element is the element which will receive keyboard and similar events by default.
- 之后的部分就是和RTCPeerConnection相类似的
createOffer()createAnswer()部分,在学习完RTCPeerConnection之后,是非常容易的,所以不赘述
sendButton
function sendData() {

  var data = dataChannelSend.value;

  sendChannel.send(data);

  trace('Sent Data: ' + data);

}
- 基于上一步建立的连接上,实现data传输功能
closeButton
function closeDataChannels() {

  trace('Closing data channels');

  sendChannel.close();

  trace('Closed data channel with label: ' + sendChannel.label);

  receiveChannel.close();

  trace('Closed data channel with label: ' + receiveChannel.label);

  localConnection.close();

  remoteConnection.close();

  localConnection = null;

  remoteConnection = null;

  trace('Closed peer connections');

  startButton.disabled = false;

  sendButton.disabled = true;

  closeButton.disabled = true;

  dataChannelSend.value = '';

  dataChannelReceive.value = '';

  dataChannelSend.disabled = true;

  disableSendButton();

  enableStartButton();

}

function enableStartButton() {

  startButton.disabled = false;

}

function disableSendButton() {

  sendButton.disabled = true;

}
- 这部分基本上也是明晰的,不赘述
And then...
- 关于WebRTC官网代码三大模块同一网页实现的分析,就写到这个地方,也写了很多很多了,换一个文本继续写跨PC的WebRTC实现,请见PC 2 PC的WebRTC实现
同网页的WebRTC实现与源码分析的更多相关文章
- gRPC源码分析0-导读
gRPC是Google开源的新一代RPC框架,官网是http://www.grpc.io.正式发布于2016年8月,技术栈非常的新,基于HTTP/2,netty4.1,proto3.虽然目前在工程化方 ...
- YII 的源码分析(二)
上一篇简单分析了一下yii的流程,从创建一个应用,到屏幕上输出结果.这一次我来一个稍复杂一点的,重点在输出上,不再是简单的一行"hello world",而是要经过view(视图) ...
- Struts2 源码分析——DefaultActionInvocation类的执行action
本章简言 上一章讲到关于拦截器的机制的知识点,让我们对拦截器有了一定的认识.我们也清楚的知道在执行用户action类实例之前,struts2会先去执行当前action类对应的拦截器.而关于在哪里执行a ...
- Struts2 源码分析——Action代理类的工作
章节简言 上一章笔者讲到关于如何加载配置文件里面的package元素节点信息.相信读者到这里心里面对struts2在启动的时候加载相关的信息有了一定的了解和认识.而本章将讲到关于struts2启动成功 ...
- Struts2 源码分析——调结者(Dispatcher)之执行action
章节简言 上一章笔者写关于Dispatcher类如何处理接受来的request请求.当然读者们也知道他并非正真的执行action操作.他只是在执行action操作之前的准备工作.那么谁才是正真的执行a ...
- 《深入理解Spark:核心思想与源码分析》(第2章)
<深入理解Spark:核心思想与源码分析>一书前言的内容请看链接<深入理解SPARK:核心思想与源码分析>一书正式出版上市 <深入理解Spark:核心思想与源码分析> ...
- wifidog源码分析 - 用户连接过程
引言 之前的文章已经描述wifidog大概的一个工作流程,这里我们具体说说wifidog是怎么把一个新用户重定向到认证服务器中的,它又是怎么对一个已认证的用户实行放行操作的.我们已经知道wifidog ...
- soundtouch源码分析__based on csdn :
1. soundtouch介绍和相关资源 The SoundTouch Library Copyright © Olli Parviainen 2001-2014 SoundTouch is an o ...
- jQuery 源码分析和使用心得 - 序
众所周知, jQuery (个人简称为jq) 在前端开发中占有着非常重要的地位, 可以说jQuery的存在大大降低了学习网页设计和交互的门槛, 他的简单的语法和顺畅的使用逻辑激发了人们强烈的学习兴趣, ...
随机推荐
- Java POI导出Excel不弹框选择下载路径(下载文件不选择下载路径,默认) Chrome
在Chrome浏览器中,Java导出Excel文件时,浏览器弹出提示框,需要选择下载路径 在Chrome中的高级设置中,把“下载前询问每个文件的保存位置”去掉就解决了 DEEPLOVE(LC)
- 解决跨域问题(CORS)
一.改变响应头部 请求代码如下: fetch("http://localhost:8888/young",{ method:"get" }).then(func ...
- java 字符串转日期格式
/** * 字符串转日期格式 * */ public static Date date(String date_str) { try { Calendar zcal = Calendar.getIns ...
- 地理位置(Geolocation)API 简介
一.开篇简述 Geolocation API(地理位置应用程序接口)提供了一个可以准确知道浏览器用户当前位置的方法.且目前看来浏览器的支持情况还算不错(因为新版本的IE支持了该API),这使得在不久之 ...
- 监控Linux系统所选的服务所占进程内存占用
[代码] #!/bin/bash #程序功能描述: # 监控系统所选的服务所占进程内存占用 #作者:孤舟点点 #版本:1.0 #创建时间:-- :: PATH=/bin:/sbin:/usr/bin: ...
- [大餐]开发摘记1--我的Fragment通信的框架
[大餐]开发摘记1--我的Fragment通信的框架 | 卖牙膏的芖口钉 盒子 盒子 博客 分类 标签 友链 大专栏 [大餐]开发摘记1--我的Fragment通信的框架ass="ROUN ...
- angular知识点(2)
angular知识点(2) 1.为了代码规范,对于需要自动加载的依赖,需要在前面加上注释,注释为://@ngInject 或者是/*@ngInject*/ 2.ngSwitch的应用 在需要用到选择出 ...
- Logstash实践
转载请注明出处:https://www.cnblogs.com/shining5/p/9542710.html Logstash简介 一个开源的数据收集引擎,具有实时数据传输能力,可以统一过滤来自不同 ...
- 数据库及MySQL概述
#什么是数据 用来描述事物的符号记录.可以是数字.文字.图形等,有多种形式,经过数字化之后存入计算机 #什么是数据库 数据库(Database)就是一个用来存放数据库的仓库,是按照一定的数据结构来组织 ...
- 【WPF学习】第五十三章 动画类型回顾
创建动画面临的第一个挑战是为动画选择正确的属性.期望的结果(例如,在窗口中移动元素)与需要使用的属性(在这种情况下是Canvas.Left和Canvas.Top属性)之间的关系并不总是很直观.下面是一 ...