Python创建一个简单的区块链
区块链(Blockchain)是一种分布式账本(listributed ledger),它是一种仅供增加(append-only),内容不可变(immutable)的有序(ordered)链式数据结构,该数据结构由网络中的一系列节点共同维护,并且这些节点之间互不信任。区块链是如今盛行的Bitcoin,Ethereum等数字货币背后的底层技术,本文通过Python从0开始创建一个简单的区块链模型,对于理解区块链基本原理很有帮助。
准备
所需条件: python3.6,pip,flask,requests,cURL
flask和requests可通过如下命令下载:
pip install falsk, requests创建文件blockchain.py,所有代码均写在此文件中。
开始
代码主要分为两部分,首先是一个Blockchain类,其中包含区块链的属性和特性方法;然后是相应的路由处理方法,以flask服务器作为区块链网络中的一个节点来处理客户端请求对区块链完成相应操作,以及和网络中其它节点进行交互。
相关数据结构
block:区块,以dict表示,包含属性索引(index),时间戳(timestamp),交易集合(transactions),工作量证明(proof),上一个区块的hash值(previous_hash)。其中,previous_hash用于链接这些有序区块,并且保证其中内容不被更改。
tansaction:交易,dict形式,存放于区块中,包含属性:发出者(sender),接收者(recipient),数额(amount)
Blockchain类的属性
chain:区块链中所有区块的list集合,每个元素都是一个block
current_transactions: 当前即将加入区块的交易集合,list表示
nodes:当前节点的其他相邻节点的set集合
Blockchain类的方法
new_block():生成新的区块,接收工作量证明proof作为参数,将block加入chain中,并且清空当前交易集合,返回生成的block。在
__init__方法中会自动生成一个创世区块(genesis block),初始proof为100,previous_hash为’1’new_transaction():生成新的交易,接收三个参数:发出者,接受者,数额,并将交易加入到当前交易集合中,返回该交易将会加入的区块的索引
hash():生成区块的hash值,接收一个block作为参数,首先利用
json.dumps()将block对象转化为json格式,然后利用hashlib.sha256()计算其hash值proof_of_work():工作量证明算法(PoW),通过循环找一个数p,使得与前一个区块的proof拼接起来的字符串的hash值的前4位为’0000’,接收上一个区块的proof作为参数,返回找到的符合要求的proof
register_node():注册节点,接收一个URL作为参数,利用
urllib.parse.urlparse()解析该地址,获取其中的内容ip:port,并加入到相邻节点集合nodes中resolve_confict(): 共识算法(consensus)解决冲突,即使用网络中最长且有效的链。遍历其他节点的集合
nodes(集合中保存了这些节点的ip和port),利用requests.get()通过路由/chain获取到这些节点的链chain。然后先进行长度判断,如果某节点的链长大于当前节点的链长;则对该链进行有效判断,即遍历该链,判断每个区块的previous_hash和proof值是否满足要求。如果该链更长且有效,则用该chain替换掉自身的链,解决冲突。
URL处理函数
用户提交的数据和服务器的响应数据均使用json格式,服务器利用Flask.request.get_json()获取表单中的json数据,利用Flask.jsonify()将response数据转化为json格式返回。
mine():挖矿,对应路由为
/mine,请求方法为GET。主要完成任务有:计算工作量证明,通过新建交易给予矿工(自身节点)1个币的奖励,新增一个区块并加入链中。new_transaction():新增交易,对应路由为
/transactions/new,请求方法为POST。通过request.get_json()获取用户提交的json格式表单,判断交易是否符合要求,调用类中添加交易的方法。full_chain():查看整条链,对应路由为
/chain,请求方法为GET。register_nodes(): 注册节点,对应路由为
/node/register,方法为POST。接收提交的节点集合,调用register_node()加入这些节点,返回nodes集合consensus():共识,对应路由为
/node/resolve,方法为GET。调用resolve_conflict()解决冲突,返回共识之后的链。
全部代码
import hashlib

import json

from time import time

from uuid import uuid4

from flask import Flask, jsonify, request

from urllib.parse import urlparse

import requests

import sys

class Blockchain(object):

    def __init__(self):

        # 当前即将加入区块的交易集合

        self.current_transactions = []

        self.chain = []

        self.nodes = set()

        # create the genesis block

        self.new_block(proof=100, previous_hash='1')

    def new_block(self, proof, previous_hash=None):

        """

        生成新块

        :param proof: <int> The proof given by the PoW algorithm

        :param previous_hash: (Optional) <str> hash of Previous block

        :return: <dict> new block

        """

        block = {

            'index': len(self.chain) + 1,

            'timestamp': time(),

            'transactions': self.current_transactions,        # a list

            'proof': proof,

            'previous_hash': previous_hash or self.hash(self.chain[-1]),

        }

        # 当前交易集合在加入区块后清空

        self.current_transactions = []

        self.chain.append(block)

        return block

    def new_transaction(self, sender, recipient, amount):

        """

        生成新的交易信息,将加入下一个待挖的区块中

        :param sender: <str> Address of the Sender

        :param recipient: <str> Address of the Recipient

        :param amount: <int> Amount

        :return: <int> The index of the Block that will hold this transaction

        """

        self.current_transactions.append({

            'sender': sender,

            'recipient': recipient,

            'amount': amount,

        })

        return self.last_block['index'] + 1

    @property

    def last_block(self):

        # Return the last block in the chain

        return self.chain[-1]

    @staticmethod

    def hash(block):

        """

        生成区块的 SHA-256 hash值

        :param block: <dict> Block

        :return: <str> the hash value

        """

        # we must make sure that the dict is ordered, or we'll have inconsistent hashes

        block_string = json.dumps(block, sort_keys=True).encode()

        return hashlib.sha256(block_string).hexdigest()

    def proof_of_work(self, last_proof):

        """

        工作量证明:

         - 查找一个 p' 使得 hash(pp')以4个0开头

         - p是上一个块的证明, p' 是当前的证明

        :param last_proof: <int>

        :return: <int>

        """

        proof = 0

        while self.valid_proof(last_proof, proof) is False:

            proof += 1

        return proof

    @staticmethod

    def valid_proof(last_proof, proof):

        """

        验证证明:是否hash(last_proof, proof)

        :param proof: <int> previous proof

        :param last_proof: <int> current proof

        :return: <bool> True if correct, Flase if not.

        """

        guess_hash = hashlib.sha256((str(last_proof) + str(proof)).encode()).hexdigest()

        return guess_hash[:4] == '0000'

    def register_node(self, address):

        """

        Add a new node to the list of nodes

        :param address: <str> Address of node.  EG. 'http://192.168.0.5:5000'

        :return: None

        """

        node = urlparse(address).netloc

        self.nodes.add(node)

    def valid_chain(self, chain):

        """

        Determine if a blockchain is valid

        :param chain: <list> a blockchain

        :return: <bool> True if valid, False if not

        """

        for i in range(1, len(chain)):

            block = chain[i]

            previous_block = chain[i-1]

            if self.hash(previous_block) != block['previous_hash']:

                return False

            if not self.valid_proof(previous_block['proof'], block['proof']):

                return False

        return True

    def resolve_conflict(self):

        """

        共识算法解决冲突,使用网络中最长且有效的链

        :param chain: <list> other blockchain

        :return: <bool> True 链被取代,False 链未被取代

        """

        flag = False

        for node in self.nodes:

            r = requests.get('http://{}/chain'.format(node))

            if r.status_code == 200:

                chain = r.json()['chain']

                length = r.json()['length']

                if length > len(self.chain) and self.valid_chain(chain):

                    self.chain = chain

                    flag = True

        return flag

# Instantiate our Node

app = Flask(__name__)

# Generate a globally unique address for this Node

node_identifier = str(uuid4()).replace('-', '')

# Instantiate the Blockchain

blockchain = Blockchain()

@app.route('/mine', methods=['GET'])

def mine():

    # We run the PoW algorithm to get the next proof...

    last_proof = blockchain.last_block['proof']

    proof = blockchain.proof_of_work(last_proof)

    # 给工作量证明的节点提供奖励,

    # 发送者为 '0' 表面是新挖出的币

    blockchain.new_transaction(

        sender='0',

        recipient=node_identifier,

        amount=1,

    )

    block = blockchain.new_block(proof)

    response = {

        'message': 'New Block Forged',

        'index': block['index'],

        'transactions': block['transactions'],

        'proof': block['proof'],

        'previous_hash': block['previous_hash'],

    }

    return jsonify(response), 200

@app.route('/transactions/new', methods=['POST'])

def new_transaction():

    # json.loads(request.get_data())

    values = request.get_json()

    # Check that the required fields are in POST'ed data

    required = ['sender', 'recipient', 'amount']

    if not all(k in values for k in required):

        return 'Missing values', 400

    # Create a new Transaction

    index = blockchain.new_transaction(values['sender'], values['recipient'], values['amount'])

    response = {'message': 'Transaction will be added to Block {}'.format(index)}

    return jsonify(response), 201

@app.route('/chain', methods=['GET'])

def full_chain():

    response = {

        'chain': blockchain.chain,

        'length': len(blockchain.chain),

    }

    return jsonify(response), 200

@app.route('/node/register', methods=['POST'])

def register_nodes():

    values = request.get_json()

    nodes = values.get('nodes')

    if nodes is None:

        return "Error: Please supply a valid list of nodes", 400

    for node in nodes:

        blockchain.register_node(node)

    response = {

        'message': 'New nodes have been added',

        'total_nodes': list(blockchain.nodes)

    }

    return jsonify(response), 201

@app.route('/node/resolve', methods=['GET'])

def consensus():

    is_replaced = blockchain.resolve_conflict()

    if is_replaced:

        response = {

            'message': 'Our chain was replaced',

            'new_chain': blockchain.chain

        }

    else:

        response = {

            'message': 'Our chain is authoritative',

            'chain': blockchain.chain

        }

    return jsonify(response), 200

if __name__ == '__main__':

    myport = 5000

    if len(sys.argv) > 1:

        myport = int(sys.argv[1])

    app.run(host='0.0.0.0', port=myport)
测试
在一台机器开启多个终端分别运行源代码,通过监听多个不同的端口来模拟多节点网络。这里模拟包含两个节点的区块链网络。
python3 blockchain.py 5000 #在终端1运行
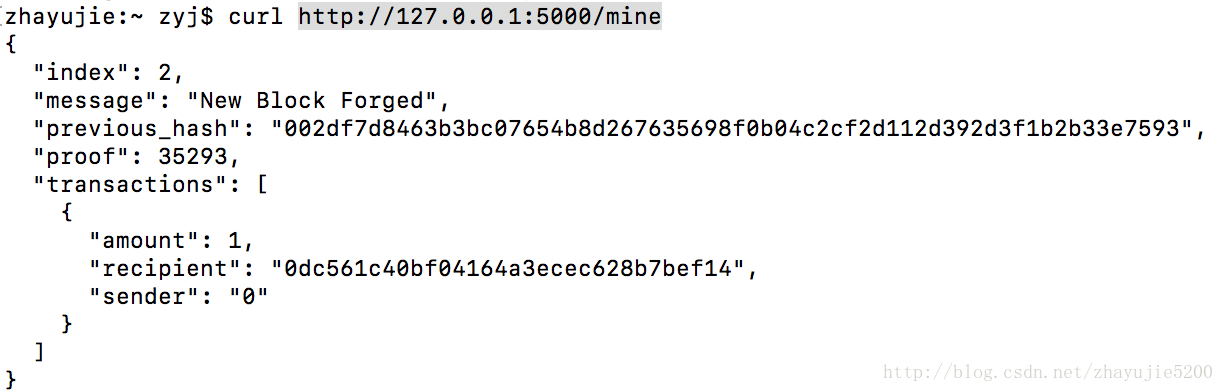
python3 blockchain.py 5001 #在终端2运行挖矿:新建另一个终端3进行通过curl命令进行操作。对节点1进行一次挖矿操作,此时链中有两个区块。
curl http://127.0.0.1:5000/mine发送交易:向节点1发送一个交易。
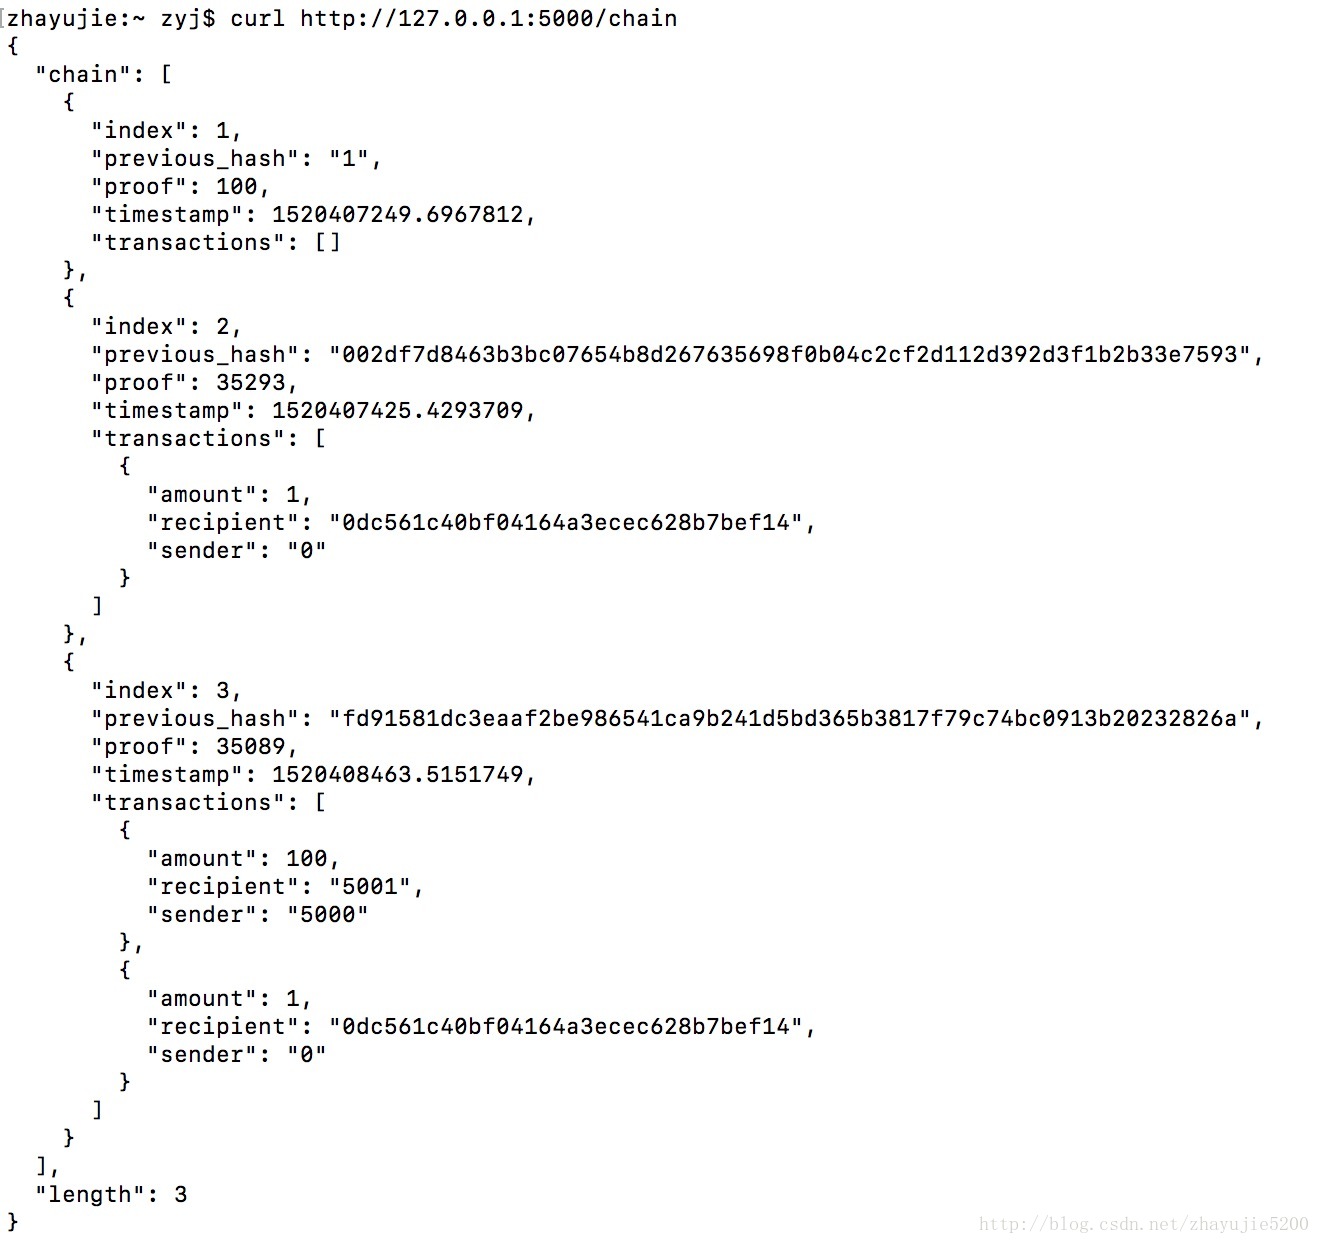
curl -X POST -H "Content-Type: application/json" -d '{"sender": "5000", "recipient": "5001", "amount": 100}' "http://127.0.0.1:5000/transactions/new"查看区块链:先进行一次mine操作,使刚刚发送的交易进入第3个区块,然后查看整个区块链的数据信息,此时该链有3个区块,其中第3个区块包含两条交易。
curl http://127.0.0.1:5000/mine

curl http://127.0.0.1:5000/chain
注册节点:向节点2(端口为5001,1个block)发送节点1的地址(端口为5000,3个block)。
curl -X POST -H "Content-Type: application/json" -d '{"nodes": ["http://127.0.0.1:5000"]}' "http://127.0.0.1:5001/node/register"共识:使节点2完成与相邻节点的共识,用节点1的链(长度为3)替换节点2的链(长度为1)。
curl http://127.0.0.1:5001/node/resolve


参考文章:https://learnblockchain.cn/2017/10/27/build_blockchain_by_python/
Python创建一个简单的区块链的更多相关文章
- 用 Python 构建一个极小的区块链
虽然有些人认为区块链是一个早晚会出现问题的解决方案,但是毫无疑问,这个创新技术是一个计算机技术上的奇迹.那么,究竟什么是区块链呢? 区块链 以比特币(Bitcoin)或其它加密货币按时间顺序公开地记录 ...
- Rust 实现一个简单的区块链
一.背景 近期用 Rust 实现了 Jeiwan/blockchain_go,与原项目相比没有加入新的功能,只是换了一个编程语言实现了一遍,源码放在 Github 上. 开发这个项目,花费了好几个周末 ...
- [Python Study Notes]一个简单的区块链结构(python 2.7)
''''''''''''''''''''''''''''''''''''''''''''''''''''''''''''''''''''''''''''''''''''''''''''''''''' ...
- Python>>>创建一个简单的3D场景
首先安装PyOpengl pip install PyOpenGL PyOpenGL_accelerate
- 基于python创建一个简单的HTTP-WEB服务器
背景 大多数情况下主机资源只有开发和测试相关人员可以登录直接操作,且有些特定情况"答辩.演示.远程"等这些场景下是无法直接登录主机的.web是所有终端用户都可以访问了,解决了人员权 ...
- python创建一个简单的服务
python -m http.server 8000 --bind 0.0.0.0 8000为端口 0.0.0.0允许远程访问
- 用Java实现简单的区块链
用 Java 实现简单的区块链 1. 概述 本文中,我们将学习区块链技术的基本概念.也将根据概念使用 Java 来实现一个基本的应用程序. 进一步,我们将讨论一些先进的概念以及该技术的实际应用. 2. ...
- 通过创建一个简单的骰子游戏来探究 Python
在我的这系列的第一篇文章 中, 我已经讲解如何使用 Python 创建一个简单的.基于文本的骰子游戏.这次,我将展示如何使用 Python 模块 Pygame 来创建一个图形化游戏.它将需要几篇文章才 ...
- 用不到 50 行的 Python 代码构建最小的区块链
引用 译者注:随着比特币的不断发展,它的底层技术区块链也逐步走进公众视野,引起大众注意.本文用不到50行的Python代码构建最小的数据区块链,简单介绍了区块链去中心化的结构与其实现原理. 尽管一些人 ...
随机推荐
- liunx 之 Ubuntu 网速慢解决方法
打开终端依次输入以下指令: sudo lshw -numeric -class network sudo ip addr show sudo ip route show sudo tracepath ...
- 标准库 xml
xml处理模块 xml是实现不同语言或程序之间进行数据交换的协议,跟json差不多,但json使用起来更简单,不过,古时候,在json还没诞生的黑暗年代,大家只能选择用xml呀,至今很多传统公司如金融 ...
- “Too many texture interpolators would be used for ForwardBase pass”
CGPROGRAM 下加一个 #pragma target 4.0 转载于:https://www.cnblogs.com/alps/p/7101092.html
- Pig设计模式概要以及与SQL的设计模式的对比
2019独角兽企业重金招聘Python工程师标准>>> 1概要模式 概要模式其实就是数据的全貌信息的获取,主要分为3种: 1.1数值概要 #HSQL SELECT MIN(num), ...
- 图论--差分约束--POJ 3169 Layout(超级源汇建图)
Like everyone else, cows like to stand close to their friends when queuing for feed. FJ has N (2 < ...
- python selenium(环境搭建)
一:自动化了解知识 工具安装 什么样的项目适合做自动化? 自动化测试一般在什么阶段开始实施? 你们公司自动化的脚本谁来维护?如何维护? 自动化用例覆盖率是多少? 自动化的原理 通过 webdriver ...
- 解决ASP.NET WebPage的CS1061报错
<%@ Page Language="C#" AutoEventWireup="true" CodeBehind="pg_CompanyInfo ...
- 谷歌浏览器的F12用处及问题筛查笔记
在前端测试功能的时候,经常有些莫名其妙的错误,这个时候开发会说打开F12看一下吧,所以感觉这个开发者功能很有用,研究一下,做如下记录: Elements:左栏以DOM树形式查看网页源代码(HTML), ...
- Java采用反射技术创建对象后对目标类的成员变量和成员方法进行访问
实现: package com.ljy; import java.lang.reflect.Field; import java.lang.reflect.Method; /** * * @Class ...
- Java——Java面向对象
该系列博文会告诉你如何从入门到进阶,一步步地学习Java基础知识,并上手进行实战,接着了解每个Java知识点背后的实现原理,更完整地了解整个Java技术体系,形成自己的知识框架. 概述: Java是面 ...