
基于Hadoop3.1.2集群的Hive3.1.2安装(有不少坑)
前置条件: 已经安装好了带有HDFS, MapReduce, Yarn 功能的 Hadoop集群
上传tar包并解压到指定目录:
tar -zxvf apache-hive-3.1.2-bin.tar.gz -C /opt/ronnie
修改hive配置文件:
新建文件夹
mkdir /opt/ronnie/hive-3.1.2/warehouse

hadoop fs -mkdir -p /opt/ronnie/hive-3.1.2/warehouse

hadoop fs -chmod 777 /opt/ronnie/hive-3.1.2/warehouse

hadoop fs -ls /opt/ronnie/hive-3.1.2/
复制配置文件
cd /opt/ronnie/hive-3.1.2/conf

cp hive-exec-log4j2.properties.template hive-exec-log4j2.properties

cp hive-log4j2.properties.template hive-log4j2.properties

cp hive-default.xml.template hive-default.xml

cp hive-default.xml.template hive-site.xml

cp hive-env.sh.template hive-env.sh
修改环境配置文件
vim hive-env.sh

HADOOP_HOME=/opt/ronnie/hadoop-3.1.2

export HIVE_CONF_DIR=/opt/ronnie/hive-3.1.2/conf

export HIVE_AUX_JARS_PATH=/opt/ronnie/hive-3.1.2/lib
vim hive-site.xml修改配置文件
这时候先回顾一下vim操作(由于这个文件页数比较多...):
gg: 到页首
G: 到页末
22, 6918 d(在此执行的删行操作)
修改配置文件参数:
<configuration>
<property>
<name>javax.jdo.option.ConnectionUserName</name>
<value>root</value>
</property>
<property>
<name>javax.jdo.option.ConnectionPassword</name>
<!--你的Mysql数据库密码-->
<value>xxxxxxx</value>
</property>
<property>
<name>javax.jdo.option.ConnectionURL</name>
<value>jdbc:mysql://192.168.180.130:3306/hive?allowMultiQueries=true&useSSL=false&verifyServerCertificate=false</value>
</property>
<property>
<name>javax.jdo.option.ConnectionDriverName</name>
<value>com.mysql.jdbc.Driver</value>
</property>
<property>
<name>datanucleus.readOnlyDatastore</name>
<value>false</value>
</property>
<property>
<name>datanucleus.fixedDatastore</name>
<value>false</value>
</property>
<property>
<name>datanucleus.autoCreateSchema</name>
<value>true</value>
</property>
<property>
<name>datanucleus.autoCreateTables</name>
<value>true</value>
</property>
<property>
<name>datanucleus.autoCreateColumns</name>
<value>true</value>
</property>
</configuration>
下载jdbc
cd /home/ronnie/soft

wget http://mirrors.163.com/mysql/Downloads/Connector-J/mysql-connector-java-5.1.48.tar.gz
MySQL设置
下载:
sudo apt-get install mysql
mysql -uroot 进入mysql界面(Ubuntu mysql 下载后默认开机自启, Centos的话还需要service start mysqld 一下)
修改密码:
查看用户及密码:
老版本:
use mysql;

select host,user,password from mysql.user;
我用的5.7版本
use mysql;

select user, host, authentication_string from user;
设置新密码
update mysql.user set authentication_string='你要设置的密码' where user='root';
这边有一个巨坑, 初始化数据库的时候报的:
org.apache.hadoop.hive.metastore.HiveMetaException: Failed to get schema version.

Underlying cause: com.mysql.jdbc.exceptions.jdbc4.CommunicationsException : Communications link failure
连接的问题, 但是grant all on hive.* to root@'%' identified by 'xxxxxx'; 敲了好几次都没用。
mysql> select user, authentication_string, host from user;

+------------------+-------------------------------------------+-----------+

| user             | authentication_string                     | host      |

+------------------+-------------------------------------------+-----------+

| root             |                                           | localhost |

| mysql.session    | *THISISNOTAVALIDPASSWORDTHATCANBEUSEDHERE | localhost |

| mysql.sys        | *THISISNOTAVALIDPASSWORDTHATCANBEUSEDHERE | localhost |

| debian-sys-maint | *19A653DDEEC19D326E8DFA1A3D00E26C16438DD8 | localhost |

| root             | *A63376A449EDC1A66FEFBC77E645D70EF6941893 | %         |

+------------------+-------------------------------------------+-----------+
发现有重复的root用户, 删掉, 直接将root修改为%
delete from user where host = '%';

mysql> select user, authentication_string, host from user;

+------------------+-------------------------------------------+-----------+

| user             | authentication_string                     | host      |

+------------------+-------------------------------------------+-----------+

| root             |                                           | localhost |

| mysql.session    | *THISISNOTAVALIDPASSWORDTHATCANBEUSEDHERE | localhost |

| mysql.sys        | *THISISNOTAVALIDPASSWORDTHATCANBEUSEDHERE | localhost |

| debian-sys-maint | *19A653DDEEC19D326E8DFA1A3D00E26C16438DD8 | localhost |

+------------------+-------------------------------------------+-----------+

mysql> update user set host='%' where user = 'root';

Query OK, 1 row affected (0.00 sec)

Rows matched: 1  Changed: 1  Warnings: 0

mysql> flush privileges;

Query OK, 0 rows affected (0.00 sec)

mysql> select user, authentication_string, host from user;

+------------------+-------------------------------------------+-----------+

| user             | authentication_string                     | host      |

+------------------+-------------------------------------------+-----------+

| root             |                                           | %         |

| mysql.session    | *THISISNOTAVALIDPASSWORDTHATCANBEUSEDHERE | localhost |

| mysql.sys        | *THISISNOTAVALIDPASSWORDTHATCANBEUSEDHERE | localhost |

| debian-sys-maint | *19A653DDEEC19D326E8DFA1A3D00E26C16438DD8 | localhost |

+------------------+-------------------------------------------+-----------+
重启服务:
service mysqld restart
还是报错......, 测试了一下远程navicat也连不上, 报的1251
vim /etc/mysql/mysql.conf.d/mysqld.cnf 把其中的bind-address改为0.0.0.0
还是报错, 最终的解决方案:
ALTER USER 'root'@'%' IDENTIFIED WITH mysql_native_password BY '密码';

#记得提交

FLUSH PRIVILEGES;
然后就连上navicat了, 执行初始化成功了
root@node02:~# schematool  -initSchema -dbType mysql

SLF4J: Class path contains multiple SLF4J bindings.

SLF4J: Found binding in [jar:file:/opt/ronnie/hive-3.1.2/lib/log4j-slf4j-impl-2.10.0.jar!/org/slf4j/impl/StaticLoggerBinder.class]

SLF4J: Found binding in [jar:file:/opt/ronnie/hadoop-3.1.2/share/hadoop/common/lib/slf4j-log4j12-1.7.25.jar!/org/slf4j/impl/StaticLoggerBinder.class]

SLF4J: See http://www.slf4j.org/codes.html#multiple_bindings for an explanation.

SLF4J: Actual binding is of type [org.apache.logging.slf4j.Log4jLoggerFactory]

Metastore connection URL:	 jdbc:mysql://192.168.180.131:3306/hive?allowMultiQueries=true&useSSL=false&verifyServerCertificate=false

Metastore Connection Driver :	 com.mysql.jdbc.Driver

Metastore connection User:	 root

Starting metastore schema initialization to 3.1.0

Initialization script hive-schema-3.1.0.mysql.sql
看一下mysql, 表生成成功

启动Hive
root@node02:~# hive

SLF4J: Class path contains multiple SLF4J bindings.

SLF4J: Found binding in [jar:file:/opt/ronnie/hive-3.1.2/lib/log4j-slf4j-impl-2.10.0.jar!/org/slf4j/impl/StaticLoggerBinder.class]

SLF4J: Found binding in [jar:file:/opt/ronnie/hadoop-3.1.2/share/hadoop/common/lib/slf4j-log4j12-1.7.25.jar!/org/slf4j/impl/StaticLoggerBinder.class]

SLF4J: See http://www.slf4j.org/codes.html#multiple_bindings for an explanation.

SLF4J: Actual binding is of type [org.apache.logging.slf4j.Log4jLoggerFactory]

SLF4J: Class path contains multiple SLF4J bindings.

SLF4J: Found binding in [jar:file:/opt/ronnie/hbase-2.0.6/lib/slf4j-log4j12-1.7.25.jar!/org/slf4j/impl/StaticLoggerBinder.class]

SLF4J: Found binding in [jar:file:/opt/ronnie/hive-3.1.2/lib/log4j-slf4j-impl-2.10.0.jar!/org/slf4j/impl/StaticLoggerBinder.class]

SLF4J: Found binding in [jar:file:/opt/ronnie/hadoop-3.1.2/share/hadoop/common/lib/slf4j-log4j12-1.7.25.jar!/org/slf4j/impl/StaticLoggerBinder.class]

SLF4J: See http://www.slf4j.org/codes.html#multiple_bindings for an explanation.

SLF4J: Actual binding is of type [org.slf4j.impl.Log4jLoggerFactory]

2019-12-02 12:34:18,689 WARN  [main] util.NativeCodeLoader: Unable to load native-hadoop library for your platform... using builtin-java classes where applicable

SLF4J: Class path contains multiple SLF4J bindings.

SLF4J: Found binding in [jar:file:/opt/ronnie/hive-3.1.2/lib/log4j-slf4j-impl-2.10.0.jar!/org/slf4j/impl/StaticLoggerBinder.class]

SLF4J: Found binding in [jar:file:/opt/ronnie/hadoop-3.1.2/share/hadoop/common/lib/slf4j-log4j12-1.7.25.jar!/org/slf4j/impl/StaticLoggerBinder.class]

SLF4J: See http://www.slf4j.org/codes.html#multiple_bindings for an explanation.

SLF4J: Actual binding is of type [org.apache.logging.slf4j.Log4jLoggerFactory]

Hive Session ID = b34ea22b-d5d7-4c0a-b8de-4ff47f241e34

Logging initialized using configuration in file:/opt/ronnie/hive-3.1.2/conf/hive-log4j2.properties Async: true

Hive Session ID = 368bd863-0a45-4c46-94d6-df196a3b4d9b

Hive-on-MR is deprecated in Hive 2 and may not be available in the future versions. Consider using a different execution engine (i.e. spark, tez) or using Hive 1.X releases.

hive>
- Hive 2以上版本已经将Hive on MR视为废弃, 将来版本可能会移除, 现在用spark或tez结合hive的会多一些。
- 现在企业主流使用的hive还是1.x, 部分企业逐渐向2.3版本靠拢, 3.1.2 确实还是太新了。
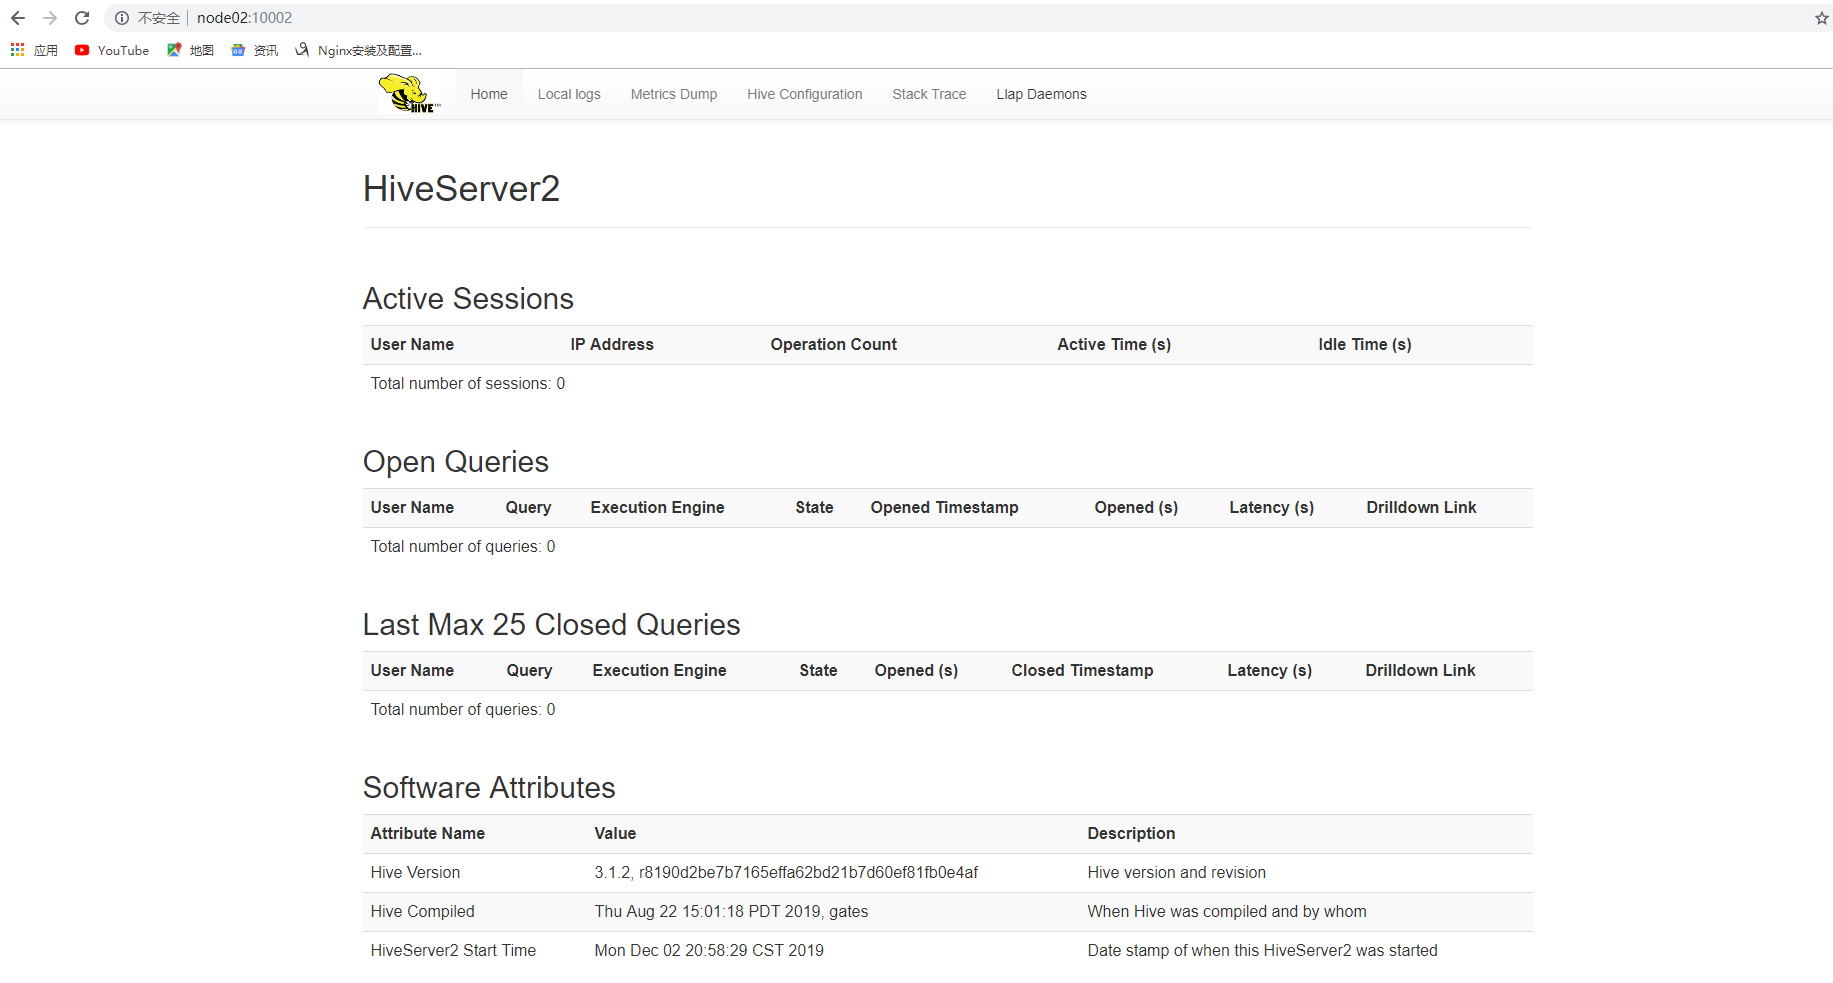
启动HiveServer2 (hiveserver2的服务端口默认是10000,WebUI端口默认是10002)
$HIVE_HOME/bin/./hive --service hiveserver2
基于Hadoop3.1.2集群的Hive3.1.2安装(有不少坑)的更多相关文章
- ubuntu18.04 基于Hadoop3.1.2集群的Hbase2.0.6集群搭建
前置条件: 之前已经搭好了带有HDFS, MapReduce,Yarn 的 Hadoop 集群 链接: ubuntu18.04.2 hadoop3.1.2+zookeeper3.5.5高可用完全分布式 ...
- 基于centos6.5 hbase 集群搭建
注意本章内容是在上一篇文章“基于centos6.5 hadoop 集群搭建”基础上创建的 1.上传hbase安装包 hbase-0.96.2-hadoop2 我的目录存放在/usr/hadoop/hb ...
- CentOS7搭建Hadoop-3.3.0集群手记
前提 这篇文章是基于Linux系统CentOS7搭建Hadoop-3.3.0分布式集群的详细手记. 基本概念 Hadoop中的HDFS和YARN都是主从架构,主从架构会有一主多从和多主多从两种架构,这 ...
- Tomcat:基于Apache+Tomcat的集群搭建
根据Tomcat的官方文档说明可以知道,使用Tomcat配置集群需要与其它Web Server配合使用才可以完成,典型的有Apache和IIS. 这里就使用Apache+Tomcat方式来完成基于To ...
- 基于Twemproxy的Redis集群搭建以及想法
基于Twemproxy的Redis集群方案(转) redis3.0 已经发布了几个月了,但是我这等菜鸟到网上还是没有找到很好的关于搭建redis3.0集群的文章,而且好像很多公司的redis版本还保持 ...
- 基于Kubernetes的WAF集群介绍
Kubernetes是Google开源的容器集群管理系统.它构建Docker技术之上,为容器化的应用提供资源调度.部署运行.服务发现.扩容缩容等整一套功能,可看作是基于容器技术的PaaS平台. 本文旨 ...
- 基于zookeeper的Swarm集群搭建
简介 Swarm:docker原生的集群管理工具,将一组docker主机作为一个虚拟的docker主机来管理. 对客户端而言,Swarm集群就像是另一台普通的docker主机. Swarm集群中的每台 ...
- 项目实战2—实现基于LVS负载均衡集群的电商网站架构
负载均衡集群企业级应用实战-LVS 实现基于LVS负载均衡集群的电商网站架构 背景:随着业务的发展,网站的访问量越来越大,网站访问量已经从原来的1000QPS,变为3000QPS,网站已经不堪重负,响 ...
- 基于Hadoop2.7.3集群数据仓库Hive1.2.2的部署及使用
基于Hadoop2.7.3集群数据仓库Hive1.2.2的部署及使用 HBase是一种分布式.面向列的NoSQL数据库,基于HDFS存储,以表的形式存储数据,表由行和列组成,列划分到列族中.HBase ...
随机推荐
- 吴裕雄 Bootstrap 前端框架开发——Bootstrap 排版:设定文本小写
<!DOCTYPE html> <html> <head> <title>菜鸟教程(runoob.com)</title> <meta ...
- Pytorch本人疑问(1) torch.nn和torch.nn.functional之间的区别
在写代码时发现我们在定义Model时,有两种定义方法: torch.nn.Conv2d()和torch.nn.functional.conv2d() 那么这两种方法到底有什么区别呢,我们通过下述代码看 ...
- Java--API解读之Method Summary
参考来源:Java 中静态方法 实例方法 具体方法区别与联系 JAVA Method Summary网页 * Static Method :"静态方法",直接引用,无需创建对象: ...
- 树莓派4B踩坑指南 - (4)输入法和字体
输入法和字体 fcitx 安装谷歌输入法和sunpinyin,哪个不用可以装完卸载: sudo apt-get install fcitx fcitx-googlepinyin fcitx-modul ...
- redhat 7.6 rsync 配置,实时同步脚本
1.查看rsync,并安装 yum install rsync -y 2.配置/etc/rsyncd.conf文件 建议cp一份作为备份,清空内容复制以下配置 [服务端配置]log file = /v ...
- Servlet简单的登陆窗口
web.xml配置: jsp代码: 注意:action书写的是为这次登陆做处理类的别名,method就是请求的方式 Get请求方式没有请求实体 //如果只是看效果就光写一下service方法就行了 p ...
- Day11 - J - Brave Game HDU - 1846
十年前读大学的时候,中国每年都要从国外引进一些电影大片,其中有一部电影就叫<勇敢者的游戏>(英文名称:Zathura),一直到现在,我依然对于电影中的部分电脑特技印象深刻.今天,大家选择上 ...
- 图片切换.----so屌
<!doctype html> <html lang="en"> <head> <meta charset="UTF-8&quo ...
- Django 学习之Xadmin
一.xadmin的特点 1.基于Bootstrap3:Xadmin使用Bootstrap3.0框架精心打造.基于Bootstrap3,Xadmin天生就支持在多种屏幕上无缝浏览,并完全支持Bootst ...
- 搜索控制器UISearchController的使用
说明:本文主要是将系统UISearchController控件声明文件中的属性.方法.代理等介绍下,后续再联合[搜索栏UISearchBar]这篇文章一起更新更实用的信息. 1.初始化 // 如果设置 ...