iOS-自定义 UITabBarController
*title;
*image;
*selectedImage;


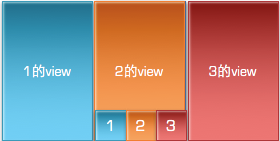
YSCTabBar类继承自
UIView,并添加3个Button模拟UITabBarItem;
            #import "YSCTabBarController.h"

            #import "YSCTabBar.h"

            #import "OneViewController.h"

            #import "TwoViewController.h"

            #import "ThreeViewController.h"

            @interface YSCTabBarController () <YSCTabBarDelegate>

            @end

            @implementation YSCTabBarController

            - (void)viewDidLoad {

                [super viewDidLoad];

                [self loadViewVC];

                YSCTabBar *tabBar = [[YSCTabBar alloc] initWithFrame:self.tabBar.frame WithCount:self.viewControllers.count];

                tabBar.delegate = self;

                [self.view addSubview:tabBar];

            }

            - (void)loadViewVC {

                OneViewController *oneVC = [[OneViewController alloc] init];

                TwoViewController *twoVC = [[TwoViewController alloc] init];

                ThreeViewController *threeVC = [[ThreeViewController alloc] init];

                self.viewControllers = @[oneVC,twoVC,threeVC];

            }

            - (void)yscTabbar:(YSCTabBar *)tabar index:(NSInteger)index {

                self.selectedIndex = index;

            }

@end #import "YSCTabBar.h"
@implementation YSCTabBar
- (instancetype)initWithFrame:(CGRect)frame WithCount:(NSInteger )count {
if (self = [super initWithFrame:frame]) {
CGFloat W = [UIScreen mainScreen].bounds.size.width / count;
CGFloat H = 49;
for (int i = 0; i < count; i ++) {
CGFloat X = i * W;
UIButton *btn = [[UIButton alloc] initWithFrame:CGRectMake(X, 0, W, H)];
btn.tag = i;
btn.backgroundColor = [UIColor colorWithRed:((float)arc4random_uniform(256) / 255.0) green:((float)arc4random_uniform(256) / 255.0) blue:((float)arc4random_uniform(256) / 255.0) alpha:1.0];
[self addSubview:btn];
[btn addTarget:self action:@selector(btnClick:) forControlEvents:UIControlEventTouchUpInside];
}
}
return self;
}
- (void)btnClick:(UIButton *)btn{
if ([self.delegate respondsToSelector:@selector(yscTabbar:index:)]) {
[self.delegate yscTabbar:self index:btn.tag];
}
}
@end #import "OneViewController.h"
@interface OneViewController ()
@end
@implementation OneViewController
- (void)viewDidLoad {
[super viewDidLoad];
// Do any additional setup after loading the view.
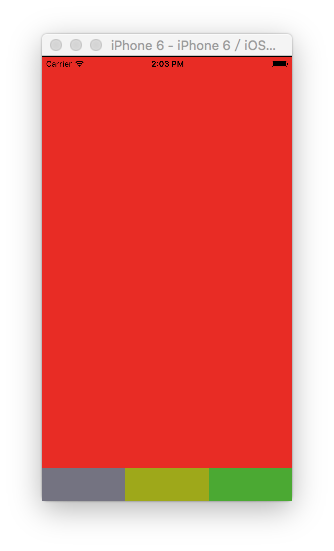
self.view.backgroundColor = [UIColor redColor];
}
@endYSCTabBarController:
- (BOOL)application:(UIApplication *)application didFinishLaunchingWithOptions:(NSDictionary *)launchOptions {

    // Override point for customization after application launch.

    self.window = [[UIWindow alloc] initWithFrame:[UIScreen mainScreen].bounds];

    YSCTabBarController *tabVC = [[YSCTabBarController alloc] init];

    self.window.rootViewController = tabVC;

    [self.window makeKeyAndVisible];

    return YES;

}
index:(NSInteger)index {
self.selectedIndex=
index;


iOS-自定义 UITabBarController的更多相关文章
- iOS 自定义UITabBarController的tabBar
#import <UIKit/UIKit.h> @interface AppDelegate : UIResponder <UIApplicationDeleg ...
- 【iOS自定义键盘及键盘切换】详解
[iOS自定义键盘]详解 实现效果展示: 一.实现的协议方法代码 #import <UIKit/UIKit.h> //创建自定义键盘协议 @protocol XFG_KeyBoardDel ...
- iOS自定义的UISwitch按钮
UISwitch开关控件 开关代替了点选框.开关是到目前为止用起来最简单的控件,不过仍然可以作一定程度的定制化. 一.创建 UISwitch* mySwitch = [[ UISwitchalloc] ...
- 如何实现 iOS 自定义状态栏
给大家介绍如何实现 iOS 自定义状态栏 Sample Code: 01 UIWindow * statusWindow = [[UIWindow alloc] initWithFrame:[UIAp ...
- 自定义UITabbarController控制器
自定义UITabbarController控制器 这是定制UITabbarController的基本原理,没有进行功能性封装. 效果: 源码地址: https://github.com/YouXi ...
- iOS自定义组与组之间的距离以及视图
iOS自定义组与组之间的距离以及视图 //头视图高度 - (CGFloat)tableView:(UITableView *)tableView heightForHeaderInSection:(N ...
- iOS 自定义转场动画
代码地址如下:http://www.demodashi.com/demo/12955.html 一.总效果 本文记录分享下自定义转场动画的实现方法,具体到动画效果:新浪微博图集浏览转场效果.手势过渡动 ...
- iOS 自定义转场动画浅谈
代码地址如下:http://www.demodashi.com/demo/11612.html 路漫漫其修远兮,吾将上下而求索 前记 想研究自定义转场动画很久了,时间就像海绵,挤一挤还是有的,花了差不 ...
- iOS自定义转场动画实战讲解
iOS自定义转场动画实战讲解 转场动画这事,说简单也简单,可以通过presentViewController:animated:completion:和dismissViewControllerA ...
随机推荐
- spring中<context:property-placeholder/>一个坑
<context:property-placeholder location="classpath:db.properties" ></context:prope ...
- java web基础
WEB基础 C/S:即服务器-客服机(Client-Server)结构.C/S结构通常采用两层结构,服务器负责数据的管理,客户机负责完成与用户的交互任务.客户通过局域网与服务器相连,接受用户的请求,并 ...
- vue中生命周期
1,说器生命周期,总觉得有熟悉,又陌生,直到看到一道面试题,问父子组件的生命周期的执行顺序,我擦,真没太注意啊,不知道. 2,网上搜了一下,说法是有点像洋葱圈的形式,由外到内,在到外,因为就像一个盒子 ...
- 【Mathtype】安装Mathtype后,word无法粘贴的问题
Win10安装mathtype后,word工具栏中自动添加mathtype的选项(mathtype为了使用户更加方便使用,故自动添加),但是却导致word无法粘贴.如何解决该问题? [方案1]官网描述 ...
- php日志监控
<?php date_default_timezone_set('Asia/Shanghai'); $time = date('Y-m-d H:i:s',time()); //访问时间 $ip ...
- Xilinx ISE多功能移位寄存器仿真及Basys2实验板实验
移位寄存器实现Verilog代码: `timescale 1ns / 1ps module add( input clk, input reset, input [1:0] s, input dl, ...
- 性能测试之Docker监控
微服务.大中台盛行的当下,容器化已经被广泛使用.在性能测试过程中,对容器的监控模型构建也是必不可少的. 我们性能测试监控模型的构建一直是围绕着Prometheus和Grafana来展开的.她们可以快速 ...
- Hystrix微服务容错处理及回调方法源码分析
前言 在 SpringCloud 微服务项目中,我们有了 Eureka 做服务的注册中心,进行服务的注册于发现和服务治理.使得我们可以摒弃硬编码式的 ip:端口 + 映射路径 来发送请求.我们有了 F ...
- 学习源码的第八个月,我成了Spring的开源贡献者
@ 目录 我的经历 碰到的问题 1.担心闹乌龙 2.不知道要怎么提交 3.英文 4.担心问题描述的不清楚 给你的建议 我的经历 关注我的朋友都知道,关注两个字划重点,要考! 我最近一直在写Spring ...
- Username for 'https://github.com': remote: Invalid username or password. fatal: Authentication failed for 'https://github.com/GLSmile/pythontest.git/' 问题
使用$ git push -u origin master 进行同步时,提示输入用户名和密码,但是我输入正确的信息后,仍然 会报Username for 'https://github.com': r ...