【分布式锁】06-Zookeeper实现分布式锁:可重入锁源码分析
前言
前面已经讲解了Redis的客户端Redission是怎么实现分布式锁的,大多都深入到源码级别。
在分布式系统中,常见的分布式锁实现方案还有Zookeeper,接下来会深入研究Zookeeper是如何来实现分布式锁的。
Zookeeper初识
文件系统
Zookeeper维护一个类似文件系统的数据结构
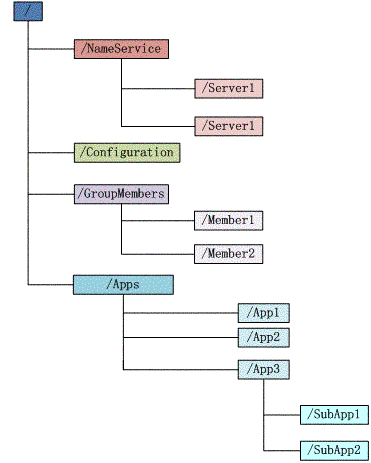 image.png
每个子目录项如NameService都被称为znoed,和文件系统一样,我们能够自由的增加、删除znode,在znode下增加、删除子znode,唯一不同的在于znode是可以存储数据的。
有4种类型的znode
PERSISTENT--持久化目录节点客户端与zookeeper断开连接后,该节点依旧存在
PERSISTENT_SEQUENTIAL-持久化顺序编号目录节点客户端与zookeeper断开连接后,该节点依旧存在,只是Zookeeper给该节点名称进行顺序编号
EPHEMERAL-临时目录节点客户端与zookeeper断开连接后,该节点被删除
EPHEMERAL_SEQUENTIAL-临时顺序编号目录节点客户端与zookeeper断开连接后,该节点被删除,只是Zookeeper给该节点名称进行顺序编号
通知机制
客户端注册监听它关心的目录节点,当目录节点发生变化(数据改变、被删除、子目录节点增加删除)等,zookeeper会通知客户端。
分布式锁
有了zookeeper的一致性文件系统,锁的问题变得容易。锁服务可以分为两类,一个是保持独占,另一个是控制时序。
对于第一类,我们将zookeeper上的一个znode看作是一把锁,通过create znode的方式来实现。所有客户端都去创建 /distribute_lock 节点,最终成功创建的那个客户端也即拥有了这把锁。厕所有言:来也冲冲,去也冲冲,用完删除掉自己创建的distribute_lock 节点就释放出锁。
对于第二类, /distribute_lock 已经预先存在,所有客户端在它下面创建临时顺序编号目录节点,和选master一样,编号最小的获得锁,用完删除自己创建的znode节点。
 image.png
注明:以上内容参考 https://www.cnblogs.com/dream-to-pku/p/9513188.html
Curator框架初识
Curator是Netflix公司开源的一套Zookeeper客户端框架。目前已经作为Apache的顶级项目出现,是最流行的Zookeeper客户端之一。
我们看下Apache Curator官网的介绍:
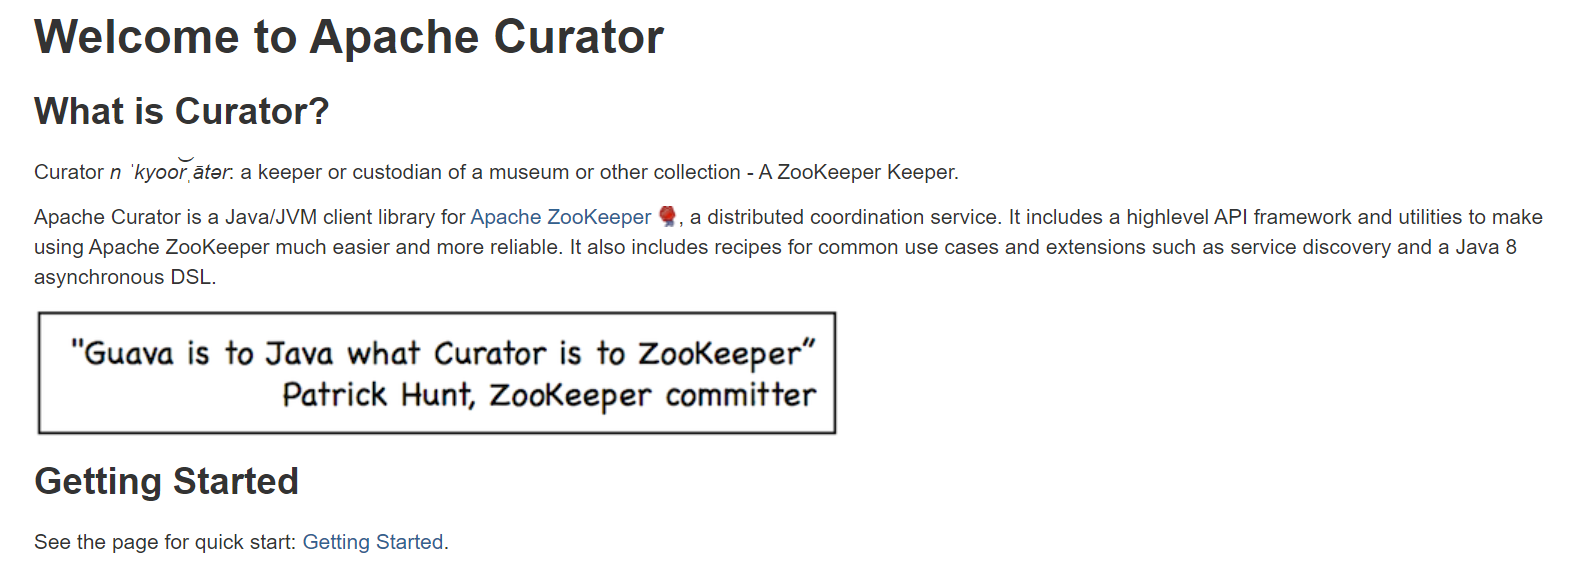 image.png
接着看下quick start中关于分布式锁相关的内容
地址为:http://curator.apache.org/getting-started.html
InterProcessMutex lock = new InterProcessMutex(client, lockPath);

if ( lock.acquire(maxWait, waitUnit) )

{

    try

    {

        // do some work inside of the critical section here

    }

    finally

    {

        lock.release();

    }

}
使用很简单,使用InterProcessMutex类,使用其中的acquire()方法,就可以获取一个分布式锁了。
Curator分布式锁使用示例
启动两个线程t1和t2去争夺锁,拿到锁的线程会占用5秒。运行多次可以观察到,有时是t1先拿到锁而t2等待,有时又会反过来。Curator会用我们提供的lock路径的结点作为全局锁,这个结点的数据类似这种格式:[_c_64e0811f-9475-44ca-aa36-c1db65ae5350-lock-00000000001],每次获得锁时会生成这种串,释放锁时清空数据。
接下来看看加锁的示例:
public class Application {

    private static final String ZK_ADDRESS = "192.20.38.58:2181";

    private static final String ZK_LOCK_PATH = "/locks/lock_01";

    public static void main(String[] args) throws InterruptedException {

        CuratorFramework client = CuratorFrameworkFactory.newClient(

                ZK_ADDRESS,

                new RetryNTimes(10, 5000)

        );

        client.start();

        System.out.println("zk client start successfully!");

        Thread t1 = new Thread(() -> {

            doWithLock(client);

        }, "t1");

        Thread t2 = new Thread(() -> {

            doWithLock(client);

        }, "t2");

        t1.start();

        t2.start();

    }

    private static void doWithLock(CuratorFramework client) {

        InterProcessMutex lock = new InterProcessMutex(client, ZK_LOCK_PATH);

        try {

            if (lock.acquire(10 * 1000, TimeUnit.SECONDS)) {

                System.out.println(Thread.currentThread().getName() + " hold lock");

                Thread.sleep(5000L);

                System.out.println(Thread.currentThread().getName() + " release lock");

            }

        } catch (Exception e) {

            e.printStackTrace();

        } finally {

            try {

                lock.release();

            } catch (Exception e) {

                e.printStackTrace();

            }

        }

    }

}
运行结果:
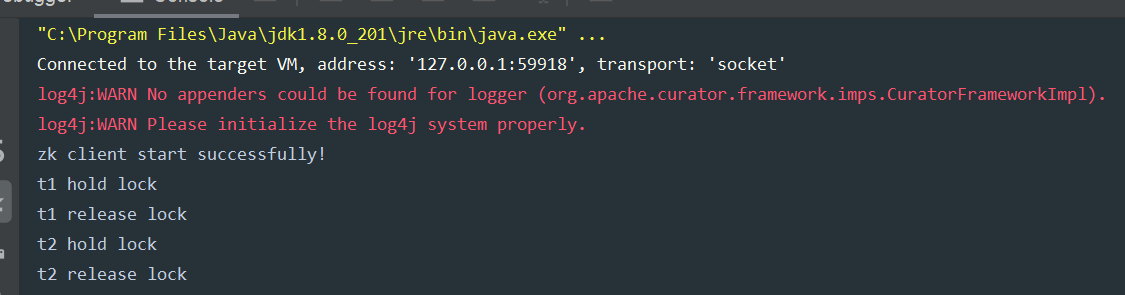 image.png
Curator 加锁实现原理
直接看Curator加锁的代码:
public class InterProcessMutex implements InterProcessLock, Revocable<InterProcessMutex> {

    private final ConcurrentMap<Thread, LockData>   threadData = Maps.newConcurrentMap();

     private static class LockData

    {

        final Thread        owningThread;

        final String        lockPath;

        final AtomicInteger lockCount = new AtomicInteger(1);

        private LockData(Thread owningThread, String lockPath)

        {

            this.owningThread = owningThread;

            this.lockPath = lockPath;

        }

    }

    @Override

    public boolean acquire(long time, TimeUnit unit) throws Exception

    {

        return internalLock(time, unit);

    }

     private boolean internalLock(long time, TimeUnit unit) throws Exception

    {

        /*

           Note on concurrency: a given lockData instance

           can be only acted on by a single thread so locking isn't necessary

        */

        Thread          currentThread = Thread.currentThread();

        LockData        lockData = threadData.get(currentThread);

        if ( lockData != null )

        {

            // re-entering

            lockData.lockCount.incrementAndGet();

            return true;

        }

        String lockPath = internals.attemptLock(time, unit, getLockNodeBytes());

        if ( lockPath != null )

        {

            LockData        newLockData = new LockData(currentThread, lockPath);

            threadData.put(currentThread, newLockData);

            return true;

        }

        return false;

    }

}
直接看internalLock()方法,首先是获取当前线程,然后查看当前线程是否在一个concurrentHashMap中,这里是重入锁的实现,如果当前已经已经获取了锁,那么这个线程获取锁的次数再+1
如果没有获取锁,那么就是用attemptLock()方法去尝试获取锁,如果lockPath不为空,说明获取锁成功,并将当前线程放入到map中。
接下来看看核心的加锁逻辑attemptLock()方法:
入参:time : 获取锁等待的时间unit:时间单位lockNodeBytes:默认为null
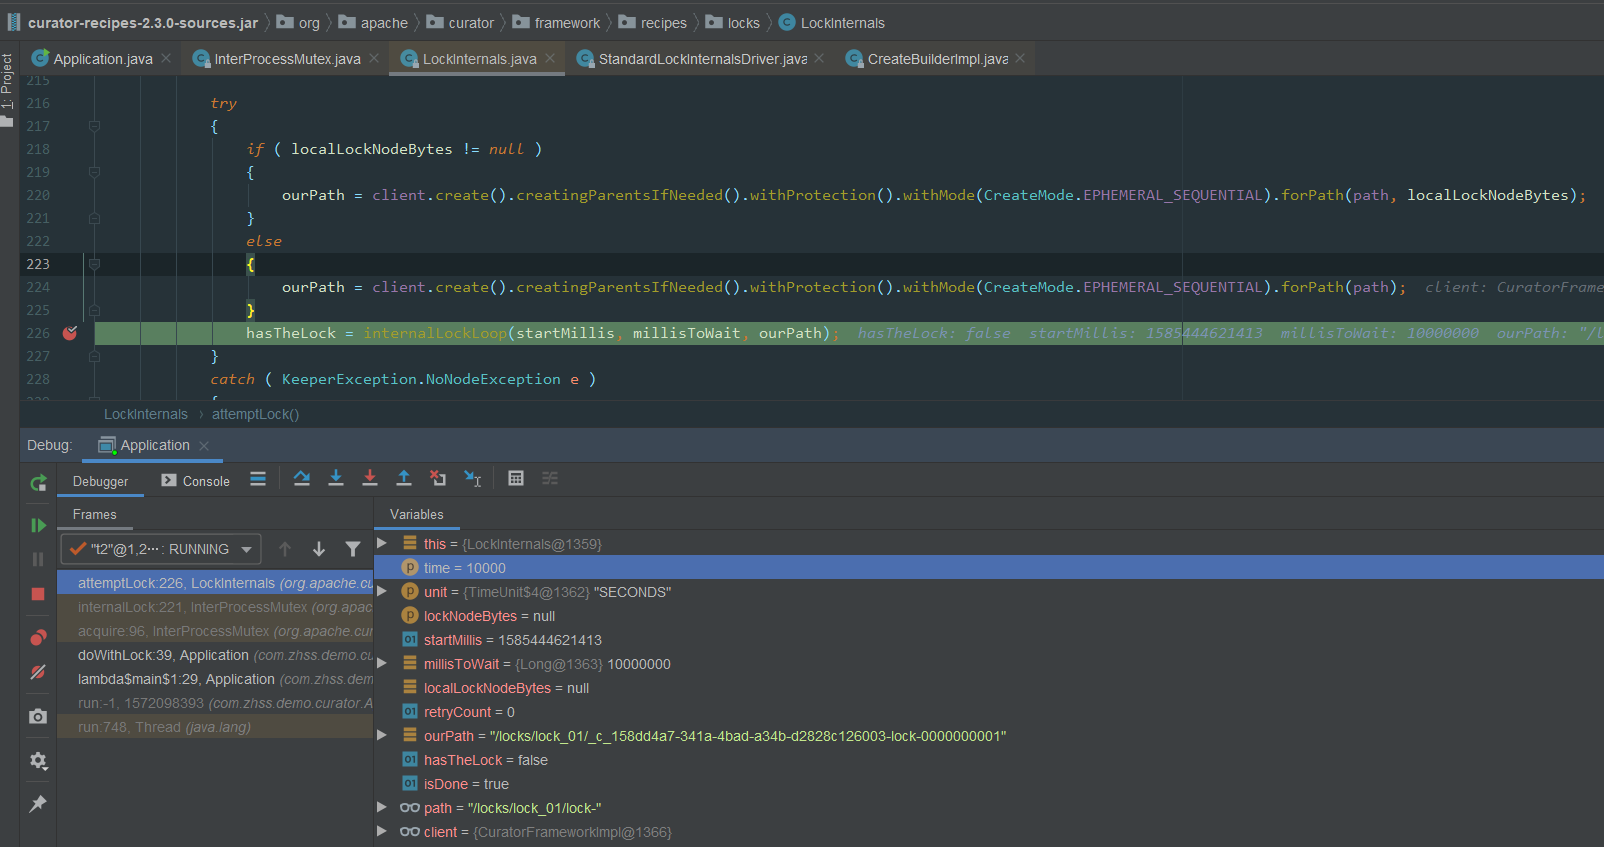
public class LockInternals {

    String attemptLock(long time, TimeUnit unit, byte[] lockNodeBytes) throws Exception

    {

        final long      startMillis = System.currentTimeMillis();

        final Long      millisToWait = (unit != null) ? unit.toMillis(time) : null;

        final byte[]    localLockNodeBytes = (revocable.get() != null) ? new byte[0] : lockNodeBytes;

        int             retryCount = 0;

        String          ourPath = null;

        boolean         hasTheLock = false;

        boolean         isDone = false;

        while ( !isDone )

        {

            isDone = true;

            try

            {

                if ( localLockNodeBytes != null )

                {

                    ourPath = client.create().creatingParentsIfNeeded().withProtection().withMode(CreateMode.EPHEMERAL_SEQUENTIAL).forPath(path, localLockNodeBytes);

                }

                else

                {

                    ourPath = client.create().creatingParentsIfNeeded().withProtection().withMode(CreateMode.EPHEMERAL_SEQUENTIAL).forPath(path);

                }

                hasTheLock = internalLockLoop(startMillis, millisToWait, ourPath);

            }

            catch ( KeeperException.NoNodeException e )

            {

                // gets thrown by StandardLockInternalsDriver when it can't find the lock node

                // this can happen when the session expires, etc. So, if the retry allows, just try it all again

                if ( client.getZookeeperClient().getRetryPolicy().allowRetry(retryCount++, System.currentTimeMillis() - startMillis, RetryLoop.getDefaultRetrySleeper()) )

                {

                    isDone = false;

                }

                else

                {

                    throw e;

                }

            }

        }

        if ( hasTheLock )

        {

            return ourPath;

        }

        return null;

    }

}
ourPath = client.create().creatingParentsIfNeeded().withProtection().withMode(CreateMode.EPHEMERAL_SEQUENTIAL).forPath(path);
使用的临时顺序节点,首先他是临时节点,如果当前这台机器如果自己宕机的话,他创建的这个临时节点就会自动消失,如果有获取锁的客户端宕机了,zk可以保证锁会自动释放的
创建的数据结构类似于:
客户端A获取锁的代码,生成的ourPath=xxxx01
客户端B获取锁的代码,生成的ourPath=xxxx02
查看Zookeeper中/locks/lock_01下所有临时节点数据:
 PS:01/02的图没有截到,这里又跑了一次截图所示 03/04 的顺序节点在ZK中的显示
接着重点看interalLockLoop()的逻辑:
public class LockInternals {

    private boolean internalLockLoop(long startMillis, Long millisToWait, String ourPath) throws Exception

    {

        boolean     haveTheLock = false;

        boolean     doDelete = false;

        try

        {

            if ( revocable.get() != null )

            {

                client.getData().usingWatcher(revocableWatcher).forPath(ourPath);

            }

            while ( (client.getState() == CuratorFrameworkState.STARTED) && !haveTheLock )

            {

                List<String>        children = getSortedChildren();

                String              sequenceNodeName = ourPath.substring(basePath.length() + 1); // +1 to include the slash

                PredicateResults    predicateResults = driver.getsTheLock(client, children, sequenceNodeName, maxLeases);

                if ( predicateResults.getsTheLock() )

                {

                    haveTheLock = true;

                }

                else

                {

                    String  previousSequencePath = basePath + "/" + predicateResults.getPathToWatch();

                    synchronized(this)

                    {

                        Stat stat = client.checkExists().usingWatcher(watcher).forPath(previousSequencePath);

                        if ( stat != null )

                        {

                            if ( millisToWait != null )

                            {

                                millisToWait -= (System.currentTimeMillis() - startMillis);

                                startMillis = System.currentTimeMillis();

                                if ( millisToWait <= 0 )

                                {

                                    doDelete = true;    // timed out - delete our node

                                    break;

                                }

                                wait(millisToWait);

                            }

                            else

                            {

                                wait();

                            }

                        }

                    }

                    // else it may have been deleted (i.e. lock released). Try to acquire again

                }

            }

        }

           // 省略部分代码

        return haveTheLock;

    }

}
重点看while循环中的逻辑
首先是获取锁的逻辑:
- 获取
/locks/lock_01下排好序的znode节点,上面看图已经知道,会有xxx01和xxx02两个节点 - 调用
getsTheLock()方法获取锁,其中maxLeases为1,默认只能一个线程获取锁 - 定位到
StandardLockInternalsDriver.getsTheLock()方法,其中代码核心如下:int ourIndex = children.indexOf(sequenceNodeName);boolean getsTheLock = ourIndex < maxLeases; - 上面
sequenceNodeName参数为xxx01的全路径名,然后查看在排好序的children列表中是否为第一个元素,如果是第一个元素,返回的ourIndex=0,此时则认为获取锁成功 - 如果为有序列表中的第一个元素,那么
predicateResults.getsTheLock()为true,获取锁的标志位havaTheLock为true,直接返回获取锁成功
然后是获取锁失败的逻辑:
获取锁失败的核心代码:
String  previousSequencePath = basePath + "/" + predicateResults.getPathToWatch();

synchronized(this)

{

    Stat stat = client.checkExists().usingWatcher(watcher).forPath(previousSequencePath);

    if ( stat != null )

    {

        if ( millisToWait != null )

        {

            millisToWait -= (System.currentTimeMillis() - startMillis);

            startMillis = System.currentTimeMillis();

            if ( millisToWait <= 0 )

            {

                doDelete = true;    // timed out - delete our node

                break;

            }

            wait(millisToWait);

        }

        else

        {

            wait();

        }

    }

}
- 针对上一个节点添加监听器
- 如果加锁有过期时间,到了过期时间后直接break退出循环
- 当前线程处于wait()状态,等待上一个线程释放锁
Curator 释放锁实现原理
释放锁其实很简单,直接删除当前临时节点,因为下一个节点监听了上一个节点信息,所以上一个节点删除后,当前节点就会被唤醒重新获取锁。
private void deleteOurPath(String ourPath) throws Exception

{

    try

    {

        client.delete().guaranteed().forPath(ourPath);

    }

    catch ( KeeperException.NoNodeException e )

    {

        // ignore - already deleted (possibly expired session, etc.)

    }

}
总结
一张图总结:

04_Zookeeper分布式锁实现原理.jpg
原图可查看我的分享:
https://www.processon.com/view/link/5e80508de4b06b85300175d2
【分布式锁】06-Zookeeper实现分布式锁:可重入锁源码分析的更多相关文章
- ZooKeeper 分布式锁 Curator 源码 01:可重入锁
前言 一般工作中常用的分布式锁,就是基于 Redis 和 ZooKeeper,前面已经介绍完了 Redisson 锁相关的源码,下面一起看看基于 ZooKeeper 的锁.也就是 Curator 这个 ...
- Redis分布式锁—Redisson+RLock可重入锁实现篇
前言 平时的工作中,由于生产环境中的项目是需要部署在多台服务器中的,所以经常会面临解决分布式场景下数据一致性的问题,那么就需要引入分布式锁来解决这一问题. 针对分布式锁的实现,目前比较常用的就如下几种 ...
- java高并发系列 - 第12天JUC:ReentrantLock重入锁
java高并发系列 - 第12天JUC:ReentrantLock重入锁 本篇文章开始将juc中常用的一些类,估计会有十来篇. synchronized的局限性 synchronized是java内置 ...
- Java可重入锁如何避免死锁
本文由https://bbs.csdn.net/topics/390939500和https://zhidao.baidu.com/question/1946051090515119908.html启 ...
- java线程的同步控制--重入锁ReentrantLock
我们常用的synchronized关键字是一种最简单的线程同步控制方法,它决定了一个线程是否可以访问临界区资源.同时Object.wait() 和Object.notify()方法起到了线程等待和通知 ...
- 通俗易懂 悲观锁、乐观锁、可重入锁、自旋锁、偏向锁、轻量/重量级锁、读写锁、各种锁及其Java实现!
网上关于Java中锁的话题可以说资料相当丰富,但相关内容总感觉是一大串术语的罗列,让人云里雾里,读完就忘.本文希望能为Java新人做一篇通俗易懂的整合,旨在消除对各种各样锁的术语的恐惧感,对每种锁的底 ...
- 写文章 通俗易懂 悲观锁、乐观锁、可重入锁、自旋锁、偏向锁、轻量/重量级锁、读写锁、各种锁及其Java实现!
网上关于Java中锁的话题可以说资料相当丰富,但相关内容总感觉是一大串术语的罗列,让人云里雾里,读完就忘.本文希望能为Java新人做一篇通俗易懂的整合,旨在消除对各种各样锁的术语的恐惧感,对每种锁的底 ...
- Java 可重入锁的那些事(一)
本文主要包含的内容:可重入锁(ReedtrantLock).公平锁.非公平锁.可重入性.同步队列.CAS等概念的理解 显式锁 上一篇文章提到的synchronized关键字为隐式锁,会自动获取和自动释 ...
- ZooKeeper 分布式锁 Curator 源码 02:可重入锁重复加锁和锁释放
ZooKeeper 分布式锁 Curator 源码 02:可重入锁重复加锁和锁释放 前言 加锁逻辑已经介绍完毕,那当一个线程重复加锁是如何处理的呢? 锁重入 在上一小节中,可以看到加锁的过程,再回头看 ...
- ZooKeeper 分布式锁 Curator 源码 03:可重入锁并发加锁
前言 在了解了加锁和锁重入之后,最需要了解的还是在分布式场景下或者多线程并发加锁是如何处理的? 并发加锁 先来看结果,在多线程对 /locks/lock_01 加锁时,是在后面又创建了新的临时节点. ...
随机推荐
- 树的三种DFS策略(前序、中序、后序)遍历
之前刷leetcode的时候,知道求排列组合都需要深度优先搜索(DFS), 那么前序.中序.后序遍历是什么鬼,一直傻傻的分不清楚.直到后来才知道,原来它们只是DFS的三种不同策略. N = Node( ...
- js数据类型大全
声明变量的命名规范(标识符) 1.不能以数字开头,只能以字母或者¥或者_开头 2.js变量名称区分大小写 3.变量名不能含有关键字(this.if.for.while) 4.驼峰命名法 console ...
- 关于Markdown下无法使用表格的解决方案
关于Markdown下无法使用表格的解决方案 写表格,出现如下场景 解决方法.点击左下角M的表示,切换到extra模式 打开了新世界.如果不能点击,估计是你没有激活pro的权限,百度下就可以了. 或者 ...
- 连接器巨头Molex莫仕:替代品厂PK原厂
序言:在中国电子产业,原厂PK替代品厂一直是一个极具话题性.美国在贸易战背景下,挤压中国的发展空间,迫使这一类企业要觉醒.当然受影响的不止中国电子企业,美国电子企业也一样. 在连接器这一领域,Mole ...
- 从头认识js-js客户端检测
常用的客户端检测方式有以下三种: 1.能力检测 2.怪癖检测 3.用户代理检测 能力检测 最常用也是最为人们广泛接受的客户端检测形式是能力检测(又称特性检测).能力检测的目标不是识别特定的浏览器,而是 ...
- spring——AOP原理及源码(三)
在上一篇中,我们创建并在BeanFactory中注册了AnnotationAwareAspectJAutoProxyCreator组件.本篇我们将要探究,这个组件是在哪里以及何时发挥作用的. 调试的起 ...
- 简单服务器端Blazor Cookie身份验证的演示
为了演示身份验证如何在服务器端 Blazor 应用程序中工作,我们将把身份验证简化为最基本的元素. 我们将简单地设置一个 cookie,然后读取应用程序中的 cookie. 应用程序身份验证 大多数商 ...
- 超详细的网络抓包神器 tcpdump 使用指南
原文链接:Tcpdump 示例教程 本文主要内容翻译自<Tcpdump Examples>. tcpdump 是一款强大的网络抓包工具,它使用 libpcap 库来抓取网络数据包,这个库在 ...
- 使用JS检测自定义协议是否存在
[该博客是拼接他人的,原因我们这边PC的开发人员问我,有没有关于js某个对象直接能检测手机或者电脑的自定义协议的,我上网搜了下,貌似移动端的解决比较多] 最终解决方案:还是需要github上面大神写的 ...
- Redis 中的客户端
Redis 是一个客户端服务端的程序,服务端提供数据存储等等服务,客户端连接服务端并通过向服务端发送命令,读取或写入数据,简单来说,客户端就是某种工具,我们通过它与 Redis 服务端进行通讯并完成数 ...