
Java IO系列之四:NIO通信模型
分布式rpc框架有很多,比如dubbo,netty,还有很多其他的产品。但他们大部分都是基于nio的,
nio是非阻塞的io,那么它的内部机制是怎么实现的呢。
1.由一个专门的线程处理所有IO事件,并负责分发。
2.事件驱动机制,事件到来的时候触发操作,不需要阻塞的监视事件。
3.线程之前通过wait,notify通信,减少线程切换。
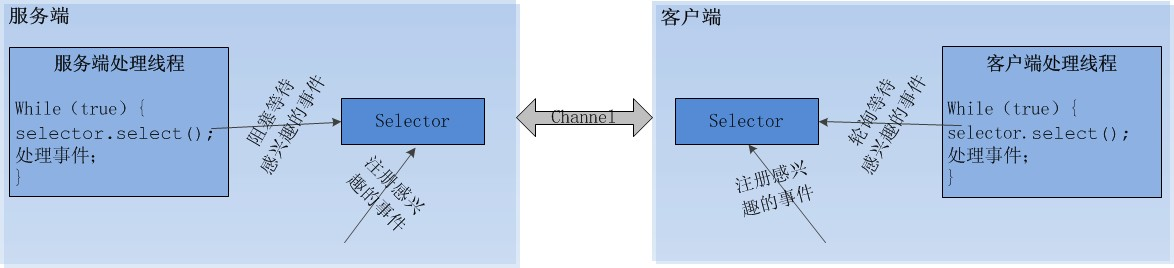

NIO使用步骤

服务端步骤:
import java.io.IOException;

import java.net.InetAddress;

import java.net.InetSocketAddress;

import java.net.UnknownHostException;

import java.nio.ByteBuffer;

import java.nio.channels.SelectionKey;

import java.nio.channels.Selector;

import java.nio.channels.ServerSocketChannel;

import java.nio.channels.SocketChannel;

import java.util.Iterator;

import java.util.Set;

public class NIOServer {

    public static void main(String[] args) throws IOException {

        new Thread(new ReactorTask()).start();

    }

    public static class ReactorTask implements Runnable {

        private Selector selector;

        public ReactorTask() {

            try {

                // 第一步:打开ServerSocketChannel,用于监听客户端的连接,它是所有客户端连接的父管道

                ServerSocketChannel acceptorSvr = ServerSocketChannel.open();

                // 第二步:绑定监听端口,设置连接为非阻塞模式

                acceptorSvr.socket().bind(new InetSocketAddress(InetAddress.getByName("localhost"), 1234));

                acceptorSvr.configureBlocking(false);

                // 第三步:创建Reactor线程,创建多路复用器并启动线程

                selector = Selector.open();

                // 第四步:将ServerSocketChannel注册到Reactor线程的多路复用器Selector上,监听Accept事件

                SelectionKey key = acceptorSvr.register(selector, SelectionKey.OP_ACCEPT);

            } catch (UnknownHostException e) {

                e.printStackTrace();

            } catch (IOException e) {

                e.printStackTrace();

            }

        }

        @Override

        public void run() {

            // 第五步:在run方法中无限循环体内轮询准备就绪的Key

            while (true) {

                try {

                    selector.select(1000);

                    Set<SelectionKey> selectedKeys = selector.selectedKeys();

                    Iterator<SelectionKey> it = selectedKeys.iterator();

                    SelectionKey key = null;

                    while (it.hasNext()) {

                        key = it.next();

                        it.remove();

                        try {

                            if (key.isValid()) {

                                // 处理新接入的请求消息

                                if (key.isAcceptable()) {

                                    // 第六步:多路复用器监听到有新的客户端接入,处理新的接入请求,完成TCP三次握手,建立物理链路

                                    ServerSocketChannel ssc = (ServerSocketChannel) key.channel();

                                    SocketChannel sc = ssc.accept();

                                    // 第七步:设置客户端链路为非阻塞模式

                                    sc.configureBlocking(false);

                                    sc.socket().setReuseAddress(true);

                                    // 第八步:将新接入的客户端连接注册到Reactor线程的多路复用器上,监听读操作,读取客户端发送的网络消息

                                    sc.register(selector, SelectionKey.OP_READ);

                                }

                                if (key.isReadable()) {

                                    // 第九步:异步读取客户端请求消息到缓存区

                                    SocketChannel sc = (SocketChannel) key.channel();

                                    ByteBuffer readBuffer = ByteBuffer.allocate(1024);

                                    int readBytes = sc.read(readBuffer);

                                    // 第十步:对ByteBuffer进行编解码,如果有半包消息指针reset,继续读取后续的报文

                                    if (readBytes > 0) {

                                        readBuffer.flip();

                                        byte[] bytes = new byte[readBuffer.remaining()];

                                        readBuffer.get(bytes);

                                        String body = new String(bytes, "UTF-8");

                                        System.out.println("The time server receive order : " + body);

                                        String currentTime = "QUERY TIME ORDER".equalsIgnoreCase(body)

                                                ? new java.util.Date(System.currentTimeMillis()).toString()

                                                : "BAD ORDER";

                                        //写应答

                                        byte[] bytes2 = currentTime.getBytes();

                                        ByteBuffer writeBuffer = ByteBuffer.allocate(bytes2.length);

                                        writeBuffer.put(bytes2);

                                        writeBuffer.flip();

                                        sc.write(writeBuffer);

                                    } else if (readBytes < 0) {

                                        // 对端链路关闭

                                        key.cancel();

                                        sc.close();

                                    } else

                                        ; // 读到0字节,忽略

                                }

                            }

                        } catch (Exception e) {

                            if (key != null) {

                                key.cancel();

                                if (key.channel() != null)

                                    key.channel().close();

                            }

                        }

                    }

                } catch (Throwable t) {

                    t.printStackTrace();

                }

            }

        }

    }

}
注意:如果发送区TCP缓冲区满,会导致写半包,此时,需要注册监听写操作位,循环写,直到整包消息写入TCP缓冲区
客户端步骤:
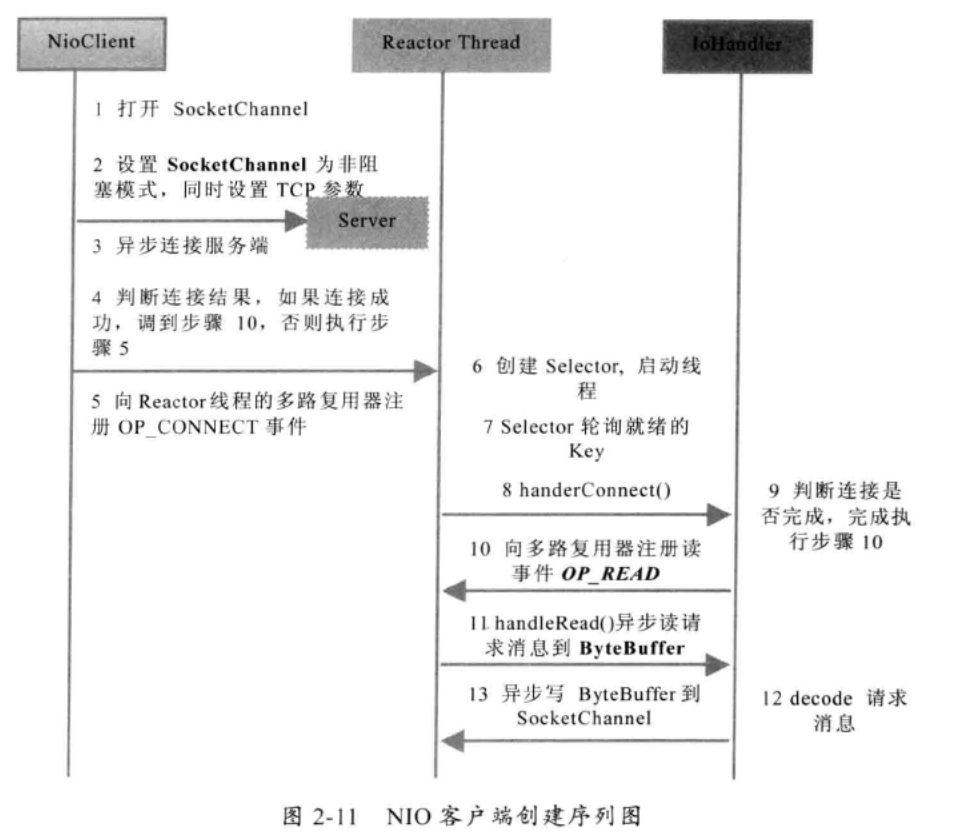
客户端:
import java.io.IOException;

import java.net.InetSocketAddress;

import java.nio.ByteBuffer;

import java.nio.channels.SelectionKey;

import java.nio.channels.Selector;

import java.nio.channels.SocketChannel;

import java.util.Iterator;

import java.util.Set;

public class TimeClientHandle implements Runnable {

    private String host;

    private int port;

    private Selector selector;

    private SocketChannel socketChannel;

    private volatile boolean stop;

    public TimeClientHandle(String host, int port) {

        this.host = host == null ? "127.0.0.1" : host;

        this.port = port;

        try {

            //第一步:打开SocketChannel,用于创建客户端连接

            socketChannel = SocketChannel.open();

            //第二步:设置SocketChannel为非阻塞模式

            socketChannel.configureBlocking(false);

            //第三步:创建多路复用器(在Reactor线程中)

            selector = Selector.open();

        } catch (IOException e) {

            e.printStackTrace();

            System.exit(1);

        }

    }

    @Override

    public void run() {

        try {

            // 第四步:socketChannel发起连接

            if (socketChannel.connect(new InetSocketAddress(host, port))) {

                //第五步:如果直接连接成功,则注册到多路复用器上

                socketChannel.register(selector, SelectionKey.OP_READ);

                //第六步:发送请求消息,读应答

                byte[] req = "QUERY TIME ORDER".getBytes();

                ByteBuffer writeBuffer = ByteBuffer.allocate(req.length);

                writeBuffer.put(req);

                writeBuffer.flip();

                socketChannel.write(writeBuffer);

                if (!writeBuffer.hasRemaining())

                    System.out.println("Send order 2 server succeed.");

            } else

                socketChannel.register(selector, SelectionKey.OP_CONNECT);

        } catch (IOException e) {

            e.printStackTrace();

            System.exit(1);

        }

        while (!stop) {

            try {

                //第七步:多路复用器在run的无限循环体内轮询准备就绪的Key

                selector.select(1000);

                Set<SelectionKey> selectedKeys = selector.selectedKeys();

                Iterator<SelectionKey> it = selectedKeys.iterator();

                SelectionKey key = null;

                while (it.hasNext()) {

                    key = it.next();

                    it.remove();

                    try {

                        if (key.isValid()) {

                            //第八步:将连接成功的Channel注册到多路复用器上

                            // 判断是否连接成功

                            SocketChannel sc = (SocketChannel) key.channel();

                            if (key.isConnectable()) {

                                if (sc.finishConnect()) {

                                    sc.register(selector, SelectionKey.OP_READ);

                                    //发送请求消息,读应答

                                    byte[] req = "QUERY TIME ORDER".getBytes();

                                    ByteBuffer writeBuffer = ByteBuffer.allocate(req.length);

                                    writeBuffer.put(req);

                                    writeBuffer.flip();

                                    sc.write(writeBuffer);

                                    if (!writeBuffer.hasRemaining())

                                        System.out.println("Send order 2 server succeed.");

                                } else

                                    System.exit(1);// 连接失败,进程退出

                            }

                            //监听读操作,读取服务端写回的网络信息

                            if (key.isReadable()) {

                                //第九步:读取信息到缓冲区

                                ByteBuffer readBuffer = ByteBuffer.allocate(1024);

                                int readBytes = sc.read(readBuffer);

                                if (readBytes > 0) {

                                    readBuffer.flip();

                                    byte[] bytes = new byte[readBuffer.remaining()];

                                    readBuffer.get(bytes);

                                    String body = new String(bytes, "UTF-8");

                                    System.out.println("Now is : " + body);

                                    this.stop = true;

                                } else if (readBytes < 0) {

                                    // 对端链路关闭

                                    key.cancel();

                                    sc.close();

                                } else

                                    ; // 读到0字节,忽略

                            }

                        }

                    } catch (Exception e) {

                        if (key != null) {

                            key.cancel();

                            if (key.channel() != null)

                                key.channel().close();

                        }

                    }

                }

            } catch (Exception e) {

                e.printStackTrace();

                System.exit(1);

            }

        }

        // 多路复用器关闭后,所有注册在上面的Channel和Pipe等资源都会被自动去注册并关闭,所以不需要重复释放资源

        if (selector != null)

            try {

                selector.close();

            } catch (IOException e) {

                e.printStackTrace();

            }

    }

}

package com.dxz.springsession.nio.demo6;

public class TimeClient {

    /**

     * @param args

     */

    public static void main(String[] args) {

    int port = 1234;

    if (args != null && args.length > 0) {

        try {

        port = Integer.valueOf(args[0]);

        } catch (NumberFormatException e) {

        // 采用默认值

        }

    }

    new Thread(new TimeClientHandle("127.0.0.1", port), "TimeClient-001")

        .start();

    }

}
抄录地址:
Java IO系列之四:NIO通信模型的更多相关文章
- java io系列16之 PrintStream(打印输出流)详解
本章介绍PrintStream以及 它与DataOutputStream的区别.我们先对PrintStream有个大致认识,然后再深入学习它的源码,最后通过示例加深对它的了解. 转载请注明出处:htt ...
- Java IO系列之一:IO
1. 概述 Java IO一般包含两个部分: 1.java.io包中堵塞型IO: 2.java.nio包中的非堵塞型IO,通常称为New IO. java.io包下,分为四大块近80个类: 1.基于字 ...
- java io系列21之 InputStreamReader和OutputStreamWriter
InputStreamReader和OutputStreamWriter 是字节流通向字符流的桥梁:它使用指定的 charset 读写字节并将其解码为字符.InputStreamReader 的作用是 ...
- java io系列25之 PrintWriter (字符打印输出流)
更多内容请参考:java io系列01之 "目录" PrintWriter 介绍 PrintWriter 是字符类型的打印输出流,它继承于Writer.PrintStream 用于 ...
- java io系列01之 "目录"
java io 系列目录如下: 01. java io系列01之 "目录" 02. java io系列02之 ByteArrayInputStream的简介,源码分析和示例(包括 ...
- java io系列06之 序列化总结(Serializable 和 Externalizable)
本章,我们对序列化进行深入的学习和探讨.学习内容,包括序列化的作用.用途.用法,以及对实现序列化的2种方式Serializable和Externalizable的深入研究. 转载请注明出处:http: ...
- java io系列15之 DataOutputStream(数据输出流)的认知、源码和示例
本章介绍DataOutputStream.我们先对DataOutputStream有个大致认识,然后再深入学习它的源码,最后通过示例加深对它的了解. 转载请注明出处:http://www.cnblog ...
- java io系列17之 System.out.println("hello world")原理
我们初学java的第一个程序是"hello world" public class HelloWorld { public static void main(String[] ar ...
- java io系列02之 ByteArrayInputStream的简介,源码分析和示例(包括InputStream)
我们以ByteArrayInputStream,拉开对字节类型的“输入流”的学习序幕.本章,我们会先对ByteArrayInputStream进行介绍,然后深入了解一下它的源码,最后通过示例来掌握它的 ...
随机推荐
- promise原理
简介 Promise 对象用于延迟(deferred) 计算和异步(asynchronous )计算.一个Promise对象代表着一个还未完成,但预期将来会完成的操作.Promise 对象是一个返 ...
- HttpClient 报错 Invalid cookie header, Invalid 'expires' attribute: Thu, 01 Jan 1970 00:00:00 GMT
今天在给我姐夫写一个 QQ 自动加好友的程序,但是在 HttpClient 登陆 QQ 的时候报了一个错: -- ::] - Invalid cookie header: Jan :: GMT -- ...
- JQ表格隔行换色
<style type="text/css"> html, body { margin: 0; padding: 0; font-size: 15px; font-fa ...
- Windows 组策略的生效规则
一般的继承与处理规则 若上层父OU的某个组策略项目被设定,但是其下层子OU未设定该项目,则下层子OU继承上层父OU的这个组策略项目设定值 若在下层子OU内的某个组策略项目被设定,则此设定值预设会覆盖由 ...
- JSX有感
开发一个网页,我们要写视图部分HTML,也要写交互逻辑JS. 写JS时,不断翻看HTML,确保querySelector能取到期望的元素. 改HTML时,一个个排查JS文件,确保其没受影响. -- 类 ...
- 我的第一个python web开发框架(36)——后台菜单管理功能
对于后台管理系统来说,要做好权限管理离不开菜单项和页面按钮控件功能的管理.由于程序没法智能的知道有什么菜单和控件,哪些人拥有哪些操作权限,所以首先要做的是菜单管理功能,将需要管理的菜单项和各个功能项添 ...
- VUE路由新页面打开的方法总结
平常做单页面的场景比较多,所以大部分的业务是在同一个页面进行跳转.要通过VUE路由使用新页面打开且传递参数,可以采用以下两个方法: 1.router-link的target <router-li ...
- Loj #2542. 「PKUWC2018」随机游走
Loj #2542. 「PKUWC2018」随机游走 题目描述 给定一棵 \(n\) 个结点的树,你从点 \(x\) 出发,每次等概率随机选择一条与所在点相邻的边走过去. 有 \(Q\) 次询问,每次 ...
- 一键发布部署vs插件[AntDeploy],让net开发者更幸福
一键发布工具(ant deploy tool) 插件下载地址: https://marketplace.visualstudio.com/items?itemName=nainaigu.AntDepl ...
- 复习交换代数——Noether正规化
目录 简介 初等启发 证明过程 几何意义 定理应用 参考资料 简介 在交换代数中有如下定理 Noether正规化引理 令$R$是一个有限生成$k$-代数整环,则存在$t_1,\ldots,t_n\in ...