
kubernetes实战-配置中心(二)交付apollo配置中心到k8s
apollo官网:官方地址
apollo架构图:
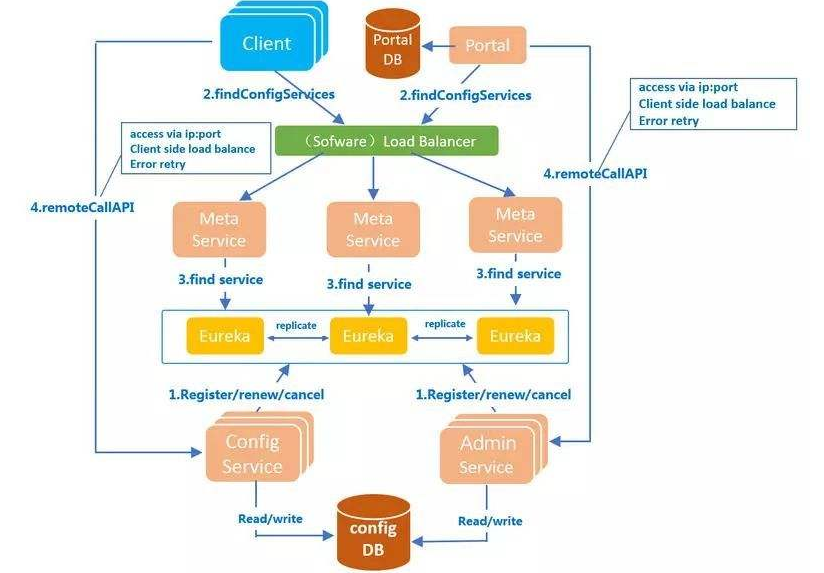
apollo需要使用数据库,这里使用mysql,注意版本需要在5.6以上:
本次环境mysql部署在10.4.7.11上,使用mariadb:10.1以上版本
# vi /etc/yum.repos.d/MariaDB.repo
[mariadb]

name = MariaDB

baseurl = https://mirrors.ustc.edu.cn/mariadb/yum/10.1/centos7-amd64/

gpgkey=https://mirrors.ustc.edu.cn/mariadb/yum/RPM-GPG-KEY-MariaDB

gpgcheck=1
导入key:
# rpm --import https://mirrors.ustc.edu.cn/mariadb/yum/RPM-GPG-KEY-MariaDB
# yum install MariaDB-server -y
简单配置mysql:
# vi /etc/my.cnf.d/server.cnf
[mysqld]

character_set_server = utf8mb4

collation_server = utf8mb4_general_ci

init_connect = "SET NAMES 'utf8mb4'"
# vi /etc/my.cnf.d/mysql-clients.cnf
[mysql]

default-character-set = utf8mb4
# systemctl start mariadb

# systemctl enable mariadb
# mysqladmin -u root password
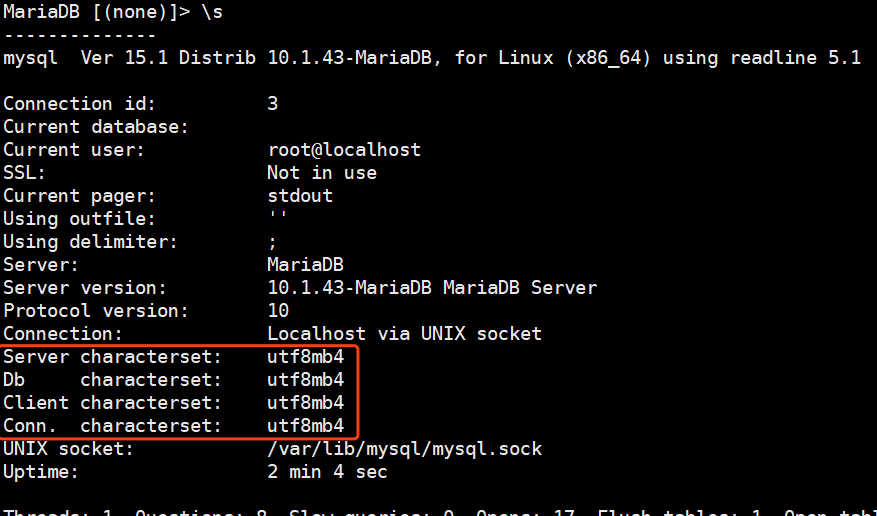
登录检查字符集:
# mysql -uroot -p

> \s
执行数据库初始化脚本:configdb初始化脚本
下载脚本:
# wget https://raw.githubusercontent.com/ctripcorp/apollo/1.5.1/scripts/db/migration/configdb/V1.0.0__initialization.sql -O apolloconfig.sql
执行初始化脚本:
# mysql -uroot -p < apolloconfig.sql
检查数据库:

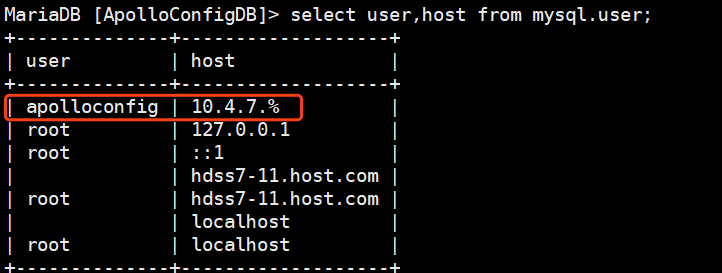
给数据库授权:
# grant INSERT,DELETE,UPDATE,SELECT on ApolloConfigDB.* to 'apolloconfig'@'10.4.7.%' identified by "123456";
修改初始化数据:
> update ServerConfig set Value='http://config.od.com/eureka' where Id=1;
也可以使用下面的sql:执行一个即可
添加config域名解析:
# vi /var/named/od.com.zone
# systemctl restart named
测试域名解析:
# dig -t A config.od.com @10.4.7.11 +short
交付顺序:
1、apolloconfigservice
2、adminservice
3、portal
下载apolloconfigservice的包:放到200上,制作镜像
# wget https://github.com/ctripcorp/apollo/releases/download/v1.5.1/apollo-configservice-1.5.1-github.zip
# mkdir /data/dockerfile/apollo-configservice

# unzip -o apollo-configservice-1.5.1-github.zip -d /data/dockerfile/apollo-configservice/

# cd /data/dockerfile/apollo-configservice/
修改连接数据库配置:
# cd config
# vi application-github.properties

添加mysql.od.com域名解析:

修改启动脚本:
# cd scripts/
# vi startup.sh
将官网上的startup.sh内容替换进来 脚本地址
添加一行:
APOLLO_CONFIG_SERVICE_NAME=$(hostname -i)
自行优化JVM
添加执行权限:
# chmod u+x startup.sh
编写dockerfile:官方地址
# cd ..
# vi Dockerfile
FROM harbor.od.com/base/jre8:8u112

ENV VERSION 1.5.1

RUN ln -sf /usr/share/zoneinfo/Asia/Shanghai /etc/localtime &&\

    echo "Asia/Shanghai" > /etc/timezone

ADD apollo-configservice-${VERSION}.jar /apollo-configservice/apollo-configservice.jar

ADD config/ /apollo-configservice/config

ADD scripts/ /apollo-configservice/scripts

CMD ["/apollo-configservice/scripts/startup.sh"]
# docker build . -t harbor.od.com/infra/apollo-configservice:v1.5.1
# docker push harbor.od.com/infra/apollo-configservice:v1.5.1
编写资源配置清单:
# cd /data/k8s-yaml/

# mkdir apollo-configservice
# cd apollo-configservice
1、cm.yaml
apiVersion: v1

kind: ConfigMap

metadata:

  name: apollo-configservice-cm

  namespace: infra

data:

  application-github.properties: |

    # DataSource

    spring.datasource.url = jdbc:mysql://mysql.od.com:3306/ApolloConfigDB?characterEncoding=utf8

    spring.datasource.username = apolloconfig

    spring.datasource.password = 123456

    eureka.service.url = http://config.od.com/eureka

  app.properties: |

    appId=100003171
2、dp.yaml
kind: Deployment

apiVersion: extensions/v1beta1

metadata:

  name: apollo-configservice

  namespace: infra

  labels:

    name: apollo-configservice

spec:

  replicas: 1

  selector:

    matchLabels:

      name: apollo-configservice

  template:

    metadata:

      labels:

        app: apollo-configservice

        name: apollo-configservice

    spec:

      volumes:

      - name: configmap-volume

        configMap:

          name: apollo-configservice-cm

      containers:

      - name: apollo-configservice

        image: harbor.od.com/infra/apollo-configservice:v1.5.1

        ports:

        - containerPort: 8080

          protocol: TCP

        volumeMounts:

        - name: configmap-volume

          mountPath: /apollo-configservice/config

        terminationMessagePath: /dev/termination-log

        terminationMessagePolicy: File

        imagePullPolicy: IfNotPresent

      imagePullSecrets:

      - name: harbor

      restartPolicy: Always

      terminationGracePeriodSeconds: 30

      securityContext:

        runAsUser: 0

      schedulerName: default-scheduler

  strategy:

    type: RollingUpdate

    rollingUpdate:

      maxUnavailable: 1

      maxSurge: 1

  revisionHistoryLimit: 7

  progressDeadlineSeconds: 600
3、svc.yaml
kind: Service

apiVersion: v1

metadata:

  name: apollo-configservice

  namespace: infra

spec:

  ports:

  - protocol: TCP

    port: 8080

    targetPort: 8080

  selector:

    app: apollo-configservice
4、ingress.yaml
kind: Ingress

apiVersion: extensions/v1beta1

metadata:

  name: apollo-configservice

  namespace: infra

spec:

  rules:

  - host: config.od.com

    http:

      paths:

      - path: /

        backend:

          serviceName: apollo-configservice

          servicePort: 8080
应用资源配置清单:
# kubectl create -f http://k8s-yaml.od.com/apollo-configservice/cm.yaml

# kubectl create -f http://k8s-yaml.od.com/apollo-configservice/dp.yaml

# kubectl create -f http://k8s-yaml.od.com/apollo-configservice/svc.yaml

# kubectl create -f http://k8s-yaml.od.com/apollo-configservice/ingress.yaml
检查启动情况:



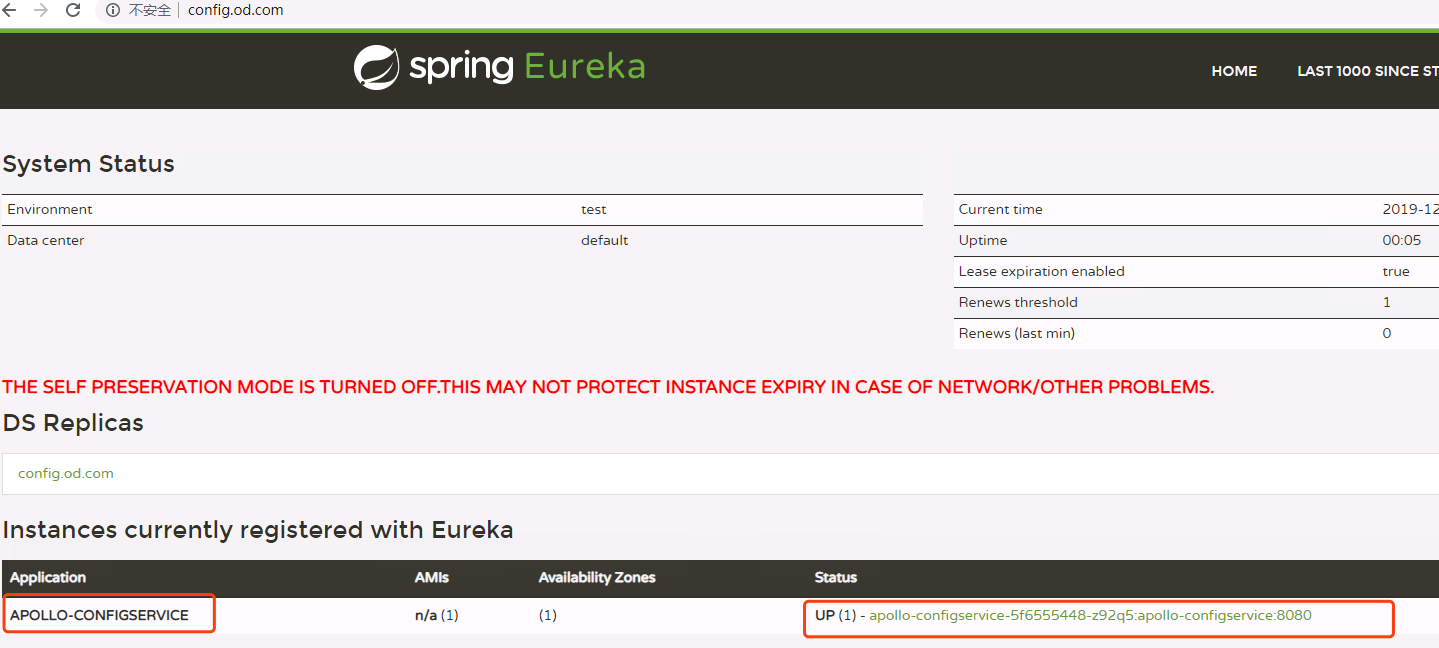
需要等到eureka启动以后才可以,接下来使用浏览器访问config.od.com:
下载adminservice:官方地址放在200上
# wget https://github.com/ctripcorp/apollo/releases/download/v1.5.1/apollo-adminservice-1.5.1-github.zip
# mkdir /data/dockerfile/apollo-adminservice
# unzip -o apollo-adminservice-1.5.1-github.zip -d /data/dockerfile/apollo-adminservice/
# cd /data/dockerfile/apollo-adminservice/
由于使用了configmap资源将配置文件挂载出来了,所以不在修改配置文件,如需修改配置文件,请参考部署apollo-configservice时候的修改方法:
修改startup.sh: 官方地址
将端口修改为:8080
添加以下一项配置:
APOLLO_ADMIN_SERVICE_NAME=$(hostname -i)
制作dockerfile:
# vi Dockerfile
FROM stanleyws/jre8:8u112

ENV VERSION 1.5.1

RUN ln -sf /usr/share/zoneinfo/Asia/Shanghai /etc/localtime &&\

    echo "Asia/Shanghai" > /etc/timezone

ADD apollo-adminservice-${VERSION}.jar /apollo-adminservice/apollo-adminservice.jar

ADD config/ /apollo-adminservice/config

ADD scripts/ /apollo-adminservice/scripts

CMD ["/apollo-adminservice/scripts/startup.sh"]
制作资源配置清单:
# mkdir /data/k8s-yaml/apollo-adminservice && cd /data/k8s-yaml/apollo-adminservice
1、cm.yaml
apiVersion: v1

kind: ConfigMap

metadata:

  name: apollo-adminservice-cm

  namespace: infra

data:

  application-github.properties: |

    # DataSource

    spring.datasource.url = jdbc:mysql://mysql.od.com:3306/ApolloConfigDB?characterEncoding=utf8

    spring.datasource.username = apolloconfig

    spring.datasource.password = 123456

    eureka.service.url = http://config.od.com/eureka

  app.properties: |

    appId=100003172
2、dp.yaml
kind: Deployment

apiVersion: extensions/v1beta1

metadata:

  name: apollo-adminservice

  namespace: infra

  labels:

    name: apollo-adminservice

spec:

  replicas: 1

  selector:

    matchLabels:

      name: apollo-adminservice

  template:

    metadata:

      labels:

        app: apollo-adminservice

        name: apollo-adminservice

    spec:

      volumes:

      - name: configmap-volume

        configMap:

          name: apollo-adminservice-cm

      containers:

      - name: apollo-adminservice

        image: harbor.od.com/infra/apollo-adminservice:v1.5.1

        ports:

        - containerPort: 8080

          protocol: TCP

        volumeMounts:

        - name: configmap-volume

          mountPath: /apollo-adminservice/config

        terminationMessagePath: /dev/termination-log

        terminationMessagePolicy: File

        imagePullPolicy: IfNotPresent

      imagePullSecrets:

      - name: harbor

      restartPolicy: Always

      terminationGracePeriodSeconds: 30

      securityContext:

        runAsUser: 0

      schedulerName: default-scheduler

  strategy:

    type: RollingUpdate

    rollingUpdate:

      maxUnavailable: 1

      maxSurge: 1

  revisionHistoryLimit: 7

  progressDeadlineSeconds: 600
应用资源配置清单:
# kubectl create -f http://k8s-yaml.od.com/apollo-adminservice/cm.yaml

# kubectl create -f http://k8s-yaml.od.com/apollo-adminservice/dp.yaml

通过日志检查启动情况:

通过config.od.com检查是否注册到了eureka:

已经顺利的注册到了注册中心中。
接下来交付portal:官方地址 200上下载并制作镜像
# wget https://github.com/ctripcorp/apollo/releases/download/v1.5.1/apollo-portal-1.5.1-github.zip
# mkdir /data/dockerfile/apollo-portal
# unzip -o apollo-portal-1.5.1-github.zip -d /data/dockerfile/apollo-portal/

# cd /data/dockerfile/apollo-portal/
由于portal使用的是另一个portaldb,我们需要在数据库中新建portdb,并初始化:初始化脚本
在7-21上下载下来脚本:
# wget https://raw.githubusercontent.com/ctripcorp/apollo/1.5.1/scripts/db/migration/portaldb/V1.0.0__initialization.sql -O apollo-portal.sql
# mysql -uroot -p
]> source ./apollo-portal.sq
创建用户并授权:
# grant INSERT,DELETE,UPDATE,SELECT on ApolloPortalDB.* to "apolloportal"@"10.4.7.%" identified by "123456";
修改数据库:
创建部门:

]> update ServerConfig set Value='[{"orgId":"od01","orgName":"Linux学院"},{"orgId":"od02","orgName":"云计算学院"},{"orgId":"od03","orgName":"Python学院"}]' where Id=2;

由于使用concigmap资源,故之做介绍,不在这里修改:
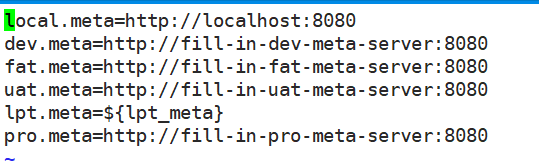
配置portal meta serice:
这里列出的是支持的环境列表配置:
# vi /data/dockerfile/apollo-portal/config/apollo-env.properties
修改startup.sh 官方地址
修改端口为8080
添加以下配置项:
APOLLO_PORTAL_SERVICE_NAME=$(hostname -i)
制作dockerfile:
# vi Dockerfile
FROM stanleyws/jre8:8u112

ENV VERSION 1.5.1

RUN ln -sf /usr/share/zoneinfo/Asia/Shanghai /etc/localtime &&\

    echo "Asia/Shanghai" > /etc/timezone

ADD apollo-portal-${VERSION}.jar /apollo-portal/apollo-portal.jar

ADD config/ /apollo-portal/config

ADD scripts/ /apollo-portal/scripts

CMD ["/apollo-portal/scripts/startup.sh"]
# docker build . -t harbor.od.com/infra/apollo-portal:v1.5.1

# docker push harbor.od.com/infra/apollo-portal:v1.5.1
编写资源配置清单:
# mkdir /data/k8s-yaml/apollo-portal && cd /data/k8s-yaml/apollo-portal
1、cm.yaml
apiVersion: v1

kind: ConfigMap

metadata:

  name: apollo-portal-cm

  namespace: infra

data:

  application-github.properties: |

    # DataSource

    spring.datasource.url = jdbc:mysql://mysql.od.com:3306/ApolloPortalDB?characterEncoding=utf8

    spring.datasource.username = apolloportal

    spring.datasource.password = 123456

  app.properties: |

    appId=100003173

  apollo-env.properties: |

    dev.meta=http://config.od.com
2、dp.yaml
kind: Deployment

apiVersion: extensions/v1beta1

metadata:

  name: apollo-portal

  namespace: infra

  labels:

    name: apollo-portal

spec:

  replicas: 1

  selector:

    matchLabels:

      name: apollo-portal

  template:

    metadata:

      labels:

        app: apollo-portal

        name: apollo-portal

    spec:

      volumes:

      - name: configmap-volume

        configMap:

          name: apollo-portal-cm

      containers:

      - name: apollo-portal

        image: harbor.od.com/infra/apollo-portal:v1.5.1

        ports:

        - containerPort: 8080

          protocol: TCP

        volumeMounts:

        - name: configmap-volume

          mountPath: /apollo-portal/config

        terminationMessagePath: /dev/termination-log

        terminationMessagePolicy: File

        imagePullPolicy: IfNotPresent

      imagePullSecrets:

      - name: harbor

      restartPolicy: Always

      terminationGracePeriodSeconds: 30

      securityContext:

        runAsUser: 0

      schedulerName: default-scheduler

  strategy:

    type: RollingUpdate

    rollingUpdate:

      maxUnavailable: 1

      maxSurge: 1

  revisionHistoryLimit: 7

  progressDeadlineSeconds: 600
3、svc.yaml
kind: Service

apiVersion: v1

metadata:

  name: apollo-portal

  namespace: infra

spec:

  ports:

  - protocol: TCP

    port: 8080

    targetPort: 8080

  selector:

    app: apollo-portal
4、ingress.yaml
kind: Ingress

apiVersion: extensions/v1beta1

metadata:

  name: apollo-portal

  namespace: infra

spec:

  rules:

  - host: portal.od.com

    http:

      paths:

      - path: /

        backend:

          serviceName: apollo-portal

          servicePort: 8080
应用资源配置清单:
# kubectl create -f http://k8s-yaml.od.com/apollo-portal/cm.yaml

# kubectl create -f http://k8s-yaml.od.com/apollo-portal/dp.yaml

# kubectl create -f http://k8s-yaml.od.com/apollo-portal/svc.yaml

# kubectl create -f http://k8s-yaml.od.com/apollo-portal/ingress.yaml

添加域名解析:portal.od.com

网页访问 portal.od.com
默认用户名:apollo
默认密码: admin
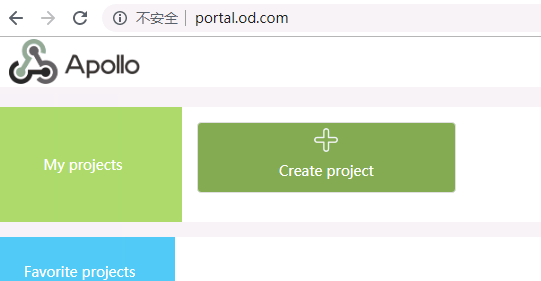
到此,apollo的三个组件都已经交付到k8s里了。
kubernetes实战-配置中心(二)交付apollo配置中心到k8s的更多相关文章
- SpringBoot自动化配置之二:自动配置(AutoConfigure)原理、EnableAutoConfiguration、condition
自动配置绝对算得上是Spring Boot的最大亮点,完美的展示了CoC约定优于配置: Spring Boot能自动配置Spring各种子项目(Spring MVC, Spring Security, ...
- 【Nacos】Springboot整合Nacos配置中心(二) 多环境配置
本篇随笔接上一篇文章:Springboot整合Nacos配置中心(一),主要记录Nacos多环境的配置的方法 Nacos多环境的配置 方法一: 1.在项目中的bootstrap.yaml文件中配置激活 ...
- AlwaysOn可用性组测试环境安装与配置(二)--AlwaysOn配置(界面与T-SQL)
四.AlwaysOn配置 1.开启AlwaysOn高可用性功能. 1.1.开启Server01的可用性组 1.2.需要重启服务:属于SQL server群集节点的服务,需要通过故障转移界面重启 1.3 ...
- Openfire开发配置,Openfire源代码配置,OpenFire二次开发配置
原文:http://www.cnblogs.com/lixiaolun/archive/2013/12/07/3462780.html 1.下载源代码:http://www.igniterealtim ...
- Openfire开发配置,Openfire源码配置,OpenFire二次开发配置
1.下载源码:http://www.igniterealtime.org/downloads/source.jsp 2.把源码解压出的openfire_src目录放至eclipse workplace ...
- TensorFlow-GPU环境配置之二——CUDA环境配置
1.安装最新显卡驱动 到系统设置->软件和更新->附加驱动中选中最新的显卡驱动,并应用 2.下载CUDA8.0 https://developer.nvidia.com/cuda-down ...
- Openfire开发配置,Openfire源代码配置,OpenFire二次开发配置(eclipse)
首先去官网把openfire的源码下下来: http://www.igniterealtime.org/downloads/source.jsp 1.下载后放到你的workspace当中,我的woek ...
- K8S(11)配置中心实战-单环境交付apollo三组件
k8s配置中心实战-交付apollo三组件 目录 k8s配置中心实战-交付apollo三组件 1 apollo简单说明 1.1 apollo最简架构图: 1.2 apollo组件部署关系 2 为app ...
- K8S(12)配置中心实战-多环境交付apollo三组件
k8s配置中心实战-多环境交付apollo三组件 目录 k8s配置中心实战-多环境交付apollo三组件 1.环境准备工作 1.1 zk环境拆分 1.2 namespace分环境 1.3 数据库拆分 ...
随机推荐
- kubernets之pod简介
一 k8s集群里面的最小单位是pod 1.1 一个较为简单的pod的配置文件 apiverson: api的版本号 kind: 资源的种类 metadata: pod的种类等相关信息 spec: p ...
- Description Resource Path Location Type Failure to transfer org.apache.maven.plugins:maven-surefire-
url:https://www.pianshen.com/article/8003307916/ Description Resource Path Location Type Failure to ...
- CodeMonkey少儿编程第3章 times循环
目标 了解程序由哪三种基本的结构组成 了解循环的概念 掌握times的结构与用法 三种基本结构 计算机程序由三种最基本的结构组成,它们分别是: 顺序结构 循环结构 选择结构 千万不要被这些陌生的术语给 ...
- YOLOv4
@ 目录 YOLO v4源码 CMake安装 CUDA安装 cuDNN安装 OpenCV安装 Cmake编译 VS编译 图像测试 测试结果 YOLOv4是最近开源的一个又快又准确的目标检测器. 首先看 ...
- VMwareWorkstation 平台 Ubuntu14 下安装配置 伪分布式 hadoop
VMwareWorkstation平台Ubuntu14下安装配置伪分布式hadoop 安装VmwareStation 内含注册机. 链接:https://pan.baidu.com/s/1j-vKgD ...
- 线上nginx的一次“no live upstreams while connecting to upstream ”分析
线上nginx的一次"no live upstreams while connecting to upstream "分析 线上nginx的一次"no live upst ...
- JVM 参数的设置及解析
JVM 参数的设置及解析 1.关于JVM配置: 2.Linux JVM设置: 1.关于JVM配置: 设置jvm内存的参数有四个: -Xmx 设置堆(Java Heap)最大值,默认值为物理内存的1/4 ...
- Tomcat 核心组件 Container容器相关
前言 Engine容器 Host容器 前言 Connector把封装了Request对象以及Response对象的Socket传递给了Container容器,那么在Contianer容器中又是怎么样的 ...
- Flink-v1.12官方网站翻译-P022-Working with State
有状态程序 在本节中,您将了解Flink为编写有状态程序提供的API.请看一下Stateful Stream Processing来了解有状态流处理背后的概念. 带键值的数据流 如果要使用键控状态,首 ...
- 四十三:漏洞发现-WEB应用之漏洞探针类型利用修复
已知CMS 如常见的dedecms,discuz,wordpress等源码结构,这种一般采用非框架开发,但是也有少部分采用框架类开发,针对此类源码程序的安全监测, 我们要利用公开的漏洞进行测试,如不存 ...