【kinetic】操作系统探索总结(五)创建简单的机器人模型smartcar
p { margin-bottom: 0.1in; direction: ltr; line-height: 120%; text-align: justify }
a:link { color: rgba(0, 0, 255, 1) }
前面我们使用的是已有的机器人模型进行仿真,这一节我们将建立一个简单的智能车机器人smartcar,为后面建立复杂机器人打下基础。
一、创建硬件描述包
01. cd ~/catkin_ws/src
02. catkin_create_pkg smartcar_description std_msgs rospy roscpp urdf (roscreat-pkg为旧版本中的命令,虽然在kinetic中也可以使用,但是还是使用catkin_create_pkg比较好,在书中没有添加std_msgs等依赖项,但是实际所测加上上面的几个依赖项才行。)
p { margin-bottom: 0.1in; direction: ltr; line-height: 120%; text-align: justify }
a:link { color: rgba(0, 0, 255, 1) }
p { margin-bottom: 0.1in; direction: ltr; line-height: 120%; text-align: justify }
a:link { color: rgba(0, 0, 255, 1) }
二、智能车尺寸数据
因为建立的是一个非常简单的机器人,所以我们尽量使用简单的元素:使用长方体代替车模,使用圆柱代替车轮,具体尺寸如下:

三、建立urdf文件
在smartcar_description文件夹下建立urdf文件夹,创建智能车的描述文件.urdf,描述代码如下:
<?xml version="1.0"?>

    <robot name="smartcar">

        <link name="base_link">

        <visual>

            <geometry>

                <box size="0.25 .16 .05"/>

            </geometry>

            <origin rpy="0 0 1.57075" xyz="0 0 0"/>

            <material name="blue">

                <color rgba="0 0 .8 1.3"/>

             </material>

        </visual>

        </link>

    <link name="right_front_wheel">

    <visual>

        <geometry>

            <cylinder length=".02" radius="0.025"/>

        </geometry>

         <material name="black">

            <color rgba="0 0 0 1"/>

        </material>

    </visual>

    </link>

    <joint name="right_front_wheel_joint" type="continuous">

    <axis xyz="0 0 1"/>

    <parent link="base_link"/>

    <child link="right_front_wheel"/>

    <origin rpy="0 1.57075 0" xyz="0.08 0.1 -0.03"/>

    <limit effort="100" velocity="100"/>

    <joint_properties damping="0.0" friction="0.0"/>

    </joint>

    <link name="right_back_wheel">

        <visual>

            <geometry>

                <cylinder length=".02" radius="0.025"/>

            </geometry>

            <material name="black">

                <color rgba="0 0 0 1"/>

            </material>

        </visual>

    </link>

    <joint name="right_back_wheel_joint" type="continuous">

        <axis xyz="0 0 1"/>

        <parent link="base_link"/>

        <child link="right_back_wheel"/>

        <origin rpy="0 1.57075 0" xyz="0.08 -0.1 -0.03"/>

        <limit effort="100" velocity="100"/>

    <joint_properties damping="0.0" friction="0.0"/>

    </joint>

    <link name="left_front_wheel">

        <visual>

            <geometry>

                <cylinder length=".02" radius="0.025"/>

            </geometry>

            <material name="black">

                <color rgba="0 0 0 1"/>

            </material>

        </visual>

    </link>

    <joint name="left_front_wheel_joint" type="continuous">

        <axis xyz="0 0 1"/>

        <parent link="base_link"/>

        <child link="left_front_wheel"/>

        <origin rpy="0 1.57075 0" xyz="-0.08 0.1 -0.03"/>

        <limit effort="100" velocity="100"/>

    <joint_properties damping="0.0" friction="0.0"/>

    </joint>

    <link name="left_back_wheel">

        <visual>

            <geometry>

            <cylinder length=".02" radius="0.025"/>

            </geometry>

            <material name="black">

            <color rgba="0 0 0 1"/>

            </material>

        </visual>

    </link>

    <joint name="left_back_wheel_joint" type="continuous">

        <axis xyz="0 0 1"/>

        <parent link="base_link"/>

        <child link="left_back_wheel"/>

        <origin rpy="0 1.57075 0" xyz="-0.08 -0.1 -0.03"/>

        <limit effort="100" velocity="100"/>

    <joint_properties damping="0.0" friction="0.0"/>

    </joint>

    <link name="head">

        <visual>

            <geometry>

                <box size=".02 .03 .03"/>

            </geometry>

            <material name="white">

                <color rgba="1 1 1 1"/>

            </material>

        </visual>

    </link>

    <joint name="tobox" type="fixed">

        <parent link="base_link"/>

        <child link="head"/>

    <origin xyz="0 0.08 0.025"/>

    </joint>

</robot>
四、建立launch命令文件
在smartcar_description文件夹下建立launch文件夹,创建智能车的描述文件
base.urdf.rviz.launch,描述代码如下:
<launch>

    <arg name="model"/>

    <arg name="gui" default="False"/>

    <param name="robot_description" textfile="$(find smartcar_description)/urdf/smartcar.urdf"/>

    <param name="use_gui" value="$(arg gui)"/>

    <node name="joint_state_publisher" pkg="joint_state_publisher" type="joint_state_publisher">

    </node>

    <node name="robot_state_publisher" pkg="robot_state_publisher" type="state_publisher"/>

    <node name="rviz" pkg="rviz" type="rviz" args="-d $(find urdf_tutorial)/rviz/urdf.rviz"/>

</launch>
p { margin-bottom: 0.1in; direction: ltr; line-height: 120%; text-align: justify }
a:link { color: rgba(0, 0, 255, 1) }
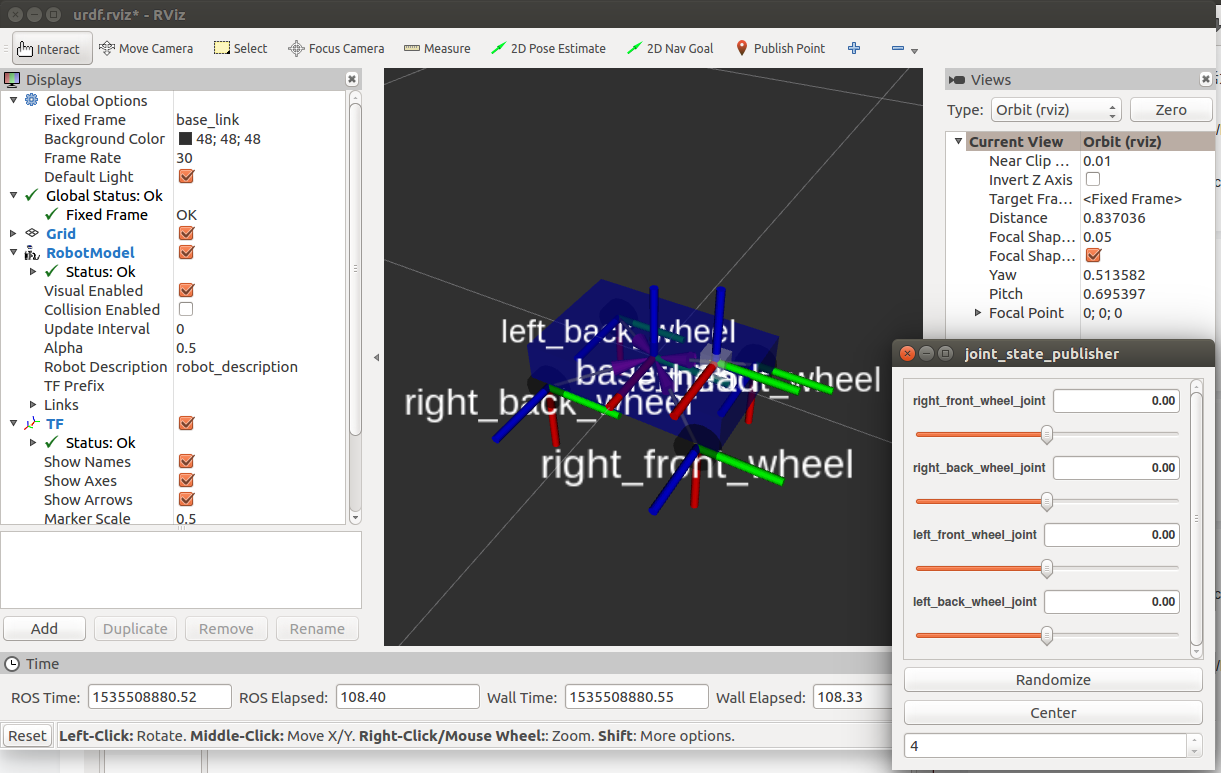
五、效果演示
在终端中输入显示命令:
01. roslaunch smartcar_description base.urdf.rviz.launch gui:=true
显示效果如下图所示,使用gui中的控制bar可以控制四个轮子单独旋转。
【kinetic】操作系统探索总结(五)创建简单的机器人模型smartcar的更多相关文章
- ROS探索总结(五)——创建简单的机器人模型smartcar
前面我们使用的是已有的机器人模型进行仿真,这一节我们将建立一个简单的智能车机器人smartcar,为后面建立复杂机器人打下基础. 一.创建硬件描述包 roscreat-pkg smartcar_de ...
- 创建简单的机器人模型smartcar
前面我们使用的是已有的机器人模型进行仿真,这一节我们将建立一个简单的智能车机器人 smartcar,为后面建立复杂机器人打下基础. 一.创建硬件描述包. cd ~/catkin_ws/srcroscr ...
- Robot Operating System (ROS)学习笔记---创建简单的机器人模型smartcar
搭建环境:XMWare Ubuntu14.04 ROS(indigo) 转载自古月居 转载连接:http://www.guyuehome.com/243 一.创建硬件描述包 已创建catkin_ ...
- ROS学习记录(一)————创建简单的机器人模型smartcar
这是我在古月居上找的(http://www.guyuehome.com/243),但直接运行的话,没办法跑起来,我也是查了好多博客和日志,才实现最后的功能的,所以,记录下来,以备后用吧,也欢迎其他和我 ...
- Melodic 使用URDF创建简单的机器人模型
本人Linux版本:Ubuntu 18.04LTS ROS版本:Melodic URDF代码 <?xml version="1.0" ?> <robot name ...
- Android开发艺术探索第五章——理解RemoteViews
Android开发艺术探索第五章--理解RemoteViews 这门课的重心在于RemoteViews,RemoteViews可以理解为一种远程的View,其实他和远程的Service是一样的,Rem ...
- Web Service 的创建简单编码、发布和部署
最近,老大准备将已有的C/S架构项目中的通信部分做成通用,需要将其支持WebService为以后项目向着B/S架构升级做好铺垫,为此身为屌丝的我去各种百度WebService是个什么卵玩意,然后逐渐搭 ...
- javaweb学习总结(二十五)——jsp简单标签开发(一)
一.简单标签(SimpleTag) 由于传统标签使用三个标签接口来完成不同的功能,显得过于繁琐,不利于标签技术的推广, SUN公司为降低标签技术的学习难度,在JSP 2.0中定义了一个更为简单.便于编 ...
- Intellij创建简单Springboot项目
Intellij创建简单Springboot项目 第一步:选择创建新项目——file-new-project 第二步:选择项目类型——Spring Initializr-next 第三步:输入项目信息 ...
随机推荐
- 冲刺随笔——Day_Seven
这个作业属于哪个课程 软件工程 (福州大学至诚学院 - 计算机工程系) 这个作业要求在哪里 团队作业第五次--Alpha冲刺 这个作业的目标 团队进行Alpha冲刺 作业正文 正文 其他参考文献 无 ...
- PyQt+moviepy音视频剪辑实战2:一个剪裁视频文件精华内容留存工具的实现
专栏:Python基础教程目录 专栏:使用PyQt开发图形界面Python应用 PyQt+moviepy音视频剪辑实战 专栏:PyQt入门学习 老猿Python博文目录 老猿学5G博文目录 一.引言 ...
- 第8.32节 Python中重写__delattr__方法捕获属性删除
一. 引言 上节介绍了__delattr__方法在Python清除实例属性时被捕获执行,本节结合例子介绍重写__delattr__方法,并说明__delattr__方法执行的触发逻辑. 二. 重写__ ...
- PyQt(Python+Qt)学习随笔:QTreeView树形视图的animated属性
老猿Python博文目录 专栏:使用PyQt开发图形界面Python应用 老猿Python博客地址 QTreeView树形视图的animated属性用于控制视图在展开或收缩分支时是否展示动画,如果对应 ...
- 第15.15节 PyQt(Python+Qt)入门学习:Designer的menu菜单、toolBar工具栏和Action动作详解
老猿Python博文目录 老猿Python博客地址 一.引言 Qt Designer中的部件栏并没有菜单.toolBar以及Action相关的部件,仅在MainWindow类型窗口提供了menu.to ...
- XFF SSTI 模板注入 [BJDCTF2020]The mystery of ip
转自https://www.cnblogs.com/wangtanzhi/p/12328083.html SSTI模板注入:之前也写过:https://www.cnblogs.com/wangtanz ...
- 【软件测试部署基础】npm的认识
1. npm简介 先来看下官方介绍: npm makes it easy for JavaScript developers to share and reuse code, and it makes ...
- 图论-zkw费用流
图论-zkw费用流 模板 这是一个求最小费用最大流的算法,因为发明者是神仙zkw,所以叫zkw费用流(就是zkw线段树那个zkw).有些时候比EK快,有些时候慢一些,没有比普通费用流算法更难,所以学z ...
- DVWA各等级文件上传漏洞
file upload 文件上传漏洞,攻击者可以通过上传木马获取服务器的webshell权限. 文件上传漏洞的利用是 够成功上传木马文件, 其次上传文件必须能够被执行, 最后就是上传文件的路径必须可知 ...
- oracle11g ADG主备切换
oracle11g ADG主备切换 1.主库 SQL> select name,open_mode,switchover_status from v$database; NAME OPEN_MO ...