Spring Cloud Alibaba基础教程-Nacos(三)
在Spring Cloud Alibaba基础教程-Nacos(二)当中学习了,如何使用 nacos图形化界面操作 ,使用Nacos部署集群,下面我们开始Nacos最后一篇的学习 ,如果对你有帮助,记得点个关注
前置条件
首先 你已经拥有Nacos的基础知识
搭建前环境 可以参考
本文需要实现:
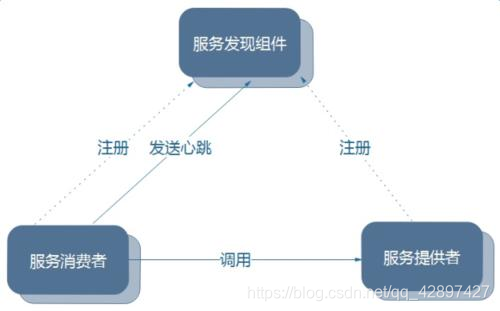
通过一个简单的示例来感受一下如何将服务注册到 Nacos的区别
- alibaba-provider-server(生产者), alibaba-consumer-client(消费者) 环境搭建
- 生产者/消费者 把服务注册到nacos 注册中心
- 通过RestTemplate 模块,消费者PRC的方式 调用生产者
- 手写 负载均衡器 LoadBalancer (不建议使用)
- 使用 负载均衡器 Rabbit
创建父工程统一管理 版本号
创建一个工程名为 alibaba-dependencies 的项目,pom.xml 配置文件如下:
<?xml version="1.0" encoding="UTF-8"?>
<project xmlns="http://maven.apache.org/POM/4.0.0" xmlns:xsi="http://www.w3.org/2001/XMLSchema-instance"
xsi:schemaLocation="http://maven.apache.org/POM/4.0.0 http://maven.apache.org/xsd/maven-4.0.0.xsd">
<modelVersion>4.0.0</modelVersion>
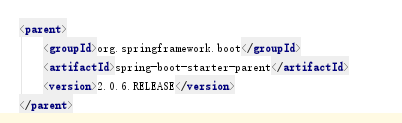
<parent>
<groupId>org.springframework.boot</groupId>
<artifactId>spring-boot-starter-parent</artifactId>
<version>2.0.6.RELEASE</version>
</parent>
<groupId>com.spiritmark.cloud</groupId>
<artifactId>alibaba-dependencies</artifactId>
<version>1.0.0-SNAPSHOT</version>
<packaging>pom</packaging>
<name>alibaba-dependencies</name>
<url>http://www.spiritmark.com</url>
<inceptionYear>2020-Now</inceptionYear>
<!-- 统一版本 -->
<properties>
<!-- Environment Settings -->
<java.version>1.8</java.version>
<project.build.sourceEncoding>UTF-8</project.build.sourceEncoding>
<project.reporting.outputEncoding>UTF-8</project.reporting.outputEncoding>
<!-- Spring Settings -->
<spring-cloud.version>Finchley.SR2</spring-cloud.version>
<spring-cloud-alibaba.version>0.2.1.RELEASE</spring-cloud-alibaba.version>
</properties>
<dependencyManagement>
<dependencies>
<dependency>
<groupId>org.springframework.cloud</groupId>
<artifactId>spring-cloud-dependencies</artifactId>
<version>${spring-cloud.version}</version>
<type>pom</type>
<scope>import</scope>
</dependency>
<dependency>
<groupId>org.springframework.cloud</groupId>
<artifactId>spring-cloud-alibaba-dependencies</artifactId>
<version>${spring-cloud-alibaba.version}</version>
<type>pom</type>
<scope>import</scope>
</dependency>
</dependencies>
</dependencyManagement>
<build>
<plugins>
<!-- Compiler 插件, 设定 JDK 版本 -->
<plugin>
<groupId>org.apache.maven.plugins</groupId>
<artifactId>maven-compiler-plugin</artifactId>
<configuration>
<showWarnings>true</showWarnings>
</configuration>
</plugin>
</plugins>
<!-- 资源文件配置 -->
<resources>
<resource>
<directory>src/main/java</directory>
<excludes>
<exclude>**/*.java</exclude>
</excludes>
</resource>
<resource>
<directory>src/main/resources</directory>
</resource>
</resources>
</build>
<!-- 仓库配置 -->
<repositories>
<repository>
<id>aliyun-repos</id>
<name>Aliyun Repository</name>
<url>http://maven.aliyun.com/nexus/content/groups/public</url>
<releases>
<enabled>true</enabled>
</releases>
<snapshots>
<enabled>false</enabled>
</snapshots>
</repository>
<repository>
<id>sonatype-repos</id>
<name>Sonatype Repository</name>
<url>https://oss.sonatype.org/content/groups/public</url>
<releases>
<enabled>true</enabled>
</releases>
<snapshots>
<enabled>false</enabled>
</snapshots>
</repository>
<repository>
<id>sonatype-repos-s</id>
<name>Sonatype Repository</name>
<url>https://oss.sonatype.org/content/repositories/snapshots</url>
<releases>
<enabled>false</enabled>
</releases>
<snapshots>
<enabled>true</enabled>
</snapshots>
</repository>
<repository>
<id>spring-snapshots</id>
<name>Spring Snapshots</name>
<url>https://repo.spring.io/snapshot</url>
<snapshots>
<enabled>true</enabled>
</snapshots>
</repository>
<repository>
<id>spring-milestones</id>
<name>Spring Milestones</name>
<url>https://repo.spring.io/milestone</url>
<snapshots>
<enabled>false</enabled>
</snapshots>
</repository>
</repositories>
</project>
依赖解读
parent:继承了 Spring Boot 的 Parent,表示我们是一个 Spring Boot 工程package:pom,表示该项目仅当做依赖项目,没有具体的实现代码spring-cloud-alibaba-dependencies:在 properties 配置中预定义了版本号为 0.2.1.RELEASE ,表示我们的 Spring Cloud Alibaba 对应的是 Spring Cloud Finchley 版本build:配置了项目所需的各种插件repositories:配置项目下载依赖时的第三方库
创建Maven 项目 alibaba-provider-server( 版本2.0.1)
创建一个工程名为 alibaba-provider-server 的服务提供者项目,pom.xml 配置如下:
    <!-- 由于在父模块中已经声明了,所以子模块不需要进行版本声明-->

    <dependencies>

        <!--  springboot 整合web组件-->

        <dependency>

            <groupId>org.springframework.boot</groupId>

            <artifactId>spring-boot-starter-web</artifactId>

        </dependency>

        <!-- springboot 整合 alibaba-nacos-discovery 注册中心 -->

        <dependency>

            <groupId>org.springframework.cloud</groupId>

            <artifactId>spring-cloud-starter-alibaba-nacos-discovery</artifactId>

        </dependency>

    </dependencies>
yml 文件配置
server:

  port: 8081

spring:

  application:

    ## 服务名称

    name: alibaba-provider-server

  cloud:

    nacos:

      discovery:

        ## 服务注册地址

        server-addr: 127.0.0.1:8848

management:

  # 端点检查(健康检查)

  endpoints:

    web:

      exposure:

        include: "*"
启动类
通过 @EnableDiscoveryClient 注解表明是一个 Nacos 客户端,该注解是 Spring Cloud 提供的原生注解
import org.springframework.boot.SpringApplication;

import org.springframework.boot.autoconfigure.SpringBootApplication;

import @EnableDiscoveryClient

@SpringBootApplication

public class NacosProviderApplication {

    public static void main(String[] args) {

        SpringApplication.run(NacosProviderApplication.class, args);

    }

    @RestController

    class EchoController {

        @GetMapping(value = "/echo/{message}")

        public String echo(@PathVariable String message) {

            return "Hello Nacos Discovery " + message;

        }

        @GetMapping("/getUserId")

        public String getUserId(String userId) {

            return "userId:" + userId;

        }

    }

}
启动工程
通过浏览器访问 http://127.0.0.1:8848/nacos,即 Nacos Server 网址
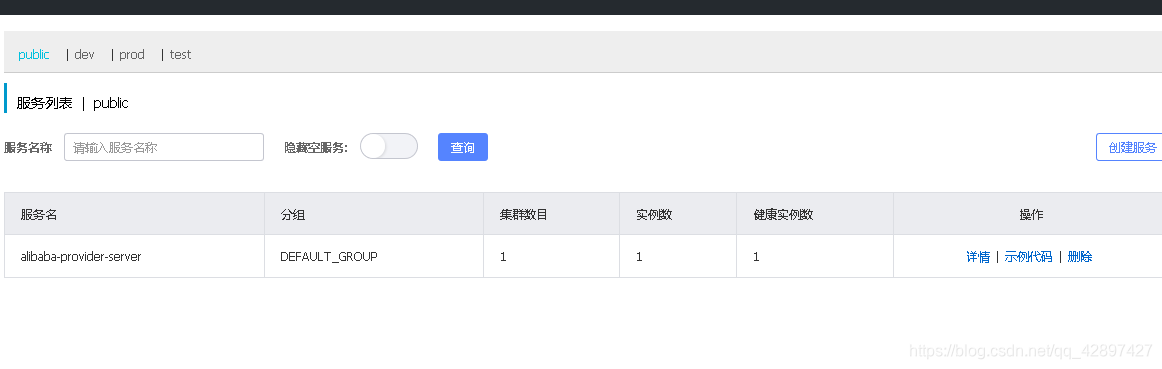
你会发现一个服务已经注册在服务中了,服务名为 nacos-provider-server
这时打开 http://localhost:8081/echo/hi ,你会在浏览器上看到:

服务的端点检查
使用 前需要导入,省略版本号,必须是 父pom中声明了,默认情况下,所有Springboot的项目全部都会使用(父项目)这个 版本
加入监视器依赖
 <dependency>

            <groupId>org.springframework.boot</groupId>

            <artifactId>spring-boot-starter-actuator</artifactId>

        </dependency>
spring-cloud-starter-alibaba-nacos-discovery 在实现的时候提供了一个
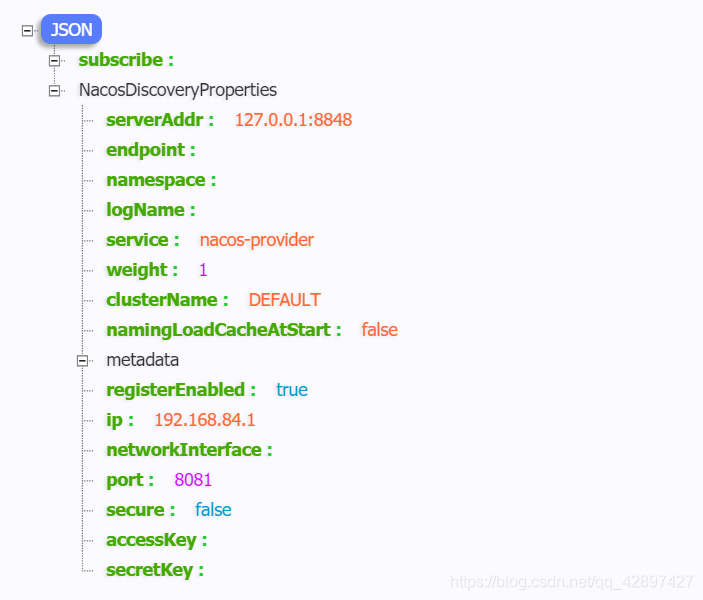
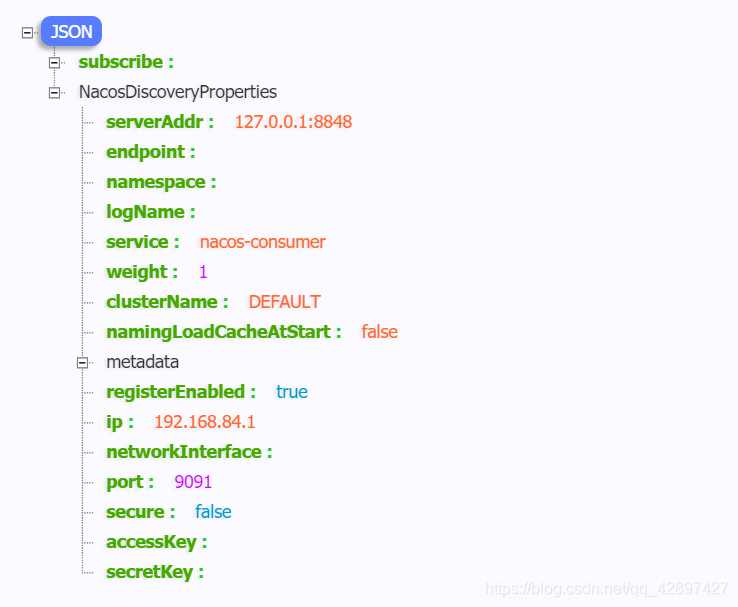
- EndPoint, EndPoint 的访问地址为 http://ip:port/actuator/nacos-discovery。
- EndPoint 的信息主要提供了两类:
1、subscribe: 显示了当前有哪些服务订阅者
2、NacosDiscoveryProperties: 显示了当前服务实例关于 Nacos 的基础配置
健康检查: 以指定方式检查服务下挂载的实例 (Instance) 的健康度,从而确认该实例 (Instance) 是否能提供服务。根据检查结果,实例 (Instance) 会被判断为健康或不健康。对服务发起解析请求时,不健康的实例 (Instance) 不会返回给客户端。
通过浏览器访问 http://localhost:8081/actuator/nacos-discovery 你会在浏览器上看到:
创建Maven alibaba-consumer-client
创建一个工程名为 alibaba-consumer-client 的服务提供者项目,pom.xml 配置如下:
        <!--  springboot 整合web组件-->

        <dependency>

            <groupId>org.springframework.boot</groupId>

            <artifactId>spring-boot-starter-web</artifactId>

        </dependency>

        <!-- springboot 整合 alibaba-nacos-discovery 注册中心 -->

        <dependency>

            <groupId>org.springframework.cloud</groupId>

            <artifactId>spring-cloud-starter-alibaba-nacos-discovery</artifactId>

        </dependency>
Yml 配置
spring:

  application:

    name: nacos-consumer

  cloud:

    nacos:

      discovery:

        server-addr: 192.168.100.22:8848

server:

  port: 9091

management:

  endpoints:

    web:

      exposure:

        include: "*"
启动类
import org.springframework.boot.SpringApplication;

import org.springframework.boot.autoconfigure.SpringBootApplication;

import org.springframework.cloud.client.discovery.EnableDiscoveryClient;

@SpringBootApplication

@EnableDiscoveryClient

public class NacosConsumerApplication {

    public static void main(String[] args) {

        SpringApplication.run(NacosConsumerApplication.class, args);

    }

}
Configuration
创建一个名为 NacosConsumerConfiguration 的 Java 配置类,主要作用是为了注入 RestTemplate
创建一个名为 NacosConsumerConfiguration 的 Java 配置类,主要作用是为了注入 RestTemplate
import org.springframework.context.annotation.Bean;

import org.springframework.context.annotation.Configuration;

import org.springframework.web.client.RestTemplate;

@Configuration

public class NacosConsumerConfiguration {

    @Bean

    public RestTemplate restTemplate() {

        return new RestTemplate();

    }

}
消费者Controller 调用生产者
import org.springframework.beans.factory.annotation.Autowired;

import org.springframework.beans.factory.annotation.Value;

import org.springframework.cloud.client.ServiceInstance;

import org.springframework.cloud.client.loadbalancer.LoadBalancerClient;

import org.springframework.web.bind.annotation.GetMapping;

import org.springframework.web.bind.annotation.RestController;

import org.springframework.web.client.RestTemplate;

@RestController

public class NacosConsumerController {

    @Autowired

    private LoadBalancerClient loadBalancerClient;

	/**

     * rpc 调用工具

     */

    @Autowired

    private RestTemplate restTemplate;

    @Value("${spring.application.name}")

    private String appName;

/**

     * 获取注册中心数据对象

     */

    @Autowired

    private DiscoveryClient discoveryClient;

    @GetMapping(value = "/echo/app/name")

    public String echo() {

        //使用 LoadBalanceClient 和 RestTemplate 结合的方式来访问

        ServiceInstance serviceInstance = loadBalancerClient.choose("nacos-provider");

        String url = String.format("http://%s:%s/echo/%s", serviceInstance.getHost(), serviceInstance.getPort(), appName);

        return restTemplate.getForObject(url, String.class);

    }

}

    @GetMapping("/login")

    public String login(){

       // 通过服务名获取到注册到nacos 的ip+端口地址信息(集群会获取多个)

        List<ServiceInstance> instances = discoveryClient.getInstances("nacos-provider");

        String ipAddr = instances.get(0).getUri().toString();

        String url  = ipAddr+"/getUserId?userId=123456789";

        // rpc 调用

        String result = restTemplate.getForObject(url, String.class);

        System.out.println("调用anacos-provider服务,result:" + result);

        return result;

    }
启动工程
通过浏览器访问 http://192.168.100.22:8848/nacos,即 Nacos Server 网址
你会发现多了一个名为 nacos-consumer 的服务

这时打开 http://localhost:9091/echo/app/name ,你会在浏览器上看到:
Hello Nacos Discovery nacos-consumer
如果输入 http://127.0.0.1:9091/login,你会在浏览器上看到:
userId : 123456789
服务的端点检查
通过浏览器访问 http://localhost:9091/actuator/nacos-discovery你会在浏览器上看到:
 > 上面我们使用了两种方式进行服务调用
- 一种是使用 DiscoveryClient 这个接口
- 一种是 使用 LoadBalancerClient 这个借口
创建一个 nacos-consumer-feign
Feign 是一个声明式的伪 Http 客户端,它使得写 Http 客户端变得更简单。使用 Feign,只需要创建一个接口并注解。它具有可插拔的注解特性,可使用 Feign 注解和 JAX-RS 注解。Feign 支持可插拔的编码器和解码器。Feign 默认集成了 Ribbon,Nacos 也很好的兼容了 Feign,默认实现了负载均衡的效果
创建一个工程名为 nacos-consumer-feign 的服务消费者项目,pom.xml 配置如下:
<?xml version="1.0" encoding="UTF-8"?>

<project xmlns="http://maven.apache.org/POM/4.0.0" xmlns:xsi="http://www.w3.org/2001/XMLSchema-instance"

         xsi:schemaLocation="http://maven.apache.org/POM/4.0.0 http://maven.apache.org/xsd/maven-4.0.0.xsd">

    <modelVersion>4.0.0</modelVersion>

    <parent>

        <artifactId>alibaba-dependencies</artifactId>

        <groupId>com.spiritmark.cloud</groupId>

        <version>1.0.0-SNAPSHOT</version>

    </parent>

    <artifactId>nacos-consumer-feign</artifactId>

    <packaging>jar</packaging>

    <name>nacos-consumer-feign</name>

    <url>http://www.spiritmark.com</url>

    <inceptionYear>2020-Now</inceptionYear>

    <dependencies>

        <!-- Spring Boot Begin -->

        <dependency>

            <groupId>org.springframework.boot</groupId>

            <artifactId>spring-boot-starter-web</artifactId>

        </dependency>

        <dependency>

            <groupId>org.springframework.boot</groupId>

            <artifactId>spring-boot-starter-actuator</artifactId>

        </dependency>

        <dependency>

            <groupId>org.springframework.boot</groupId>

            <artifactId>spring-boot-starter-test</artifactId>

            <scope>test</scope>

        </dependency>

        <!-- Spring Boot End -->

        <!-- Spring Cloud Begin -->

        <dependency>

            <groupId>org.springframework.cloud</groupId>

            <artifactId>spring-cloud-starter-alibaba-nacos-discovery</artifactId>

        </dependency>

        <dependency>

            <groupId>org.springframework.cloud</groupId>

            <artifactId>spring-cloud-starter-openfeign</artifactId>

        </dependency>

        <!-- Spring Cloud End -->

    </dependencies>

</project>
主要增加了 org.springframework.cloud:spring-cloud-starter-openfeign 依赖
Application
通过 @EnableFeignClients 注解开启 Feign 功能
import org.springframework.boot.SpringApplication;

import org.springframework.boot.autoconfigure.SpringBootApplication;

import org.springframework.cloud.client.discovery.EnableDiscoveryClient;

import org.springframework.cloud.openfeign.EnableFeignClients;

@SpringBootApplication

@EnableDiscoveryClient

@EnableFeignClients

public class NacosConsumerFeignApplication {

    public static void main(String[] args) {

        SpringApplication.run(NacosConsumerFeignApplication.class, args);

    }

}
创建Feign接口
通过 @FeignClient(“服务名”) 注解来指定调用哪个服务。代码如下:
import org.springframework.cloud.openfeign.FeignClient;

import org.springframework.web.bind.annotation.GetMapping;

import org.springframework.web.bind.annotation.PathVariable;

@FeignClient(value = "alibaba-provider-server")

public interface EchoService {

    @GetMapping(value = "/echo/{message}")

    String echo(@PathVariable("message") String message);

}
Controller
import org.springframework.beans.factory.annotation.Autowired;

import org.springframework.web.bind.annotation.GetMapping;

import org.springframework.web.bind.annotation.RestController;

@RestController

public class NacosConsumerFeignController {

    @Autowired

    private EchoService echoService;

    @GetMapping(value = "/echo/hi")

    public String echo() {

        return echoService.echo("Hi Feign");

    }

}
application.yml
spring:

  application:

    name: nacos-consumer-feign

  cloud:

    nacos:

      discovery:

        server-addr: 127.0.0.1:8848

server:

  port: 9092

management:

  endpoints:

    web:

      exposure:

        include: "*"
启动工程
通过浏览器访问 http://localhost:8848/nacos,即 Nacos Server 网址
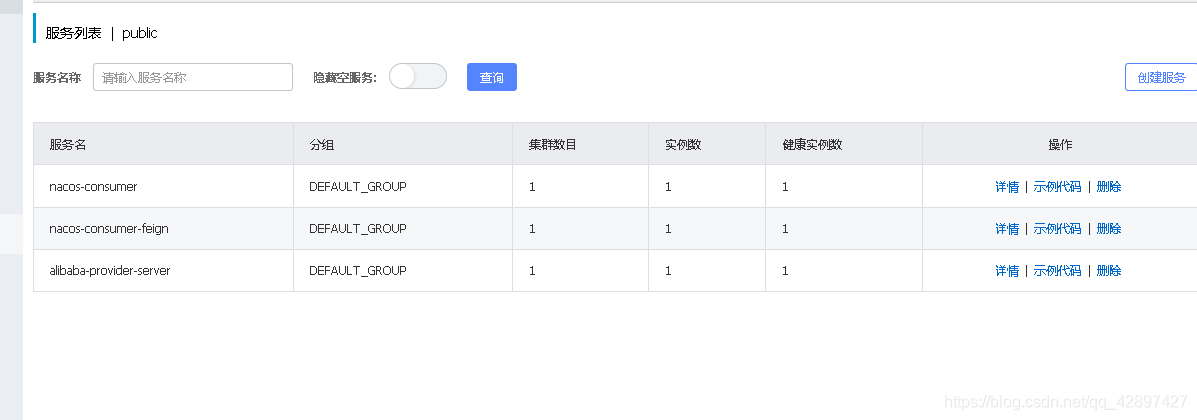 你会发现多了一个名为
 nacos-consumer-feign 的服务
这时打开 http://localhost:9092/echo/hi ,你会在浏览器上看到:
 看到上面这图也就是调用成功了
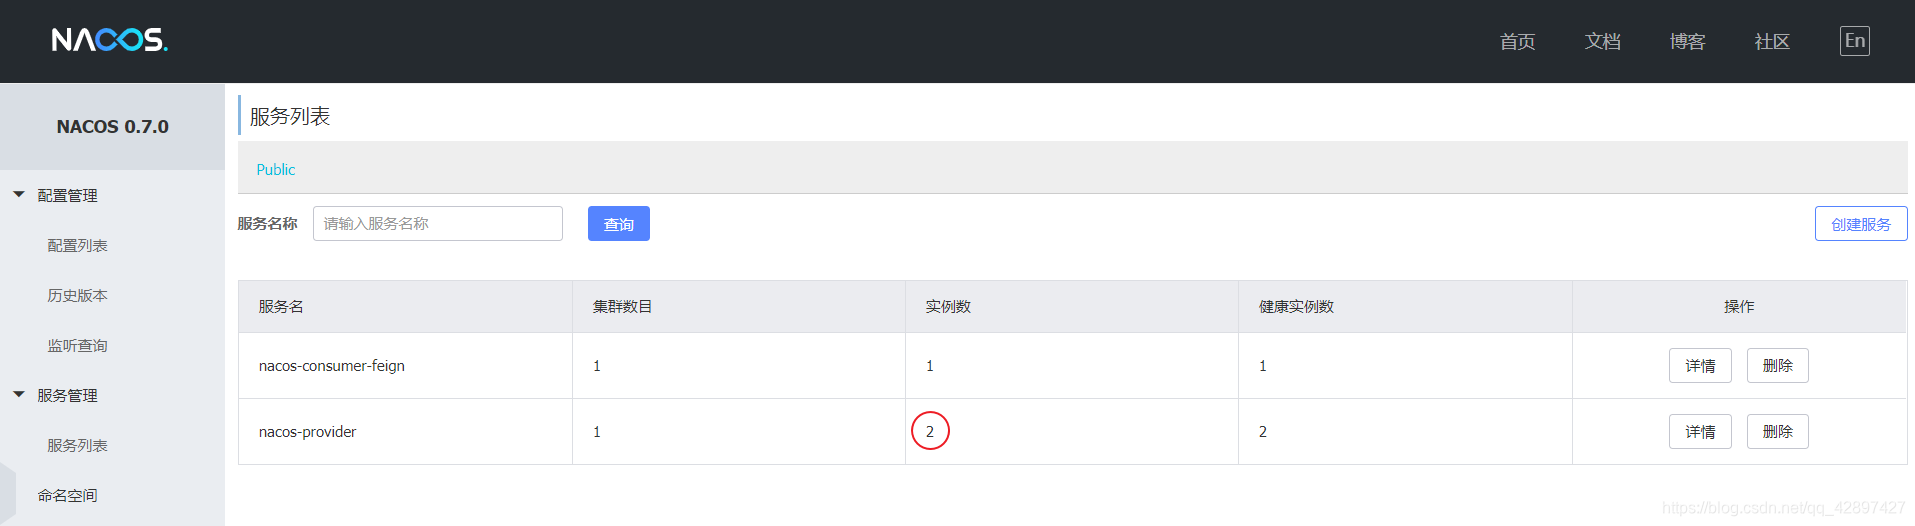
测试负载均衡
启动多个 consumer-provider 实例,效果图如下:

勾上它就可以启动多个实例了

 修改 consumer-provider 项目中的 Controller 代码,用于确定负载均衡生效
import org.springframework.beans.factory.annotation.Value;

import org.springframework.boot.SpringApplication;

import org.springframework.boot.autoconfigure.SpringBootApplication;

import org.springframework.cloud.client.discovery.EnableDiscoveryClient;

import org.springframework.web.bind.annotation.GetMapping;

import org.springframework.web.bind.annotation.PathVariable;

import org.springframework.web.bind.annotation.RestController;

@SpringBootApplication

@EnableDiscoveryClient

public class NacosProviderApplication {

    public static void main(String[] args) {

        SpringApplication.run(NacosProviderApplication.class, args);

    }

    @Value("${server.port}")

    private String port;

    @RestController

    public class EchoController {

        @GetMapping(value = "/echo/{message}")

        public String echo(@PathVariable String message) {

            return "Hello Nacos Discovery " + message + " i am from port " + port;

        }

    }
分布式配置中心
在分布式系统中,由于服务数量巨多,为了方便服务配置文件统一管理,实时更新,所以需要分布式配置中心组件
NacosConfig
Nacos 提供用于存储配置和其他元数据的 key/value 存储,为分布式系统中的外部化配置提供服务器端和客户端支持。使用 Spring Cloud Alibaba Nacos Config,您可以在 Nacos Server 集中管理你 Spring Cloud 应用的外部属性配置。
Spring Cloud Alibaba Nacos Config 是 Spring Cloud Config Server 和 Client 的替代方案,客户端和服务器上的概念与 Spring Environment 和 PropertySource 有着一致的抽象,在特殊的 bootstrap 阶段,配置被加载到 Spring 环境中。当应用程序通过部署管道从开发到测试再到生产时,您可以管理这些环境之间的配置,并确保应用程序具有迁移时需要运行的所有内容。
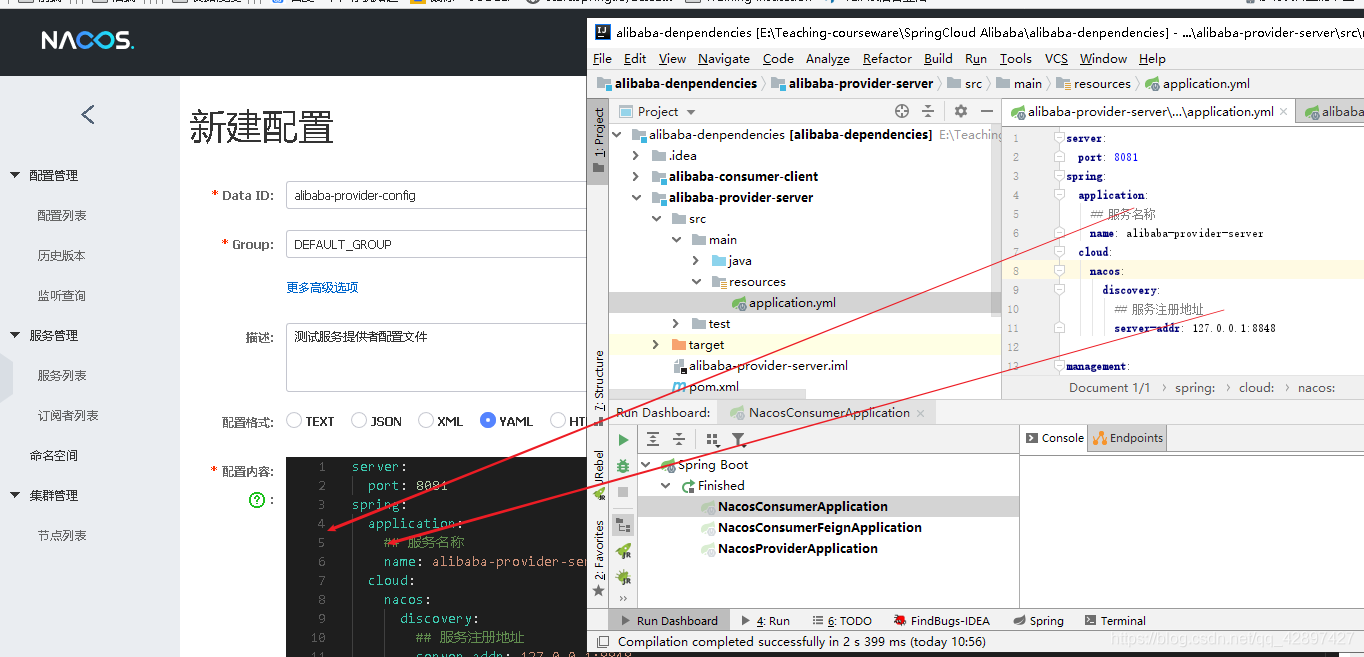
创建配置文件
需要在 Nacos Server 中创建配置文件,我们依然采用 YAML 的方式部署配置文件,操作流程如下:
- 浏览器打开 http://localhost:8848/nacos ,访问 Nacos Server
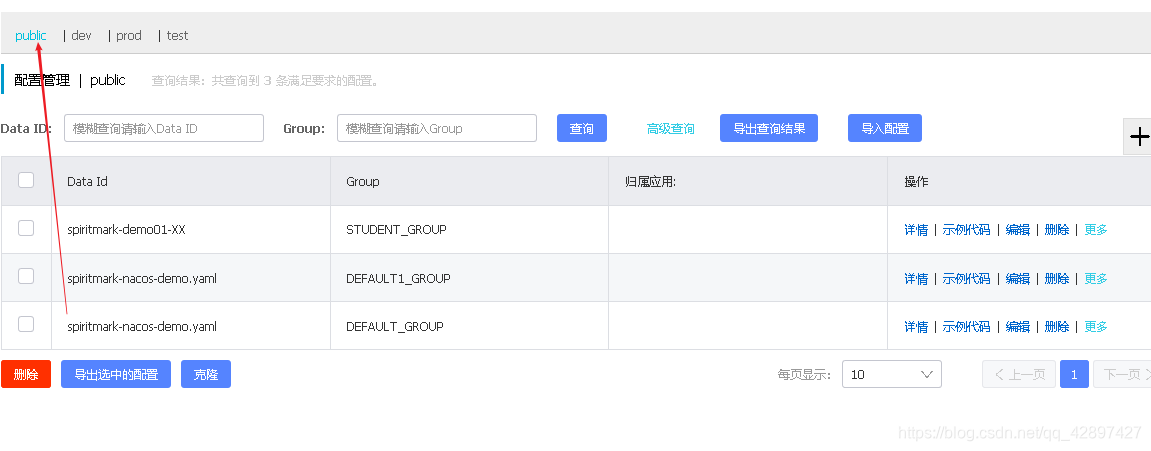
- 新建配置文件,此处我们以之前创建的 服务提供者 项目为例
将我们IDEA 上面的配置文件迁移上来
 注意:Data ID 的默认扩展名为 .yaml,希望使用 properties配置,此处必须指明是 .properties
发布成功后在 “配置列表” 一栏即可看到刚才创建的配置项

Nacos Config客户端的使用
POM
此处我们以之前创建的 服务提供者 项目为例
在 pom.xml 中增加 org.springframework.cloud:spring-cloud-starter-alibaba-nacos-config 依赖
<dependency>

    <groupId>org.springframework.cloud</groupId>

    <artifactId>spring-cloud-starter-alibaba-nacos-config</artifactId>

</dependency>
bootstrap.properties
注意:Spring Boot 配置文件的加载顺序,依次为 bootstrap.properties -> bootstrap.yml -> application.properties -> application.yml ,其中 bootstrap.properties 配置为最高优先级
创建名为 bootstrap.properties 的配置文件并删除之前创建的 application.yml 配置文件,由于已经在服务端配置,此处不再赘述
#指定开发环境

spring.profiles.active=dev

#服务器地址

spring.cloud.nacos.config.server-addr=127.0.0.1:8848

#默认为Public命名空间,可以省略不写

spring.cloud.nacos.config.namespace=public

#指定配置群组 --如果是Public命名空间 则可以省略群组配置

spring.cloud.nacos.config.group=DEFAULT_GROUP

#文件名 --  如果没有配置则默认为 ${spring.appliction.name}

spring.cloud.nacos.config.prefix=alibaba-provider-config

#指定文件后缀

spring.cloud.nacos.config.file-extension=yml

# 注册中心地址

spring.cloud.nacos.discovery.server-addr=127.0.0.1:8848
在Nacos-Server中新建配置,其中Data ID它的定义规则是:${prefix}-${spring.profile.active}.${file-extension}
- prefix 默认为 spring.application.name 的值,也可以通过配置项 spring.cloud.nacos.config.prefix 来配置
- spring.profile.active 即为当前环境对应的 profile,可以通过配置项 spring.profile.active 来配置。
- file-exetension 为配置内容的数据格式,可以通过配置项 spring.cloud.nacos.config.file-extension 来配置。目前只支持 properties 和 yaml 类型。
如果按照上面的配置则nacos配置中心一定要按照该约定配置!
注意:当 spring.profile.active 为空时,对应的连接符 - 也将不存在,dataId 的拼接格式变成 prefix.{prefix}.prefix.{file-extension}
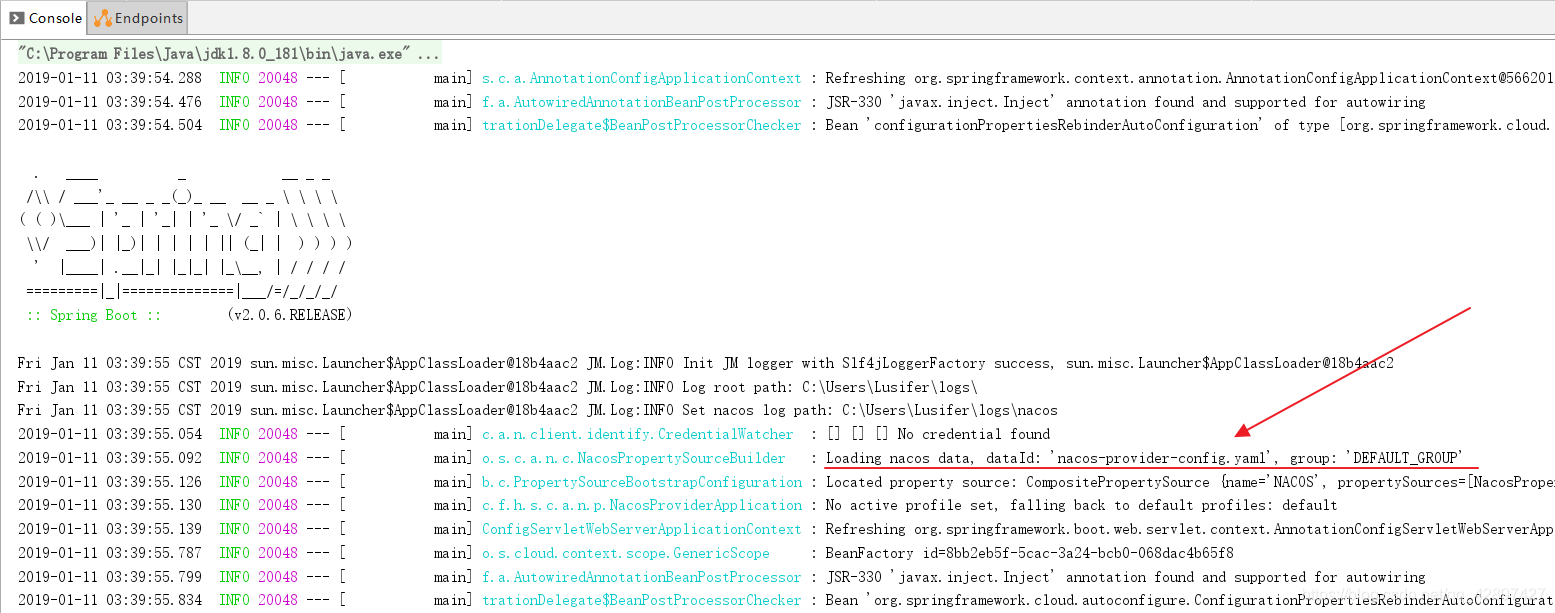
启动应用
启动应用后我们可以通过日志看到,已经成功加载到了配置文件
配置的动态更新
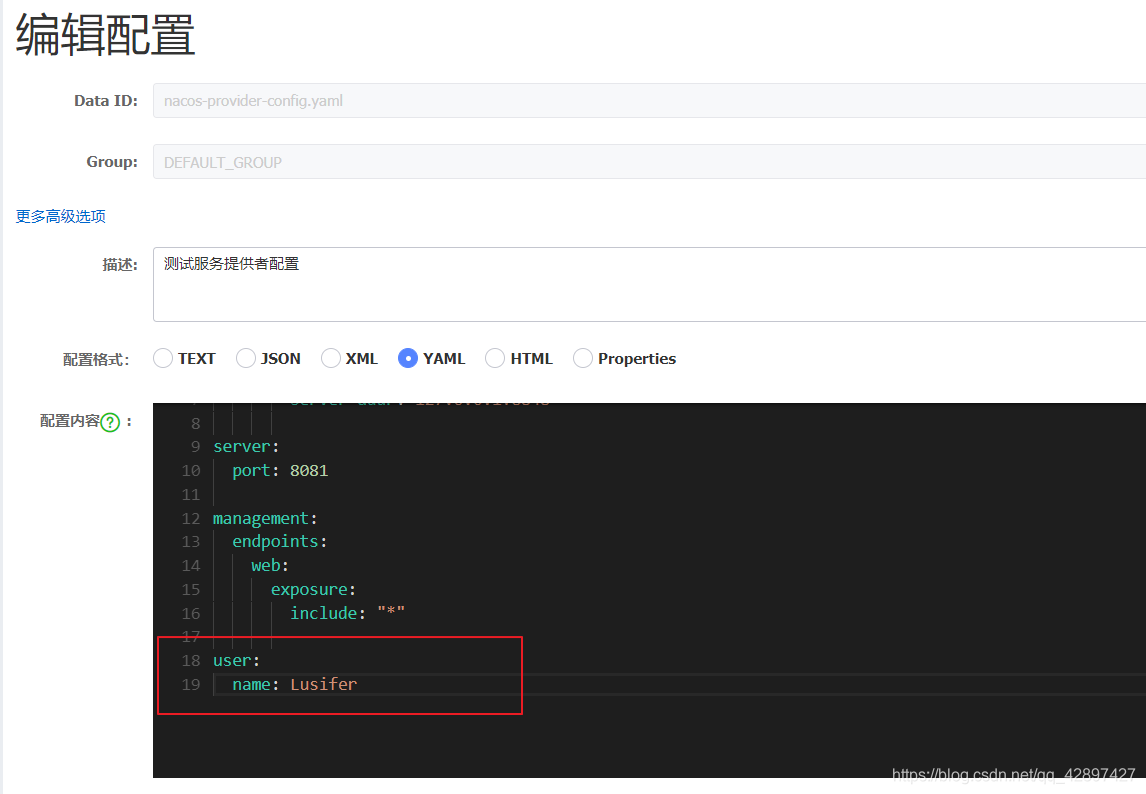
Nacos Config 也支持配置的动态更新,操作流程如下:
- 修改服务端配置,增加一个
user.name的属性
修改 Controller ,增加一个请求方法,测试配置更新效果
// 注入配置文件上下文

@Autowired

private ConfigurableApplicationContext applicationContext;

// 从上下文中读取配置

@GetMapping(value = "/hi")

public String sayHi() {

    return "Hello " + applicationContext.getEnvironment().getProperty("user.name");

}
通过浏览器访问该接口,浏览器显示
Hello Lusifer
- 修改服务端配置
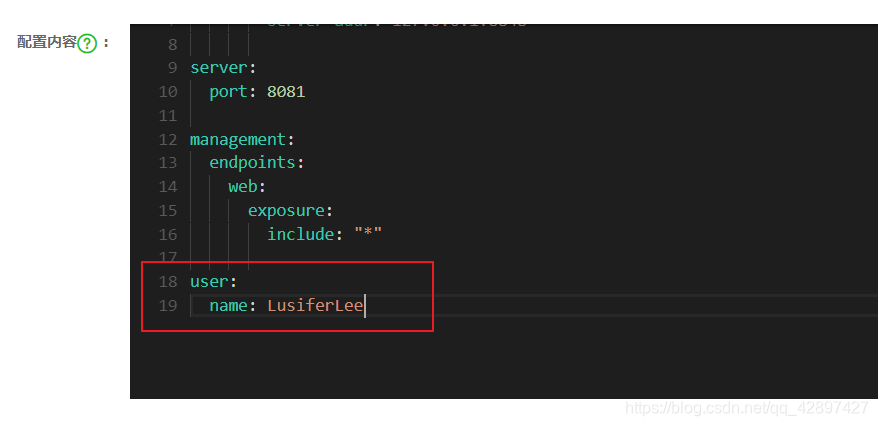
此时观察控制台日志,你会发现我们已经成功刷新了配置

- 刷新浏览器,浏览器显示
Hello LusiferLee
当然这里有一个问题,就是 如果你使用下面的方式去获取的话,你刷新配置还是没有改变
    @Value("${nacos.config}")

    private String config;

    @RequestMapping("/getValue")

    public String getValue() {

        return config;

    }
所以我们可以使用 @RefreshScope 注解,这样就可以了
    @SpringBootApplication

    @EnableDiscoveryClient

    @RestController

    @RefreshScope

    public class NacosConfigApplication {

        public static void main(String[] args) {

            SpringApplication.run(NacosConfigApplication.class, args);

        }

        @Value("${nacos.config}")

        private String config;

        @RequestMapping("/getValue")

        public String getValue() {

            return config;

        }

    }
注意:你可以使用 spring.cloud.nacos.config.refresh.enabled=false 来关闭动态刷新
谢谢大家的观看
Spring Cloud Alibaba基础教程-Nacos(三)的更多相关文章
- Spring Cloud Alibaba基础教程-Nacos(二)
在Spring Cloud Alibaba基础教程-Nacos(一)当中学习了,如何从 nacos当中 通过Java的方式获取值,以及连接数据库,下面我们开始第二篇的学习 ,如果对你有帮助,方便下次寻 ...
- Spring Cloud Alibaba基础教程-Nacos(一)
2019快结束,也有很久没写博客了,今天我们来谈谈Nacos,如果对您有帮助,麻烦左上角点个关注 ,谢谢 ! 嘻嘻 今天先写第一篇 文章目录 为什么要使用Nacos Eureka 闭源 Nacos的优 ...
- Spring Cloud Alibaba基础教程:Nacos的集群部署
继续说说生产环境的Nacos搭建,通过上一篇<Spring Cloud Alibaba基础教程:Nacos的数据持久化>的介绍,我们已经知道Nacos对配置信息的存储原理,在集群搭建的时候 ...
- Spring Cloud Alibaba基础教程:Nacos的数据持久化
前情回顾: <Spring Cloud Alibaba基础教程:使用Nacos实现服务注册与发现> <Spring Cloud Alibaba基础教程:支持的几种服务消费方式> ...
- Spring Cloud Alibaba基础教程:Nacos配置的多文件加载与共享配置
前情回顾: <Spring Cloud Alibaba基础教程:使用Nacos实现服务注册与发现> <Spring Cloud Alibaba基础教程:支持的几种服务消费方式> ...
- Spring Cloud Alibaba基础教程:Nacos配置的多环境管理
前情回顾: <Spring Cloud Alibaba基础教程:使用Nacos实现服务注册与发现> <Spring Cloud Alibaba基础教程:支持的几种服务消费方式> ...
- Spring Cloud Alibaba基础教程:Nacos配置的加载规则详解
前情回顾: <Spring Cloud Alibaba基础教程:使用Nacos实现服务注册与发现> <Spring Cloud Alibaba基础教程:支持的几种服务消费方式(Res ...
- Spring Cloud Alibaba基础教程:使用Nacos作为配置中心
通过本教程的前两篇: <Spring Cloud Alibaba基础教程:使用Nacos实现服务注册与发现> <Spring Cloud Alibaba基础教程:支持的几种服务消费方 ...
- Spring Cloud Alibaba基础教程:使用Nacos实现服务注册与发现
自Spring Cloud Alibaba发布第一个Release以来,就备受国内开发者的高度关注.虽然Spring Cloud Alibaba还没能纳入Spring Cloud的主版本管理中,但是凭 ...
随机推荐
- guitar pro 系列教程(六):Guitar Pro音频导出功能之RSE音源
让我们继续进行guitar pro的教程 上一章节,我们讲解了guitar Pro的播放与显示功能,在Guita pro的音源选择中分为两类,一种是自带的RES高保真音源,一种是MIDI输入音源.如果 ...
- Java里的数组降序
Java升序容易,降序不易. 基本类型不能降序,至少要是包装类. 升序使用Arrays.sort() 降序要么使用Collections.reverse,要么实现Comparator接口 import ...
- 终于有人把鸿蒙OS讲明白了,大佬讲解!快收藏!
来自 | GitHub科技 本文面向的是开发人员,主要想通过科普让大家了解一下鸿蒙开发.接下来,我想给大家科普一下这个这么火的鸿蒙系统. 到底什么是鸿蒙 OS 在官网上看到鸿蒙 OS 的简介是,分布式 ...
- 程序媛数据报告:近三年增长至70%,平均月薪1.54W,女性程序媛并不是特殊物种
- LeetCode 025 Reverse Nodes in k-Group
题目描述:Reverse Nodes in k-Group Given a linked list, reverse the nodes of a linked list k at a time an ...
- Spring Boot + Elasticsearch 使用示例
本文分别使用 Elasticsearch Repository 和 ElasticsearchTemplate 实现 Elasticsearch 的简单的增删改查 一.Elastic Stack El ...
- 大厂是如何用DevCloud流水线实现自动化部署Web应用的?
DevUI是一支兼具设计视角和工程视角的团队,服务于华为云DevCloud平台和华为内部数个中后台系统,服务于设计师和前端工程师. 官方网站:devui.design Ng组件库:ng-devui(欢 ...
- 学习工具---maven
写在前面 为什么要用maven? 作为一跨平台的项目管理工具,它有着以下丰富的应用场景: 作为程序员,有相当一部分时间花在编译.运行单元测试.生成文档.打包.部署和发布等不起眼的工作上,而maven将 ...
- PyQt(Python+Qt)学习随笔:QTreeWidgetItem项列图标的访问方法
老猿Python博文目录 专栏:使用PyQt开发图形界面Python应用 老猿Python博客地址 树型部件QTreeWidget中的QTreeWidgetItem项中可以有多列数据,每列数据都可以设 ...
- 第11.9节 Python正则表达式的贪婪模式和非贪婪模式
在使用正则表达式时,匹配算法存在贪婪模式和非贪婪模式两种模式,在<第11.8节 Pytho正则表达式的重复匹配模式及元字符"?". "*". " ...