30分钟学会使用Spring Web Services基础开发
时隔一年终于又推出了一篇30分钟系列,上一篇《30分钟学会反向Ajax》是2016年7月的事情了。时光荏苒,岁月穿梭。虽然一直还在从事Java方面的开发工作,但是私下其实更喜欢使用C++。不过今天,我们要再次回归到Java的主题,来谈一谈如何使用——Spring Web Services框架。
Spring Web Services(下简称ws)本质上是基于SpringBoot的项目,因此如果有对SpringBoot不太了解的同学,回头再来看比较合适。
ws分为server端与client端两个部分,本文旨在介绍框架搭建的流程与重点。
一、ws.server端搭建
建立Server的关键是首先建立xsd文件。xsd文件是xml文件的定义与基础,你希望别人如何访问与获取你的数据都需要在xsd文件中说明。
countries.xsd
<xs:schema xmlns:xs="http://www.w3.org/2001/XMLSchema"

    xmlns:tns="http://learnhow.org/ws/schema" targetNamespace="http://learnhow.org/ws/schema"

    elementFormDefault="qualified">

    <xs:element name="getCountryRequest">

        <xs:complexType>

            <xs:sequence>

                <xs:element name="name" type="xs:string" />

            </xs:sequence>

        </xs:complexType>

    </xs:element>

    <xs:element name="getCountryResponse">

        <xs:complexType>

            <xs:sequence>

                <xs:element name="country" type="tns:country" />

            </xs:sequence>

        </xs:complexType>

    </xs:element>

    <xs:complexType name="country">

        <xs:sequence>

            <xs:element name="name" type="xs:string" />

            <xs:element name="population" type="xs:int" />

            <xs:element name="capital" type="xs:string" />

            <xs:element name="currency" type="tns:currency" />

            <xs:element name="language" type="tns:language" />

        </xs:sequence>

    </xs:complexType>

    <xs:simpleType name="currency">

        <xs:restriction base="xs:string">

            <xs:enumeration value="GBP" />

            <xs:enumeration value="EUR" />

            <xs:enumeration value="PLN" />

        </xs:restriction>

    </xs:simpleType>

    <xs:complexType name="language">

        <xs:sequence>

            <xs:element name="name" type="xs:string" />

        </xs:sequence>

    </xs:complexType>

</xs:schema>
users.xsd
<xs:schema xmlns:xs="http://www.w3.org/2001/XMLSchema"

    xmlns:tns="http://learnhow.org/ws/schema" targetNamespace="http://learnhow.org/ws/schema"

    elementFormDefault="qualified">

    <xs:element name="getUserRequest">

        <xs:complexType>

            <xs:sequence>

                <xs:element name="name" type="xs:string" />

            </xs:sequence>

        </xs:complexType>

    </xs:element>

    <xs:element name="getUserResponse">

        <xs:complexType>

            <xs:sequence>

                <xs:element name="user" type="tns:user" />

            </xs:sequence>

        </xs:complexType>

    </xs:element>

    <xs:complexType name="user">

        <xs:sequence>

            <xs:element name="name" type="xs:string" />

            <xs:element name="gender" type="tns:gender" />

            <xs:element name="age" type="xs:int" />

            <xs:element name="address" type="xs:string" />

        </xs:sequence>

    </xs:complexType>

    <xs:simpleType name="gender">

        <xs:restriction base="xs:string">

            <xs:enumeration value="MALE" />

            <xs:enumeration value="FEMALE" />

        </xs:restriction>

    </xs:simpleType>

</xs:schema>
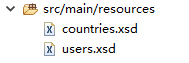
这两个文件默认请存放于 src/main/resources 目录下,如下图所示:
建立完成以后我们可以着手编写pom.xml文件,即建立工程依赖。
<project xmlns="http://maven.apache.org/POM/4.0.0" xmlns:xsi="http://www.w3.org/2001/XMLSchema-instance"

    xsi:schemaLocation="http://maven.apache.org/POM/4.0.0 http://maven.apache.org/xsd/maven-4.0.0.xsd">

    <modelVersion>4.0.0</modelVersion>

    <groupId>org.learnhow</groupId>

    <artifactId>ws.server</artifactId>

    <version>0.0.1-SNAPSHOT</version>

    <packaging>jar</packaging>

    <name>ws.server</name>

    <url>http://maven.apache.org</url>

    <parent>

        <groupId>org.springframework.boot</groupId>

        <artifactId>spring-boot-starter-parent</artifactId>

        <version>1.5.4.RELEASE</version>

    </parent>

    <properties>

        <maven.compiler.source>1.8</maven.compiler.source>

        <maven.compiler.target>1.8</maven.compiler.target>

        <project.build.sourceEncoding>UTF-8</project.build.sourceEncoding>

    </properties>

    <dependencies>

        <dependency>

            <groupId>org.springframework.boot</groupId>

            <artifactId>spring-boot-starter-web-services</artifactId>

        </dependency>

        <dependency>

            <groupId>wsdl4j</groupId>

            <artifactId>wsdl4j</artifactId>

        </dependency>

        <dependency>

            <groupId>junit</groupId>

            <artifactId>junit</artifactId>

            <scope>test</scope>

        </dependency>

    </dependencies>

    <build>

        <plugins>

            <plugin>

                <groupId>org.codehaus.mojo</groupId>

                <artifactId>jaxb2-maven-plugin</artifactId>

                <version>1.6</version>

                <executions>

                    <execution>

                        <id>xjc</id>

                        <goals>

                            <goal>xjc</goal>

                        </goals>

                    </execution>

                </executions>

                <configuration>

                    <schemaDirectory>${project.basedir}/src/main/resources/</schemaDirectory>

                    <outputDirectory>${project.basedir}/src/main/java</outputDirectory>

                    <clearOutputDir>false</clearOutputDir>

                </configuration>

            </plugin>

        </plugins>

    </build>

</project>
重点是最后的一项maven plugin,它会读取resources目录下的xsd文件并在 src/main/java 目录下建立.java文件。需要注意的是代码的package路径是通过xsd的targetNamespace事先指定的。
代码文件被maven创建完成以后代表第一段工作顺利完成。下面我们需要人工编写Endpoint类,即建立对外访问的服务接口。通常你提供了几分xsd文件就应该创建几个Endpoint类。Endpoint本质上是接收一个request,然后经过你的业务逻辑再返回一个response。与传统意义上的浏览器不同,后者通常传输json字符串,而前者则是xml。
CountryEndpoint
package org.learnhow.ws.server;

import org.learnhow.ws.schema.GetCountryRequest;

import org.learnhow.ws.schema.GetCountryResponse;

import org.springframework.beans.factory.annotation.Autowired;

import org.springframework.ws.server.endpoint.annotation.Endpoint;

import org.springframework.ws.server.endpoint.annotation.PayloadRoot;

import org.springframework.ws.server.endpoint.annotation.RequestPayload;

import org.springframework.ws.server.endpoint.annotation.ResponsePayload;

@Endpoint

public class CountryEndpoint {

    private static final String NAMESPACE_URI = "http://learnhow.org/ws/schema";

    @Autowired

    private CountryRepository countryRepository;

    @PayloadRoot(namespace = NAMESPACE_URI, localPart = "getCountryRequest")

    @ResponsePayload

    public GetCountryResponse getCountry(@RequestPayload GetCountryRequest request) {

        GetCountryResponse response = new GetCountryResponse();

        response.setCountry(countryRepository.findCountry(request.getName()));

        return response;

    }

}
UserEndpoint
package org.learnhow.ws.server;

import org.learnhow.ws.schema.GetUserRequest;

import org.learnhow.ws.schema.GetUserResponse;

import org.springframework.beans.factory.annotation.Autowired;

import org.springframework.ws.server.endpoint.annotation.Endpoint;

import org.springframework.ws.server.endpoint.annotation.PayloadRoot;

import org.springframework.ws.server.endpoint.annotation.RequestPayload;

import org.springframework.ws.server.endpoint.annotation.ResponsePayload;

@Endpoint

public class UserEndpoint {

    private static final String NAMESPACE_URI = "http://learnhow.org/ws/schema";

    @Autowired

    private UserRepository userRepository;

    @PayloadRoot(namespace = NAMESPACE_URI, localPart = "getUserRequest")

    @ResponsePayload

    public GetUserResponse getUser(@RequestPayload GetUserRequest request) {

        GetUserResponse response = new GetUserResponse();

        response.setUser(userRepository.findUser(request.getName()));

        return response;

    }

}
很显然你的业务逻辑应该封装在CountryRepository和UserRepository对象里。接下来创建CountryRepository对象。
CountryRepository
package org.learnhow.ws.server;

import java.util.HashMap;

import java.util.Map;

import javax.annotation.PostConstruct;

import org.learnhow.ws.schema.Country;

import org.learnhow.ws.schema.Currency;

import org.learnhow.ws.schema.Language;

import org.springframework.stereotype.Component;

@Component

public class CountryRepository {

    private static final Map<String, Country> countries = new HashMap<>();

    @PostConstruct

    public void initData() {

        Country spain = new Country();

        spain.setName("Spain");

        spain.setCapital("Madrid");

        spain.setCurrency(Currency.EUR);

        spain.setPopulation(46704314);

        Language spanish = new Language();

        spanish.setName("spanish");

        spain.setLanguage(spanish);

        Country poland = new Country();

        poland.setName("Poland");

        poland.setCapital("Warsaw");

        poland.setCurrency(Currency.PLN);

        poland.setPopulation(38186860);

        Language polish = new Language();

        polish.setName("polish");

        poland.setLanguage(polish);

        Country uk = new Country();

        uk.setName("United Kingdom");

        uk.setCapital("London");

        uk.setCurrency(Currency.GBP);

        uk.setPopulation(63705000);

        Language english = new Language();

        english.setName("english");

        uk.setLanguage(english);

        countries.put(spain.getName(), spain);

        countries.put(poland.getName(), poland);

        countries.put(uk.getName(), uk);

    }

    public Country findCountry(String name) {

        return countries.get(name);

    }

}
UserRepository(略)
最后是编写configuration,它是整个框架调用的核心。
package org.learnhow.ws.server;

import org.springframework.boot.web.servlet.ServletRegistrationBean;

import org.springframework.context.ApplicationContext;

import org.springframework.context.annotation.Bean;

import org.springframework.context.annotation.Configuration;

import org.springframework.core.io.ClassPathResource;

import org.springframework.ws.config.annotation.EnableWs;

import org.springframework.ws.config.annotation.WsConfigurerAdapter;

import org.springframework.ws.transport.http.MessageDispatcherServlet;

import org.springframework.ws.wsdl.wsdl11.DefaultWsdl11Definition;

import org.springframework.xml.xsd.SimpleXsdSchema;

import org.springframework.xml.xsd.XsdSchema;

@EnableWs

@Configuration

public class WebServiceConfig extends WsConfigurerAdapter {

    @Bean

    public ServletRegistrationBean messageDispatcherServlet(ApplicationContext applicationContext) {

        MessageDispatcherServlet servlet = new MessageDispatcherServlet();

        servlet.setApplicationContext(applicationContext);

        servlet.setTransformWsdlLocations(true);

        return new ServletRegistrationBean(servlet, "/ws/*");

    }

    @Bean(name = "countries")

    public DefaultWsdl11Definition defaultWsdl11DefinitionCountry() {

        DefaultWsdl11Definition wsdl11Definition = new DefaultWsdl11Definition();

        wsdl11Definition.setPortTypeName("CountriesPort");

        wsdl11Definition.setLocationUri("/ws");

        wsdl11Definition.setTargetNamespace("http://learnhow.org/ws/schema");

        wsdl11Definition.setSchema(countriesSchema());

        return wsdl11Definition;

    }

    @Bean(name = "users")

    public DefaultWsdl11Definition defaultWsdl11DefinitionUser() {

        DefaultWsdl11Definition wsdl11Definition = new DefaultWsdl11Definition();

        wsdl11Definition.setPortTypeName("CountriesPort");

        wsdl11Definition.setLocationUri("/ws");

        wsdl11Definition.setTargetNamespace("http://learnhow.org/ws/schema");

        wsdl11Definition.setSchema(usersSchema());

        return wsdl11Definition;

    }

    @Bean

    public XsdSchema countriesSchema() {

        return new SimpleXsdSchema(new ClassPathResource("countries.xsd"));

    }

    @Bean

    public XsdSchema usersSchema() {

        return new SimpleXsdSchema(new ClassPathResource("users.xsd"));

    }

}
最后一步:编写启动项Application
package org.learnhow.ws;

import org.springframework.boot.SpringApplication;

import org.springframework.boot.autoconfigure.SpringBootApplication;

@SpringBootApplication

public class Application {

    public static void main(String[] args) {

        SpringApplication.run(Application.class, args);

    }

}
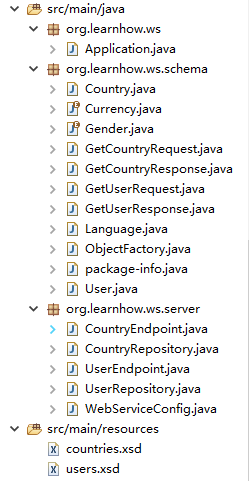
完成的目录结构如下:
二、测试
启动application,打开浏览器访问:http://localhost:8080/ws/countries.wsdl与http://localhost:8080/ws/users.wsdl 如果页面分别展示了两份xml文件代表服务器已经可以正常运行了。也可以用SoapUI Pro进一步测试数据的读取和发送是否正常。
三、ws.client端搭建
如果说server端是通过xsd产生java与WSDL的过程那么client端就恰恰相反。我们还是使用maven工具通过服务器暴露在外的wsdl文件建立java对象。首先编辑pom.xml文件配置依赖和wsdl访问路径。
<project xmlns="http://maven.apache.org/POM/4.0.0" xmlns:xsi="http://www.w3.org/2001/XMLSchema-instance"

    xsi:schemaLocation="http://maven.apache.org/POM/4.0.0 http://maven.apache.org/maven-v4_0_0.xsd">

    <modelVersion>4.0.0</modelVersion>

    <groupId>org.learnhow</groupId>

    <artifactId>ws.client</artifactId>

    <packaging>jar</packaging>

    <version>0.0.1-SNAPSHOT</version>

    <properties>

        <maven.compiler.source>1.8</maven.compiler.source>

        <maven.compiler.target>1.8</maven.compiler.target>

    </properties>

    <parent>

        <groupId>org.springframework.boot</groupId>

        <artifactId>spring-boot-starter-parent</artifactId>

        <version>1.5.4.RELEASE</version>

    </parent>

    <dependencies>

        <dependency>

            <groupId>org.springframework.boot</groupId>

            <artifactId>spring-boot-starter</artifactId>

        </dependency>

        <dependency>

            <groupId>org.springframework.ws</groupId>

            <artifactId>spring-ws-core</artifactId>

        </dependency>

    </dependencies>

    <build>

        <plugins>

            <plugin>

                <groupId>org.springframework.boot</groupId>

                <artifactId>spring-boot-maven-plugin</artifactId>

            </plugin>

            <plugin>

                <groupId>org.jvnet.jaxb2.maven2</groupId>

                <artifactId>maven-jaxb2-plugin</artifactId>

                <version>0.13.2</version>

                <executions>

                    <execution>

                        <goals>

                            <goal>generate</goal>

                        </goals>

                    </execution>

                </executions>

                <configuration>

                    <schemaLanguage>WSDL</schemaLanguage>

                    <generatePackage>ws.wsdl</generatePackage>

                    <schemas>

                        <schema>

                            <url>http://localhost:8080/ws/countries.wsdl</url>

                        </schema>

                        <schema>

                            <url>http://localhost:8080/ws/users.wsdl</url>

                        </schema>

                    </schemas>

                </configuration>

            </plugin>

        </plugins>

    </build>

</project>
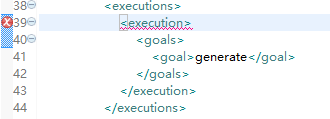
这里要注意,如果此时你已经将server的进程停止,也就是wsdl无法访问,pom.xml文件会报错。看上去大概会像这样:
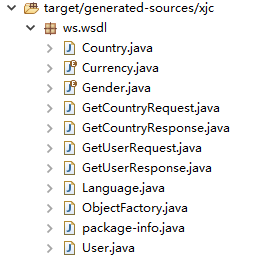
正常情况下maven会自动帮你在target目录下建立java对象,目录结构如下:
如果你发现无法正常建立java对象,请首先检查以下两点:
maven引入的依赖是否完整:国内的网络环境不是很好,有时候通过maven搭建环境经常会在运行时报出各种莫名其妙的错误。其中绝大多数其实都是由于依赖引入不完整造成的。此时你可能需要对Maven Dependencies目录下的jar包逐一检查。
maven结构错误:maven的版本很多,不同的版本间可能在元素的结构定义上有所差距。如果在<plugins>节点报错可以考虑在外层再包一层<pluginManagement>节点。具体原因我也没有深究,只能说“有时管用”,如果你对maven有深入的了解也希望告诉我。
如果以上环境你进行的都很顺利,那么恭喜你80%的工作已经完成了。
下面是编写client客户端代码:
package org.learnhow.ws.client;

import org.springframework.ws.client.core.support.WebServiceGatewaySupport;

import org.springframework.ws.soap.client.core.SoapActionCallback;

import ws.wsdl.GetCountryRequest;

import ws.wsdl.GetCountryResponse;

public class CountryClient extends WebServiceGatewaySupport {

    public static final String URI = "http://localhost:8080/ws";

    public static final String SOAPACTION = "http://learnhow.org/ws/schema/getUserRequest";

    public GetCountryResponse getCountry(String countryName) {

        GetCountryRequest request = new GetCountryRequest();

        request.setName(countryName);

        GetCountryResponse response = (GetCountryResponse) getWebServiceTemplate().marshalSendAndReceive(URI, request,

                new SoapActionCallback(SOAPACTION));

        return response;

    }

}
UserClient(略)
然后依然是创建configuration供框架调用
package org.learnhow.ws.client;

import org.springframework.context.annotation.Bean;

import org.springframework.context.annotation.Configuration;

import org.springframework.oxm.jaxb.Jaxb2Marshaller;

@Configuration

public class AppConfiguration {

    @Bean

    public Jaxb2Marshaller marshaller() {

        Jaxb2Marshaller marshaller = new Jaxb2Marshaller();

        marshaller.setContextPath("ws.wsdl");

        return marshaller;

    }

    @Bean("country")

    public CountryClient counrtyClient(Jaxb2Marshaller marshaller) {

        CountryClient client = new CountryClient();

        client.setDefaultUri(CountryClient.URI);

        client.setMarshaller(marshaller);

        client.setUnmarshaller(marshaller);

        return client;

    }

    @Bean("user")

    public UserClient userClient(Jaxb2Marshaller marshaller) {

        UserClient client = new UserClient();

        client.setDefaultUri(UserClient.URI);

        client.setMarshaller(marshaller);

        client.setUnmarshaller(marshaller);

        return client;

    }

}
最后是编写Application启动项
package org.learnhow.ws;

import org.learnhow.ws.client.CountryClient;

import org.learnhow.ws.client.UserClient;

import org.springframework.boot.CommandLineRunner;

import org.springframework.boot.SpringApplication;

import org.springframework.boot.autoconfigure.SpringBootApplication;

import org.springframework.context.annotation.Bean;

import ws.wsdl.GetCountryResponse;

import ws.wsdl.GetUserResponse;

@SpringBootApplication

public class Application {

    public static void main(String[] args) {

        SpringApplication.run(Application.class, args);

    }

    @Bean

    CommandLineRunner lookup(CountryClient client) {

        return args -> {

            String countryName = "Spain";

            if (args.length > 0) {

                countryName = args[0];

            }

            GetCountryResponse response = client.getCountry(countryName);

            System.out.println("response: " + response.getCountry().getName());

        };

    }

}
运行application,如果你能看到控制台有 "response: Spain" 打出代表数据已经能够正常获取。
后记:
本文的代码逻辑主要参考了Spring Web Services官网文档。另外WebService除了通过Spring还有多种实现手段,感兴趣的同学可以看看如何使用wsimport工具以及Tomcat发布WebService的例子。这里不再赘述。
30分钟学会使用Spring Web Services基础开发的更多相关文章
- 【grunt第二弹】30分钟学会使用grunt打包前端代码(02)
前言 上一篇博客,我们简单的介绍了grunt的使用,一些基础点没能覆盖,我们今天有必要看看一些基础知识 [grunt第一弹]30分钟学会使用grunt打包前端代码 配置任务/grunt.initCon ...
- 30 分钟学会 Flex 布局
30 分钟学会 Flex 布局 有酒 617 人赞同了该文章 为什么我要写这一篇关于 Flex 布局的教程? 因为它十分简单灵活,区区简单几行代码就可以实现各种页面的的布局,以前我在学习页面布局的 ...
- 30分钟学会如何使用Shiro
本篇内容大多总结自张开涛的<跟我学Shiro>原文地址:http://jinnianshilongnian.iteye.com/blog/2018936 我并没有全部看完,只是选择了一部分 ...
- 30分钟学会Docker里面开启k8s(Kubernetes)登录仪表盘(图文讲解)
前言 我们之前搭建了第一个docker项目: windows环境30分钟从0开始快速搭建第一个docker项目(带数据库交互):https://www.cnblogs.com/xiongze520/p ...
- 30分钟学会XAML
1.狂妄的WPF 相对传统的Windows图形编程,需要做很多复杂的工作,引用许多不同的API.例如:WinForm(带控件表单).GDI+(2D图形).DirectX API(3D图形)以及流媒体和 ...
- Web Services基础学习(W3C)
1.Web services 使用 XML 来编解码数据,并使用 SOAP 来传输数据 2.基础的 Web Services 平台是 XML + HTTP. Web services 平台的元素: S ...
- 教你30分钟学会XAML
1.狂妄的WPF 相对传统的Windows图形编程,需要做很多复杂的工作,引用许多不同的API.例如:WinForm(带控件表单).GDI+(2D图形).DirectX API(3D图形)以及流媒体和 ...
- 转:30分钟学会如何使用Shiro
引自:http://www.cnblogs.com/learnhow/p/5694876.html 本篇内容大多总结自张开涛的<跟我学Shiro>原文地址:http://jinniansh ...
- 30分钟学会如何使用Shiro(转自:http://www.cnblogs.com/learnhow/p/5694876.html)
本篇内容大多总结自张开涛的<跟我学Shiro>原文地址:http://jinnianshilongnian.iteye.com/blog/2018936 我并没有全部看完,只是选择了一部分 ...
随机推荐
- 如何通过JS实现简单抖动效果
<!DOCTYPE html><html lang="en"><head> <meta charset="UTF-8" ...
- 关于python编译的一点小结
大家都知道python是脚本语言,源码可以直接执行,有时需要提高执行效率或者保密(因为有时候不想让使用人看到源码文件),那就涉及到python编译了,那么该如何做呢? 有两种方法可以做到. 1.一种是 ...
- 【Python3之常用模块】
一.time 1.三种表达方式 在Python中,通常有这几种方式来表示时间: 时间戳(timestamp):通常来说,时间戳表示的是从1970年1月1日00:00:00开始按秒计算的偏移量.命令如下 ...
- Eclipse导入项目常见问题----乱码问题03
有时打开导入的项目文件时,会出现如下图情况: 解决方法 如下图步骤所示: 此时,我们可以看到文件正常了 jdk版本问题(有个红色感叹号)01:http://blog.csdn.net/baidu_37 ...
- 如何用VS进行程序调试
VS是一个强大的IDE,如果你现在只会简单地用它查看一下执行效果,那就太大材小用了. 1. CRT函数报错 首先来说说最常见的一个编译错误.微信里常常收到这个错误的截图提问. CRT(C Runtim ...
- 什么时候该选用Xamarin?
现在开发app也好,桌面程序也好,有很多不同的技术可以选择.那么,什么时候应该选用Xamarin呢? 5 questions to consider before choosing Xamarin 1 ...
- 使用FlashWavRecorder实现浏览器录制wav音频和上传音频文件,兼容IE8以上浏览器
前言:本项目基于github开源插件实现,该插件使用flash实现,兼容IE8以上浏览器 感谢michalstocki的分享该项目,github项目地址:https://github.com/mich ...
- 前端开发规范:命名规范、html 规范、css 规范、js 规范
上周小组的培训内容是代码可读性艺术,主要分享如何命名.如何优化代码排版,如何写好的注释.我们都知道写出优雅的代码是成为大牛的必经之路. 下面感谢一位前端开发小伙伴总结的前端开发规范,通过学习相关开发规 ...
- 原生javascript实现网页显示日期时钟效果
刚接触javascript中Date内置对象时,以为这些方法都太简单了,结果要自己实际操作写一个时钟效果还真一时把我难住了,主要有几点大家要注意的.先看实际效果 要实现这样的效果 某年某月某日星期几几 ...
- PHP完成一个日历
今天我们就用php中的数组合date 做一个日历. 先让我们回顾一下PHP里面的date . 1.时间戳:表示从计算机元年/UNIX纪年(0时区 1970/1/1 00:00:00)到当前事件的秒数. ...