
Netty 聊天小程序
这节讲解基于 Netty 快速实现一个聊天小程序。
一、服务端
1. SimpleChatServerHandler(处理器类)
该类主要实现了接收来自客户端的消息并转发给其他客户端。
 /**

  * 服务端处理器

  */

 public class SimpleChatServerHandler extends SimpleChannelInboundHandler<String> {

     public static ChannelGroup channels

         = new DefaultChannelGroup(GlobalEventExecutor.INSTANCE);

     /**

      * 收到新的客户端连接时调用

      * 将客户端channel存入列表,并广播消息

      */

     @Override

     public void handlerAdded(ChannelHandlerContext ctx) throws Exception {

         Channel incoming = ctx.channel();

         // 广播加入消息

         channels.writeAndFlush("[SERVER] - " + incoming.remoteAddress() + " 加入\n");

         channels.add(incoming);        // 存入列表

     }

     /**

      * 客户端连接断开时调用

      * 广播消息

      */

     @Override

     public void handlerRemoved(ChannelHandlerContext ctx) throws Exception {

         Channel incoming = ctx.channel();

         // 广播离开消息

         channels.writeAndFlush("[SERVER] - " + incoming.remoteAddress() + " 离开\n");

         // channel会自动从ChannelGroup中删除

     }

     /**

      * 收到消息时调用

      * 将消息转发给其他客户端

      */

     @Override

     protected void channelRead0(ChannelHandlerContext ctx, String msg) throws Exception {

         Channel incoming = ctx.channel();

         for(Channel channel : channels) {        // 遍历所有连接的客户端

             if(channel != incoming) {            // 其他客户端

                 channel.writeAndFlush("[" + incoming.remoteAddress() + "] " + msg + "\n" );

             } else {                            // 自己

                 channel.writeAndFlush("[you] " + msg + "\n" );

             }

         }

     }

     /**

      * 监听到客户端活动时调用

      */

     @Override

     public void channelActive(ChannelHandlerContext ctx) throws Exception {

         Channel incoming = ctx.channel();

         System.out.println("SimpleChatClient: " + incoming.remoteAddress() + " 在线");

     }

     /**

      * 监听到客户端不活动时调用

      */

     @Override

     public void channelInactive(ChannelHandlerContext ctx) throws Exception {

         Channel incoming = ctx.channel();

         System.out.println("SimpleChatClient: " + incoming.remoteAddress() + " 掉线");

     }

     /**

      * 当Netty由于IO错误或者处理器在处理事件抛出异常时调用

      * 关闭连接

      */

     @Override

     public void exceptionCaught(ChannelHandlerContext ctx, Throwable cause) throws Exception {

         Channel incoming = ctx.channel();

         System.out.println("SimpleChatClient: " + incoming.remoteAddress() + " 异常");

     }

 }
2. SimpleChatServerInitializer(配置 Channel 类)
该类添加分隔符协议处理类,解码、编码器还有自定义处理器。
 /**

  * 服务器配置初始化

  * 添加多个处理器

  */

 public class SimpleChatServerInitializer extends ChannelInitializer<SocketChannel> {

     @Override

     protected void initChannel(SocketChannel ch) throws Exception {

         ChannelPipeline pipeline = ch.pipeline();

         // 添加处理类

         // 使用'\r''\n'分割帧

         pipeline.addLast("framer",

                 new DelimiterBasedFrameDecoder(8192, Delimiters.lineDelimiter()));

         // 解码、编码器

         pipeline.addLast("decoder", new StringDecoder());

         pipeline.addLast("encoder", new StringEncoder());

         // 处理器

         pipeline.addLast("handler", new SimpleChatServerHandler());

         System.out.println("SimpleChatClient: " + ch.remoteAddress() + "连接上");

     }

 }
3. SimpleChatServer(服务端主程序)
启动服务端。
 /**

  * 服务端 main 启动

  */

 public class SimpleChatServer {

     private int port;        // 端口

     public SimpleChatServer(int port) {

         this.port = port;

     }

     // 配置并开启服务器

     public void run() throws Exception {

         EventLoopGroup bossGroup = new NioEventLoopGroup();        // 用来接收进来的连接

         EventLoopGroup workerGroup = new NioEventLoopGroup();    // 用来处理已接收的连接

         try {

             ServerBootstrap sb = new ServerBootstrap();            // 启动NIO服务的辅助启动类

             sb.group(bossGroup, workerGroup)

                 .channel(NioServerSocketChannel.class)                // 设置如何接受连接

                 .childHandler(new SimpleChatServerInitializer())    // 配置Channel

                 .option(ChannelOption.SO_BACKLOG, 128)                // 设置缓冲区

                 .childOption(ChannelOption.SO_KEEPALIVE, true);    // 启用心跳机制

             System.out.println("SimpleChatServer 启动了");

             ChannelFuture future = sb.bind(port).sync();        // 绑定端口,开始接收连接

             future.channel().closeFuture().sync();                // 等待关闭服务器(不会发生)

         } finally {

             workerGroup.shutdownGracefully();

             bossGroup.shutdownGracefully();

             System.out.println("SimpleChatServer 关闭了");

         }

     }

     public static void main(String[] args) throws Exception {

         int port = 8080;

         new SimpleChatServer(port).run();     // 开启服务器

     }

 }
二、客户端
1. SimpleChatClientHandler(处理器类)
直接输出收到的消息。
 /**

  * 客户端处理类

  * 直接输出收到的消息

  */

 public class SimpleChatClientHandler extends SimpleChannelInboundHandler<String> {

     @Override

     protected void channelRead0(ChannelHandlerContext ctx, String msg) throws Exception {

         System.out.println(msg);    // 直接输出消息

     }

 }
2. SimpleChatClientInitializer(配置 Channel 类)
与服务端类似。
 /**

  * 客户端配置初始化

  * 与服务端类似

  */

 public class SimpleChatClientInitializer extends ChannelInitializer<SocketChannel> {

     @Override

     protected void initChannel(SocketChannel ch) throws Exception {

         ChannelPipeline pipeline = ch.pipeline();

         // 添加处理类

         // 使用'\r''\n'分割帧

         pipeline.addLast("framer",

                 new DelimiterBasedFrameDecoder(8192, Delimiters.lineDelimiter()));

         // 解码、编码器

         pipeline.addLast("decoder", new StringDecoder());

         pipeline.addLast("encoder", new StringEncoder());

         // 处理器

         pipeline.addLast("handler", new SimpleChatClientHandler());

     }

 }
3. SimpleChatClient(客户端主程序)
接收来自控制台的消息,每帧以 "\r\n" 结尾,再发给服务端。
 /**

  * 客户端

  * 开启客户端,接收控制台输入并发送给服务端

  */

 public class SimpleChatClient {

     private final String host;        // IP

     private final int port;        // 端口

     public SimpleChatClient(String host, int port) {

         this.host = host;

         this.port = port;

     }

     // 配置并运行客户端

     public void run() throws Exception {

         EventLoopGroup group = new NioEventLoopGroup();

         try {

             Bootstrap b = new Bootstrap();        // 客户端辅助启动类

             b.group(group)                                    // 客户端只需要一个用来接收并处理连接

                 .channel(NioSocketChannel.class)            // 设置如何接受连接

                 .handler(new SimpleChatClientInitializer());// 配置 channel

             // 连接服务器

             Channel channel = b.connect(host, port).sync().channel();

             // 读取控制台输入字符

             BufferedReader in = new BufferedReader(new InputStreamReader(System.in));

             while(true) {

                 // 每行成一帧输出,以"\r\n"结尾

                 channel.writeAndFlush(in.readLine() + "\r\n");

             }

         } catch (Exception e) {

             e.printStackTrace();        // 输出异常

         } finally {

             group.shutdownGracefully();    // 关闭

         }

     }

     public static void main(String[] args) throws Exception {

         new SimpleChatClient("localhost", 8080).run();        // 启动客户端

     }

 }
三、运行效果
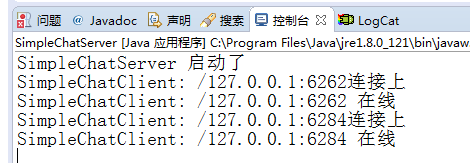
先运行服务端程序,然后在运行两次客户端程序,如下:
服务端输出:
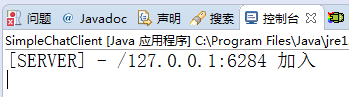
首先连接的客户端输出:
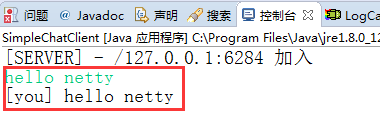
随便选个客户端在控制台输出信息并回车,如下:
自身输出:
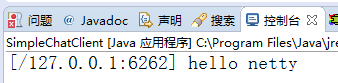
另一客户端输出:
以上……
Netty 聊天小程序的更多相关文章
- netty使用以及聊天小程序
<从零开始搭建游戏服务器>Netty导入创建Socket服务器 Netty入门教程 Netty 聊天小程序
- Netty学习——基于netty实现简单的客户端聊天小程序
Netty学习——基于netty实现简单的客户端聊天小程序 效果图,聊天程序展示 (TCP编程实现) 后端代码: package com.dawa.netty.chatexample; import ...
- [Socket]Socket聊天小程序
一个简单是Socket聊天小程序,读写操作在不同的线程中.服务器端采用线程池. 1.Server import java.io.IOException; import java.net.ServerS ...
- 类似微信聊天小程序-网易云信,IM DEMO小程序版本
类似微信聊天小程序-网易云信,IM DEMO小程序版本 代码地址: https://github.com/netease-im/NIM_Web_Weapp_Demo 云信IM DEMO 小程序版本 ( ...
- 基于JAVA网络编程的聊天小程序
package com.neusoft.edu.socket; import java.io.BufferedReader; import java.io.IOException; import ja ...
- QT UDP聊天小程序
利用QT的UDP技术,实现两个QT程序之间的聊天程序. #ifndef WIDGET_H #define WIDGET_H #include <QWidget> #include < ...
- java 网络编程(四)----UDP进阶篇聊天小程序
设计要求:单线程模式,客户端只发送数据,数据的来源为键盘录入,服务器端只接收数据,当客户端发送886的时候,客户端和服务器端都退出. 1. 发送端: public class Send impleme ...
- 用Socket编写的聊天小程序
Socket是什么? 是套接字,除此之外我也不太清楚,先略过 直接上实例,首先服务端: ; //自定义端口号 private string ServerUser = "Tracy" ...
- python实现简单的聊天小程序
概要 这是一个使用python实现一个简单的聊天室的功能,里面包含群聊,私聊两种聊天方式.实现的方式是使用套接字编程的一个使用TCP协议 c/s结构的聊天室 实现思路 x01 服务端的建立 首先,在服 ...
随机推荐
- 获取当前iframe动态加载文档的href
Insus.NET想实现一个功能,一个旧的站点A,它有两个网页logon.aspx和Default.aspx(登录成功能访问).由于某些原因,需另建一个新站点B,这个新站点B也有两个网页B_Index ...
- 《码出高效 Java开发手册》第二章 面向对象
码云地址: https://gitee.com/forxiaoming/JavaBaseCode/tree/master/EasyCoding 第2章 面向对象 Object-Oriented Pro ...
- 了解java虚拟机—垃圾回收算法(5)
引用计数器法(Reference Counting) 引用计数器的实现很简单,对于一个对象A,只要有任何一个对象引用了A,则A的引用计数器就加1,当引用失效时,引用计数器减1.只要对象A的引用计数器的 ...
- Mybatis插件开发
前面几篇文章介绍了Mybtis中四个重要的对象,其中提到它们都是在Configuration中被创建的,我们一起看一下创建四大对象的方法,代码如下所示: public ParameterHandler ...
- Hadoop Mapreduce 参数 (二)
MergeManagerImpl 类 内存参数计算 maxInMemCopyUse 位于构造函数中 final float maxInMemCopyUse = jobConf.getFloat(MRJ ...
- Python并发编程(守护进程,进程锁,进程队列)
进程的其他方法 P = Process(target=f,) P.Pid 查看进程号 查看进程的名字p.name P.is_alive() 返回一个true或者False P.terminate( ...
- 网络编程协议(TCP和UDP协议,黏包问题)以及socketserver模块
网络编程协议 1.osi七层模型 应用层 表示层 会话层 传输层 网络层 数据链路层 物理层 2.套接字 socket 有两类,一种基于文件类型,一种基于网络类型 3.Tcp和udp协议 ...
- layui数据表格的td模板
1.常用操作模板 <script type="text/html" id="userbar"> <a class="layui-bt ...
- vue 子组件和父组件
作者QQ:1095737364 QQ群:123300273 欢迎加入! 1.添加子组件 1.父组件修改 <template> <!-- v-for 表情表示循环输出数据 ...
- @NotNull、@NotEmpty、@NotBlank的区别
Spring中@NotNull.@NotEmpty.@NotBlank的区别@NotNull:用于基本数据类型@NotEmpty:用于集合类@NotBlank:用于String上面