python tkinter模块 创建窗口V1.2
先上图
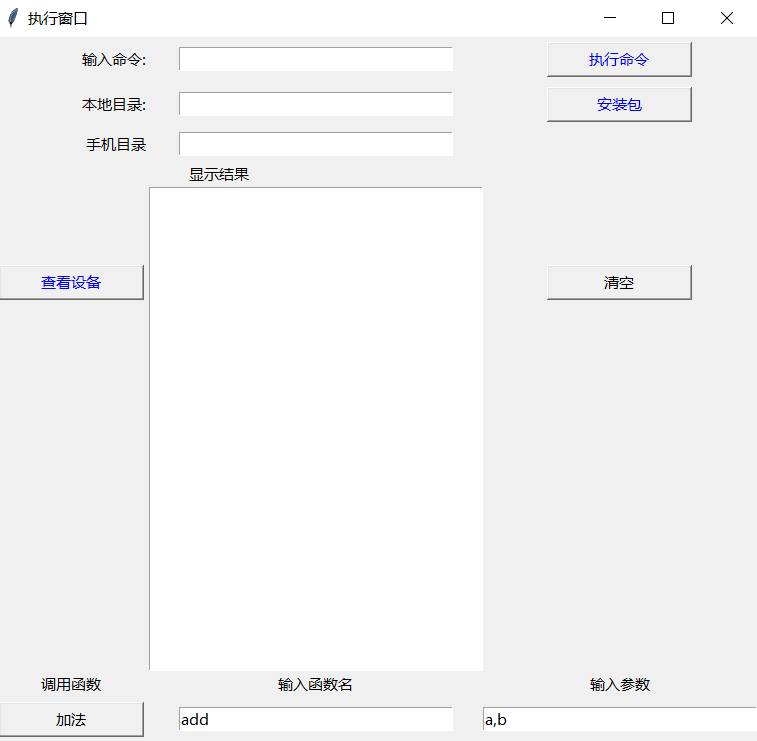
代码如下
 #-*-coding:utf-8-*-

 import os

 from tkinter import *

 root=Tk()

 root.title('执行窗口')

 """

 V1.2

 """

 def add(a,b):

     a=int(a)

     b=int(b)

     sum=eval('a+b')  #执行表达式

     print('a+b=',sum)

     return sum

 #调用其他函数fun(asg1,asg2)

 def go_func():

     #第一个参数,调用函数,第2个参数,函数参数

     func = n51.get()

     asgs = n52.get()

     func = eval(func)  #转为函数

     #print(type(func))

     #无参数

     if len(asgs) == 0:

         func()

     else:

         #多参数j,分割

         asg=asgs.split(',')

         func(*asg)

 #--------------------------------------

 #清空文本框内容

 def  clear():

     text.delete('1.0','end')

 #执行

 def show():

     print('hello')

     text.insert('1.0', "hello\n")

 #文本信息

 def insert_text(msg):

     text.insert(INSERT,'%s'%msg)

 def get_app_deviceid():

     print('请先检查是否连接了设备,是否启动了开发者选项,是否开启了adb调试....')

     #查看连接设备

     out=os.popen('adb devices').read()

     patter= re.compile(r"[a-zA-Z0-9]+")

     device_list=patter.findall(out)

     #print(device_list)

     print('设备连接信息:--------------------------------------\n',out)

     #调取text

     insert_text(out)

     #存放设备号

     deviceid=[]

     #提取设备号,存放到deviceid中,

     if 'device' in device_list:

         #print('设备号:',deviceid)

         #多个设备,

         n=4

         while len(device_list)>n:

             deviceid.append(device_list[n])

             n=n+2

         print('设备号:',deviceid)

     else:

         print('无此设备,请检查是否连接设备。')

     return out

 #执行cmd命令

 def  execute_cmd(cmd='adb devices'):

         cmd= e1.get()

         print(cmd)

         out = os.popen(cmd).read()

         print(out)

         return out

 def get_text():

     # 获取entry输入的文字

     str2=""

     str2=e1.get()

     # 在光标处插入文字

     text.insert("insert", str2)

 #-grid-----------------------------------------------------------------------

 #label控件

 Label(root,text="输入命令:").grid(row=0,column=0,sticky=E) #靠右

 Label(root,text="本地目录:").grid(row=1,column=0,sticky=E) #靠右

 Label(root, text='手机目录').grid(row=2,column=0,sticky=E) #靠左

 Label(root, text='显示结果',width=15).grid(row=3,column=1,sticky=W) #靠左

 #输入控件

 e1=Entry(root,width=30)

 e1.grid(row=0,column=1,padx=5,pady=5)

 e2=Entry(root,width=30)

 e2.grid(row=1,column=1,padx=5,pady=5)

 e3=Entry(root,width=30)

 e3.grid(row=2,column=1,padx=5,pady=5)

 #命令控件

 #b1=Button(root,text="点击看看吧",command=show,height=1,width=15,fg='blue').grid(row=2,column=1)

 #Label(root, text='显示结果', width=15, height=1).grid(row=2,column=1,sticky=W) #靠左

 #grid(row=1,column=2),row,行,从0开始,column列从0开始;

 b1=Button(root,text="执行命令",command=get_text,height=1,width=15,fg='blue').grid(row=0,column=2,padx=5, pady=5)

 b2=Button(root,text="安装包",command=show,height=1,width=15,fg='blue').grid(row=1,column=2,padx=5, pady=5)

 b3=Button(root,text="查看设备",command=get_app_deviceid,height=1,width=15,fg='blue').grid(row=4,column=0,padx=5, pady=5)

 b4=Button(root,text="清空",command=clear,height=1,width=15,fg='black').grid(row=4,column=2,padx=5, pady=5)

 #显示结果,text控件

 text = Text(root, width=30, font =('Verdana',10),fg='blue')

 text.grid(row=4,column=1,rowspan=3)

 #调用函数

 Label(root, text='调用函数').grid(row=8,column=0)

 Label(root, text='输入函数名').grid(row=8,column=1)

 Label(root, text='输入参数').grid(row=8,column=2)

 #调用函数

 b5= Button(root,text = "加法",command = go_func,width = 15).grid(row = 9,column = 0,padx=5, pady=5)

 #输入函数名

 var1 = StringVar()

 n51 = Entry(root,width = 30,textvariable = var1)

 var1.set("add")

 n51.grid(row = 9,column = 1)

 #输入函数参数

 var2 = StringVar()

 n52 = Entry(root,width = 30,textvariable = var2)

 var2.set("a,b")

 n52.grid(row = 9,column = 2)

 root.mainloop()
python tkinter模块 创建窗口V1.2的更多相关文章
- Python tkinter模块弹出窗口及传值回到主窗口操作详解
这篇文章主要介绍了Python tkinter模块弹出窗口及传值回到主窗口操作,结合实例形式分析了Python使用tkinter模块实现的弹出窗口及参数传递相关操作技巧,需要的朋友可以参考下 本文实例 ...
- python3中 tkinter模块创建window窗体、添加按钮、事务处理、创建菜单等的使用
开始接触桌面图形界面编程,你可以到安装路径 \lib\tkinter 打开__init__.py 文件了解tkinter 1 tkinter 模块创建窗体,代码如下截图: 运行结果,如有右图显 ...
- python - Tkinter 模块 - python 自带的gui模块
Tkinter模块("Tk 接口")是Python的标准Tk GUI工具包的接口,位Python的内置模块,直接import tkinter即可使用. 1.创建窗口 from Tk ...
- Python Tkinter模块 Grid(grid)布局管理器参数详解
在使用Tkinter模块编写图像界面时,经常用到pack()和grid()进行布局管理,pack()参数较少,使用方便,是最简单的布局,但是当控件数量较多时,可能需要使用grid()进行布局(不要在同 ...
- 利用TKinter模块创建GUI窗口
# -*- coding: utf-8 -*- from Tkinter import * root = Tk() # 80x80代表了初始化时主窗口的大小,0,0代表了初始化时窗口所在的位置 ...
- Python tkinter模块和参数
转自:https://www.cnblogs.com/aland-1415/p/6849193.html 1.使用tkinter.Tk() 生成主窗口(root=tkinter.Tk()):root. ...
- python XlsxWriter模块创建aexcel表格
https://blog.csdn.net/qq_41030861/article/details/82148777 安装使用pip install XlsxWriter来安装,Xlsxwriter用 ...
- python tkinter模块小工具界面
代码 #-*-coding:utf-8-*- import os from tkinter import * root=Tk() root.title('小工具') #清空文本框内容 def clea ...
- python TKinter的主窗口运行程序完毕后,怎么让其自动关闭
如题: 在pycharm 调试Tkinter程序的时候,关闭右上角的X 实际上并未退出进程,长期以往 再大的内存也会被耗尽. 一般就是下面的代码: """ from tk ...
随机推荐
- C++学习之可变参数的函数与模板
所谓可变参数指的是函数的参数个数可变,参数类型不定的函数.为了编写能处理不同数量实参的函数,C++11提供了两种主要的方法:如果所有的实参类型相同,可以传递一个名为initializer_list的标 ...
- J2EE基础总结(5)——EJB
什么是EJB JB事实上就是企业Java Beans. EJB是J2EE平台的重要组成部分. J2EE平台基于组件的企业级应用架构,提供多 层次.分布式和高事务的功能特点. EJB提供 ...
- Mysql经常使用函数
-----------------------------字符串函数--------------------------------------- ----拼接字符串.不论什么字符串与null拼接为n ...
- 关于C语言指针的一些新认识(2)
在使用C语言编程的过程中,遇到了很多关于指针使用的小问题,这里总结一下就当做是编程的小技巧啦 Q1. 如何用printf( )输出指针 这个问题相当于如何用printf( )输出地址,答案是:用"%p ...
- ES 2016+
ES2016(ES7)新增: Array.prototype.includes Exponentiation Operator 求冥运算 ES2017 (ES8)新增: ECMAScript® 201 ...
- _stdcall与_cdecl
_cdecl(C Declaration的缩写)是C/C++和MFC程序默认使用的调用约定,因此可以省略,也可以在函数声明时加上_cdecl关键字来手工指定.采用_cdecl约定时,函数参数按照从右到 ...
- P3178 [HAOI2015]树上操作 树链剖分
这个题就是一道树链剖分的裸题,但是需要有一个魔性操作___编号数组需要开longlong!!!震惊!真的神奇. 题干: 题目描述 有一棵点数为 N 的树,以点 为根,且树点有边权.然后有 M 个操作, ...
- PCB genesis连孔加除毛刺孔(圆孔与槽孔)实现方法(二)
一.为什么 连孔加除毛刺孔 原因是 PCB板材中含有玻璃纤维, 毛刺产生位置在于2个孔相交位置,由于此处钻刀受力不均导致纤维切削不断形成毛刺 ,为了解决这个问题:在钻完2个连孔后,在相交处再钻一个孔, ...
- PCB SQL Server 触发器应用实例
这里以实际例子对触发器的应用对触发器的理解与应用来得更实际 一.更新触发器(Update) 临时表:inserted表有数据(新数据) Deleted表有数据(旧数据) 实例说明:当表更新时, ...
- Linux下查看CPU和内存(很详细)
在系统维护的过程中,随时可能有需要查看 CPU 使用率,并根据相应信息分析系统状况的需要.在 CentOS 中,可以通过 top 命令来查看 CPU 使用状况.运行 top 命令后,CPU 使用状态会 ...