WCF4.0安装 NET.TCP启用及常见问题
WCF4.0安装及NET.TCP启用
WCF 4.0 一般默认安装.net Framework 4.0的时候已经安装。
但如果先装.net framework 4.0,后装IIS,就会出现问题。需要重新注册WCF4.0。
WCF4.0 已经是.net 4.0的一个内部组件,不需要.net3.5 那样麻烦先装windows组件。
一、确认是否安装WCF4.0:
如下图,查看*.svc 后缀的文件是否被svc-Integrated-4.0 或 svc-ISAPI-4.0_64/32bit 程序处理:
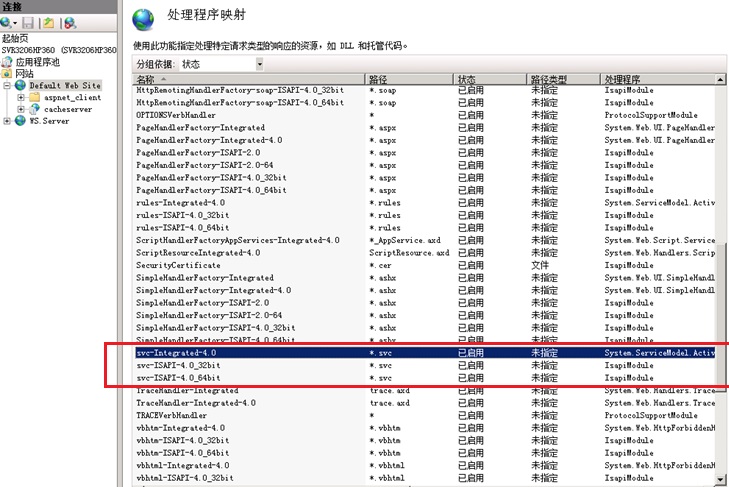
如果没有上面的三个处理程序,则可以判定 wcf 4.0 没有安装。
二、安装WCF 4.0
找到对应的.net framework 目录,运行命令:
"%WINDIR%\Microsoft.Net\Framework\v4.0.30319\aspnet_regiis" –i –enable
"%WINDIR%\Microsoft.Net\Framework\v4.0.30319\ServiceModelReg.exe" -r
Running the command aspnet_regiis –i –enable will make the Default App Pool run using .NET Framework 4, which may produce incompatibility issues for other applications on the same computer.
如果你有另外的app Pool,可以不用管这个 –enable,可以手动去设置那个pool的.net 版本是4.0.
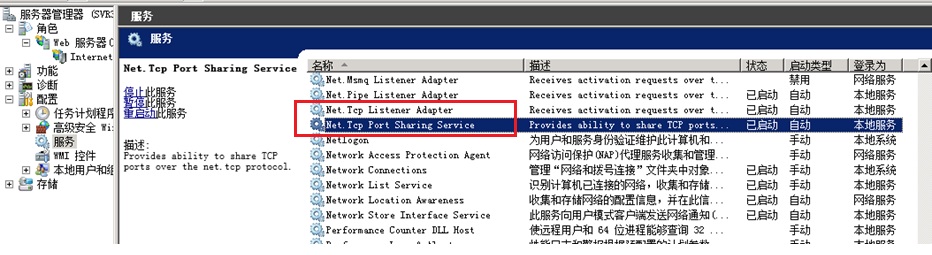
三、启动服务:NetTCP Listener Adapter 和 Net TCp Port Sharing Service:
四、为IIS站点配置NETTCP协议支持:
1)绑定808:*端口:
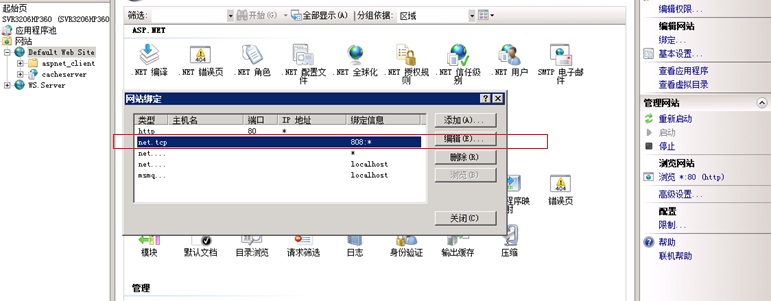
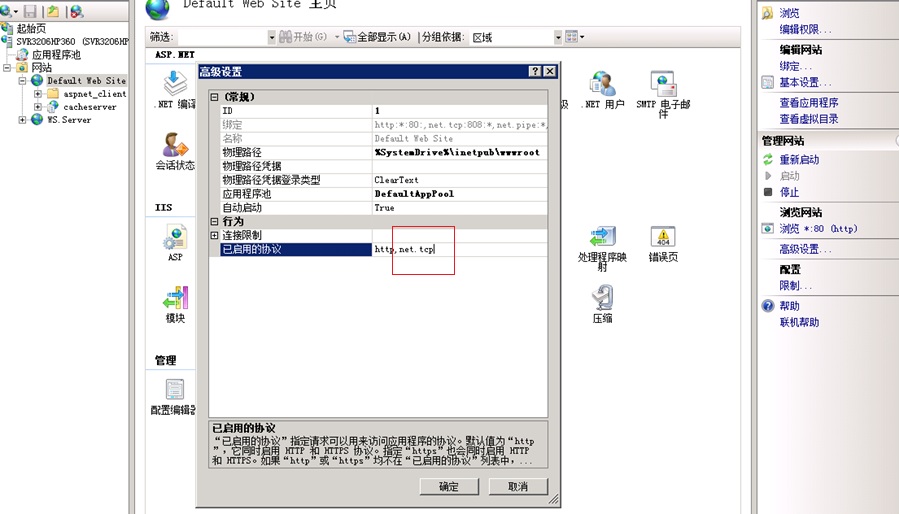
2)启用net.tcp协议:
如果不配置会出现下面错误:
Could not find a base address that matches scheme net.tcp for the endpoint with binding NetTcpBinding. Registered base address schemes are [http].
五、WCF3.0 和WCF 4.0 冲突:
如果有.net 3.5 和.net 4.0同时存在,有可能程序会找错对应的处理程序。
Could not load type ‘System.ServiceModel.Activation.HttpModule’ from assembly ‘System.ServiceModel, Version=3.0.0.0, Culture=neutral, PublicKeyToken=b77a5c561934e089′.
重新注册就可以:
"%WINDIR%\Microsoft.Net\Framework\v4.0.30319\aspnet_regiis" –i –enable
"%WINDIR%\Microsoft.Net\Framework\v4.0.30319\ServiceModelReg.exe" -r
我有参考这篇文章:http://www.cnblogs.com/Gyoung/archive/2012/12/11/2812555.html
在 WCF 4.0 启用NET.TCP 不需要 这2个操作:
1) 安装WAS

2) 确定WCF是否启用Non-Http支持

六、其他可能的错误:
1) IIS站点多主机头绑定的错误:
Server Error in '/WcfServiceOfMyTest' Application.
This collection already contains an address with scheme http. There can be at most one address per scheme in this collection. If your service is being hosted in IIS you can fix the problem by setting 'system.serviceModel/serviceHostingEnvironment/multipleSiteBindingsEnabled' to true or specifying 'system.serviceModel/serviceHostingEnvironment/baseAddressPrefixFilters'.
Parameter name: item
方法是:在config的</system.serviceModel> 里面允许多主机头绑定:
</system.serviceModel>
.......
<serviceHostingEnvironment multipleSiteBindingsEnabled="true" />
</system.serviceModel>
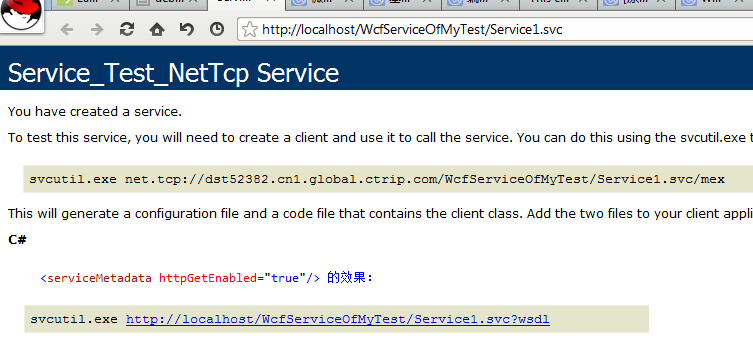
2) 为什么测试界面的协议不一样
svcutil.exe http://localhost/WcfServiceOfMyTest/Service1.svc?wsdl
与
svcutil.exe net.tcp://dst52382.cn1.global.ctrip.com/WcfServiceOfMyTest/Service1.svc/mex
区别在协议 http 和 net.tcp 的是否启用,配置在这里会影响:
<serviceMetadata httpGetEnabled="false"/>
七、测试程序
新建一个默认的wcf service
配置如下:
<?xml version="1.0"?>

<configuration>

  <system.web>

    <compilation debug="true" targetFramework="4.0" />

  </system.web>

    <system.serviceModel>

      <protocolMapping>

        <add scheme="tcp" binding="netTcpBinding"/>

      </protocolMapping>

      <bindings>

        <netTcpBinding>

          <binding name="netTcpBindConfig"  closeTimeout="00:30:00" portSharingEnabled="true"

                  openTimeout="00:30:00" receiveTimeout="00:30:00" sendTimeout="00:30:00" maxBufferPoolSize="2147483647" maxBufferSize="2147483647"

                    maxConnections="100" maxReceivedMessageSize="2147483647"

                  transactionFlow="false" transferMode="Buffered" transactionProtocol="OleTransactions"

                  hostNameComparisonMode="StrongWildcard" listenBacklog="100">

            <readerQuotas maxDepth="2147483647"

                                      maxStringContentLength="2147483647"

                                      maxArrayLength="2147483647"

                                      maxBytesPerRead="2147483647"

                                      maxNameTableCharCount="2147483647" />

            <reliableSession ordered="true"  inactivityTimeout="00:01:00" enabled="false" />

            <security mode="None">

              <transport clientCredentialType="Windows" protectionLevel="EncryptAndSign"  />

              <message clientCredentialType="Windows"  />

            </security>

          </binding>

        </netTcpBinding>

      </bindings>

      <services>

        <service behaviorConfiguration="MyBehavior" name="WcfServiceOfMyTest.Service_Test_NetTcp"> <!--这个服务名字不是随便取得,要跟你的class文件里的类的名字一致!-->

          <endpoint address="" binding="netTcpBinding" contract="WcfServiceOfMyTest.IJustAnInterface" bindingConfiguration="netTcpBindConfig"></endpoint>

          <endpoint address="mex" binding="mexTcpBinding" contract="IMetadataExchange" ></endpoint>

        </service>

      </services>

      <behaviors>

        <serviceBehaviors>

          <behavior name="MyBehavior" >

            <serviceMetadata httpGetEnabled="false"/>

            <serviceDebug includeExceptionDetailInFaults="true" />

            <dataContractSerializer maxItemsInObjectGraph="6553600"/>

          </behavior>

        </serviceBehaviors>

      </behaviors>

      <serviceHostingEnvironment multipleSiteBindingsEnabled="true" />

    </system.serviceModel>

  <system.webServer>

    <modules runAllManagedModulesForAllRequests="true"/>

  </system.webServer>

</configuration>
这个配置会有错误:
There is no compatible TransportManager found for URI 'net.tcp://dst52382.cn1.global.ctrip.com/WcfServiceOfMyTest/Service1.svc/mex'. This may be because that you have used an absolute address which points outside of the virtual application, or the binding settings of the endpoint do not match those that have been set by other services or endpoints. Note that all bindings for the same protocol should have same settings in the same application.
对应的中文描述:
未找到 URI“net.tcp://gyoung/Service1.svc/mex”的兼容 TransportManager。这可能是因为使用了指向虚拟应用程序外部的绝对地址,或终结点的绑定设置与其他服务或终结点所设置的绑定设置不匹配。 请注意,同一协议的所有绑定在同一应用程序中应具有相同的设置。
这个错误的重点在后半句话,endpoint的binding配置需要一致,这里2个endpoint,一个是服务终结点,它的 maxConnections="100" 不是默认值10,另外一个是元数据终结点,这里的max connection默认是10.
<endpoint address="" binding="netTcpBinding"
<endpoint address="mex" binding="mexTcpBinding"

他们的binding类型不一致。将他们改为一致。如下:
 <service behaviorConfiguration="MyBehavior" name="WcfServiceOfMyTest.Service_Test_NetTcp">

      <endpoint address="" binding="netTcpBinding" contract="WcfServiceOfMyTest.IJustAnInterface" bindingConfiguration="netTcpBindConfig"></endpoint>

      <endpoint address="mex" binding="netTcpBinding" contract="IMetadataExchange"  bindingConfiguration="netTcpBindConfig" ></endpoint>

 </service>
八、完整源代码:
接口源代码:
namespace WcfServiceOfMyTest

{

    // NOTE: You can use the "Rename" command on the "Refactor" menu to change the interface name "IService1" in both code and config file together.

    [ServiceContract]

    public interface IJustAnInterface

    {

        [OperationContract]

        string GetData(int value);

        [OperationContract]

        CompositeType GetDataUsingDataContract(CompositeType composite);

        // TODO: Add your service operations here

    }

    // Use a data contract as illustrated in the sample below to add composite types to service operations.

    [DataContract]

    public class CompositeType

    {

        bool boolValue = true;

        string stringValue = "Hello ";

        [DataMember]

        public bool BoolValue

        {

            get { return boolValue; }

            set { boolValue = value; }

        }

        [DataMember]

        public string StringValue

        {

            get { return stringValue; }

            set { stringValue = value; }

        }

    }

}
服务源代码:
using System;

using System.Collections.Generic;

using System.Linq;

using System.Runtime.Serialization;

using System.ServiceModel;

using System.ServiceModel.Web;

using System.Text;

namespace WcfServiceOfMyTest

{

    // NOTE: You can use the "Rename" command on the "Refactor" menu to change the class name "Service1" in code, svc and config file together.

    public class Service_Test_NetTcp : IJustAnInterface

    {

        public string GetData(int value)

        {

            return string.Format("You entered: {0}", value);

        }

        public CompositeType GetDataUsingDataContract(CompositeType composite)

        {

            if (composite == null)

            {

                throw new ArgumentNullException("composite");

            }

            if (composite.BoolValue)

            {

                composite.StringValue += "Suffix";

            }

            return composite;

        }

    }

}
web.config 配置:
<?xml version="1.0"?>

<configuration>

  <system.web>

    <compilation debug="true" targetFramework="4.0" />

  </system.web>

    <system.serviceModel>

      <protocolMapping>

        <add scheme="tcp" binding="netTcpBinding"/>

      </protocolMapping>

      <bindings>

        <netTcpBinding>

          <binding name="netTcpBindConfig"  closeTimeout="00:30:00" portSharingEnabled="true"

                  openTimeout="00:30:00" receiveTimeout="00:30:00" sendTimeout="00:30:00" maxBufferPoolSize="2147483647" maxBufferSize="2147483647"

                    maxConnections="100" maxReceivedMessageSize="2147483647"

                  transactionFlow="false" transferMode="Buffered" transactionProtocol="OleTransactions"

                  hostNameComparisonMode="StrongWildcard" listenBacklog="100">

            <readerQuotas maxDepth="2147483647"

                                      maxStringContentLength="2147483647"

                                      maxArrayLength="2147483647"

                                      maxBytesPerRead="2147483647"

                                      maxNameTableCharCount="2147483647" />

            <reliableSession ordered="true"  inactivityTimeout="00:01:00" enabled="false" />

            <security mode="None">

              <transport clientCredentialType="Windows" protectionLevel="EncryptAndSign"  />

              <message clientCredentialType="Windows"  />

            </security>

          </binding>

        </netTcpBinding>

      </bindings>

      <services>

        <service behaviorConfiguration="MyBehavior" name="WcfServiceOfMyTest.Service_Test_NetTcp">

          <endpoint address="" binding="netTcpBinding" contract="WcfServiceOfMyTest.IJustAnInterface" bindingConfiguration="netTcpBindConfig"></endpoint>

          <endpoint address="mex" binding="netTcpBinding" contract="IMetadataExchange"  bindingConfiguration="netTcpBindConfig" ></endpoint>

        </service>

      </services>

      <behaviors>

        <serviceBehaviors>

          <behavior name="MyBehavior" >

            <serviceMetadata httpGetEnabled="false"/>

            <serviceDebug includeExceptionDetailInFaults="true" />

            <dataContractSerializer maxItemsInObjectGraph="6553600"/>

          </behavior>

        </serviceBehaviors>

      </behaviors>

      <serviceHostingEnvironment multipleSiteBindingsEnabled="true" />

    </system.serviceModel>

  <system.webServer>

    <modules runAllManagedModulesForAllRequests="true"/>

  </system.webServer>

</configuration>
九、HTTP 与 NET.TCP 通信效率的差别:

参考资料:
http://www.cnblogs.com/artech/archive/2009/06/21/1507945.html
http://www.cnblogs.com/Gyoung/archive/2012/12/11/2812555.html
http://blogs.msdn.com/b/swiss_dpe_team/archive/2008/02/08/iis-7-support-for-non-http-protocols.aspx
http://www.cnblogs.com/webabcd/archive/2010/08/02/1790175.html
http://www.codeproject.com/Articles/16765/WCF-Windows-Communication-Foundation-Example
http://www.codeproject.com/Tips/90804/Using-WCF-without-a-generated-proxy-by-using-Chann
http://blogs.msdn.com/b/vipulmodi/archive/2006/11/16/dynamic-programming-with-wcf.aspx
http://www.codeproject.com/Articles/89312/Windows-Communication-Foundation-QuickStart-Multip
WCF4.0安装 NET.TCP启用及常见问题的更多相关文章
- centos7编译安装LNMP(nginx-1.16.0,mysql8.0.16,php-7.3.6)常见问题报错及解决方法
LNMP的安装与配置 nginx-1.16.0安装及配置: 第一步:前往官网下载nignx源码包 下载完毕后上传至服务器(先安装lrzsz) yum -y install lrzsz 安装完毕后执行: ...
- WCF学习之旅—WCF4.0中的简化配置功能(十五)
六 WCF4.0中的简化配置功能 WCF4.0为了简化服务配置,提供了默认的终结点.绑定和服务行为.也就是说,在开发WCF服务程序的时候,即使我们不提供显示的 服务终结点,WCF框架也能为我们的服务提 ...
- MySQL 6.0安装图解
MySQL 6.0安装图解 由于免费,MySQL数据库在项目中用的越来越广泛,而且它的安全性能也特别高,不亚于oracle这样的大型数据库软件.可以简单的说,在一些中小型的项目中,使用MySQL ,P ...
- CentOS7.0安装EMQ代理服务
CentOS7.0安装EMQ代理服务 安装文件下载 官网 : https://www.emqx.io/cn/ 下载地址: https://www.emqx.io/cn/downloads 选择需要的版 ...
- 烂泥:zabbix3.0安装与配置
本文由ilanniweb提供友情赞助,首发于烂泥行天下 想要获得更多的文章,可以关注我的微信ilanniweb 这个月又快过完了,最近也比较忙,没时间写文章,今天挤点时间把zabbix3.0安装与配置 ...
- CentOS 7.0安装配置Vsftp服务器
一.配置防火墙,开启FTP服务器需要的端口 CentOS 7.0默认使用的是firewall作为防火墙,这里改为iptables防火墙. 1.关闭firewall: systemctl stop fi ...
- zabbix3.0安装部署文档
zabbix v3.0安装部署 摘要: 本文的安装过程摘自http://www.ttlsa.com/以及http://b.lifec-inc.com ,和站长凉白开的<ZABBIX从入门到精通v ...
- inux环境PHP7.0安装
inux环境PHP7.0安装 PHP7和HHVM比较PHP7的在真实场景的性能确实已经和HHVM相当, 在一些场景甚至超过了HHVM.HHVM的运维复杂, 是多线程模型, 这就代表着如果一个线程导 ...
- CentOS 7.0安装配置LAMP服务器(Apache+PHP+MariaDB)
CentOS 7.0默认使用的是firewall作为防火墙,这里改为iptables防火墙. 1.关闭firewall: systemctl stop firewalld.service #停止fir ...
随机推荐
- “全栈2019”Java第四章:创建第一个Java程序
难度 初级 学习时间 10分钟 适合人群 零基础 开发语言 Java 开发环境 JDK v11 IntelliJ IDEA v2018.3 文章原文链接 "全栈2019"Java第 ...
- Java - io输入输出流 --转换流
转换流 转换输出流 OutputStreamWriter: 说明: /* * OutputStreamWriter 这个类的作用 * 就是指定输出流的编码格式 * 这个类的构造方法 需要传递 一个输 ...
- Django-DRF-视图的演变
版本一(基于类视图APIView类) views.py: APIView是继承的Django View视图的. from .serializers import UserSerializers #导入 ...
- 【文文殿下】[51nod1469] 淋漓尽致子串
SAM的经典应用 一个状态的SIze==1绝对不合法. 一个状态在parent树上有一个Size>1的后继绝对不合法(前面可以再补字符) 一个状态可以转移到Size>1的节点绝对不合法,因 ...
- 干货 | 精选《SQL注入、渗透、反病毒》学习总结集锦给你们~
学到手的都是本事,如果觉得对你有帮助也欢迎分享给身边的基友们吧! 分享干货,手留余香哦~ 本次“开学季拜师活动”的徒弟们在师父的精心指导下,在短短5天内得到了迅速地成长,以前或当时遇到的问题都能够柳暗 ...
- javascript获取wx.config内部字段解决微信分享
转自:http://www.jb51.net/article/80679.htm 专题推荐:js微信开发_脚本之家 http://www.jb51.net/Special/879.htm 背景在微信分 ...
- RN 47 中的 JS 线程及 RunLoop
RCBridge 初始化时声明了一个 CADisplayLink _jsDisplayLink = [CADisplayLink displayLinkWithTarget:self selector ...
- 【Quartz】工作原理
本文参考至http://www.cnblogs.com/davidwang456/p/4205237.html和https://blog.csdn.net/guolong1983811/article ...
- Tomcat 基础优化
作者:北京运维 本文档是身边一些朋友.技术大佬之前分享的一些笔记,记录了 Tomcat 优化方法,笔记较多而且比较杂乱,经过整理.分类我个人觉得大致可以从以下几个方面优化 Tomcat: Tomcat ...
- springcloud(八)-Hystrix熔断器
雪崩效应 在微服务架构中通常会有多个服务层调用,基础服务的故障可能会导致级联故障,进而造成整个系统不可用的情况,这种现象被称为服务雪崩效应.服务雪崩效应是一种因“服务提供者”的不可用导致“服务消费者” ...