Spring boot官方文档学习(一)
个人说明:本文内容都是从为知笔记上复制过来的,样式难免走样,以后再修改吧。另外,本文可以看作官方文档的选择性的翻译(大部分),以及个人使用经验及问题。
- 内置Servlet Container
- 使用Spring Boot
- 安装Spring Boot CLI
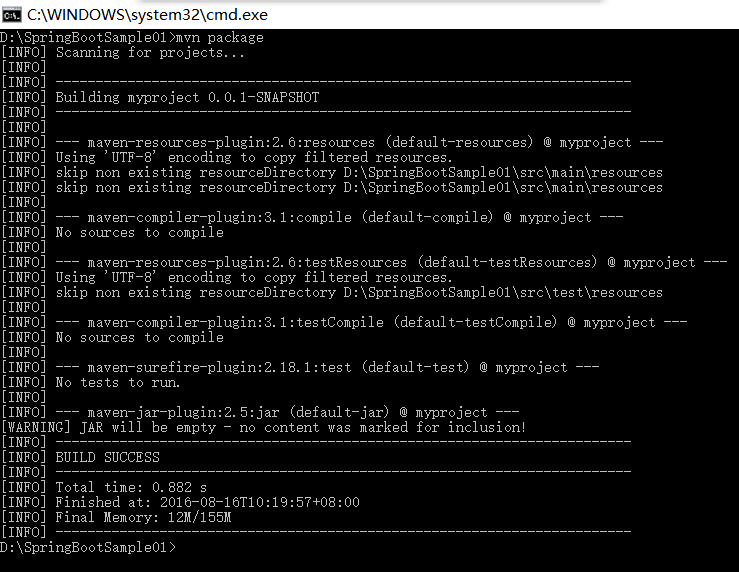
- 开发一个简单的Spring Boot应用--使用最原始的方式
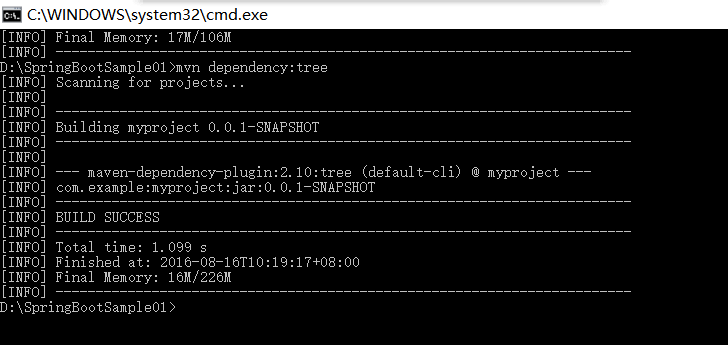
- Dependency Management
- Starters
- 自动配置
- Spring Beans 和 依赖注入(略)
- @SpringBootApplication
- 运行Spring Boot Application
- Developer tools
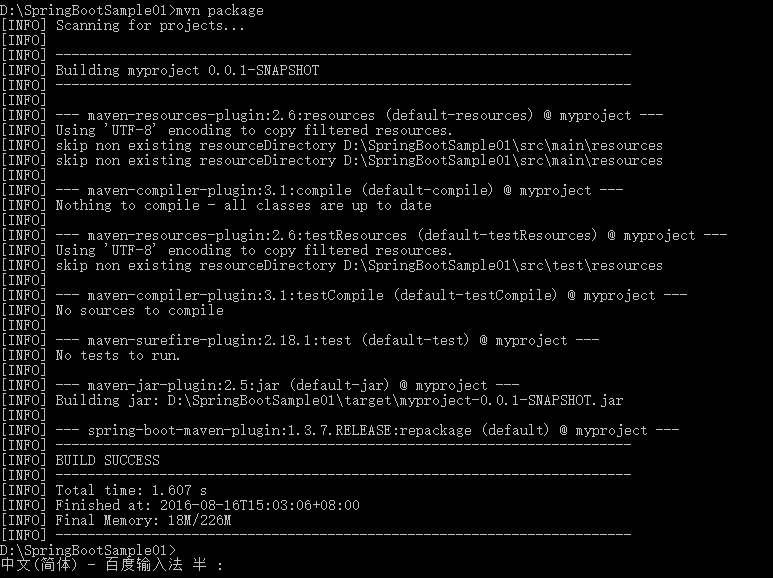
- 生产打包
Name Servlet Version Java Version Tomcat 8
3.1
Java 7+
Tomcat 7
3.0
Java 6+
Jetty 9.3
3.1
Java 8+
Jetty 9.2
3.1
Java 7+
Jetty 8
3.0
Java 6+
Undertow 1.3
3.1
Java 7+
此外,你仍然可以部署Spring Boot项目到任何兼容Servlet3.0+的容器。
org.springframework.boot groupId 。
<?xml version="1.0" encoding="UTF-8"?>

<project xmlns="http://maven.apache.org/POM/4.0.0" xmlns:xsi="http://www.w3.org/2001/XMLSchema-instance"

    xsi:schemaLocation="http://maven.apache.org/POM/4.0.0 http://maven.apache.org/xsd/maven-4.0.0.xsd">

    <modelVersion>4.0.0</modelVersion>

    <groupId>com.example</groupId>

    <artifactId>myproject</artifactId>

    <version>0.0.1-SNAPSHOT</version>

    <!-- Inherit defaults from Spring Boot -->

    <parent>

        <groupId>org.springframework.boot</groupId>

        <artifactId>spring-boot-starter-parent</artifactId>

        <version>1.4.0.RELEASE</version>

    </parent>

    <!-- Add typical dependencies for a web application -->

    <dependencies>

        <dependency>

            <groupId>org.springframework.boot</groupId>

            <artifactId>spring-boot-starter-web</artifactId>

        </dependency>

    </dependencies>

    <!-- Package as an executable jar -->

    <build>

        <plugins>

            <plugin>

                <groupId>org.springframework.boot</groupId>

                <artifactId>spring-boot-maven-plugin</artifactId>

            </plugin>

        </plugins>

    </build>

</project>
<?xml version="1.0" encoding="UTF-8"?>

<project xmlns="http://maven.apache.org/POM/4.0.0" xmlns:xsi="http://www.w3.org/2001/XMLSchema-instance"

    xsi:schemaLocation="http://maven.apache.org/POM/4.0.0 http://maven.apache.org/xsd/maven-4.0.0.xsd">

    <modelVersion>4.0.0</modelVersion>

    <groupId>com.example</groupId>

    <artifactId>myproject</artifactId>

    <version>0.0.1-SNAPSHOT</version>

    <parent>

        <groupId>org.springframework.boot</groupId>

        <artifactId>spring-boot-starter-parent</artifactId>

        <version>1.4.0.RELEASE</version>

    </parent>

    <!-- Additional lines to be added here... -->

</project>
<dependencies>

    <dependency>

        <groupId>org.springframework.boot</groupId>

        <artifactId>spring-boot-starter-web</artifactId>

    </dependency>

</dependencies>

import org.springframework.boot.*;

import org.springframework.boot.autoconfigure.*;

import org.springframework.stereotype.*;

import org.springframework.web.bind.annotation.*;

@RestController

@EnableAutoConfiguration

public class Example {

    @RequestMapping("/")

    String home() {

        return "Hello World!";

    }

    public static void main(String[] args) throws Exception {

        SpringApplication.run(Example.class, args);

    }

}
<build>

    <plugins>

        <plugin>

            <groupId>org.springframework.boot</groupId>

            <artifactId>spring-boot-maven-plugin</artifactId>

        </plugin>

    </plugins>

</build>

<properties>

    <spring-data-releasetrain.version>Fowler-SR2</spring-data-releasetrain.version>

</properties>
<!-- 使用 java 1.8 -->

<java.version>1.8</java.version>
<dependencyManagement>

     <dependencies>

        <dependency>

            <!-- Import dependency management from Spring Boot -->

            <groupId>org.springframework.boot</groupId>

            <artifactId>spring-boot-dependencies</artifactId>

            <version>1.4.0.RELEASE</version>

            <type>pom</type>

            <scope>import</scope>

        </dependency>

    </dependencies>

</dependencyManagement>
<dependencyManagement>

    <dependencies>

        <!-- Override Spring Data release train provided by Spring Boot -->

        <dependency>

            <groupId>org.springframework.data</groupId>

            <artifactId>spring-data-releasetrain</artifactId>

            <version>Fowler-SR2</version>

            <scope>import</scope>

            <type>pom</type>

        </dependency>

        <dependency>

            <groupId>org.springframework.boot</groupId>

            <artifactId>spring-boot-dependencies</artifactId>

            <version>1.4.0.RELEASE</version>

            <type>pom</type>

            <scope>import</scope>

        </dependency>

    </dependencies>

</dependencyManagement>
<build>

    <plugins>

        <plugin>

            <groupId>org.springframework.boot</groupId>

            <artifactId>spring-boot-maven-plugin</artifactId>

        </plugin>

    </plugins>

</build>
import org.springframework.boot.autoconfigure.*;

import org.springframework.boot.autoconfigure.jdbc.*;

import org.springframework.context.annotation.*;

@Configuration

@EnableAutoConfiguration(exclude={DataSourceAutoConfiguration.class})

public class MyConfiguration {

}
@Configuration, @EnableAutoConfiguration and @ComponentScan。 java -Xdebug -Xrunjdwp:server=y,transport=dt_socket,address=8000,suspend=n -jar target/myproject-0.0.1-SNAPSHOT.jar
mvn spring-boot:run
<dependencies>

    <dependency>

        <groupId>org.springframework.boot</groupId>

        <artifactId>spring-boot-devtools</artifactId>

        <optional>true</optional>

    </dependency>

</dependencies>
<build>

    <plugins>

        <plugin>

            <groupId>org.springframework.boot</groupId>

            <artifactId>spring-boot-maven-plugin</artifactId>

            <configuration>

                <fork>true</fork>

            </configuration>

        </plugin>

    </plugins>

</build>
spring.devtools.restart.exclude=static/**,public/**
public static void main(String[] args) {

    System.setProperty("spring.devtools.restart.enabled", "false");

    SpringApplication.run(MyApp.class, args);

}
restart.include.companycommonlibs=/mycorp-common-[\\w-]+\.jar

restart.include.projectcommon=/mycorp-myproj-[\\w-]+\.jar
spring.devtools.reload.trigger-file=.reloadtrigger
spring.devtools.remote.secret=mysecret
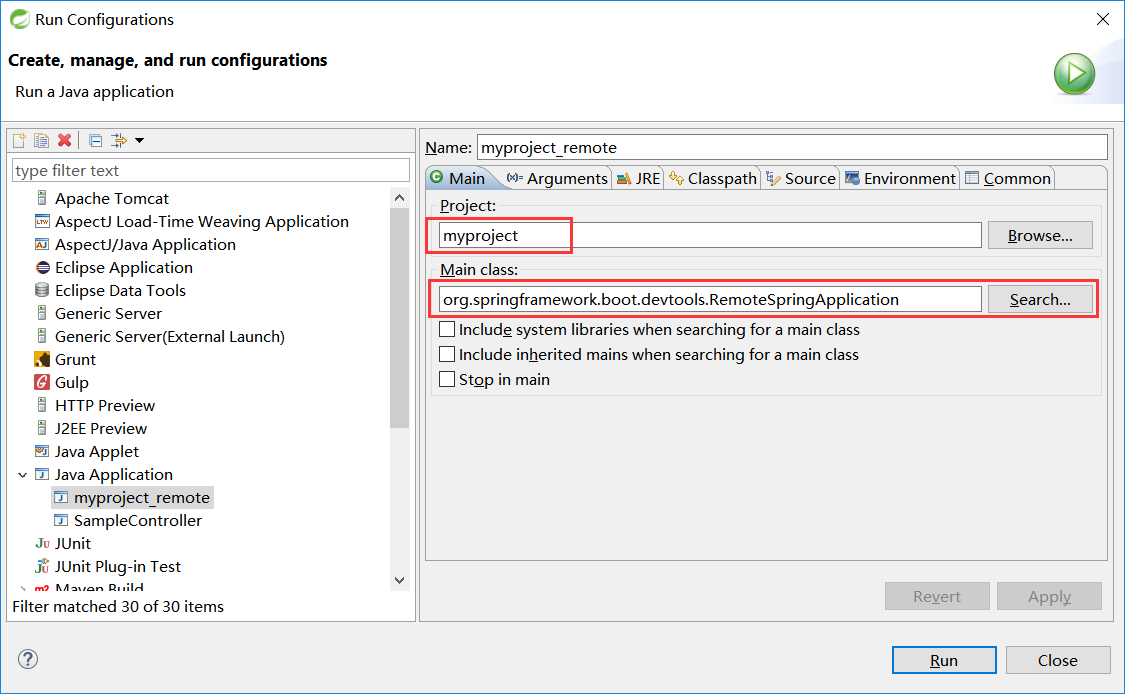
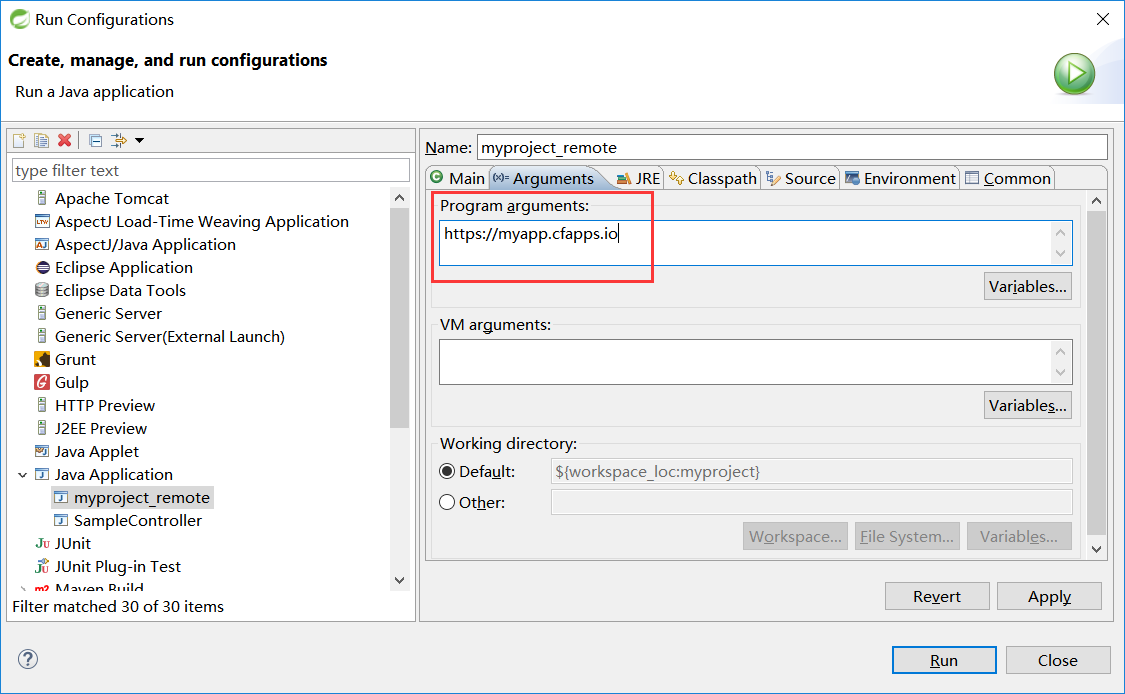
Select Run -> Run Configurations...Create a new Java Application "launch configuration"Browse for the my-app projectUse org.springframework.boot.devtools.RemoteSpringApplication as the main class.Add https://myapp.cfapps.io to the Program arguments (or whatever your remote URL is).
---

  env:

    JAVA_OPTS: "-Xdebug -Xrunjdwp:server=y,transport=dt_socket,suspend=n"
Spring boot官方文档学习(一)的更多相关文章
- Spring Boot 官方文档学习(一)入门及使用
个人说明:本文内容都是从为知笔记上复制过来的,样式难免走样,以后再修改吧.另外,本文可以看作官方文档的选择性的翻译(大部分),以及个人使用经验及问题. 其他说明:如果对Spring Boot没有概念, ...
- 20191106 Spring Boot官方文档学习(1-2)
学习内容相关信息 最新版本:2.2.0 CURRENT GA 官网地址 官方文档地址 单页版文档地址 代码生成网址 2.入门 Spring Boot的主要目标是: 为所有Spring开发提供更快且入门 ...
- 20191127 Spring Boot官方文档学习(9.1-9.3)
9."使用方法"指南 9.1.Spring Boot应用程序 9.1.1.创建自己的FailureAnalyzer FailureAnalyzer被包装在FailureAnalys ...
- 20191110 Spring Boot官方文档学习(3)
3.使用Spring Boot 3.1.构建系统 建议选择Maven或Gradle作为构建工具 每个Spring Boot版本都提供了它所支持的依赖关系的精选列表.实际上,您不需要为构建配置中的所有这 ...
- 20191128 Spring Boot官方文档学习(9.4-9.8)
9.4.Spring MVC Spring Boot有许多启动器包含Spring MVC.请注意,一些启动器包括对Spring MVC的依赖,而不是直接包含它. 9.4.1.编写JSON REST服务 ...
- 20191128 Spring Boot官方文档学习【目录】
Spring Boot文档 入门 使用Spring Boot 3.1. 构建系统 3.2. 结构化代码 3.3. 配置类 3.4. 自动配置 3.5. Spring beans和依赖注入 3.6. 使 ...
- 20191128 Spring Boot官方文档学习(9.11-9.17)
9.11.消息传递 Spring Boot提供了许多包含消息传递的启动器.本部分回答了将消息与Spring Boot一起使用所引起的问题. 9.11.1.禁用事务JMS会话 如果您的JMS代理不支持事 ...
- 20191110 Spring Boot官方文档学习(4.2)
4.2.外部化配置 Spring Boot使您可以外部化配置,以便可以在不同环境中使用相同的应用程序代码.您可以使用Properties文件,YAML文件,环境变量和命令行参数来外部化配置.属性值可以 ...
- 20191114 Spring Boot官方文档学习(4.7)
4.7.开发Web应用程序 Spring Boot非常适合于Web应用程序开发.您可以使用嵌入式Tomcat,Jetty,Undertow或Netty创建独立的HTTP服务器.大多数Web应用程序都使 ...
随机推荐
- 调用ffmpeg库编译时出现common.h:175:47: error: 'UINT64_C' was not declared in this scope
解决办法 出现错误:jni/ffmpeg/libavutil/common.h:175:47: error: 'UINT64_C' was not declared in this scope 解决: ...
- (转)SDL 1.2 to 2.0 Migration Guide--SDL1.2更新到SDL2.0指南
SDL 1.2 to 2.0 Migration Guide 目录 SDL 1.2 to 2.0 Migration Guide Translations Introduction Overview ...
- jquery-file-upload附件上传
引入样式和js文件 <link href="css/bootstrap.min.css" type="text/css" rel="styles ...
- apache Storm学习之三-消息可靠性
4.1 简介 storm可以确保spout发送出来的每个消息都会被完整的处理.本章将会描述storm体系是如何达到这个目标的,并将会详述开发者应该如何使用storm的这些机制来实现数据的可靠处理. 4 ...
- 第六章 mybatis注入映射器
为了代替手工使用 SqlSessionDaoSupport 或 SqlSessionTemplate 编写数据访问对象 (DAO)的代码,MyBatis-Spring 提供了一个动态代理的实现:Map ...
- Linux 代理设置
apt proxy vim /etc/apt/apt.conf Acquire::http::proxy "http://10.48.127.169:8080/"; Acquire ...
- 如何用MathType快速输入公式
我们在写论文的时候,如果涉及到数学公式的话,我们一般都会使用MathType软件,但同时对于一些新手来说不太用使用此款软件,输入公式时就会很慢,今天教大家如何利用MathType快速输入公式. 具体方 ...
- 在你开发完brew应用之后 ,你又如果将brew应用由编译成可以部署到brew真机上的程序包呢
参考自:http://blog.csdn.net/feimor/article/details/6239281 一.准备工作(安装工具) 先安装Visual C++ 6.0,再安装BREW SDK v ...
- Android 6.0启动过程具体解析
在之前的一篇文章中.从概念上学习了Andoird系统的启动过程.Android系统启动过程学习 而在这篇文章中,我们将从代码角度细致学习Android系统的启动过程,同一时候,学习Android启动过 ...
- Java精选笔记_JSP开发模型
JSP开发模型 JSP Model JSP Model1简单轻便,适合小型Web项目的快速开发. JSP Model2模型是在JSP Model1的基础上提出的,它提供了更清晰的代码分层,更适用于多人 ...