多模态对比语言图像预训练CLIP:打破语言与视觉的界限
多模态对比语言图像预训练CLIP:打破语言与视觉的界限
一种基于多模态(图像、文本)对比训练的神经网络。它可以在给定图像的情况下,使用自然语言来预测最相关的文本片段,而无需为特定任务进行优化。CLIP的设计类似于GPT-2和GPT-3,具备出色的零射击能力,可以应用于多种多模态任务。
多模态对比语言图像预训练(CLIP)是一种神经网络模型,它通过多模态对比训练来学习图像和文本之间的关联。与传统的单模态预训练模型不同,CLIP能够同时处理图像和文本,从而更好地理解它们之间的语义关系。
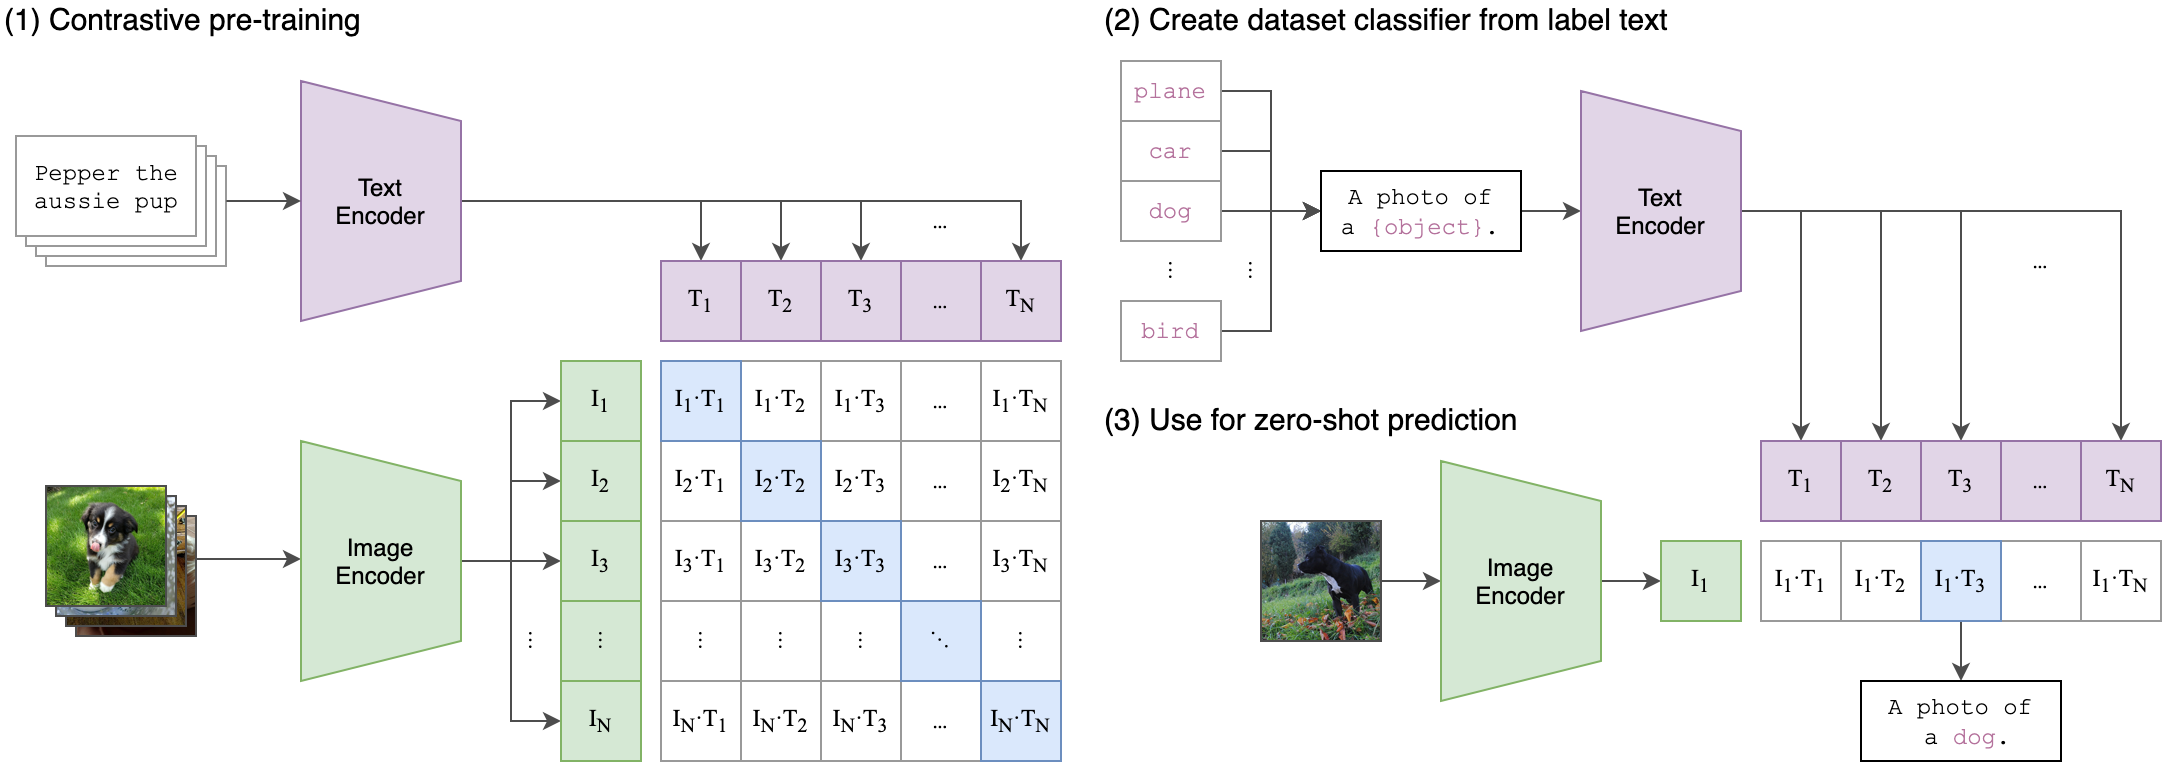
CLIP的设计类似于GPT-2和GPT-3,是一种自回归语言模型。它通过对比学习来学习图像和文本之间的映射关系。在训练过程中,CLIP会接收一张图像和一个与之相关的文本片段,并学习如何将这两个模态的信息进行关联。通过这种方式,CLIP可以学会将图像与相应的文本片段进行匹配,从而在给定图像的情况下,使用自然语言来预测最相关的文本片段。
由于CLIP采用了对比学习的方法,它可以在无需为特定任务进行优化的前提下,表现出色地完成多种多模态任务。这使得CLIP成为了一种通用的多模态预训练模型,可以广泛应用于图像标注、视觉问答、图像生成等领域。
CLIP(对比语言图像预训练)是一种基于多种(图像、文本)对进行训练的神经网络。在给定图像的情况下,它可以用自然语言来预测最相关的文本片段,而无需直接针对任务进行优化,类似于GPT-2和gpt - 3的零射击能力。我们发现CLIP在不使用任何原始的1.28M标记示例的情况下,在ImageNet“零射击”上匹配原始ResNet50的性能,克服了计算机视觉中的几个主要挑战。
1.安装
ftfy

regex

tqdm

torch

torchvision
$ conda install --yes -c pytorch pytorch=1.7.1 torchvision cudatoolkit=11.0

$ pip install ftfy regex tqdm

$ pip install git+https://github.com/openai/CLIP.git
Replace cudatoolkit=11.0 above with the appropriate CUDA version on your machine or cpuonly when installing on a machine without a GPU.
import torch

import clip

from PIL import Image

device = "cuda" if torch.cuda.is_available() else "cpu"

model, preprocess = clip.load("ViT-B/32", device=device)

image = preprocess(Image.open("CLIP.png")).unsqueeze(0).to(device)

text = clip.tokenize(["a diagram", "a dog", "a cat"]).to(device)

with torch.no_grad():

    image_features = model.encode_image(image)

    text_features = model.encode_text(text)

    logits_per_image, logits_per_text = model(image, text)

    probs = logits_per_image.softmax(dim=-1).cpu().numpy()

print("Label probs:", probs)  # prints: [[0.9927937  0.00421068 0.00299572]]
- API
The CLIP module clip provides the following methods:
clip.available_models()
Returns the names of the available CLIP models.
clip.load(name, device=..., jit=False)
返回模型和模型所需的TorchVision转换,由' clip.available_models() '返回的模型名指定。它将根据需要下载模型。' name '参数也可以是本地检查点的路径。
可以选择性地指定运行模型的设备,默认是使用第一个CUDA设备(如果有的话),否则使用CPU。当' jit '为' False '时,将加载模型的非jit版本。
clip.tokenize(text: Union[str, List[str]], context_length=77)
返回一个LongTensor,其中包含给定文本输入的标记化序列。这可以用作模型的输入
' clip.load() '返回的模型支持以下方法:
model.encode_image(image: Tensor)
给定一批图像,返回由CLIP模型的视觉部分编码的图像特征。
model.encode_text(text: Tensor)
给定一批文本tokens,返回由CLIP模型的语言部分编码的文本特征。
model(image: Tensor, text: Tensor)
给定一批图像和一批文本标记,返回两个张量,包含对应于每个图像和文本输入的logit分数。其值是对应图像和文本特征之间的相似度的余弦值,乘以100。
2.案例介绍
2.1 零样本能力
下面的代码使用CLIP执行零样本预测,如本文附录B所示。本例从CIFAR-100数据集获取图像,并在数据集的100个文本标签中预测最可能的标签。
import os

import clip

import torch

from torchvision.datasets import CIFAR100

#Load the model

device = "cuda" if torch.cuda.is_available() else "cpu"

model, preprocess = clip.load('ViT-B/32', device)

#Download the dataset

cifar100 = CIFAR100(root=os.path.expanduser("~/.cache"), download=True, train=False)

#Prepare the inputs

image, class_id = cifar100[3637]

image_input = preprocess(image).unsqueeze(0).to(device)

text_inputs = torch.cat([clip.tokenize(f"a photo of a {c}") for c in cifar100.classes]).to(device)

#Calculate features

with torch.no_grad():

    image_features = model.encode_image(image_input)

    text_features = model.encode_text(text_inputs)

#Pick the top 5 most similar labels for the image

image_features /= image_features.norm(dim=-1, keepdim=True)

text_features /= text_features.norm(dim=-1, keepdim=True)

similarity = (100.0 * image_features @ text_features.T).softmax(dim=-1)

values, indices = similarity[0].topk(5)

#Print the result

print("\nTop predictions:\n")

for value, index in zip(values, indices):

    print(f"{cifar100.classes[index]:>16s}: {100 * value.item():.2f}%")
输出将如下所示(具体数字可能因计算设备的不同而略有不同):
Top predictions:

           snake: 65.31%

          turtle: 12.29%

    sweet_pepper: 3.83%

          lizard: 1.88%

       crocodile: 1.75%
Note that this example uses the encode_image() and encode_text() methods that return the encoded features of given inputs.
2.2 Linear-probe 评估
The example below uses scikit-learn to perform logistic regression on image features.
import os

import clip

import torch

import numpy as np

from sklearn.linear_model import LogisticRegression

from torch.utils.data import DataLoader

from torchvision.datasets import CIFAR100

from tqdm import tqdm

#Load the model

device = "cuda" if torch.cuda.is_available() else "cpu"

model, preprocess = clip.load('ViT-B/32', device)

#Load the dataset

root = os.path.expanduser("~/.cache")

train = CIFAR100(root, download=True, train=True, transform=preprocess)

test = CIFAR100(root, download=True, train=False, transform=preprocess)

def get_features(dataset):

    all_features = []

    all_labels = []

    with torch.no_grad():

        for images, labels in tqdm(DataLoader(dataset, batch_size=100)):

            features = model.encode_image(images.to(device))

            all_features.append(features)

            all_labels.append(labels)

    return torch.cat(all_features).cpu().numpy(), torch.cat(all_labels).cpu().numpy()

#Calculate the image features

train_features, train_labels = get_features(train)

test_features, test_labels = get_features(test)

#Perform logistic regression

classifier = LogisticRegression(random_state=0, C=0.316, max_iter=1000, verbose=1)

classifier.fit(train_features, train_labels)

#Evaluate using the logistic regression classifier

predictions = classifier.predict(test_features)

accuracy = np.mean((test_labels == predictions).astype(float)) * 100.

print(f"Accuracy = {accuracy:.3f}")
Note that the C value should be determined via a hyperparameter sweep using a validation split.
3.更多资料参考:
- OpenCLIP: includes larger and independently trained CLIP models up to ViT-G/14
- Hugging Face implementation of CLIP: for easier integration with the HF ecosystem
更多优质内容请关注公号:汀丶人工智能;会提供一些相关的资源和优质文章,免费获取阅读。
多模态对比语言图像预训练CLIP:打破语言与视觉的界限的更多相关文章
- 预训练语言模型的前世今生 - 从Word Embedding到BERT
预训练语言模型的前世今生 - 从Word Embedding到BERT 本篇文章共 24619 个词,一个字一个字手码的不容易,转载请标明出处:预训练语言模型的前世今生 - 从Word Embeddi ...
- 【中文版 | 论文原文】BERT:语言理解的深度双向变换器预训练
BERT:Pre-training of Deep Bidirectional Transformers for Language Understanding 谷歌AI语言组论文<BERT:语言 ...
- 预训练中Word2vec,ELMO,GPT与BERT对比
预训练 先在某个任务(训练集A或者B)进行预先训练,即先在这个任务(训练集A或者B)学习网络参数,然后存起来以备后用.当我们在面临第三个任务时,网络可以采取相同的结构,在较浅的几层,网络参数可以直接加 ...
- CNN基础二:使用预训练网络提取图像特征
上一节中,我们采用了一个自定义的网络结构,从头开始训练猫狗大战分类器,最终在使用图像增强的方式下得到了82%的验证准确率.但是,想要将深度学习应用于小型图像数据集,通常不会贸然采用复杂网络并且从头开始 ...
- 深度学习tensorflow实战笔记 用预训练好的VGG-16模型提取图像特征
1.首先就要下载模型结构 首先要做的就是下载训练好的模型结构和预训练好的模型,结构地址是:点击打开链接 模型结构如下: 文件test_vgg16.py可以用于提取特征.其中vgg16.npy是需要单独 ...
- 从Word Embedding到Bert模型—自然语言处理中的预训练技术发展史(转载)
转载 https://zhuanlan.zhihu.com/p/49271699 首发于深度学习前沿笔记 写文章 从Word Embedding到Bert模型—自然语言处理中的预训练技术发展史 张 ...
- 预训练语言模型整理(ELMo/GPT/BERT...)
目录 简介 预训练任务简介 自回归语言模型 自编码语言模型 预训练模型的简介与对比 ELMo 细节 ELMo的下游使用 GPT/GPT2 GPT 细节 微调 GPT2 优缺点 BERT BERT的预训 ...
- 学习AI之NLP后对预训练语言模型——心得体会总结
一.学习NLP背景介绍: 从2019年4月份开始跟着华为云ModelArts实战营同学们一起进行了6期关于图像深度学习的学习,初步了解了关于图像标注.图像分类.物体检测,图像都目标物体检测等 ...
- zz从Word Embedding到Bert模型—自然语言处理中的预训练技术发展史
从Word Embedding到Bert模型—自然语言处理中的预训练技术发展史 Bert最近很火,应该是最近最火爆的AI进展,网上的评价很高,那么Bert值得这么高的评价吗?我个人判断是值得.那为什么 ...
- 第二十四节,TensorFlow下slim库函数的使用以及使用VGG网络进行预训练、迁移学习(附代码)
在介绍这一节之前,需要你对slim模型库有一些基本了解,具体可以参考第二十二节,TensorFlow中的图片分类模型库slim的使用.数据集处理,这一节我们会详细介绍slim模型库下面的一些函数的使用 ...
随机推荐
- 阿里云视频云「 vPaaS 」演绎了怎样的音视频应用开发「未来图景」?
vPaaS是阿里云视频云最新推出的低代码音视频应用开发产品,其中,vPaaS低代码音视频工厂,彻底打破了音视频应用的繁冗技术开发壁垒:vPaaS视频原生应用开发平台,全新定义了音视频应用的开发方式. ...
- C# 32位程序申请大内存
VS2015 项目-->属性-->生成事件 在"后期生成事件命令行"中输入: cd /d $(DevEnvDir) cd.. cd.. cd VC\bin editbi ...
- 什么是「滑动窗口算法」(sliding window algorithm),有哪些应用场景?
今天是算法数据结构专题的第2篇文章,我们一起来学习一下「滑动窗口算法」. 前言 最近刷到leetCode里面的一道算法题,里面有涉及到Sliding windowing算法,因此写一篇文章稍微总结一下 ...
- Java 设计模式课堂作业记录
第二章 P25,有人将面向对象设计原则简单归类为 3 条:①封装变化点: ②对接口进行编程: ③多使用组合,而不是继承.请查阅相关资料谈谈理解 3.7 : 该三大原则 应该算 是OO的基础,很多OO设 ...
- 第17场-快乐AC赛
A - 看我,看我,我最简单了 POJ - 2387 这道题是以前记录过的最短路板子题,然而我还是脑抽用Floyd交了一发 解题报告:https://www.cnblogs.com/RioTian/p ...
- springboot启动流程简单总结
Spring Boot程序有一个入口,就是main方法.main里面调用SpringApplication.run()启动整个Spring Boot程序,该方法所在类需要使用@SpringBootAp ...
- 技术文档丨 OpenSCA技术原理之npm依赖解析
本文主要介绍基于npm包管理器的组件成分解析原理. npm介绍 npm(全称Node Package Manager)是Node.js标准的软件包管理器. npm的依赖管理文件是package.jso ...
- 深度 | 新兴软件研发范式崛起,云计算全面走向 Serverless 化
11月3日,2022 杭州 · 云栖大会上,阿里云智能总裁张建锋表示,以云为核心的新型计算体系正在形成,软件研发范式正在发生新的变革,Serverless 是其中最重要的趋势之一,阿里云将坚定推进核心 ...
- 机器学习-决策树系列-决策树-ID3算法 -C4.5算法-26
目录 1. 决策树 2. 举个例子 计算信息增益 3. C4.5算法 1. 决策树 决策树是属于有监督机器学习的一种,起源非常早,符合直觉并且非常直观, 模型生成:通过大量数据生成一颗非常好的树,用这 ...
- jedis 与 redission 实现分布式锁
本文为博主原创,未经允许不得转载: 目录: 1. Jedis 实现分布式锁 2. Redission 实现分布式锁 为了确保分布式锁可用,至少要保证锁的实现同时满足以下几个条件 互斥性:在任意时刻只有 ...