
Springboot中自定义监听器
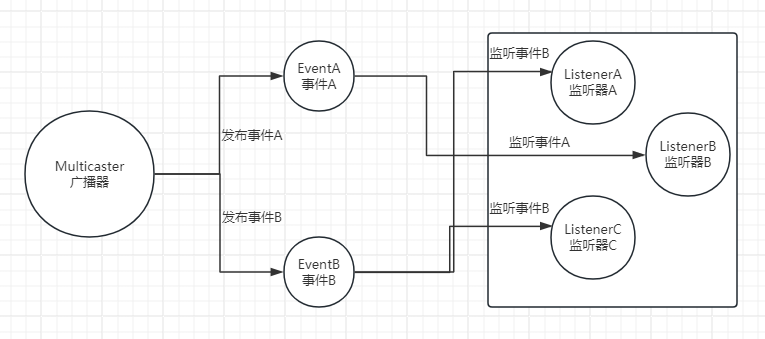
一、监听器模式图
二、监听器三要素
- 广播器:用来发布事件
- 事件:需要被传播的消息
- 监听器:一个对象对一个事件的发生做出反应,这个对象就是事件监听器
三、监听器的实现方式
1、实现自定义事件
自定义事件需要继承ApplicationEvent类,并添加一个构造函数,用于接收事件源对象。
该事件中添加了一个SysUser对象,用于传递用户信息。
package com.ruoyi.web.listener;

import com.ruoyi.common.core.domain.entity.SysUser;

import org.springframework.context.ApplicationEvent;

/**

 * @Description: 自定义事件

 * @Author: baiwen

 * @createTime: 2024年06月19日 13:10:07

 */

public class MyEvent extends ApplicationEvent {

    private SysUser sysUser;

    public MyEvent(Object source, SysUser sysUser) {

        super(source);

        this.sysUser = sysUser;

    }

    public SysUser getSysUser() {

        return sysUser;

    }

}
2、实现自定义监听器
自定义监听器需要实现ApplicationListener接口,并重写 onApplicationEvent方法。
接口中的泛型参数为自定义事件类型,表示监听该类型的事件。
可以从该事件中获取用户信息,并进行相应的处理。
package com.ruoyi.web.listener;

import com.ruoyi.common.core.domain.entity.SysUser;

import org.springframework.context.ApplicationListener;

import org.springframework.stereotype.Component;

/**

 * @Description: 自定义监听器

 * @Author: baiwen

 * @createTime: 2024年06月19日 13:12:39

 */

@Component

public class MyEventListener implements ApplicationListener<MyEvent> {

    @Override

    public void onApplicationEvent(MyEvent event) {

        SysUser sysUser = event.getSysUser();

        System.out.println("监听到了事件,用户名:" + sysUser.getUserName());

    }

}
3、发布自定义事件
在需要发布事件的地方,使用ApplicationEventPublisher的publishEvent方法来发布事件。
这里使用Test类来模拟事件发布,实际应用中可以根据具体需求来选择合适的发布场景。
package com.ruoyi.test;

import com.ruoyi.common.core.domain.entity.SysUser;

import com.ruoyi.web.listener.MyEvent;

import org.junit.Test;

import org.junit.runner.RunWith;

import org.springframework.boot.test.context.SpringBootTest;

import org.springframework.context.ApplicationEventPublisher;

import org.springframework.test.context.junit4.SpringRunner;

import javax.annotation.Resource;

/**

 * @Description:

 * @Author: baiwen

 * @createTime: 2024年06月19日 13:16:33

 */

@SpringBootTest

@RunWith(SpringRunner.class)

public class MyEventPushTest {

    @Resource

    private ApplicationEventPublisher applicationEventPublisher;

    @Test

    public void testpublishEvent() throws InterruptedException

    {

        SysUser sysUser = new SysUser();

        sysUser.setUserName("zhangsan");

        System.out.println("发布MyEvent事件。。。");

        applicationEventPublisher.publishEvent(new MyEvent(this, sysUser));

    }

}
4、测试
运行MyEventPushTest类中的testpublishEvent方法,控制台会输出以下内容:
发布MyEvent事件。。。

监听到了事件,用户名:zhangsan
5、其他实现方案
主要是监听器的注册方式不同,目的只有一个,把监听器加入到spring容器中。
方式一,就是上面的MyEventListener类是通过@Component注解将该类注册为Spring的Bean,从而实现监听器的功能。
方式二,可以通过在启动类中添加监听器的方式,使监听器生效。
package com.ruoyi;

import com.ruoyi.web.listener.MyEventListener;

import org.springframework.boot.autoconfigure.SpringBootApplication;

import org.springframework.boot.autoconfigure.jdbc.DataSourceAutoConfiguration;

import org.springframework.boot.builder.SpringApplicationBuilder;

/**

 * 启动程序

 *

 * @author baiwen

 */

@SpringBootApplication(exclude = { DataSourceAutoConfiguration.class })

public class RuoYiApplication

{

    public static void main(String[] args)

    {

        new SpringApplicationBuilder(RuoYiApplication.class).listeners(new MyEventListener()).run(args);

    }

}
方式三,可以通过配置spring.factories,使监听器生效。
在resource文件夹下创建META-INF/spring.factories文件。
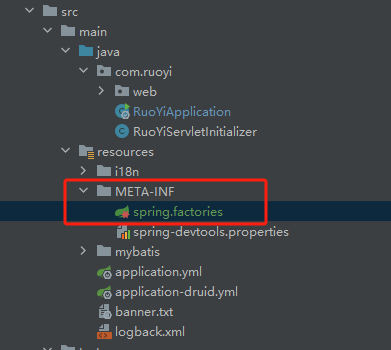
配置内容如下:
# 监听器

org.springframework.context.ApplicationListener=com.ruoyi.web.listener.MyEventListener
除此之外,还有第四种方式,通过@EventListener注解实现监听器的功能。
通过@EventListener注解的condition属性来指定监听的事件类型。
package com.ruoyi.web.listener;

import com.ruoyi.common.core.domain.entity.SysUser;

import org.springframework.context.event.EventListener;

import org.springframework.stereotype.Component;

/**

 * @Description: 自定义监听器2

 * @Author: baiwen

 * @createTime: 2024年06月19日 14:07:57

 */

@Component

public class MyEventListener2 {

    @EventListener(MyEvent.class)

    public void listenerApplicationStarted(MyEvent event) {

        SysUser sysUser = event.getSysUser();

        System.out.println("注解方式监听到了事件,用户名:" + sysUser.getUserName());

    }

}
发布事件后,可以看到能正常监听到事件。
发布MyEvent事件。。。

注解方式监听到了事件,用户名:zhangsan
总结
以上,就是SpringBoot中实现监听器的四种方式。
至于监听器的实现原理,后续再补充。
Springboot中自定义监听器的更多相关文章
- 详解Springboot中自定义SpringMVC配置
详解Springboot中自定义SpringMVC配置 WebMvcConfigurer接口 这个接口可以自定义拦截器,例如跨域设置.类型转化器等等.可以说此接口为开发者提前想到了很多拦截层面的需 ...
- springboot中自定义根路径的配置
Spring boot默认是/ ,这样直接通过http://ip:port/就可以访问到index页面,如果要修改为http://ip:port/path/ 访问的话,那么需要在Application ...
- SpringBoot中自定义properties文件配置参数并带有输入提示
1. 创建配置类 在项目中创建一个参数映射类如下 @ConfigurationProperties(prefix = "user.info") public class MyPro ...
- SpringBoot中自定义错误页面
错误页面定制(在有模板引擎的情况下): 有模板的支持下: 在templates文件夹下 建立 error文件夹 在error文件夹下 404.html 500.html 4xx.html (名字就叫4 ...
- springBoot中实现自定义属性配置、实现异步调用、多环境配置
springBoot中其他相关: 1:springBoot中自定义参数: 1-1.自定义属性配置: 在application.properties中除了可以修改默认配置,我们还可以在这配置自定义的属性 ...
- springboot中使用自定义两级缓存
工作中用到了springboot的缓存,使用起来挺方便的,直接引入redis或者ehcache这些缓存依赖包和相关缓存的starter依赖包,然后在启动类中加入@EnableCaching注解,然后在 ...
- springboot中使用拦截器、监听器、过滤器
拦截器.过滤器.监听器在web项目中很常见,这里对springboot中怎么去使用做一个总结. 1. 拦截器(Interceptor) 我们需要对一个类实现HandlerInterceptor接 ...
- springboot(整合多数据源demo,aop,定时任务,异步方法调用,以及获取properties中自定义的变量值)
有这么一个需求 每个部门,需要操作的数据库不同,A部门要将数据放test数据库,B 部门数据 要放在test1数据库 同一个项目 需要整合 多个数据源 上传个demo 方便自己以后回看!!!!!!!! ...
- Button 在布局文件中定义监听器,文字阴影,自定义图片,代码绘制样式,添加音效的方法
1.Button自己在xml文件中绑定监听器 <LinearLayout xmlns:android="http://schemas.android.com/apk/res/andro ...
- Springboot 之 自定义配置文件及读取配置文件注意:配置文件中的字符串不要有下划线 .配置中 key不能带下划线,value可以(下划线的坑,坑了我两天..特此纪念)
注意:配置文件中的字符串不要有下划线 .配置中 key不能带下划线,value可以 错误的.不能读取的例子: mySet .ABAP_AS_POOLED = ABAP_AS_WITH_P ...
随机推荐
- 01二分 [AGC006D] Median Pyramid Hard + P2824 [HEOI2016/TJOI2016] 排序
[AGC006D] Median Pyramid Hard 考虑对于一个长度为 2n + 1 的 01 序列 b 如何快速确定堆顶元素. _ _ _ _ x _ _ _ 0 x _ _ 0 0 x _ ...
- Lua 学习笔记(自用)
Lua 学习笔记 1 语言基础 运行方式类似Python,可以直接在交互行运行,也可以通过解释器运行某个脚本.也可以在交互行运行某个lua脚本 dofile("hello.lua" ...
- DP-Modeler软件初步教程1:数据文件导入
1.导入航拍影像的空三文件 先打开DPSlnManager.exe软件,DP数据管理是用这个软件来操作的. 先从CC中导出空间文件,XML格式和无损影像.然后导入到DP 2.从CC中导出OSGB,然 ...
- cesium教程3-加载3dtile模型,并调整位置
直接上示例代码: <!DOCTYPE html> <html lang="en"> <head> <meta charset=" ...
- SpringBoot3集成WebSocket
标签:WebSocket,Session,Postman. 一.简介 WebSocket通过一个TCP连接在客户端和服务器之间建立一个全双工.双向的通信通道,使得客户端和服务器之间的数据交换变得更加简 ...
- OpenOCD + DAP-LINK调试ESP32的失败经历(2)
背景 https://www.cnblogs.com/liteng0305/p/17018299.html 上次使用乐鑫编译好的OpenOCD失败,可能是因为没有开启CMSIS-DAP支持,手动开启编 ...
- Hibernate双向关联导致Java对象转换为JSON字符串时死循环问题的分析与解决方案
引言: 本文描述了在SSH框架中,多个持久层对象相互引用,从而引发分页查询中,查询所得的持久化对象转换为JSON字符串报错的原因及解决方案 使用EasyUI框架的小伙伴们都知道,在使用datagrid ...
- windows下载安装ipopt求解器 可用于pyomo调用
方案一:采用官方编译的应用程序 官方对windows下有已经编译好的应用程序,只需要下载下来,并将ipopt的应用程序所在文件夹路径添加到系统全局环境变量就可以了.这样在利用pyomo或者其他建模工具 ...
- docker离线安装
1. yum安装 #源添加 wget -O /etc/yum.repos.d/CentOS-Base.repo http://mirrors.aliyun.com/repo/Centos-7.repo ...
- Vue3组件通信方式
Vue3组件通信方式 不管是vue2还是vue3,组件通信方式很重要,不管是项目还是面试都是经常用到的知识点. 比如:vue2组件通信方式 props:可以实现父子组件.子父组件.甚至兄弟组件通信 自 ...