WPF --- TextBox的输入校验
引言
在WPF应用程序开发中,数据校验是确保用户输入数据的正确性和完整性的重要一环。
之前在做一些参数配置功能时,最是头疼各种参数校验,查阅一些资料后,我总结了数据校验方式有两种:
- ValidationRule
- IDataErrorInfo
接下来分别介绍这两种校验方式。
ValidationRule
ValidationRule 是一个抽象类,提供了抽象方法 Validate(), 它是WPF中用于数据验证的一种机制,它可以在用户输入数据之前或之后执行自定义的验证逻辑。可以轻松地实现对数据的格式、范围、逻辑等方面的验证,并在验证失败时提供相应的反馈信息。
ValidationRule主要作用域在前端页面上。
基本用法
首先创建一个 ValidationRule,我这里设定了两个属性 MaxVal、MinVal,然后在 Validate() 方法中判断空、判断大于上限或小于下限,然后在符合条件是,返回 ValidationResult,并给出错误提示:
public class IntegerValidationRule : ValidationRule

{

    public int MaxVal { get; set; }

    public int MinVal { get; set; }

    public override ValidationResult Validate(object value, CultureInfo cultureInfo)

    {

        string text = value as string;

        if (!int.TryParse(text, out int result))

        {

            return new ValidationResult(false, "Text cannot be empty.");

        }

        if (result > MaxVal)

        {

            return new ValidationResult(false, "Value out of upper limit range.");

        }

        if (result < MinVal)

        {

            return new ValidationResult(false, "Value out of lower limit range.");

        }

        return ValidationResult.ValidResult;

    }

}
接下来创建有个测试使用的 ViewModel:
public class TestViewModel : INotifyPropertyChanged

{

    private TestViewModel() { }

    public static TestViewModel Instance { get; } = new TestViewModel();

    public event PropertyChangedEventHandler? PropertyChanged;

    protected void OnPropertyChanged(string propertyName)

    {

        PropertyChanged?.Invoke(this, new PropertyChangedEventArgs(propertyName));

    }

    private int testField1;

    /// <summary>

    /// 测试属性1

    /// </summary>

    public int TestField1

    {

        get => testField1;

        set

        {

            testField1 = value;

            OnPropertyChanged(nameof(TestField1));

        }

    }

    private int testField2;

    /// <summary>

    /// 测试属性2

    /// </summary>

    public int TestField2

    {

        get => testField2;

        set

        {

            testField2 = value;

            OnPropertyChanged(nameof(TestField2));

        }

    }

}
在测试之前,我们可以先看一下 Binding 的方法列表:
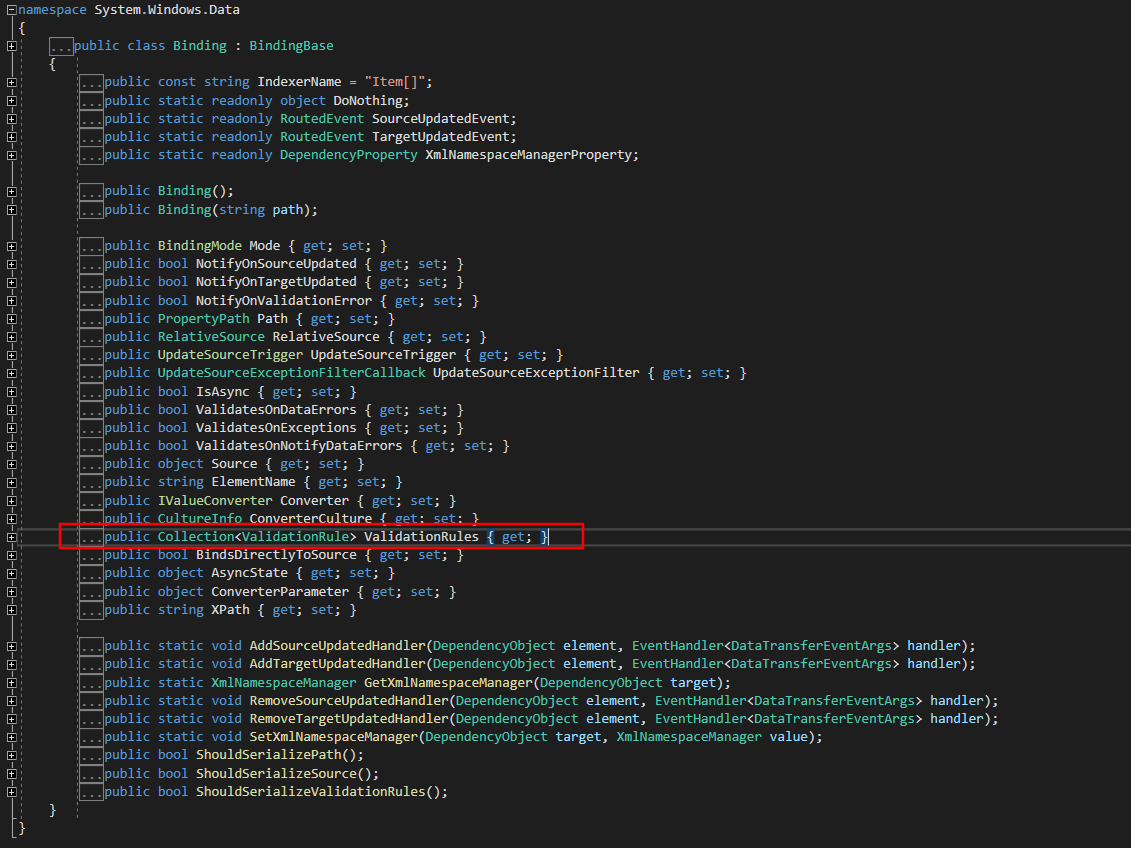
可以看到 ValidationRules 是 Binding 下的集合,这意味着 ValidationRule 是在 Binding 下使用且可以执行多个校验规则。校验时按照顺序依次校验。
接下来我们创建一个WPF应用程序,在界面添加 TextBox,命名为”textbox1“,将文本绑定在 TestViewModel 的 TestField1。
且为Validation.ErrorTemplate 绑定一个模板,这里绑定了一个红色的感叹号。
然后为 TextBox 设置触发器,当 Validation.HasError为 true时,将 ToolTip 绑定校验失败的错误提示。
代码如下:
<Window

    x:Class="WpfApp4.MainWindow"

    xmlns="http://schemas.microsoft.com/winfx/2006/xaml/presentation"

    xmlns:x="http://schemas.microsoft.com/winfx/2006/xaml"

    xmlns:d="http://schemas.microsoft.com/expression/blend/2008"

    xmlns:local="clr-namespace:WpfApp4"

    xmlns:mc="http://schemas.openxmlformats.org/markup-compatibility/2006"

    Title="MainWindow"

    Width="900"

    Height="450"

    mc:Ignorable="d">

    <Window.Resources>

        <ControlTemplate x:Key="ValidationTemplate">

            <DockPanel>

                <TextBlock

                    Margin="-10,0,0,0"

                    VerticalAlignment="Center"

                    FontSize="22"

                    Foreground="Red"

                    Text="!" />

            </DockPanel>

        </ControlTemplate>

        <Style TargetType="TextBox">

            <Style.Triggers>

                <Trigger Property="Validation.HasError" Value="true">

                    <Setter Property="ToolTip" Value="{Binding RelativeSource={RelativeSource Self}, Path=(Validation.Errors)[0].ErrorContent}" />

                </Trigger>

            </Style.Triggers>

        </Style>

    </Window.Resources>

    <Grid>

        <Grid.ColumnDefinitions>

            <ColumnDefinition Width="1*" />

            <ColumnDefinition Width="1*" />

        </Grid.ColumnDefinitions>

        <StackPanel Grid.Column="0">

            <TextBlock

                HorizontalAlignment="Center"

                FontSize="18"

                FontWeight="Bold"

                Text="Validation Demo" />

            <TextBox

                Name="textBox1"

                Height="30"

                Margin="10"

                FontSize="22"

                Validation.ErrorTemplate="{StaticResource ValidationTemplate}">

                <TextBox.Text>

                    <Binding Path="TestField1" UpdateSourceTrigger="PropertyChanged">

                        <Binding.ValidationRules>

                            <local:IntegerValidationRule

                                MaxVal="999"

                                MinVal="5" />

                        </Binding.ValidationRules>

                    </Binding>

                </TextBox.Text>

            </TextBox>

        </StackPanel>

    </Grid>

</Window>
最后在窗体后台绑定 ViewModel:
public MainWindow()

{

    InitializeComponent();

    this.DataContext =  TestViewModel.Instance;

}
测试
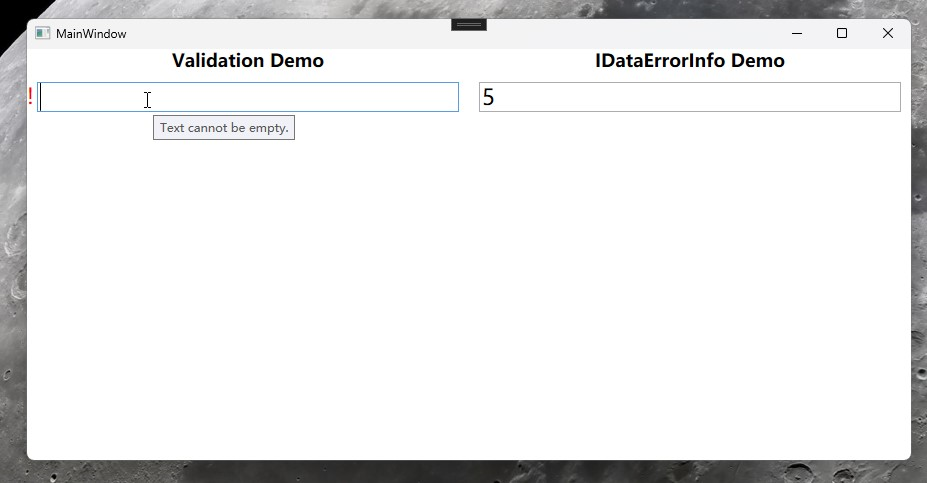
为空时,出现红色叹号,
ToolTip提示 "Text cannot be empty."
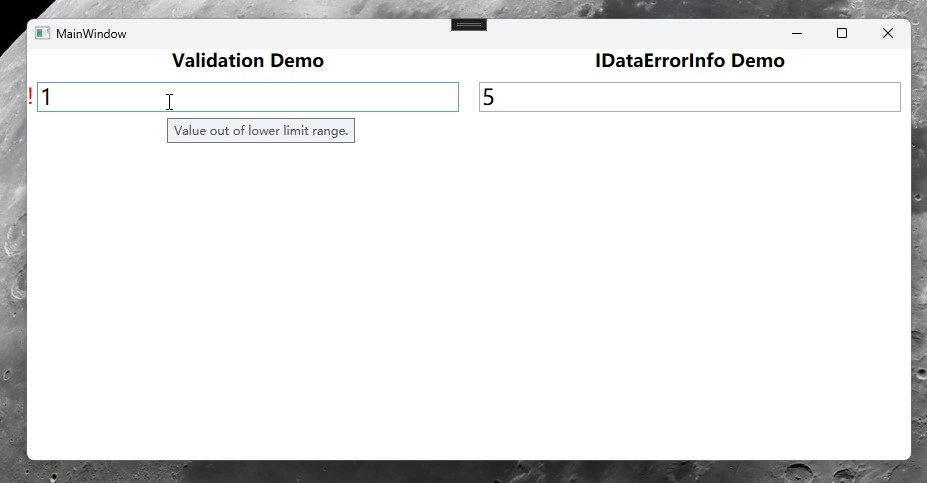
小于下限时,出现红色叹号,
ToolTip提示 "Value out of lower limit range."
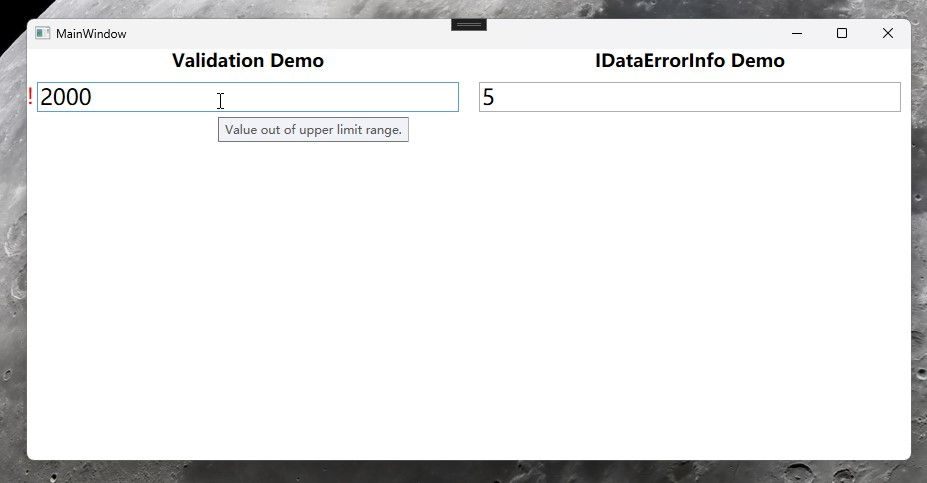
大于上限时,出现红色叹号,
ToolTip提示 "Value out of upper limit range."
IDataErrorInfo
IDataErrorInfo 是一个接口,Viewmodel 实现接口用于在后台,提供数据验证和错误信息。
IDataErrorInfo 主要作用域为后台 ViewModel
该接口包含两个成员:Error 和 this[string columnName]。这两个成员允许你在数据绑定时提供验证错误信息。
基本用法
接下来,在程序里添加 TextBox,命名为”textbox2“,并添加一个 TextBlock 绑定 Error 展示在界面。
<StackPanel Grid.Column="1">

    <TextBlock

        HorizontalAlignment="Center"

        FontSize="18"

        FontWeight="Bold"

        Text="IDataErrorInfo Demo" />

    <TextBox

        Name="textBox2"

        Margin="10"

        VerticalAlignment="Center"

        FontSize="22"

        Text="{Binding TestField2, Mode=TwoWay, UpdateSourceTrigger=PropertyChanged, ValidatesOnDataErrors=True}" />

     <TextBlock

         HorizontalAlignment="Center"

         FontSize="18"

         FontWeight="Bold"

         Foreground="Red"

         Text="{Binding Error, Mode=TwoWay, UpdateSourceTrigger=PropertyChanged}" />

</StackPanel>
后台 TestViweModel 实现 IDataErrorInfo,依旧是判断上限值和下限值,此处不判断空,是因为后台 TestField2 类型是Int,为空时不会赋值,代码如下:
public class TestViewModel : INotifyPropertyChanged, IDataErrorInfo
{
//省略上文已有代码..。
private string error;
public string Error
{
get => error;
set
{
error = value; OnPropertyChanged(nameof(Error));
}
}
public string this[string columnName]
{
get
{
switch (columnName)
{
case nameof(TestField2):
return CheckTestFild2();
default:
return null;
}
}
}
public int MaxVal = 999;
public int MinVal = 5;
private string CheckTestFild2()
{
if (TestField2 > MaxVal)
{
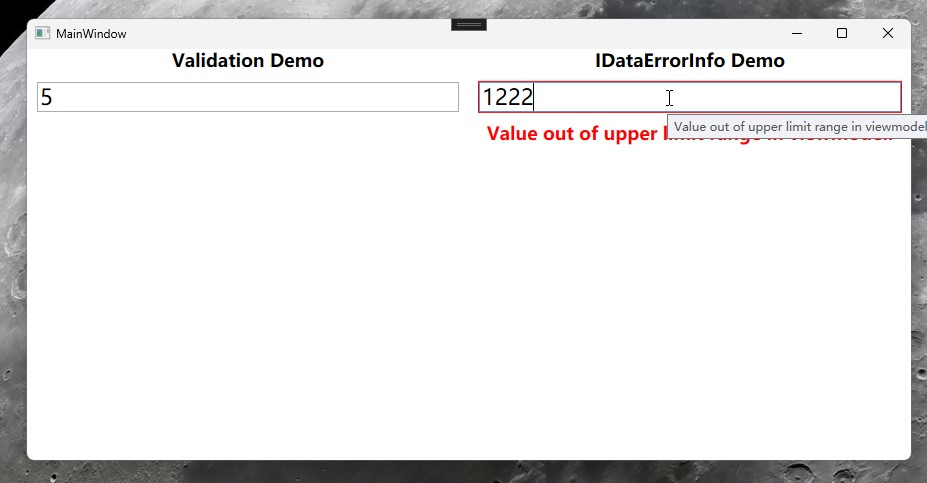
Error = "Value out of upper limit range in viewmodel.";
}
else if (TestField2 < MinVal)
{
Error = "Value out of lower limit range in viewmodel.";
}
else
{
Error = string.Empty;
}
return Error;
}
}
测试
小于下限时,出现红色文字提示,
ToolTip提示 "Value out of lower limit range in viewmodel."

大于上限时,出现红色文字提示,
ToolTip提示 "Value out of upper limit range in viewmodel."
小结
以上两种数据校验(IDataErrorInfo、ValidationRule)的方式,均可以实现自定义数据校验,例如对数据的格式、范围、逻辑等方面的验证,并在验证失败时提供相应的反馈信息。
ValidationRule适用于在界面做数据校验,且可以定义多个校验规则。
ValidationRule适用于在ViewModel做数据校验,可以做一些无法在前端页面做的事情,比如出现异常值是还原为默认值。
所以两者既可以单独使用,也可以组合使用,即使使用MVVM模式,依旧能够优雅的做数据校验。
WPF --- TextBox的输入校验的更多相关文章
- WPF TextBox 验证输入
//验证输入为数字private void txt_time_KeyDown(object sender, KeyEventArgs e){ if (!((e.Key >= Key.D0 &am ...
- WPF TextBox 只能输入数字键
<Grid> <TextBox Name="textBox1" PreviewTextInput="textBox1_PreviewT ...
- wpf textbox只能输入数字,屏蔽中文输入
1.设置textbox属性InputMethod.IsInputMethodEnabled="False" 2.增加KeyDown事件 private void TextBox_K ...
- (WPF) Textbox 每次输入触发事件处理
1. Code behind. protected void TextBox1_TextChanged(object sender, EventArgs e) { Label1.Text = Ser ...
- 正则表达式——WPF输入控件TextBox 限定输入特定字符
概念: 正则表达式是对字符串操作的一种逻辑公式, 就是用事先定义好的一些特定字符.及这些特定字符的组合,组成一个“规则字符串”, 这个“规则字符串”用来表达对字符串的一种过滤逻辑. 目的: 给定一个正 ...
- WPF TextBox按字节长度限制输入
前两天做一个项目的时候,由于页面没有限制TextBox的输入长度,所以,后台直接报错了,超出数据库最大的长度. 数据库的长度是按照字节来计算的,而且不同的编码格式,汉字占用的字节长度又不相同,比如,我 ...
- WPF TextBox 一些设置技巧
WPF TextBox 一些设置技巧 运行环境:Win10 x64, NetFrameWork 4.8, 作者:乌龙哈里,日期:2019-05-01 参考: 章节: 取消输入法 输入方式设定为Over ...
- C#设置textBox只能输入数字(正数,负数,小数)简单实现
/* *设置textBox只能输入数字(正数,负数,小数) */ public static bool NumberDotTextbox_KeyPress(object sender, KeyPres ...
- struts_20_对Action中所有方法、某一个方法进行输入校验(基于XML配置方式实现输入校验)
第01步:导包 第02步:配置web.xml <?xml version="1.0" encoding="UTF-8"?> <web-app ...
- struts_19_对Action中所有方法、某一个方法进行输入校验(手工编写代码实现输入校验)
对所有方法进行校验1.通过手工编写代码的形式实现 需求:用户名:不能为空手机号:不能为空,并且要符合手机号的格式1,3/5/8,后面是9个数字 第01步:导包 第02步:配置web.xml <? ...
随机推荐
- 使用guestmount更改qcow2镜像内容
参考: 使用guestmount更改qcow2镜像内容 guestmount 安装 yum install libguestfs libguestfs-tools -y 使用 guestmount - ...
- 关于quartus II的导入以前的工程,QSF文件出现的错误的解决方案。
在有时候打开以前的工程,或者别人做好的例程会遇到一些报错信息.具体报错信息如下: 报错信息语句行: 在文件QSF文件中有几行出错,显示错误读取,即不能打开工程.打开文件发现该几行的PIN 使能信号处于 ...
- 2021-3-9 excel导出
public void ExportExcel(DataTable dt) { //要添加epplus的nuget包 ExcelPackage.LicenseContext = LicenseCont ...
- 代码随想录算法训练营第四天|力扣24.两两交换链表节点、力扣19.删除链表的倒数第N个结点、力扣面试02.07链表相交、力扣142.环形链表
两两交换链表中的节点(力扣24.) dummyhead .next = head; cur = dummyhead; while(cur.next!=null&&cur.next.ne ...
- 静态vlan的划分
静态vlan的划分 1,toupu图 2,配置id与子网掩码 2.1,pc,server的ip与子网配置 pc5 pc6 pc7 pc8 server1 server2 3,vlan的静态划分 1,v ...
- spring-mvc 系列:视图(ThymeleafView、InternalResourceView、RedirectView)
目录 一.ThymeleafView 二.转发视图 三.重定向视图 四.视图控制器view-controller 五.配置jsp解析 SpringMVC中的视图是View接口,视图的作用渲染数据,将模 ...
- 【Nacos篇】Nacos基本操作及配置
官方文档:https://nacos.io/zh-cn/docs/v2/ecology/use-nacos-with-spring-cloud.html 前置条件:SpringCloud脚手架 单机模 ...
- 4.4 C++ Boost 数据集序列化库
Boost 库是一个由C/C++语言的开发者创建并更新维护的开源类库,其提供了许多功能强大的程序库和工具,用于开发高质量.可移植.高效的C应用程序.Boost库可以作为标准C库的后备,通常被称为准标准 ...
- 如何在linux上安装neovim0.9(以debian和ubuntu为例) – 东凭渭水流
发布于 1 分钟前 3 次阅读 由于apt中只有neovim-0.72的安装包.想使用新版需要自己安装,以下是安装过程 1.首先需要卸载旧版neovim sudo remove neovim 2.从 ...
- Job System 初探
作者:i_dovelemon 日期:2023-08-24 主题:Fiber, Atomic Operation, MPMC Queue, Multiple thread, Job system 引言 ...