
部署堡垒机2——安装MySQL8.0.32或8.0.28+
MySQL的三大版本
a)MySQL Enterprise Edition:企业版本(付费)
b)MySQL Cluster CGE:高级集群版(收费)
c)MySQL Community Server:社区版(开源)
登录MySQL官网
https://www.mysql.com/downloads/
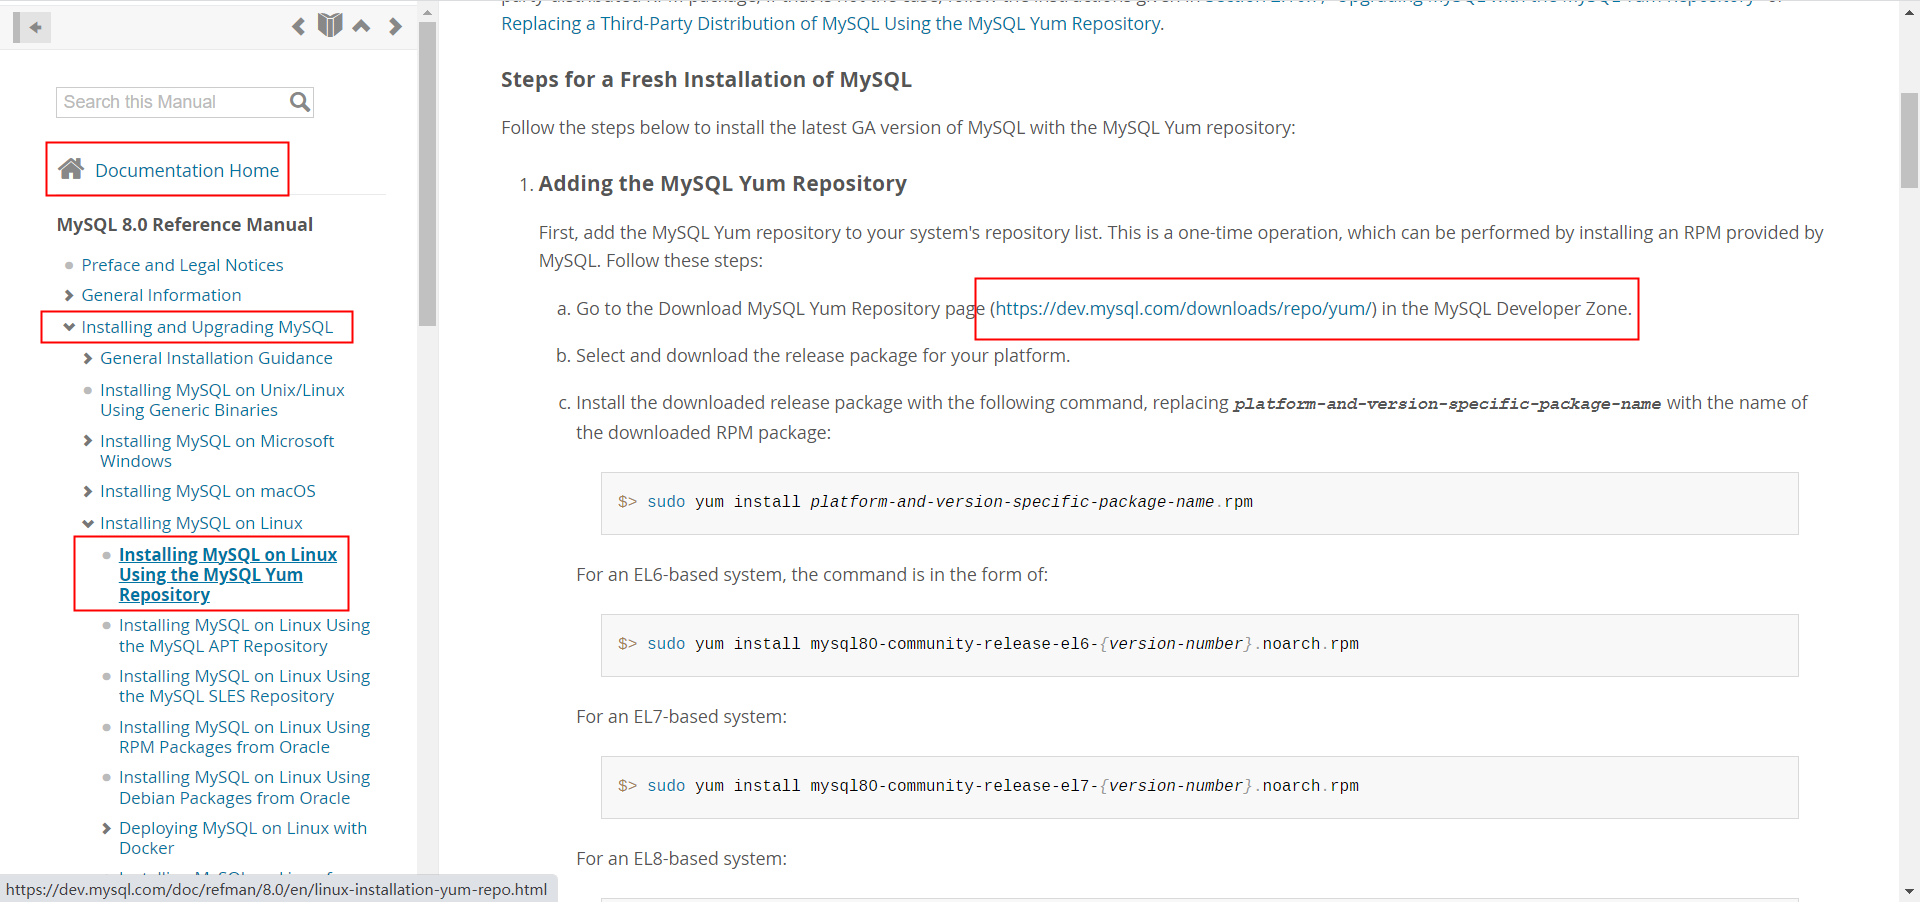
点击“DOCUMENTATION”——“MySQL Server”——“Installing and Upgrading MySQL”——“Installing MySQL on Linux”
点击:Installing MySQL on Linux Using the MySQL Yum Repository
点击:https://dev.mysql.com/downloads/repo/yum/
点击linux 7——download

右键复制链接地址
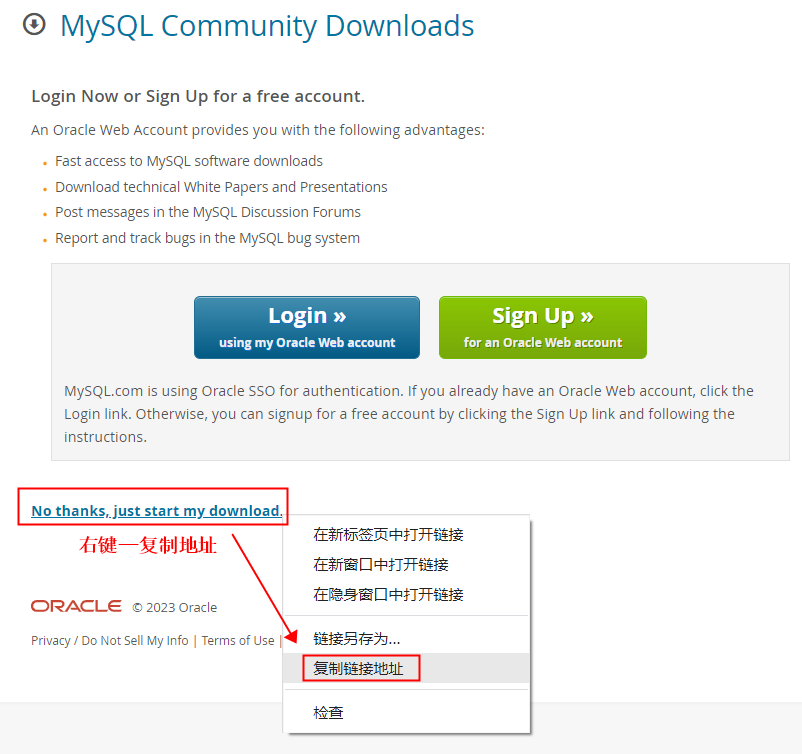
wget https://dev.mysql.com/get/mysql80-community-release-el7-7.noarch.rpm操作步骤如下:
cd /opt/

wget https://dev.mysql.com/get/mysql80-community-release-el7-7.noarch.rpm

yum install mysql80-community-release-el7-7.noarch.rpm

gcc -v

yum update -y

yum list | grep mysql

yum install -y mysql-community-server

root@jumpserver-app-t01:/opt#mysql -V

mysql  Ver 8.0.32 for Linux on x86_64 (MySQL Community Server - GPL)
启动mysqld服务
root@jumpserver-app-t01:/opt/mysql#systemctl start mysqld

root@jumpserver-app-t01:/opt/mysql#systemctl status mysqld

root@jumpserver-app-t01:/opt/mysql#systemctl enable mysqld

root@jumpserver-app-t01:/opt/mysql#
找到mysql的默认密码在这里:root@localhost: si<%<s%x7.On
root@jumpserver-app-t01:/var/log#cat /var/log/mysqld.log

2023-02-21T11:06:14.287837Z 0 [System] [MY-013169] [Server] /usr/sbin/mysqld (mysqld 8.0.32) initializing of server in progress as process 90720

2023-02-21T11:06:14.296083Z 1 [System] [MY-013576] [InnoDB] InnoDB initialization has started.

2023-02-21T11:06:14.658319Z 1 [System] [MY-013577] [InnoDB] InnoDB initialization has ended.

2023-02-21T11:06:15.848026Z 6 [Note] [MY-010454] [Server] A temporary password is generated for root@localhost: si<%<s%x7.On

2023-02-21T11:06:18.815307Z 0 [System] [MY-010116] [Server] /usr/sbin/mysqld (mysqld 8.0.32) starting as process 90787

2023-02-21T11:06:18.821989Z 1 [System] [MY-013576] [InnoDB] InnoDB initialization has started.

2023-02-21T11:06:18.911013Z 1 [System] [MY-013577] [InnoDB] InnoDB initialization has ended.

2023-02-21T11:06:19.119711Z 0 [Warning] [MY-010068] [Server] CA certificate ca.pem is self signed.

2023-02-21T11:06:19.119756Z 0 [System] [MY-013602] [Server] Channel mysql_main configured to support TLS. Encrypted connections are now supported for this channel.

2023-02-21T11:06:19.136298Z 0 [System] [MY-011323] [Server] X Plugin ready for connections. Bind-address: '::' port: 33060, socket: /var/run/mysqld/mysqlx.sock

2023-02-21T11:06:19.136335Z 0 [System] [MY-010931] [Server] /usr/sbin/mysqld: ready for connections. Version: '8.0.32'  socket: '/var/lib/mysql/mysql.sock'  port: 3306  MySQL Community Server - GPL.

root@jumpserver-app-t01:/var/log#
此时需要到mysql中使用临时密码登录,并修改临时密码,因为临时密码是不可用的
mysql -uroot -p

si<%<s%x7.On

mysql> alter user root@'localhost' identified by'*******@666';

Query OK, 0 rows affected (0.00 sec)

mysql> flush privileges;    #刷新数据表信息后exit退出

Query OK, 0 rows affected (0.00 sec)

mysql>exit

Bye
分割线
PS:简单的MySQL安装方法,去阿里源中找到mysql-community-server-8.0.28-1.el7.x86_64.rpm,下载到本地后,然后yum localinstall ./*
这样既能安装该组件,还能安装所需依赖
cd /opt

mkdir mysql

cd mysql

wget https://mirrors.aliyun.com/mysql/MySQL-8.0/mysql-community-server-8.0.28-1.el7.x86_64.rpm?spm=a2c6h.25603864.0.0.5e8670b2c1XZn4

yum localinstall ./*

后面一路选Y安装即可

systemctl start mysqld

systemctl status mysqld

systemctl enable mysqld
分割线
1、创建JumpServer数据库,并存储为中文支持格式
root@jumpserver-app-t01.novalocal:/jumpserver/mysql_rpm#mysql -uroot -p

Enter password:

mysql> create database jumpserver default charset 'utf8' collate 'utf8_bin';

Query OK, 1 row affected, 2 warnings (0.00 sec)

mysql>
2、创建用户 @是占位符、%是允许该账号在任何位置都可以登录
mysql> create user 'jumpserver'@'%' IDENTIFIED BY '******66666';

Query OK, 0 rows affected (0.00 sec)

mysql> flush privileges;

Query OK, 0 rows affected (0.00 sec)

###mysql登录报错时用这个命令

alter user jumpserver@'%' identified with mysql_native_password by '******66666';

###登录报错内容如下:

root@jumpserver-app-p01:/root#mysql -h 10.15.32.10 -P 3306 -u jumpserver -p

Enter password:

ERROR 2059 (HY000): Authentication plugin 'caching_sha2_password' cannot be loaded: /usr/lib64/mysql/plugin/caching_sha2_password.so: cannot open shared object file: No such file or directory
3、给JumpServer用户授予访问JumpServer数据库的权限。
#grant授权'jumpserver'@'%'用户在使用identified by 'chaoge888'密码时,允许访问jumpserver.*所有的表,的all privileges所有权限“添删改查”

mysql> grant all privileges on jumpserver.* to 'jumpserver'@'%' ;

Query OK, 0 rows affected (0.01 sec)

mysql> flush privileges;

Query OK, 0 rows affected (0.00 sec)

mysql>exit

Bye
MySQL数据库基础常用命令8.0版本适用
#查询数据库账户

select user, host from mysql.user;

#删除账户 'zabbix'

drop user 'zabbix'@'%';

#查询数据库

show databases;

#删除数据库zabbix;

drop database zabbix;

#修改账户密码

alter user 'zabbix'@'%' identified  by 'Qqqq1234.com';
ubuntu安装的mysql,默认配置文件保存在/etc/mysql/mysql.conf.d/mysqld.cnf
root@JumpServer-DB-P01:/opt# cat /etc/mysql/mysql.conf.d/mysqld.cnf

#

# The MySQL database server configuration file.

#

# One can use all long options that the program supports.

# Run program with --help to get a list of available options and with

# --print-defaults to see which it would actually understand and use.

#

# For explanations see

# http://dev.mysql.com/doc/mysql/en/server-system-variables.html

# Here is entries for some specific programs

# The following values assume you have at least 32M ram

[mysqld]

#

# * Basic Settings

#

user		= mysql

# pid-file	= /var/run/mysqld/mysqld.pid

# socket	= /var/run/mysqld/mysqld.sock

# port		= 3306

# datadir	= /var/lib/mysql

# If MySQL is running as a replication slave, this should be

# changed. Ref https://dev.mysql.com/doc/refman/8.0/en/server-system-variables.html#sysvar_tmpdir

# tmpdir		= /tmp

#

# Instead of skip-networking the default is now to listen only on

# localhost which is more compatible and is not less secure.

bind-address		= 0.0.0.0

mysqlx-bind-address	= 0.0.0.0

#

# * Fine Tuning
部署堡垒机2——安装MySQL8.0.32或8.0.28+的更多相关文章
- jumpserver跳板机(堡垒机)安装
jumpserver跳板机(堡垒机) Jumpserver 是一款由Python编写开源的跳板机(堡垒机)系统,实现了跳板机应有的功能,基于ssh协议来管理,客户端无需安装agent,助力互联网企业 ...
- 开源堡垒机Gateone 安装过程记录及报错处理
1.下载git源码或者zip包都可以,下载到我们制定部署目录. git地址:https://github.com/liftoff/GateOne.git 2.检查tornado 版本,安装tornad ...
- Jumpserver(堡垒机)的安装与应用
官网:http://docs.jumpserver.org/zh/docs/introduce.html 作者:邓聪聪 环境 系统: CentOS 7.6 IP: 172.16.16.2 关闭 sel ...
- day11 堡垒机
项目实战:运维堡垒机开发 前景介绍 到目前为止,很多公司对堡垒机依然不太感冒,其实是没有充分认识到堡垒机在IT管理中的重要作用的,很多人觉得,堡垒机就是跳板机,其实这个认识是不全面的,跳板功能只是堡垒 ...
- python【第十三篇】可以写一个堡垒机了
前景介绍 到目前为止,很多公司对堡垒机依然不太感冒,其实是没有充分认识到堡垒机在IT管理中的重要作用的,很多人觉得,堡垒机就是跳板机,其实这个认识是不全面的,跳板功能只是堡垒机所具备的功能属性中的其中 ...
- Python之路,Day12 - 那就做个堡垒机吧
Python之路,Day12 - 那就做个堡垒机吧 本节内容 项目实战:运维堡垒机开发 前景介绍 到目前为止,很多公司对堡垒机依然不太感冒,其实是没有充分认识到堡垒机在IT管理中的重要作用的,很多 ...
- Day12 - 堡垒机开发
Python之路,Day12 - 那就做个堡垒机吧 本节内容 项目实战:运维堡垒机开发 前景介绍 到目前为止,很多公司对堡垒机依然不太感冒,其实是没有充分认识到堡垒机在IT管理中的重要作用的,很多 ...
- Django项目:堡垒机(Linux服务器主机管理系统)--03--03堡垒机在Linux系统里记录会话日志02/02
#main.py #本文件写所有的连接交互动作程序 # ————————————————03堡垒机在Linux系统里记录会话日志 开始———————————————— from Fortress im ...
- Django项目:堡垒机(Linux服务器主机管理系统)--02--02堡垒机设计后台交互程序
#main.py #本文件写所有的连接交互动作程序 #————————————————02堡垒机设计后台交互程序 开始———————————————— from django.contrib.auth ...
- Python之堡垒机
本节内容 项目实战:运维堡垒机开发 前景介绍 到目前为止,很多公司对堡垒机依然不太感冒,其实是没有充分认识到堡垒机在IT管理中的重要作用的,很多人觉得,堡垒机就是跳板机,其实这个认识是不全面的,跳板功 ...
随机推荐
- 【ChatGPT-应用篇】基于chatGPT覆盖测试过程的初步探索
1.前言 22年底ChatGPT就已风靡行业内外,简单来说,它是基于自然语言生成式 AI 模型,打造的一款聊天机器人.是 OpenAI 于 11 月 30 日推出的最新作品,供公众免费测试.他可以根据 ...
- 「codeforces - 185D」Visit of the Great
link. 简单提一下做法,注意到 \(k^{2^a}\equiv k^{2^b}\equiv-1\equiv (-1)^{2^{b-a}}=1\pmod{(k^{2^a}+1,k^{2^{b}}+1 ...
- Linux平台Oracle 23c单实例 安装部署配置 快速参考
转眼间已经2023年,再有一周就要过年了,在这里先给大家拜个早年,祝大家新的一年万事顺利. Oracle如今版本号也和年份挂钩,在前段时间的OCW上也宣布发布了beta版本的23c,因为23c是继19 ...
- 深入理解java和dubbo的SPI机制
1 SPI简介 1.1 SPI(Service Provider Interface) 本质:将接口实现类的全限定名配置在文件中,并由服务加载器读取配置文件,加载实现类.这样可以在运行时,动态为接口替 ...
- 游戏客户端开发中对MVC模式的思考
话说在前头,我分析MVC模式是为了确定自己要做的独立游戏的结构出来,并不适用于大型商业游戏的开发. MVC模式的概述 关于MVC模式,Model用于存储数据,View层用于显示数据,Controlle ...
- Java 基础学习第一弹
1. equels和==的区别 equals方法用于比较对象的内容是否相等,可以根据自定义的逻辑来定义相等的条件,而==操作符用于比较对象的引用是否相等,即它们是否指向同一块内存地址.equals方法 ...
- django admin字段设置大全
# 在列表页显示的字段,默认会显示所有字段,有对应的方法可以重写 list_display = ('__str__',) # 在列表页显示的字段中,可以链接到change_form页面的字段 list ...
- 搭建LNMP
搭建LNMP 准备(关闭防火墙,selinux) systemctl stop firewalld systemctl disable firewalld setenforce 0 安装依赖包( ...
- 请教shell读写XML问题
请教shell读写XML问题 现有 123.xml文件,内容是:<?xml version="1.0" encoding="GBK"?><vi ...
- srm-50
刚开始拿到题目没有思路,看了字符串发现也没什么特别的,也没有提示输入什么什么,然后找到main函数,f5进去以后也没什么特别的 然后就看了wp发现得从程序本身出发去解决问题 点开程序,随便输入点什么 ...