
springBoot配置elasticsearch搜索
1、本地安装elasticsearch服务,具体过程见上一篇文章(安装和配置elasticsearch服务集群)
2、修改项目中pom文件,引入搜索相关jar包
<!-- elasticsearch相关jar包开始 -->

	<dependency>

		<groupId>org.springframework.boot</groupId>

		<artifactId>spring-boot-starter-data-elasticsearch</artifactId>

	</dependency>
     <!-- 链接数据库用的jar包 -->

	<dependency>

		<groupId>org.springframework.boot</groupId>

		<artifactId>spring-boot-starter-jdbc</artifactId>

	</dependency>

<!-- elasticsearch相关jar包结束 -->
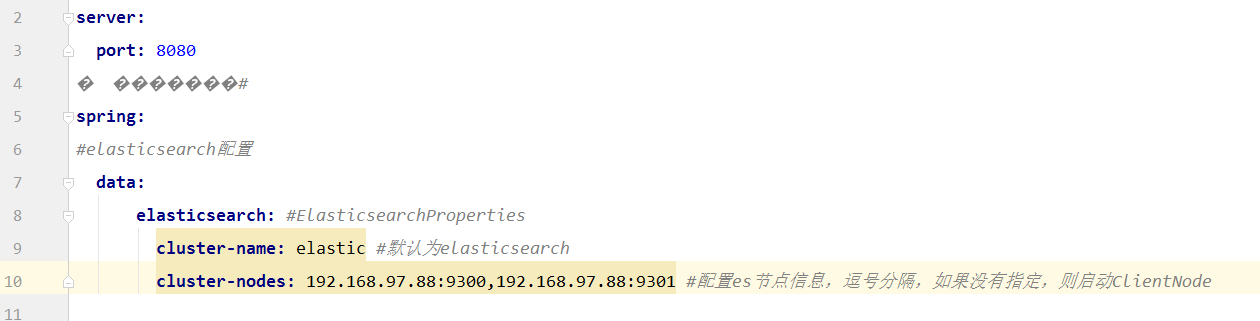
2、在application.yml文件中添加elasticsearch配置信息
spring:

  #elasticsearch配置
  data:
    elasticsearch: #ElasticsearchProperties
    cluster-name: elastic #默认为elasticsearh
    cluster-nodes: 192.168.97.88:9300,192.168.97.88:9301 #配置es节点信息,逗号分隔,如果没有指定,则启动ClientNode
3、编写elasticsearch操作的相关类
(1)、获取elasticsearch客户端
//获取elasticsearch客户端

String hostName = "192.168.97.88" ; //本地elasticsearch的yml配置文件中写的IP地址

Integer port = 9200 ; //远程链接的端口号为9200

RestClient restClient = RestClient.builder(new HttpHost(hostName, port)).build();

/*

//如果想要获取阿里云上的elasticsearch客户端,代码如下

final CredentialsProvider credentialsProvider = new BasicCredentialsProvider();

credentialsProvider.setCredentials(AuthScope.ANY,new UsernamePasswordCredentials("阿里云elasticsearch用户名", "阿里云elasticsearch密码"));

RestClient restClient = RestClient.builder(new HttpHost("阿里云elasticsearch的ip", 9200))

                       .setHttpClientConfigCallback(new RestClientBuilder.HttpClientConfigCallback() {

                          @Override

                          public HttpAsyncClientBuilder customizeHttpClient(HttpAsyncClientBuilder httpClientBuilder) {

                              return httpClientBuilder.setDefaultCredentialsProvider(credentialsProvider);

                          }

                      }).setMaxRetryTimeoutMillis(5 * 60 * 1000)  //设置超时时间

                   .build();

*/
(2)、查看索引是否存在 (索引必须为全小写)
//查看 demoIndex 索引是否存在

Response isExist = restClient.performRequest("HEAD","/demoindex" , Collections.<String, String>emptyMap());

System.out.println(isExist.getStatusLine().getStatusCode());
(3)、索引不存在,创建索引
//查看 demoIndex 索引是否存在

Response isExist = restClient.performRequest("HEAD","/demoindex" , Collections.<String, String>emptyMap());

int status = isExist.getStatusLine().getStatusCode();

if( status == 404){

    //不存在索引,创建索引

    String method = "PUT";

    String endpoint = "demoindex";

    Response response = restClient.performRequest(method, "/" + endpoint);

    System.out.println(EntityUtils.toString(response.getEntity()));

}
(4)、索引已经创建存在,我们接下来进行索引的 增删改查 操作
①、新增索引数据
//手动拼写一个符合要求的json串   json串的格式为:{"field1":"value1","field2":"value2"}

String json = "{" +

     "\"user\":\"kimchy\"," +

     "\"postDate\":\"2013-01-30\"," +

     "\"message\":\"trying out Elasticsearch\"" +

     "}";

HttpEntity entity = new NStringEntity(json, ContentType.APPLICATION_JSON);

//发送一个请求,将json转换的实体发送到es,并常见索引,索引主键id=1

Response indexResponse = restClient.performRequest(

       "PUT",

       "/" + "demoindex" + "/" + "demoindex" + "/1",

       Collections.<String, String>emptyMap(),

       entity);

//获取结果中的实体,查看是否新增成功

System.out.println(EntityUtils.toString(indexResponse.getEntity()));
得到如下结果图,表示成功

②、批量新增索引数据 ( bulk )
//批量添加索引数据

//手动拼写一个符合要求的json串

// json串的格式为:

// { "index" : { "_id" : "1" }}   //这里为手动赋值id,也可以{ "index" : { }}为es自动设置id   id相同时后添加的数据会覆盖之前添加的数据

// {"field1":"value1","field2":"value2"}

// { "index" : { "_id" : "2" }}

// {"field1":"value1","field2":"value2"}

String json = "{ \"index\" : { \"_id\" : \"1\" }} \n" +

        "{" +

        "\"user\":\"kimchy1\"," +

        "\"postDate\":\"2013-01-30\"," +

        "\"message\":\"trying out Elasticsearch1\"" +

        "} \n";  //一定要加换行

json += "{ \"index\" : { \"_id\" : \"2\" }} \n" +

        "{" +

        "\"user\":\"kimchy2\"," +

        "\"postDate\":\"2014-01-30\"," +

        "\"message\":\"trying out Elasticsearch2\"" +

        "}";

//将字符串转换成http实体

HttpEntity entity = new NStringEntity(json,ContentType.APPLICATION_JSON);

//发送请求,并的到处理结果

Response response = restClient.performRequest("POST","/demoindex/demoindex/_bulk",Collections.singletonMap("pretty","true"),entity);

//获取结果中的实体,查看是否新增成功

System.out.println(EntityUtils.toString(response.getEntity()));
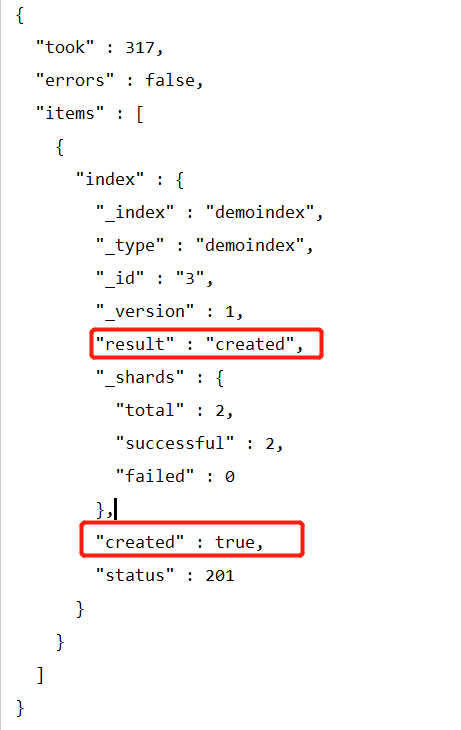
得到如下结果图,则表示批量插入成功;若红框裱起来的位置为update表示修改成功
③、修改单个索引时去执行插入单个索引,将主键id设置为需要更改的索引id即可
④、删除指定索引
//删除指定id索引

Response deleteResponse = restClient.performRequest(

        "DELETE",

        "/demoindex/demoindex/3", //删除id为 3 的索引

        Collections.<String, String>emptyMap());

System.out.println(EntityUtils.toString(deleteResponse.getEntity()));
得到如下结果,表示删除成功

⑤、根据属性来删除对应索引
//根据属性值来删除索引

//删除user="kimchy2"的索引

String queryString = "{\n" +

        "  \"query\": {\n" +

        "\"match_phrase\":  {\"user\": \"kimchy2\"}\n" +

        "}\n" +

        "}\n";

HttpEntity entity = new NStringEntity(queryString, ContentType.APPLICATION_JSON);

Response deleteResponse = restClient.performRequest(

        "POST",

        "/demoindex/demoindex/_delete_by_query",

        Collections.<String, String>emptyMap(),entity);

System.out.println((EntityUtils.toString(deleteResponse.getEntity())));
得到如下结果图表示删除成功

⑥、删除所有索引数据
//删除所有索引数据

String queryString = "";

queryString = "{\n" +

        "  \"query\": {\n" +

        "\"match_all\":  {}\n" +

        "}\n" +

        "}\n";

HttpEntity entity = new NStringEntity(queryString, ContentType.APPLICATION_JSON);

Response deleteResponse = restClient.performRequest(

        "POST",

        "/demoindex/demoindex/_delete_by_query",

        Collections.<String, String>emptyMap(),entity);

System.out.println(EntityUtils.toString(deleteResponse.getEntity()));
⑦、搜索索引中的数据
//查询索引数据

String queryStr = "{ \n" +

                      "\"query\" : { \n" +

                           "\"match_phrase\": { \"user\": { \"query\" : \"kimchy1\", \"boost\" :\"5\" }}}\n" +

                      "}\n" +

                  "}";

HttpEntity entity = new NStringEntity(queryStr, ContentType.APPLICATION_JSON);

Response response = restClient.performRequest("GET", "/demoindex/demoindex/" + "_search",Collections.singletonMap("pretty", "true"),entity);

System.out.println(EntityUtils.toString(response.getEntity()));
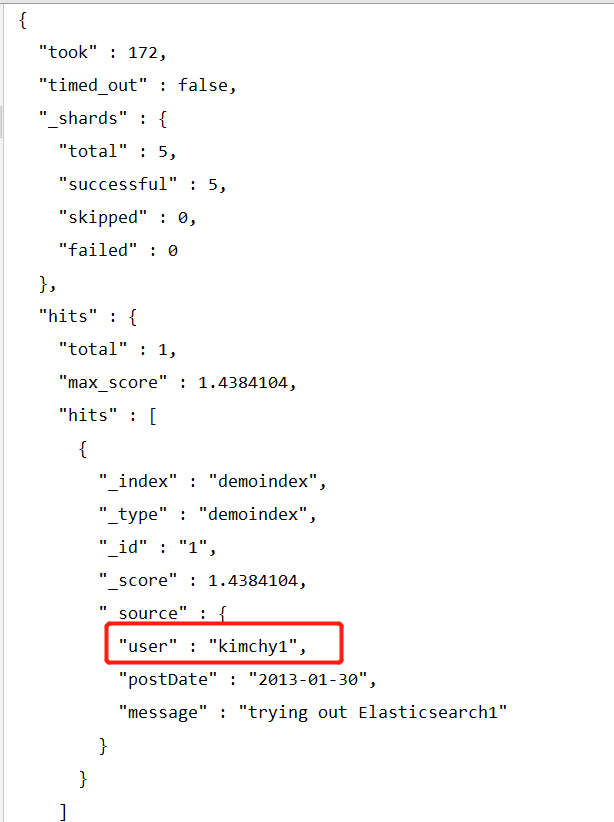
得到查询结果
有关更多查询匹配方式请看下一篇文章
springBoot配置elasticsearch搜索的更多相关文章
- kotlin + springboot启用elasticsearch搜索
参考自: http://how2j.cn/k/search-engine/search-engine-springboot/1791.html?p=78908 工具版本: elasticsearch ...
- springboot 配置elasticsearch Java High Rest Client
前提声明 在新版本的spring boot中逐渐放弃了对Spring Data Elasticsearch的支持,所以不推荐使用,使用ES官方推出的Java High Rest Client. 引入依 ...
- 基于Spring-Boot框架的Elasticsearch搜索服务器配置
一.相关包maven配置 <!-- https://mvnrepository.com/artifact/org.springframework.data/spring-data-elastic ...
- SpringBoot整合ElasticSearch实现多版本的兼容
前言 在上一篇学习SpringBoot中,整合了Mybatis.Druid和PageHelper并实现了多数据源的操作.本篇主要是介绍和使用目前最火的搜索引擎ElastiSearch,并和Spring ...
- springboot集成elasticsearch
在基础阶段学习ES一般是首先是 安装ES后借助 Kibana 来进行CURD 了解ES的使用: 在进阶阶段可以需要学习ES的底层原理,如何通过Version来实现乐观锁保证ES不出问题等核心原理: 第 ...
- 最新学习springboot 配置注解
一.概述 Spring Boot设计目的是用来简化新Spring应用的初始搭建以及开发过程.Spring Boot并不是对Spring功能上的增强,而是提供了一种快速使用Spring的方式. ...
- Springboot整合elasticSearch的官方API实例
前言:在上一篇博客中,我介绍了从零开始安装ElasticSearch,es是可以理解为一个操作数据的中间件,可以把它作为数据的存储仓库来对待,它具备强大的吞吐能力和计算能力,其基于Lucene服务器开 ...
- SpringBoot整合ElasticSearch:基于Jest技术
1.给pom.xml添加依赖 <!--SpringBoot默认使用SpringData ElasticSearch模块进行操作 <dependency> <groupId> ...
- 一次 ElasticSearch 搜索优化
一次 ElasticSearch 搜索优化 1. 环境 ES6.3.2,索引名称 user_v1,5个主分片,每个分片一个副本.分片基本都在11GB左右,GET _cat/shards/user 一共 ...
随机推荐
- String 的成员函数
本篇是把一些string的成员函数的用法记录下来 size()函数和lenth()函数 s.size()或者s.lenth() 它们都会返回长度,是总长度而不是下标长度 find函数 s.find(s ...
- e校帮V1.1使用指南
2017年04月17日,e校帮正式版本V1.1.4正式上线了.大家可以在e校帮官网进行下载,http://exiaobang.top 或者在搜狗手机助手/搜狗输入法/酷安进行下载. e校帮简介: e校 ...
- c语言进阶2-变量的作用域与无参函数
一. 什么是函数 函数是具有特定功能的模块.可以说一个完整的程序其实是由多个函数共同完成的.C语言的全部工作都是由程式各样的函数完成的,所以也把C语言称为函数式语言.使用模块化设计可能 使 ...
- 使用canvas来完成线性渐变和径向渐变的功能
fillStyle的第二种使用情况就是渐变色的填充.渐变色就分为线性渐变色和径向渐变色. 线性渐变:大致分为两步 这里又会使用到canvas的两个新的函数. 第一步 : 使用一个新的函数cre ...
- linux初学者-mail篇
linux初学者-mail篇 邮件是在生活中比较常用的一个工具,在linux系统中的邮件也是.在linux中,邮件的发送所用的服务时postfix,邮件的接收所用的服务是pop(110端口).ima ...
- mac 下搭建安装 sass
一.安装系统需要的包 安装Xcode开发工具,它将帮你安装好 Unix 环境需要的开发包 打开 App Store,搜索 Xcode,第一个就是,对了,有4个多G,网速如果不大好,就请先厕所哭会儿吧, ...
- .NET开发框架(八)-服务器集群之网络负载平衡演示(视频)
(有声视频-服务器集群之负载平衡-NLB演示) 观看NLB视频的童鞋,都会继续观看IIS的负载平衡教程,点击>> 本文以[图文+视频],讲解Windows服务器集群的网络负载平衡NLB的作 ...
- 有关vs2010将c++生成exe文件时出现LINK : fatal error LNK1123: 转换到 COFF 期间失败和环境变量问题
不知怎么本来编译好好的VS2010环境,忽然出现“转换到 COFF 期间失败: 文件无效或损坏”的链接错误.花了好多天,试了好多方法,最终解决了这个问题.现在罗列一下这几种解决方案:方案1:点击“项目 ...
- 【iOS】The sandbox is not in sync with the Podfile.lock. Run 'pod install' or update your CocoaPods install
从 github 下载的项目经常会遇到这个问题, 如图所示: 参考: iOS 'The sandbox is not sync with the Podfile.lock'问题解决 尚未解决…………
- Ok-Http | Android 网络请求框架使用方式
POST : package he3.sd.util; import com.parkingwang.okhttp3.LogInterceptor.LogInterceptor; import jav ...