vue之手把手教你写日历组件
---恢复内容开始---
1.日历组件
1.分析功能:日历基本功能,点击事件改变日期,样式的改变
1.结构分析:html
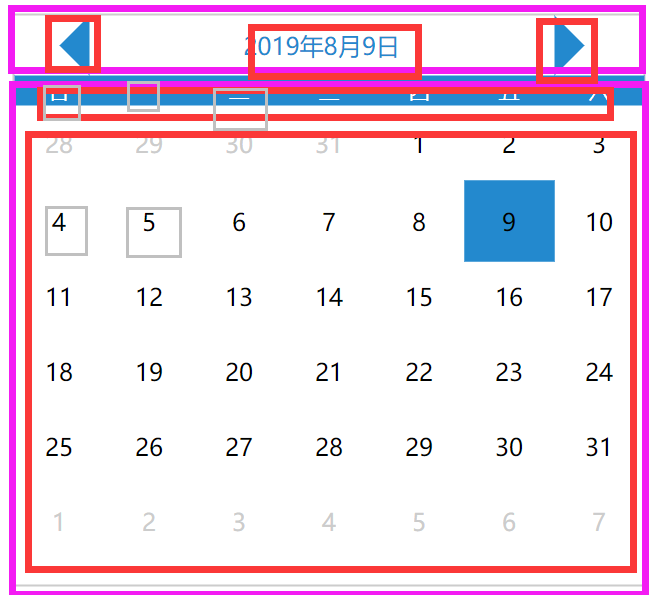
1.分为上下两个部分
2.上面分为左按钮,中间内容展示,右按钮
下面分为周几展示和日期展示
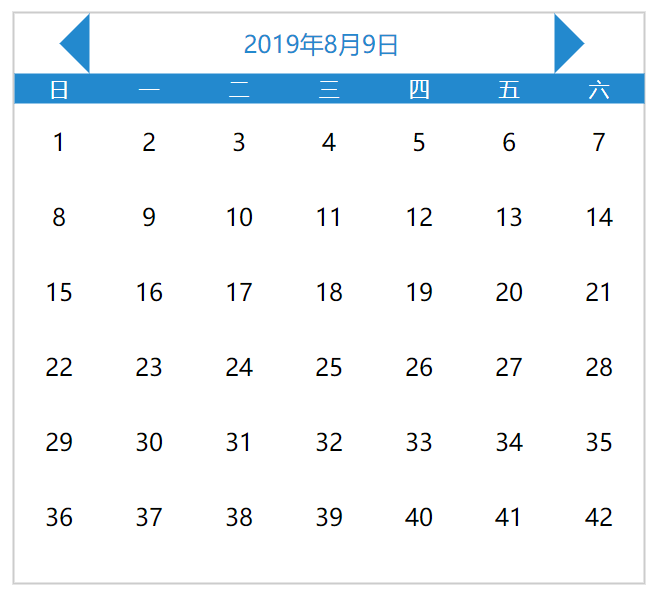
3.基本结构页面html书写
<template>
    <div class="calender2">
        <div class="date-header">
            <div class="pre-month"></div>
            <div class="show-date">2019年8月9日</div>
            <div class="next-month"></div>
        </div>
        <div class="date-content">
            <div class="week-header">
                <div
                v-for="item in ['日','一','二','三','四','五','六']"
                :key= item
                >{{ item }}</div>
            </div>
            <div class="week-day">
                <div
                class="every-day"
                v-for="item in 42"
                :key="item"
                >{{ item }}</div>
            </div>
        </div>
    </div>
</template>
*{
    margin: 0px;
    border: 0px;
    list-style: none;
}
.calender2{
    position: absolute;
    top: 50%;
    left: 50%;
    transform: translate(-50%,-50%);
    height:380px;
    width:420px;
    border: 1px solid #ccc;
}
.date-header{
    margin-left: 10px;
    height: 40px;
    width: 350px;
    line-height: 40px;
    text-align: center;
}
.pre-month{
    position: absolute;
    display: inline-block;
    height: 0px;
    width:0px;
    border:20px solid ;
    border-color: transparent rgb(35, 137, 206) transparent transparent;
}
.next-month{
    position: absolute;
    display: inline-block;
    height: 0px;
    width:0px;
    border:20px solid ;
    border-color: transparent transparent transparent  rgb(35, 137, 206);
}
.show-date{
    margin-left: 40px;
    margin-top: 0px;
    display: inline-block;
    line-height: 40px;
    text-align: center;
    width: 310px;
    color: rgb(35, 137, 206);
}
.week-header{
    background: rgb(35, 137, 206);
    color: #fff;
    font-size: 14px;
    text-align: center;
    line-height: 20px;
}
.week-header div{
    margin: 0;
    padding: 0;
    display: inline-block;
    height: 20px;
    width: 60px;
}
.every-day{
    display: inline-block;
    height: 50px;
    width: 60px;
    text-align: center;
    line-height: 50px;
}
.other-day{
    color: #ccc;
}
.now-day{
    background: rgb(35, 137, 206);
}
.active-day{
    /* padding: 2px */
    /* border-sizing:content-box; */
    border: 2px solid rgb(35, 137, 206);
}
</style>
4.一些事件以及逻辑
1.使得当前的日期为今天的日期
<div class="show-date">{{ year }}年{{ month }}月{{ day }}日</div>
data(){
        return{
            year:null,
            month:null,
            day:null
        }
    },
    created(){
        this.getInitDate();
    },
    methods:{
        getInitDate(){
            const date = new Date();
            this.year = date.getFullYear();
            this.month = date.getUTCMonth() + 1;
            this.day = date.getDate();
        }
    }
2.设置该月日期起始值(找到一号是在哪里)
beginDay(){
    return new Date(this.year, this.mounth - 1, 1).getDay();
}
3.当月天数字体正常显示
<div
v-if="item - beginDay >= 0 && item - beginDay <= curDays"
>{{ item - beginDay }}</div>
4.当月天数之前的部分变灰,外加正常显示日期
注意几个数学问题:
1.当前月天数日期
2.上月剩余天数
3.此月显示的下月天数
<div
     v-if="item - beginDay > 0 && item - beginDay <= curDays"
     >{{ item - beginDay }}</div>
<div
     class="other-day"
     v-else-if="item - beginDay <= 0"
     >{{ item - beginDay + prevDays }}</div>
<div
     class="other-day"
     v-else>{{ item - beginDay -curDays }}</div>
5.能知道当前日期,能点击其他日期,并且会有相应的变化
知道当前日期:
this.curDate = `${this.year}-${this.month}-${this.day}`
判断今天是不是当前日期,并且给一个样式:
'now-day':`${year}-${month}-${item - beginDays}` == curDate
当点击当月有的日期的时候会根据你的点击显示的日期发生变化
判断是点击的那一天:
'active-day':`${year}-${month}-${item - beginDay}` === `${year}-${month}-${day}`
点击这一天,绑定点击事件
@click="handleClickDay(item - beginDay)"
handleClickDay(day){
    this.day = day
}
6.前后两个按钮的功能
            <div class="pre-month" @click="handlePrev"></div>
            <div class="next-month" @click="handleNext"></div>
handlePrev(){
            if(this.month == 1){
                this.month = 12
                this.year--
            }else{
                this.month--
            }
        },
        handleNext(){
            if(this.month == 12){
                this.month = 1
                this.year++
            }else{
                this.month++
            }
        }
7.判断点击的是否为当月的最后一天
computedDay(){
            const allDay = new Date(this.year, this.month, 0).getDate();
            if(this.day > allDay){
                this.day = allDay;
            }
        }
将这个函数分别在handlePrev(),handleNext()里面执行-------注意是this.computedDay();
完成
---恢复内容结束---
1.日历组件
1.分析功能:日历基本功能,点击事件改变日期,样式的改变
1.结构分析:html
1.分为上下两个部分
2.上面分为左按钮,中间内容展示,右按钮
下面分为周几展示和日期展示
3.基本结构页面html书写
<template>
    <div class="calender2">
        <div class="date-header">
            <div class="pre-month"></div>
            <div class="show-date">2019年8月9日</div>
            <div class="next-month"></div>
        </div>
        <div class="date-content">
            <div class="week-header">
                <div
                v-for="item in ['日','一','二','三','四','五','六']"
                :key= item
                >{{ item }}</div>
            </div>
            <div class="week-day">
                <div
                class="every-day"
                v-for="item in 42"
                :key="item"
                >{{ item }}</div>
            </div>
        </div>
    </div>
</template>
*{
    margin: 0px;
    border: 0px;
    list-style: none;
}
.calender2{
    position: absolute;
    top: 50%;
    left: 50%;
    transform: translate(-50%,-50%);
    height:380px;
    width:420px;
    border: 1px solid #ccc;
}
.date-header{
    margin-left: 10px;
    height: 40px;
    width: 350px;
    line-height: 40px;
    text-align: center;
}
.pre-month{
    position: absolute;
    display: inline-block;
    height: 0px;
    width:0px;
    border:20px solid ;
    border-color: transparent rgb(35, 137, 206) transparent transparent;
}
.next-month{
    position: absolute;
    display: inline-block;
    height: 0px;
    width:0px;
    border:20px solid ;
    border-color: transparent transparent transparent  rgb(35, 137, 206);
}
.show-date{
    margin-left: 40px;
    margin-top: 0px;
    display: inline-block;
    line-height: 40px;
    text-align: center;
    width: 310px;
    color: rgb(35, 137, 206);
}
.week-header{
    background: rgb(35, 137, 206);
    color: #fff;
    font-size: 14px;
    text-align: center;
    line-height: 20px;
}
.week-header div{
    margin: 0;
    padding: 0;
    display: inline-block;
    height: 20px;
    width: 60px;
}
.every-day{
    display: inline-block;
    height: 50px;
    width: 60px;
    text-align: center;
    line-height: 50px;
}
.other-day{
    color: #ccc;
}
.now-day{
    background: rgb(35, 137, 206);
}
.active-day{
    /* padding: 2px */
    /* border-sizing:content-box; */
    border: 2px solid rgb(35, 137, 206);
}
</style>
4.一些事件以及逻辑
1.使得当前的日期为今天的日期
<div class="show-date">{{ year }}年{{ month }}月{{ day }}日</div>
data(){
        return{
            year:null,
            month:null,
            day:null
        }
    },
    created(){
        this.getInitDate();
    },
    methods:{
        getInitDate(){
            const date = new Date();
            this.year = date.getFullYear();
            this.month = date.getUTCMonth() + 1;
            this.day = date.getDate();
        }
    }
2.设置该月日期起始值(找到一号是在哪里)
beginDay(){
    return new Date(this.year, this.mounth - 1, 1).getDay();
}
3.当月天数字体正常显示
<div
v-if="item - beginDay >= 0 && item - beginDay <= curDays"
>{{ item - beginDay }}</div>
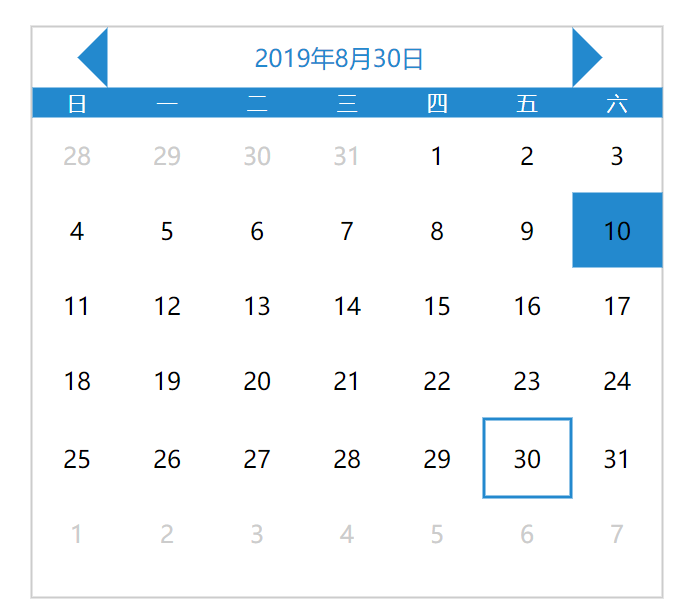
4.当月天数之前的部分变灰,外加正常显示日期
注意几个数学问题:
1.当前月天数日期
2.上月剩余天数
3.此月显示的下月天数
<div
     v-if="item - beginDay > 0 && item - beginDay <= curDays"
     >{{ item - beginDay }}</div>
<div
     class="other-day"
     v-else-if="item - beginDay <= 0"
     >{{ item - beginDay + prevDays }}</div>
<div
     class="other-day"
     v-else>{{ item - beginDay -curDays }}</div>
5.能知道当前日期,能点击其他日期,并且会有相应的变化
知道当前日期:
this.curDate = `${this.year}-${this.month}-${this.day}`
判断今天是不是当前日期,并且给一个样式:
'now-day':`${year}-${month}-${item - beginDays}` == curDate
当点击当月有的日期的时候会根据你的点击显示的日期发生变化
判断是点击的那一天:
'active-day':`${year}-${month}-${item - beginDay}` === `${year}-${month}-${day}`
点击这一天,绑定点击事件
@click="handleClickDay(item - beginDay)"
handleClickDay(day){
    this.day = day
}
6.前后两个按钮的功能
            <div class="pre-month" @click="handlePrev"></div>
            <div class="next-month" @click="handleNext"></div>
handlePrev(){
            if(this.month == 1){
                this.month = 12
                this.year--
            }else{
                this.month--
            }
        },
        handleNext(){
            if(this.month == 12){
                this.month = 1
                this.year++
            }else{
                this.month++
            }
        }
7.判断点击的是否为当月的最后一天
computedDay(){
            const allDay = new Date(this.year, this.month, 0).getDate();
            if(this.day > allDay){
                this.day = allDay;
            }
        }
将这个函数分别在handlePrev(),handleNext()里面执行-------注意是this.computedDay();
完成
vue之手把手教你写日历组件的更多相关文章
- [原创]手把手教你写网络爬虫(4):Scrapy入门
手把手教你写网络爬虫(4) 作者:拓海 摘要:从零开始写爬虫,初学者的速成指南! 封面: 上期我们理性的分析了为什么要学习Scrapy,理由只有一个,那就是免费,一分钱都不用花! 咦?怎么有人扔西红柿 ...
- [原创]手把手教你写网络爬虫(5):PhantomJS实战
手把手教你写网络爬虫(5) 作者:拓海 摘要:从零开始写爬虫,初学者的速成指南! 封面: 大家好!从今天开始,我要与大家一起打造一个属于我们自己的分布式爬虫平台,同时也会对涉及到的技术进行详细介绍.大 ...
- 手把手教你写Kafka Streams程序
本文从以下四个方面手把手教你写Kafka Streams程序: 一. 设置Maven项目 二. 编写第一个Streams应用程序:Pipe 三. 编写第二个Streams应用程序:Line Split ...
- 手把手教你写DI_0_DI是什么?
DI是什么? Dependency Injection 常常简称为:DI. 它是实现控制反转(Inversion of Control – IoC)的一个模式. fowler 大大大神 "几 ...
- 手把手教你写Sublime中的Snippet
手把手教你写Sublime中的Snippet Sublime Text号称最性感的编辑器, 并且越来越多人使用, 美观, 高效 关于如何使用Sublime text可以参考我的另一篇文章, 相信你会喜 ...
- 手把手教你写LKM rookit! 之 第一个lkm程序及模块隐藏(一)
唉,一开始在纠结起个什么名字,感觉名字常常的很装逼,于是起了个这<手把手教你写LKM rookit> 我觉得: 你们觉得:...... 开始之前,我们先来理解一句话:一切的操作都是系统调用 ...
- 手把手教你写电商爬虫-第三课 实战尚妆网AJAX请求处理和内容提取
版权声明:本文为博主原创文章,未经博主允许不得转载. 系列教程: 手把手教你写电商爬虫-第一课 找个软柿子捏捏 手把手教你写电商爬虫-第二课 实战尚妆网分页商品采集爬虫 看完两篇,相信大家已经从开始的 ...
- 手把手教你写电商爬虫-第四课 淘宝网商品爬虫自动JS渲染
版权声明:本文为博主原创文章,未经博主允许不得转载. 系列教程: 手把手教你写电商爬虫-第一课 找个软柿子捏捏 手把手教你写电商爬虫-第二课 实战尚妆网分页商品采集爬虫 手把手教你写电商爬虫-第三课 ...
- 只有20行Javascript代码!手把手教你写一个页面模板引擎
http://www.toobug.net/article/how_to_design_front_end_template_engine.html http://barretlee.com/webs ...
随机推荐
- POJ 1741:Tree(树上点分治)
题目链接 题意 给一棵边带权树,问两点之间的距离小于等于K的点对有多少个. 思路 <分治算法在树的路径问题中的应用> 图片转载于http://www.cnblogs.com/Paul-Gu ...
- 个人亲测,在win10系统下安装多实例mysql8.0详细教程
由于公司的新项目需要导入sql脚本,需要更高版本的mysql数据库,原来的数据库我也不想删除和升级,因此安装了第二个mysql8的实例,废话不多说,步骤如下: 1.下载mysqlGPL版本,我下载的版 ...
- docker-compose一键部署redis一主二从三哨兵模式(含密码,数据持久化)
本篇基于centos7服务器进行部署开发 一.拉取redis镜像,使用如下命令 docker pull redis 1.查看镜像是否拉取成功,使用如下命令 docker images 显示如下则证明拉 ...
- android_activity_研究(一)
android中活动的概念(activity)是一个很重要的东东.这里有很多东东值得好好研究.最好的研究来源当然是官网啦,所以本人这里写一点对官网文章的研究心得. 一.活动(activity)的概念 ...
- 【题解】Unit Fraction Partition-C++
Description给出数字P,Q,A,N,代表将分数P/Q分解成至多N个分数之和,这些分数的分子全为1,且分母的乘积不超过A.例如当输入数据为2 3 120 3时,我们可以得到以下几种分法: In ...
- Linux下移动图像监测系统——motion的移植及应用
移动图像监控主系统的开发 移动图像监控的原理方法: 通过获取摄像头图像,比较前后每一帧的图像数据,从而实现移动物体监控.所有移动监控均是如此,只是图像帧的比较算法不同. 移动图像监控系统的实现 选择开 ...
- Hive之函数与自定义函数
系统自带的函数 1)查看系统自带的函数 hive> show functions; 2)显示自带的函数的用法 hive> desc function upper; 3)详细显示自带的函数的 ...
- APP爬虫(2)把小姐姐的图片down下来
APP爬虫(1)想学新语言,又没有动力,怎么办? 书接上文.使用appium在帖子列表界面模拟上划动作,捕捉不到列表的规律.上划结束后,列表只能获取到屏幕呈现的部分,而且下标还是从0开始的. 根据酸奶 ...
- python课堂整理9---函数1
函数 一. 函数就是为了完成某一个特定的功能 形式参数不占运行空间,只有传入实参后才占,用完立刻释放空间. 函数一遇到 return 就结束掉了 函数名() :运行函数,有返回值的话用变量承接 def ...
- 关于 64位系统 java连接access 报错java.sql.SQLException: [Microsoft][ODBC 驱动程序管理器] 未发现数据源名称并且未指定默认驱动程序
报错的原因是url = "jdbc:odbc:Driver={Microsoft Access Driver (*.mdb)};DBQ=E:/公司/2000.mdb"; 这样是不行 ...