
Spring Boot (五): Redis缓存使用姿势盘点

1. Redis 简介
Redis 是目前业界使用最广泛的内存数据存储。相比 Memcached,Redis 支持更丰富的数据结构,例如 hashes, lists, sets 等,同时支持数据持久化。除此之外,Redis 还提供一些类数据库的特性,比如事务,HA,主从库。可以说 Redis 兼具了缓存系统和数据库的一些特性,因此有着丰富的应用场景。本文介绍 Redis 在 Spring Boot 中两个典型的应用场景。
2. Lettuce 简介
如果在 Java 应用中使用过 Redis 缓存,那么对 Jedis 一定不陌生, Lettuce 和 Jedis 一样,都是连接 Redis Server 的客户端程序。Jedis 在实现上是直连 Redis Server,多线程环境下非线程安全,除非使用连接池,为每个 Jedis 实例增加物理连接。 Lettuce 基于 Netty 的连接实例(StatefulRedisConnection),可以在多个线程间并发访问,且线程安全,满足多线程环境下的并发访问,同时它是可伸缩的设计,一个连接实例不够的情况也可以按需增加连接实例。
3. Spring Boot 应用中使用方式
- 直接通过
RedisTemplate来使用 - 使用
Spring Cache集成Redis - 通过
Spring Session做Session共享
4. 工程实战
4.1 工程依赖 pom.xml 如下:
代码清单:spring-boot-redis/pom.xml
<dependencies>

    <dependency>

        <groupId>org.springframework.boot</groupId>

        <artifactId>spring-boot-starter-data-redis</artifactId>

    </dependency>

    <dependency>

        <groupId>org.apache.commons</groupId>

        <artifactId>commons-pool2</artifactId>

    </dependency>

    <dependency>

        <groupId>org.springframework.boot</groupId>

        <artifactId>spring-boot-starter-web</artifactId>

    </dependency>

    <dependency>

        <groupId>org.springframework.session</groupId>

        <artifactId>spring-session-data-redis</artifactId>

    </dependency>

    <dependency>

        <groupId>org.projectlombok</groupId>

        <artifactId>lombok</artifactId>

        <optional>true</optional>

    </dependency>

    <dependency>

        <groupId>org.springframework.boot</groupId>

        <artifactId>spring-boot-starter-test</artifactId>

        <scope>test</scope>

    </dependency>

</dependencies>
spring-boot-starter-data-redis :在
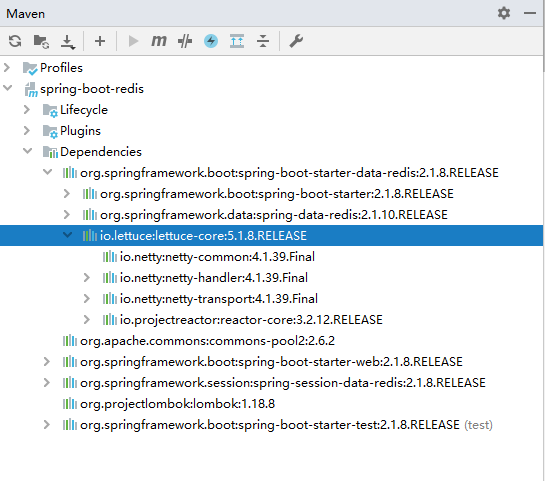
Spring Boot 2.x后底层不再是使用Jedis,而是换成了Lettuce,如图:commons-pool2 : 用作
redis连接池,如不引入启动会报错。spring-session-data-redis :
Spring Session引入,用作共享Session。
4.2 配置文件 application.yml
代码清单:spring-boot-redis/src/main/resources/application.yml
server:

  port: 8080

  servlet:

    session:

      timeout: 30m

spring:

  application:

    name: spring-boot-redis

  cache:

    # 使用了Spring Cache后,能指定spring.cache.type就手动指定一下,虽然它会自动去适配已有Cache的依赖,但先后顺序会对Redis使用有影响(JCache -> EhCache -> Redis -> Guava)

    type: REDIS

  redis:

    host: 192.168.0.128

    port: 6379

    password: 123456

    # 连接超时时间(ms)

    timeout: 10000

    # Redis默认情况下有16个分片,这里配置具体使用的分片,默认是0

    database: 0

    lettuce:

      pool:

        # 连接池最大连接数(使用负值表示没有限制) 默认 8

        max-active: 100

        # 连接池最大阻塞等待时间(使用负值表示没有限制) 默认 -1

        max-wait: -1

        # 连接池中的最大空闲连接 默认 8

        max-idle: 8

        # 连接池中的最小空闲连接 默认 0

        min-idle: 0
这里的配置不多解释,需要解释的已经标注注释。
4.3 RedisTemplate 使用方式
4.3.1 创建实体类 User.java
代码清单:spring-boot-redis/src/main/java/com/springboot/springbootredis/model/User.java
@Data

@AllArgsConstructor

@NoArgsConstructor

public class User implements Serializable {

    private static final long serialVersionUID = 662692455422902539L;

    private Long id;

    private String name;

    private int age;

}
4.3.2 自定义 RedisTemplate
默认情况下的模板只能支持 RedisTemplate<String, String> ,也就是只能存入字符串,这在开发中是不友好的,所以自定义模板是很有必要的,当自定义了模板又想使用 String 存储这时候就可以使用 StringRedisTemplate 的方式,它们并不冲突,添加配置类 RedisCacheConfig.java ,代码如下:
代码清单:spring-boot-redis/src/main/java/com/springboot/springbootredis/config/RedisCacheConfig.java
@Configuration

@AutoConfigureAfter(RedisAutoConfiguration.class)

public class RedisCacheConfig {

    @Bean

    public RedisTemplate<String, Serializable> redisCacheTemplate(LettuceConnectionFactory redisConnectionFactory) {

        RedisTemplate<String, Serializable> template = new RedisTemplate<>();

        template.setKeySerializer(new StringRedisSerializer());

        template.setValueSerializer(new GenericJackson2JsonRedisSerializer());

        template.setConnectionFactory(redisConnectionFactory);

        return template;

    }

}
4.3.3 测试接口 UserController.java
代码清单:
@RestController

@Slf4j

public class UserController {

    @Autowired

    private StringRedisTemplate stringRedisTemplate;

    @Autowired

    RedisTemplate<String, Serializable> redisCacheTemplate;

    @Autowired

    UserService userService;

    @GetMapping("/test")

    public void test() {

        stringRedisTemplate.opsForValue().set("geekdigging", "https://www.geekdigging.com/");

        log.info("当前获取对象:{}",stringRedisTemplate.opsForValue().get("geekdigging"));

        redisCacheTemplate.opsForValue().set("geekdigging.com", new User(1L, "geekdigging", 18));

        User user = (User) redisCacheTemplate.opsForValue().get("geekdigging.com");

        log.info("当前获取对象:{}", user);

    }

}
4.3.4 测试
启动服务,打开浏览器访问链接:http://localhost:8080/test ,查看控制台日志打印,如下:
2019-09-24 23:49:30.191  INFO 19108 --- [nio-8080-exec-1] c.s.s.controller.UserController          : 当前获取对象:https://www.geekdigging.com/

2019-09-24 23:49:30.243  INFO 19108 --- [nio-8080-exec-1] c.s.s.controller.UserController          : 当前获取对象:User(id=1, name=geekdigging, age=18)
测试成功。
4.4 使用 Spring Cache 集成 Redis
4.4.1 Spring Cache 特点
Spring 3.1 引入了激动人心的基于注释(annotation)的缓存(cache)技术,它本质上不是一个具体的缓存实现方案(例如 EHCache 或者 Redis),而是一个对缓存使用的抽象,通过在既有代码中添加少量它定义的各种 annotation,即能够达到缓存方法的返回对象的效果。
Spring Cache 具备相当的好的灵活性,不仅能够使用 SpEL(Spring Expression Language)来定义缓存的 key 和各种 condition,还提供开箱即用的缓存临时存储方案,也支持和主流的专业缓存例如 EHCache、Redis、Guava 的集成。
- 基于 annotation 即可使得现有代码支持缓存
- 开箱即用 Out-Of-The-Box,不用安装和部署额外第三方组件即可使用缓存
- 支持 Spring Express Language,能使用对象的任何属性或者方法来定义缓存的 key 和 condition
- 支持 AspectJ,并通过其实现任何方法的缓存支持
- 支持自定义 key 和自定义缓存管理者,具有相当的灵活性和扩展性
4.4.2 定义接口 UserService.java
代码清单:spring-boot-redis/src/main/java/com/springboot/springbootredis/service/UserService.java
public interface UserService {

    User save(User user);

    User get(Long id);

    void delete(Long id);

}
4.4.3 接口实现 UserServiceImpl.java
代码清单:spring-boot-redis/src/main/java/com/springboot/springbootredis/service/impl/UserServiceImpl.java
@Service

@Slf4j

public class UserServiceImpl implements UserService {

    private static final Map<Long, User> USER_MAP = new HashMap<>();

    static {

        USER_MAP.put(1L, new User(1L, "geekdigging.com", 18));

        USER_MAP.put(2L, new User(2L, "geekdigging.com", 19));

        USER_MAP.put(3L, new User(3L, "geekdigging.com", 20));

    }

    @CachePut(value = "user", key = "#user.id")

    @Override

    public User save(User user) {

        USER_MAP.put(user.getId(), user);

        log.info("进入 save 方法,当前存储对象:{}",  user);

        return user;

    }

    @Cacheable(value = "user", key = "#id")

    @Override

    public User get(Long id) {

        log.info("进入 get 方法,当前获取对象:{}",  USER_MAP.get(id));

        return USER_MAP.get(id);

    }

    @CacheEvict(value = "user", key = "#id")

    @Override

    public void delete(Long id) {

        USER_MAP.remove(id);

        log.info("进入 delete 方法,删除成功");

    }

}
为了方便演示数据库操作,直接定义了一个 Map<Long, User> USER_MAP ,这里的核心就是三个注解 @Cacheable 、 @CachePut 、 @CacheEvict 。
4.4.3.1 @Cacheable
根据方法的请求参数对其结果进行缓存
- key: 缓存的 key,可以为空,如果指定要按照 SpEL 表达式编写,如果不指定,则缺省按照方法的所有参数进行组合(如:
@Cacheable(value="user",key="#userName")) - value: 缓存的名称,必须指定至少一个(如:
@Cacheable(value="user")或者@Cacheable(value={"user1","use2"})) - condition: 缓存的条件,可以为空,使用 SpEL 编写,返回 true 或者 false,只有为 true 才进行缓存(如:
@Cacheable(value = "user", key = "#id",condition = "#id < 10"))
4.4.3.2 @CachePut
根据方法的请求参数对其结果进行缓存,和 @Cacheable 不同的是,它每次都会触发真实方法的调用
- key: 同上
- value: 同上
- condition: 同上
4.4.3.3 @CachEvict
根据条件对缓存进行清空
- key: 同上
- value: 同上
- condition: 同上
- allEntries: 是否清空所有缓存内容,缺省为 false,如果指定为 true,则方法调用后将立即清空所有缓存(如:
@CacheEvict(value = "user", key = "#id", allEntries = true)) - beforeInvocation: 是否在方法执行前就清空,缺省为 false,如果指定为 true,则在方法还没有执行的时候就清空缓存,缺省情况下,如果方法执行抛出异常,则不会清空缓存(如:
@CacheEvict(value = "user", key = "#id", beforeInvocation = true))
4.4.4 启动主类
代码清单:spring-boot-redis/src/main/java/com/springboot/springbootredis/SpringBootRedisApplication.java
@SpringBootApplication

@EnableCaching

public class SpringBootRedisApplication {

    public static void main(String[] args) {

        SpringApplication.run(SpringBootRedisApplication.class, args);

    }

}
- 这里需增加注解
@EnableCaching开启 Spring Session。
4.4.5 增加测试接口
代码清单:spring-boot-redis/src/main/java/com/springboot/springbootredis/controller/UserController.java
@GetMapping("/test1")

public void test1() {

    User user = userService.save(new User(4L, "geekdigging.com", 35));

    log.info("当前 save 对象:{}", user);

    user = userService.get(1L);

    log.info("当前 get 对象:{}", user);

    userService.delete(5L);

}
4.4.6 测试
启动服务,打开浏览器访问链接:http://localhost:8080/test ,刷新页面,控制台日志打印如下:
2019-09-25 00:07:21.887  INFO 21484 --- [nio-8080-exec-1] c.s.s.service.impl.UserServiceImpl       : 进入 save 方法,当前存储对象:User(id=4, name=geekdigging.com, age=35)

2019-09-25 00:07:21.897  INFO 21484 --- [nio-8080-exec-1] c.s.s.controller.UserController          : 当前 save 对象:User(id=4, name=geekdigging.com, age=35)

2019-09-25 00:07:21.899  INFO 21484 --- [nio-8080-exec-1] c.s.s.service.impl.UserServiceImpl       : 进入 get 方法,当前获取对象:User(id=1, name=geekdigging.com, age=18)

2019-09-25 00:07:21.900  INFO 21484 --- [nio-8080-exec-1] c.s.s.controller.UserController          : 当前 get 对象:User(id=1, name=geekdigging.com, age=18)

2019-09-25 00:07:21.901  INFO 21484 --- [nio-8080-exec-1] c.s.s.service.impl.UserServiceImpl       : 进入 delete 方法,删除成功
再次刷新页面,查看控制台日志:
2019-09-25 00:08:54.076  INFO 21484 --- [nio-8080-exec-7] c.s.s.service.impl.UserServiceImpl       : 进入 save 方法,当前存储对象:User(id=4, name=geekdigging.com, age=35)

2019-09-25 00:08:54.077  INFO 21484 --- [nio-8080-exec-7] c.s.s.controller.UserController          : 当前 save 对象:User(id=4, name=geekdigging.com, age=35)

2019-09-25 00:08:54.079  INFO 21484 --- [nio-8080-exec-7] c.s.s.controller.UserController          : 当前 get 对象:User(id=1, name=geekdigging.com, age=18)

2019-09-25 00:08:54.079  INFO 21484 --- [nio-8080-exec-7] c.s.s.service.impl.UserServiceImpl       : 进入 delete 方法,删除成功
结果和我们期望的一致,可以看到增删改查中,查询是没有日志输出的,因为它直接从缓存中获取的数据,而添加、修改、删除都是会进入 UserServiceImpl 的方法内执行具体的业务代码。
4.5 Session 共享
4.5.1 Spring Session 简介
Spring Session 提供了一套创建和管理 Servlet HttpSession 的方案。Spring Session 提供了集群 Session(Clustered Sessions)功能,默认采用外置的 Redis 来存储 Session 数据,以此来解决 Session 共享的问题。
4.5.2 启动主类 SpringBootRedisApplication.java
代码清单:spring-boot-redis/src/main/java/com/springboot/springbootredis/SpringBootRedisApplication.java
@SpringBootApplication

@EnableCaching

@EnableRedisHttpSession(maxInactiveIntervalInSeconds = 1800)

public class SpringBootRedisApplication {

    public static void main(String[] args) {

        SpringApplication.run(SpringBootRedisApplication.class, args);

    }

}
- maxInactiveIntervalInSeconds: 设置 Session 失效时间,使用 Spring Session 之后,原 Spring Boot 配置文件
application.yml中的server.session.timeout属性不再生效。
4.5.3 增加测试接口
代码清单:spring-boot-redis/src/main/java/com/springboot/springbootredis/controller/UserController.java
@GetMapping("/getBlogUrl")

public String getSessionId(HttpServletRequest request) {

    String url = (String) request.getSession().getAttribute("url");

    if (StringUtils.isEmpty(url)) {

        request.getSession().setAttribute("url", "https://www.geekdigging.com/");

    }

    log.info("获取session内容为: {}", request.getSession().getAttribute("url"));

    return request.getRequestedSessionId();

}
4.5.4 测试
启动服务,打开浏览器访问链接:http://localhost:8080/getBlogUrl ,查看 Redis 当前存储内容,如下图:
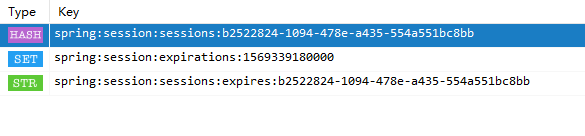
其中 1569339180000 为失效时间,意思是这个时间后 Session 失效, b2522824-1094-478e-a435-554a551bc8bb 为 SessionId 。
4.5.6 如何在多台服务中共享 Session
按照上面的步骤在另一个项目中再次配置一次,启动后自动就进行了 Session 共享。
5. 示例代码
6. 参考
http://emacoo.cn/backend/spring-redis/
https://blog.battcn.com/2018/05/11/springboot/v2-nosql-redis/
Spring Boot (五): Redis缓存使用姿势盘点的更多相关文章
- Spring Boot 结合 Redis 缓存
Redis官网: 中:http://www.redis.cn/ 外:https://redis.io/ redis下载和安装 Redis官方并没有提供Redis的Windows版本,这里使用微软提供的 ...
- Spring Boot自定义Redis缓存配置,保存value格式JSON字符串
Spring Boot自定义Redis缓存,保存格式JSON字符串 部分内容转自 https://blog.csdn.net/caojidasabi/article/details/83059642 ...
- SpringBoot入门系列(七)Spring Boot整合Redis缓存
前面介绍了Spring Boot 中的整合Mybatis并实现增删改查,.不清楚的朋友可以看看之前的文章:https://www.cnblogs.com/zhangweizhong/category/ ...
- Spring Boot 使用Redis缓存
本文示例源码,请看这里 Spring Cache的官方文档,请看这里 缓存存储 Spring 提供了很多缓存管理器,例如: SimpleCacheManager EhCacheCacheManager ...
- spring boot集成redis缓存
spring boot项目中使用redis作为缓存. 先创建spring boot的maven工程,在pom.xml中添加依赖 <dependency> <groupId>or ...
- Spring Boot Cache Redis缓存
1.集成MyBatis 1.1.引入maven依赖 1.2.生成Mapper 具体可以看MyBatis Generator官网 http://www.mybatis.org/generator/run ...
- (转)spring boot整合redis
一篇写的更清晰的文章,包括redis序列化:http://makaidong.com/ncjava/330749_5285125.html 1.项目目录结构 2.引入所需jar包 <!-- Sp ...
- Spring Boot + Mybatis + Redis二级缓存开发指南
Spring Boot + Mybatis + Redis二级缓存开发指南 背景 Spring-Boot因其提供了各种开箱即用的插件,使得它成为了当今最为主流的Java Web开发框架之一.Mybat ...
- (35)Spring Boot集成Redis实现缓存机制【从零开始学Spring Boot】
[本文章是否对你有用以及是否有好的建议,请留言] 本文章牵涉到的技术点比较多:Spring Data JPA.Redis.Spring MVC,Spirng Cache,所以在看这篇文章的时候,需要对 ...
随机推荐
- Centos知识
1.看系统的版本: cat /etc/redhat-release 2.看内核版本: uname -r 3.查看系统是32位还是64位 uname - m 4.磁盘: 磁盘分区有主分区.扩展分区和逻辑 ...
- NFS挂载报错
nfs共享的时候,无论怎么检查都报错:mount.nfs: access denied by server while mounting NFS版本问题编辑/etc/sysconfig/nfs文件,找 ...
- 三维动画形变算法(Gradient-Based Deformation)
将三角网格上的顶点坐标(x,y,z)看作3个独立的标量场,那么网格上每个三角片都存在3个独立的梯度场.该梯度场是网格的微分属性,相当于网格的特征,在形变过程中随控制点集的移动而变化.那么当用户拖拽网格 ...
- linux 7忘记密码找回
一.linux 7忘记密码二种更改方法 centos7/rhel7进入单用户方式和重置密码方式发生了较大变化,GRUB由b引导变成了ctrl+x引导.重置密码主要有rd.break和init两种方法. ...
- react antd 关于selectedRows 的问题
在table中,经常会用到单选和多选的功.这里会有一个方法, 当触发onchange的时候回有两个数组,[selectedRowKeys, selectedRows],当前选中的keys和每一项, 这 ...
- 安排:《蚂蚁花呗1234面:Redis+分布式架构+MySQL+linux+红黑树》
前言: 大厂面试机会难得,为了提高面试通关率,建议朋友们在面试前先复盘自己的知识栈,依据掌握程度划分重要.优先级,系统地去学习!如果不准备充分就去参加面试,既会失去进入大厂的机会,更是对自己的不负责. ...
- 安装VMware Workstation时遇到Microsoft Runtime DLL安装程序未能完成安装
解决:这时不要点确定.开始菜单运行输入‘%temp%’,在弹出的窗体中找到一个文件名中含‘{XXXXXXXXXXXXX}~setup'的文件夹,打开里面会看到有 xxx.msi的,运行就开始vmwar ...
- Leetcode之二分法专题-162. 寻找峰值(Find Peak Element)
Leetcode之二分法专题-162. 寻找峰值(Find Peak Element) 峰值元素是指其值大于左右相邻值的元素. 给定一个输入数组 nums,其中 nums[i] ≠ nums[i+1] ...
- Java连载24-break语句、continue语句、输出质数练习
一.break 1.break是Java语言中的关键字,被翻译为“中断/折断” 2.break + ";"可以成为一个单独的完整的java语句: break; 3.break语 ...
- 【数据结构】10.java源码关于LinkedHashMap
目录 1.LinkedHashMap的内部结构 2.LinkedHashMap构造函数 3.元素新增策略 4.元素删除 5.元素修改和查找 6.特殊操作 7.扩容 8.总结 1.LinkedHashM ...