
React: React组件的生命周期
一、简介
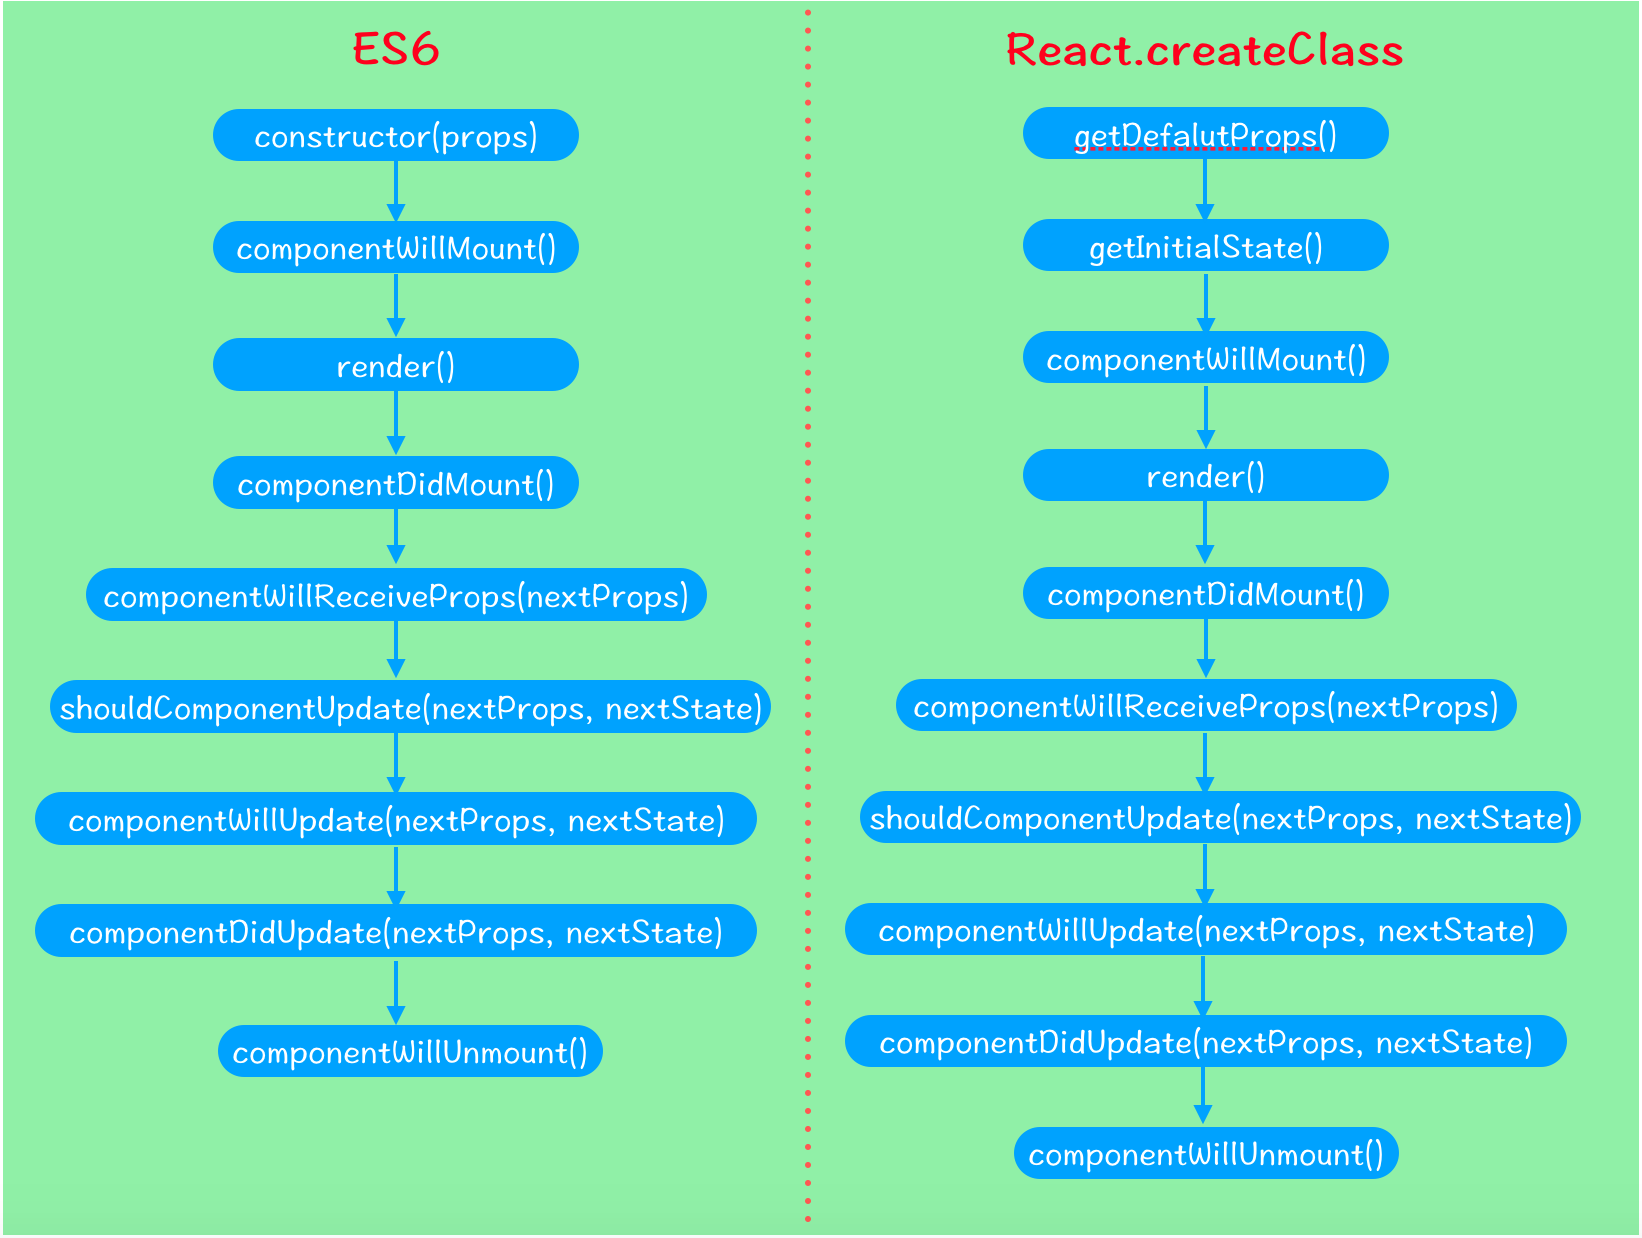
在前面的第二篇博文中对组件的生命周期虽然做了一个大略介绍,但总感觉说的过于简单,毕竟生命周期是React组件的核心部分。在我们熟练使用React挂载和合成组件来创建应用表现层的过程中,针对数据异步或延时问题,只有充分利用组件的生命周期来把握框架载入和数据处理的时机,才能将组件性能发挥到合理水平,并提高应用程序的健壮性。基本来说,组件的生命周期可分为挂载生命周期和更新生命周期两大部分,它们都包括一系列方法,这些方法在组件渲染前后会被触发,事实上,render方法本身也是组件生命周期的一部分。当然,根据用户使用的是ES6类创建组件还是React.createClass创建组件,它们体现的生命周期有一点点的区别。使用React.createClass创建组件时,开发者可以默认在getDefalutProps和getInitialState函数中分别初始化属性和state,而使用ES6类创建组件时,这两个函数被取而代之是constructor构造函数,在构造函数内部可以获取默认属性并且设置state。完整的生命周期对比如图所示:
二、详解
1、挂载生命周期
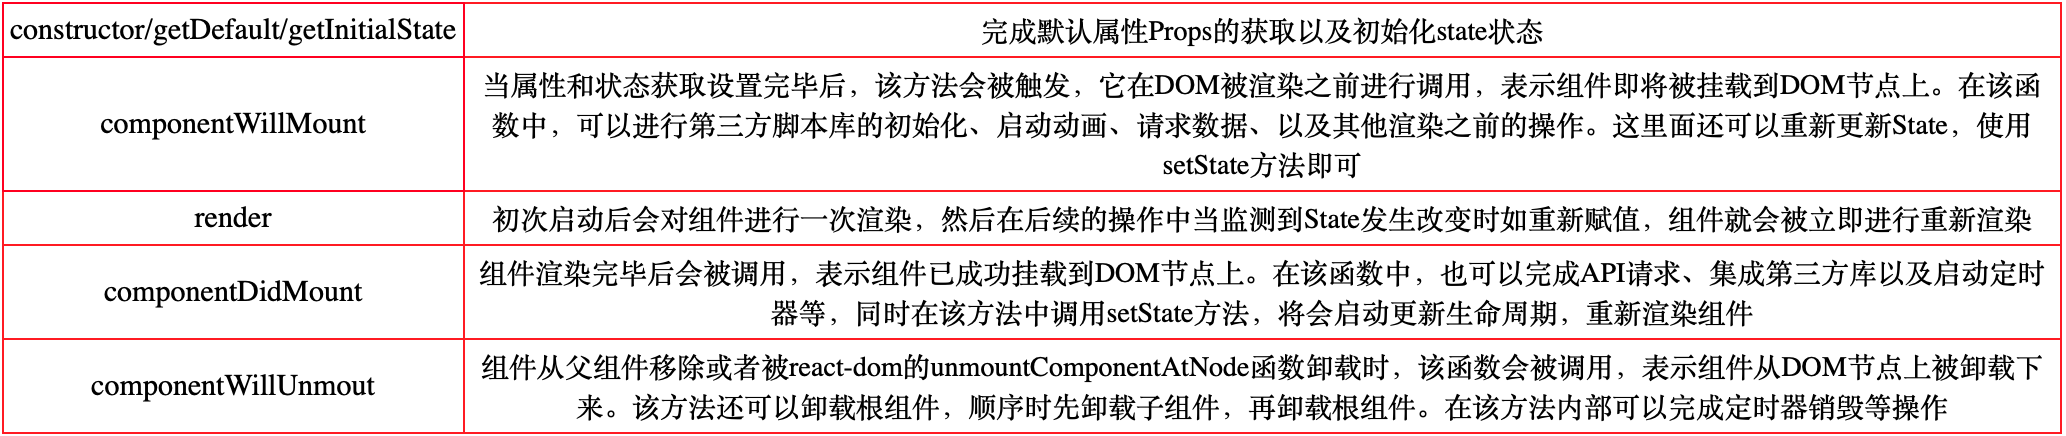
包括方法有:constructor/getDefault/getInitialState、componentWillMount、render、componentDidMount、componentWillUnmout。
2、更新生命周期
包括方法有:componentWillReceiveProps、shouldComponentUpdate、componentWillUpdate、componentDidUpdate。

三、示例
1、React.createClass
<!DOCTYPE html>

<html>

<head lang="en">

    <meta charset="UTF-8">

    <title>Hello React</title>

    <script src="react/react.js"></script>

    <script src="react/react-dom.js"></script>

    <script src="react/browser.min.js"></script>

</head>

<body>

    <div id="container"></div>

    <script type="text/babel">

        const targetNode = document.getElementById("container");

        const Component = React.createClass({

            getDefaultProps(){

                console.log("---getDefaultProps---");

                return {}

            },

            getInitialState(){

                console.log("---getInitialState---");

                return ({

                    count: 0

                })

            },

            componentWillMount(){

                console.log("---componentWillMount---")

            },

            render(){

                console.log("---render---");

                return (

                    <div>

                        <h1>{`${this.props.title} ${this.state.count}`}</h1>

                    </div>

                )

            },

            componentDidMount(){

                console.log("---componentDidMount---");

                this.setProps({

                    title:"I AM XYQ! Welcome me, current count is"

                })

            },

            /*

            * 现象:父组件更新子组件的props,在子组件接收到新的props时,更新子组件的state,但是却没有重新渲染。

            * 原因:官方说在该函数中调用 this.setState() 将不会引起第二次渲染。每次子组件接收到新的props,都会重新渲染一次,

            * 除非你做了处理来阻止(比如使用:shouldComponentUpdate)。 但是你可以在这次渲染前,根据新的props更新state,

            * 更新state也会触发一次重新渲染,但react基于性能考虑,只会渲染一次。

            * */

            componentWillReceiveProps(nextProps){

                console.log("---componentWillReceiveProps---");

                this.setState({

                    count: this.state.count + 1

                })

            },

            shouldComponentUpdate(nextProps, nextState){

                console.log("---shouldComponentUpdate---"+`count is ${nextState.count}`);

                return true

            },

            componentWillUpdate(nextProps, nextState){

                console.log("---componentWillUpdate---")

            },

            componentDidUpdate(nextProps, nextState){

                console.log("---componentDidUpdate---");

                ReactDOM.unmountComponentAtNode(targetNode); //卸载根组件

            },

            componentWillUnmount(){

                console.log("---componentWillUnmout---");

            }

        });

        ReactDOM.render(

            <Component/>,

            targetNode

        )

    </script>

</body>

</html>
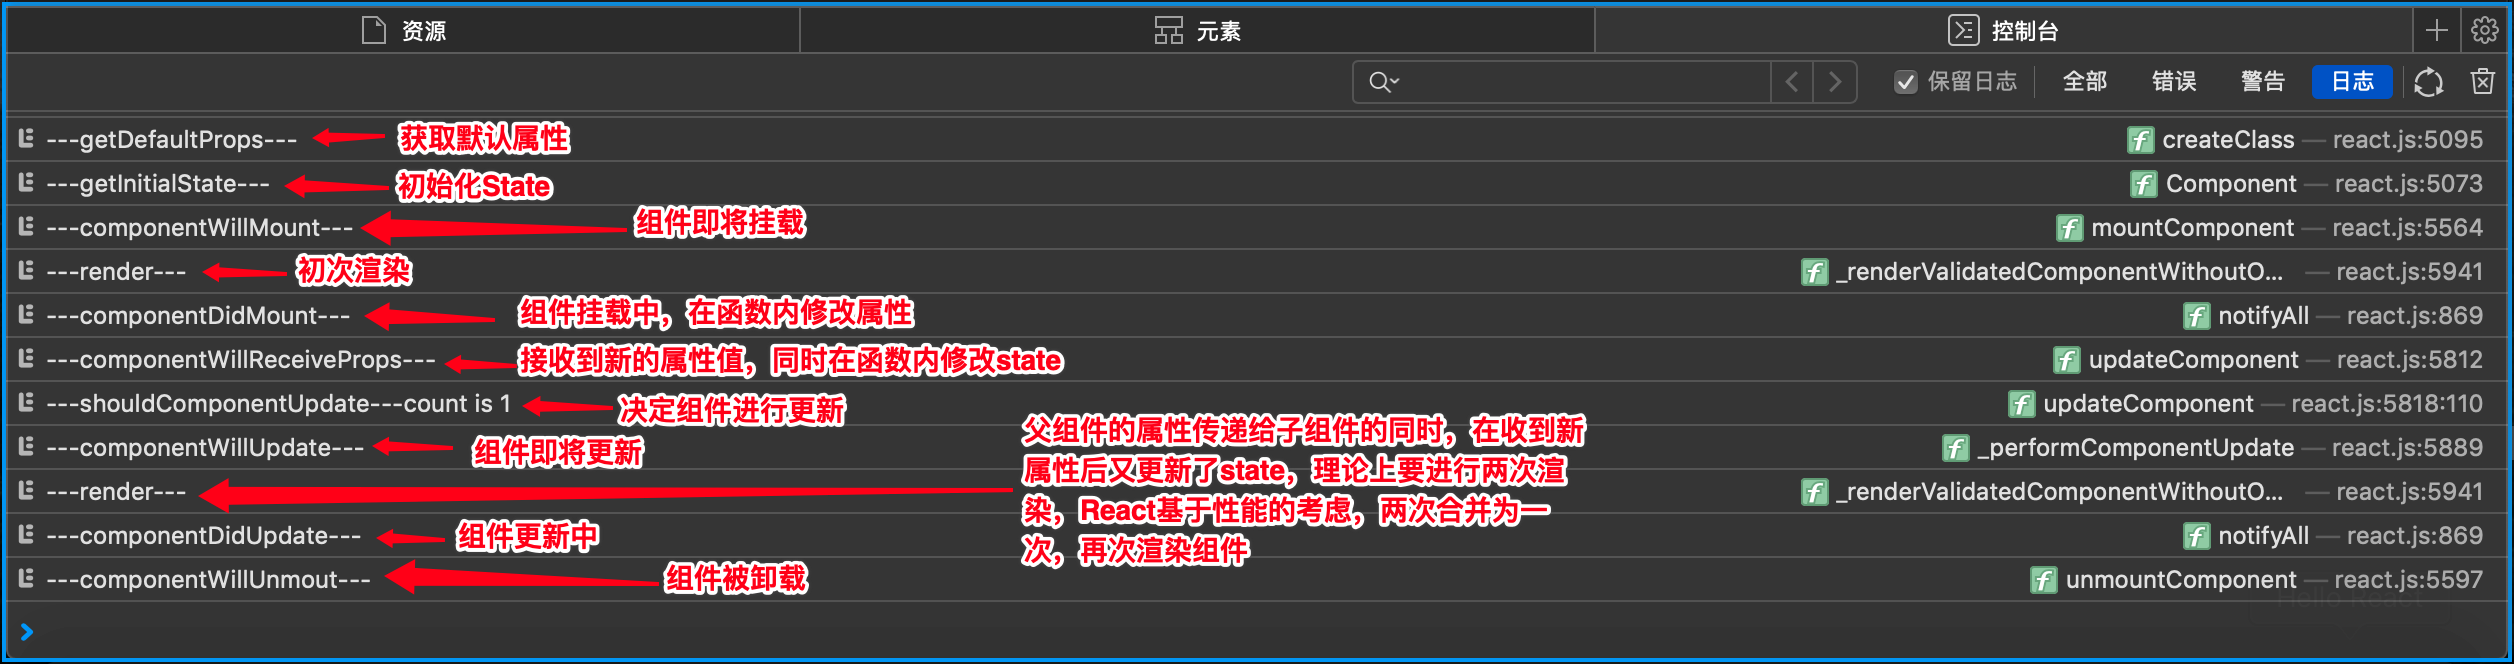
结果与分析 【需要把ReactDOM.unmountComponentAtNode()方法注释掉,才会显示结果,不然组件就从DOM上卸载了】

2、ES6
<!DOCTYPE html>

<html>

<head lang="en">

    <meta charset="UTF-8">

    <title>Hello React</title>

    <script src="react/react.js"></script>

    <script src="react/react-dom.js"></script>

    <script src="react/browser.min.js"></script>

</head>

<body>

    <div id="container"></div>

    <script type="text/babel">

        const targetNode = document.getElementById("container");

        //父组件

        class Parent extends React.Component {

            constructor(props){

                super(props)

                this.state = {title:""}

                this.deleteComponent = this.deleteComponent.bind(this)

            };

            deleteComponent(){

                ReactDOM.unmountComponentAtNode(targetNode); //卸载根组件

            }

            render(){

                return (

                    <div onClick={this.deleteComponent}>

                        <Children name={this.state.title}/>

                    </div>)

            };

            //父组件修改传递给子组件的属性值,子组件会触发componentWillReceiveProps函数

            componentDidMount(){

                this.setState({

                    title: "I AM XYQ! Welcome me, current count is"

                })

            };

        }

        //子组件

        class Children extends React.Component{

            constructor(props){

                super(props);

                this.state = {count:0};

                console.log("---constructor---")

            };

            componentWillMount(){

                console.log("---componentWillMount---")

            };

            render(){

                console.log("---render---");

                return (

                    <h1>{`${this.props.name} ${this.state.count}`}</h1>

                )

            };

            componentDidMount(){

                console.log("---componentDidMount---");

            };

            //此处获取的nextProps就是父组件的state中的title属性

            componentWillReceiveProps(nextProps){

                console.log("---componentWillReceiveProps---");

                this.setState({

                    count: this.state.count + 1

                })

            };

            shouldComponentUpdate(nextProps, nextState){

                console.log("---shouldComponentUpdate---"+`count is ${nextState.count}`);

                return true

            };

            componentWillUpdate(nextProps, nextState){

                console.log("---componentWillUpdate---")

            };

            componentDidUpdate(nextProps, nextState){

                console.log("---componentDidUpdate---");

            };

            componentWillUnmount(){

                console.log("---componentWillUnmout---");

            }

        }

        ReactDOM.render(

            <Parent/>,

            targetNode

        )

    </script>

</body>

</html>
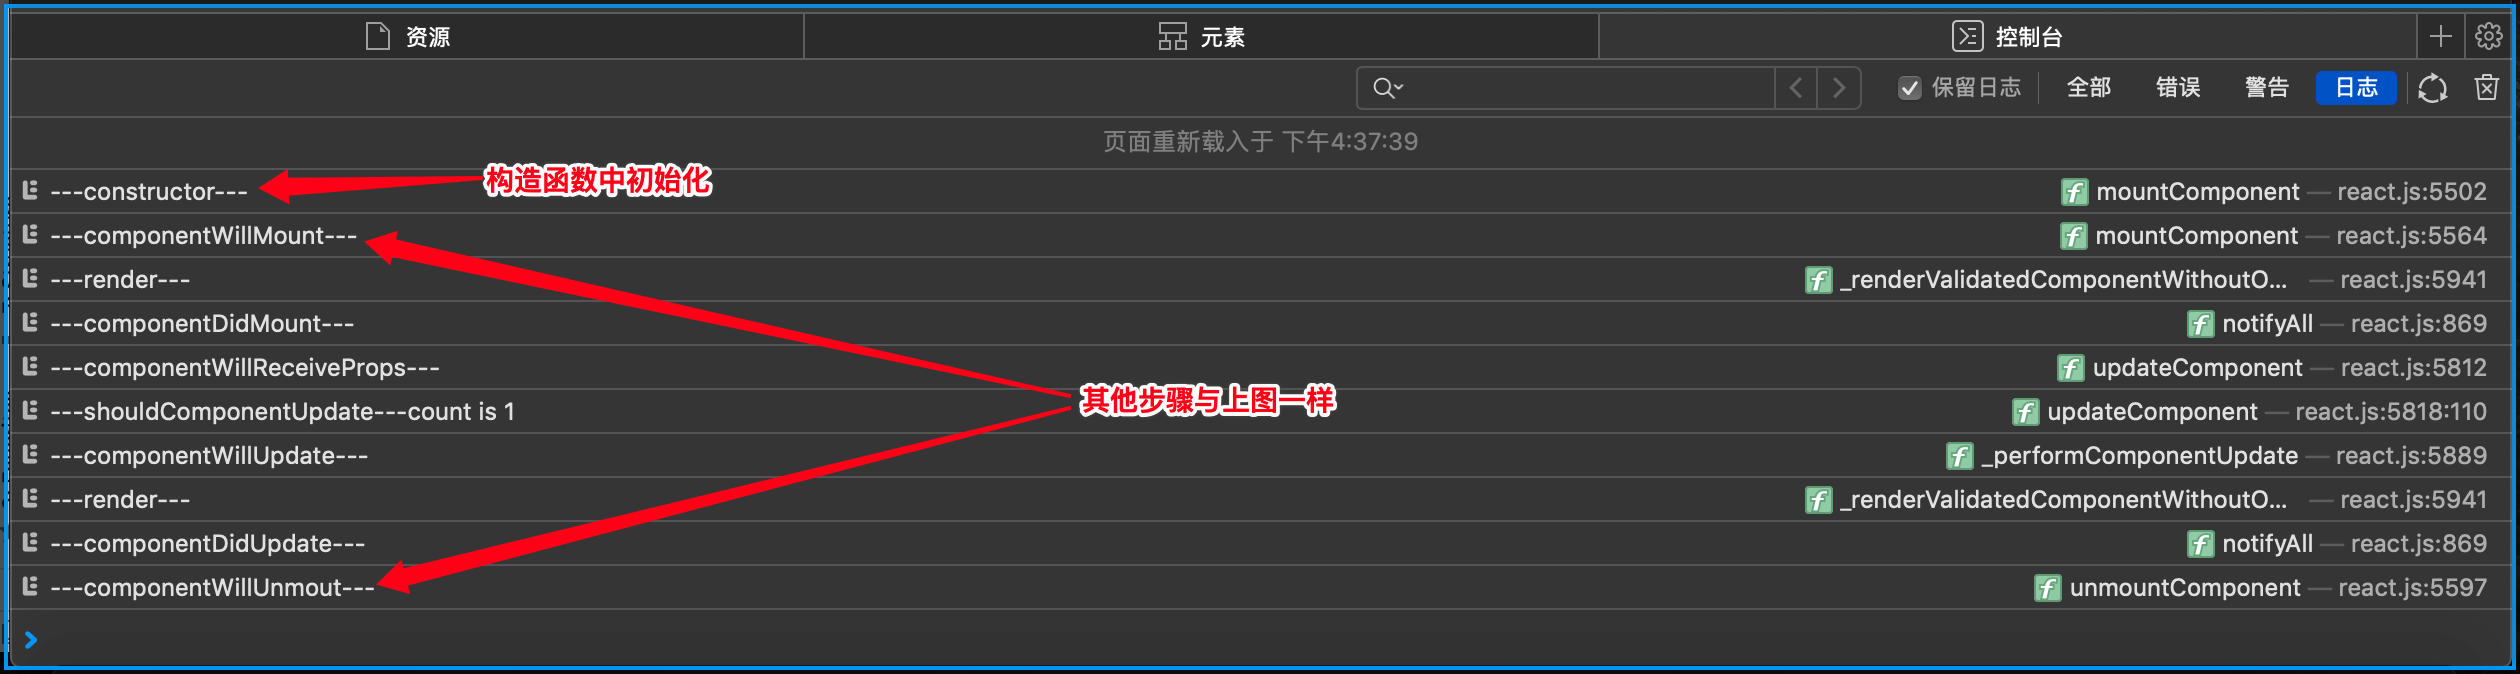
结果与分析 【点击deleteComponent()事件,组件就从DOM上卸载了】

React: React组件的生命周期的更多相关文章
- reactjs入门到实战(七)---- React的组件的生命周期
React的组件的生命周期有三个状态分别是:挂载(生产组件示例化.准备挂载到页面.挂载到页面).更新(更新值.更新DOM).和卸载(卸载后). >>>其他 getInitia ...
- react native组件的生命周期
react native组件的生命周期 一.当页面第一次加载时,会依次调用: constructor() componentWillMount(): 这个函数调用时机是在组件创建,并初始化了状态之后, ...
- Android React Native组件的生命周期及回调函数
熟悉android的童鞋应该都清楚,android是有生命周期的,其很多组件也是有生命周期.今天小编和大家分享的React Native组件的生命周期,还不了解的童鞋,赶紧来围观吧 在android开 ...
- 【RN - 基础】之React Native组件的生命周期
下图描述了React Native中组件的生命周期: 从上图中可以看到,React Native组件的生命周期可以分为初始化阶段.存在阶段和销毁阶段. 实例化阶段 实例化阶段是React Native ...
- React Native组件、生命周期及属性传值props详解
创建组件的三种方式 第一种:通过ES6的方式创建 /** * 方式一 :ES6 */ export default class HelloComponent extends Component { r ...
- React:组件的生命周期
在组件的整个生命周期中,随着该组件的props或者state发生改变,其DOM表现也会有相应的变化.一个组件就是一个状态机,对于特定地输入,它总返回一致的输出. 一个React组件的生命周期分为三个部 ...
- react教程 — 组件的生命周期 和 执行顺序
一.组件执行的生命周期: 参考 https://www.cnblogs.com/soyxiaobi/p/9559117.html 或 https://www.c ...
- React(三)组件的生命周期
Component Specs and LifeCycle <div id="app"></div> <script src="bower_ ...
- React Native——组件的生命周期
组件生命周期 上流程图描述了组件从创建.运行到销毁的整个过程,可以看到如果一个组件在被创建,从开始一直到运行会依次调用getDefaultProps到render这五个函数:在运行过程中,如果有属性和 ...
- React入门--------组件的生命周期
Mounting/组件挂载相关: componentWillMount componentDidMount Updating/组件更新相关: componentWillReceiveProps sho ...
随机推荐
- Lua-Async 协程的高级用法
Lua-Async 这是一个基于协程的异步调用库, 该库的设计思路类似JavaScript的Promise, 但相比Promise, 它有更多的灵活性. -- 引入Async local Async ...
- JS-选择排序
选择排序 选择排序的原理如下.遍历数组,设置最小值的索引为 0,如果取出的值比当前最小值小,就替换最小值索引,遍历完成后,将第一个元素和最小值索引上的值交换.如上操作后,第一个元素就是数组中的最小值, ...
- eclipse 创建 springboot项目
file --> new --> project --> Spring Boot --> Spring start project Group:公司域名倒置,一般是com ...
- 《Java基础知识》Java标示符、保留字和数制
一.Java标识符程序员对程序中的各个元素加以命名时使用的命名记号称为标识符(identifier).Java语言中,标识符是以字母,下划线(_),美元符($)开始的一个字符序列,后面可以跟字母,下划 ...
- sqlserver 行转列、字符串行转列、自动生产行转列脚本
行转列,老生常谈的问题.这里总结一下网上的方法. 1.生成测试数据: CREATE TABLE human( name ), --姓名 norm ), --指标 score INT , --分数 gr ...
- 查询BPC动态表
今天BASIS说后台有张数据表(/1CPMB/ABLBCAD)数据量已超过20亿,需要归档,但是不清楚是哪个业务模型. 有两种方式可以查询BPC动态生成的表名. (1)根据命名规则 环境前缀:apps ...
- mitmproxy 使用笔记
零.背景 我之前写过关于 charles 的使用笔记,为什么现在又要来写同类型的 mitmproxy 工具呢?下面我会娓娓道来他比 charles 多出的强大功能. 一.介绍 mitmproxy 是一 ...
- python接口测试中常见的两种接口依赖处理方式
一.请求体的字段依赖 这种情况多数是在当前测试的接口,它的前置接口的请求体中的字段要拿来在当前的接口请求体中继续使用,比如修改用户信息的接口,该接口会使用到用户名的字段,该字段是由创建用户时的请求体中 ...
- python3内置函数回忆
1.数学运算类 # 1.数学运算类 # abs:计算绝对值 print(abs(-23)) # divmod,返回一个tuple,第一个值为商,第二个值为余数 print(divmod(10,4)) ...
- java8新特性之——lambda表达式的使用
lambda表达式简介 个人理解,lambda表达式就是一种新的语法,没有什么新奇的,简化了开发者的编码,其实底层还是一些常规的代码.Lambda 是一个匿名函数,我们可以把 Lambda 表达式理解 ...