手动部署LNMP环境(CentOS 7)
手动部署LNMP环境(CentOS 7)
一、修改 yum 源
[root@localhost ~]# rpm -Uvh https://dl.fedoraproject.org/pub/epel/epel-release-latest-7.noarch.rpm

[root@localhost ~]# rpm -Uvh https://mirror.webtatic.com/yum/el7/webtatic-release.rpm

[root@localhost ~]# rpm -Uvh  http://dev.mysql.com/get/mysql57-community-release-el7-9.noarch.rpm
需要修改mysql或者php版本,对应的修改yum源和命令即可
Webtatic:https://webtatic.com
MySQL:https://dev.mysql.com/downloa...
二、安装 Nginx、MySQL、PHP
[root@localhost ~]# yum -y install nginx

[root@localhost ~]# yum -y install mysql-community-server

[root@localhost ~]# yum -y install php70w-devel php70w.x86_64 php70w-cli.x86_64 php70w-common.x86_64 php70w-gd.x86_64 php70w-ldap.x86_64 php70w-mbstring.x86_64 php70w-mcrypt.x86_64  php70w-pdo.x86_64   php70w-mysqlnd  php70w-fpm php70w-opcache php70w-pecl-redis php70w-pecl-mongo
三、配置
1、配置 MySQL
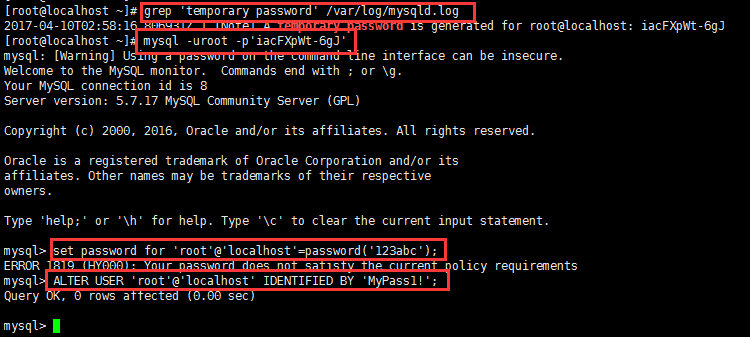
MySQL 安装完成之后,在 /var/log/mysqld.log 文件中给 root 生成了一个默认密码
通过下面的方式找到root 默认密码,然后登录 MySQL 进行修改:
[root@localhost ~]# systemctl start mysqld    # 启动 MySQL

[root@localhost ~]# grep 'temporary password' /var/log/mysqld.log  # 查找默认密码

2017-04-10T02:58:16.806931Z 1 [Note] A temporary password is generated for root@localhost: iacFXpWt-6gJ
登录 MySQL:
[root@localhost ~]# mysql -uroot -p'iacFXpWt-6gJ'
修改root 默认密码:
mysql> ALTER USER 'root'@'localhost' IDENTIFIED BY 'MyPass1!';
或者:
mysql> set password for 'root'@'localhost'=password('123abc');
注:
MySQL5.7 默认安装了密码安全检查插件(validate_password),默认密码检查策略要求密码必须包含:大小写字母、数字和特殊符号,并且长度不能少于8位。否则会提示 ERROR 1819 (HY000): Your password does not satisfy the current policy requirements 错误
详见 MySQL 官网密码策略详细说明:https://dev.mysql.com/doc/ref...
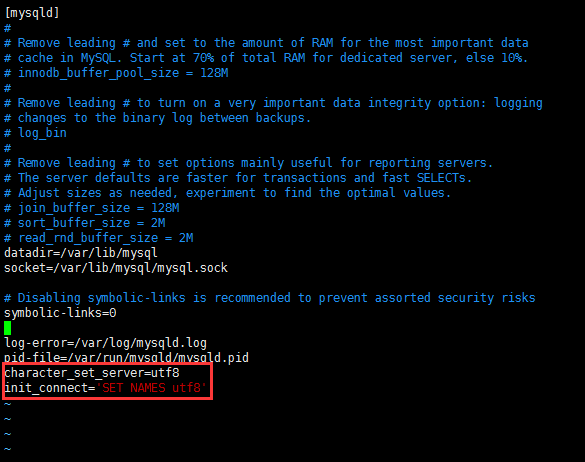
配置默认编码为 utf8:
修改 /etc/my.cnf 配置文件,在 [mysqld] 下添加编码配置,配置完成后重启:
[root@localhost ~]# vim /etc/my.cnf

[mysqld]

character_set_server=utf8

init_connect='SET NAMES utf8'

[root@localhost ~]# systemctl restart mysqld    # 重启 MySQL
设置开机启动:
[root@localhost ~]# systemctl enable mysqld
默认配置文件路径:
配置文件:/etc/my.cnf
日志文件:/var/log/mysqld.log
服务启动脚本:/usr/lib/systemd/system/mysqld.service
socket 文件:/var/run/mysqld/mysqld.pid
2、配置 Nginx
安装完成以后查看自己防火墙是否开启,如果已开启,我们需要修改防火墙配置,开启 Nginx 外网端口访问。
[root@localhost ~]# systemctl status firewalld
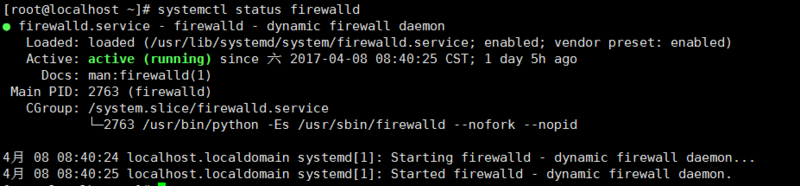
如果显示 active (running),则需要调整防火墙规则的配置。
开启80/443端口:
[root@localhost ~]# firewall-cmd --zone=public --add-port=80/tcp --permanent

[root@localhost ~]# firewall-cmd --zone=public --add-port=443/tcp --permanent
出现 success 表明添加成功
命令含义:
--zone #作用域
--add-port=80/tcp #添加端口,格式为:端口/通讯协议
--permanent #永久生效,没有此参数重启后失效
修改 Nginx 配置:
[root@localhost ~]# vim /etc/nginx/nginx.conf
在 server {} 里添加:
location / {

    #定义首页索引文件的名称

    index index.php index.html index.htm;

}

# PHP 脚本请求全部转发到 FastCGI处理. 使用FastCGI默认配置.

location ~ .php$ {

    fastcgi_pass 127.0.0.1:9000;

    fastcgi_index index.php;

    fastcgi_param  SCRIPT_FILENAME  $document_root$fastcgi_script_name;

    include fastcgi_params;

}

配置完成重启 Nginx:
[root@localhost ~]# systemctl start nginx # 启动 Nginx
注:本文只是简单配置 Nginx,具体更多配置请自行百度。
设置开机启动:
[root@localhost ~]# systemctl enable nginx
3、设置开机启动 php-fpm:
[root@localhost ~]# systemctl enable php-fpm

[root@localhost ~]# systemctl start php-fpm    # 启动 php-fpm
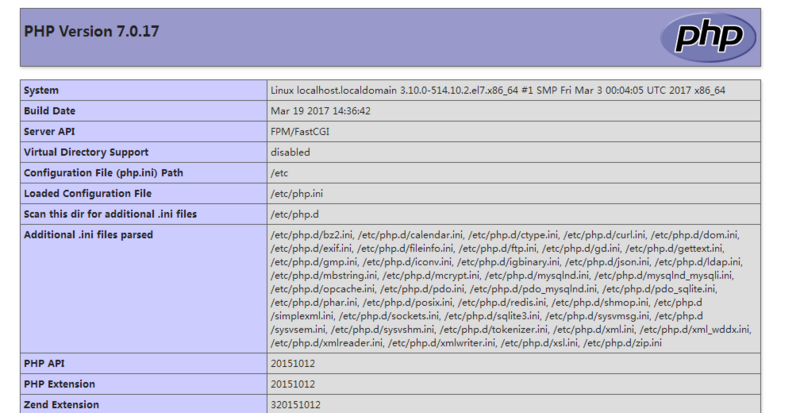
四、测试
- 在
/usr/share/nginx/html文件下创建php文件,输出phpinfo信息
<?php echo phpinfo(); ?>
- 浏览器访问
http://<内网IP地址>/phpinfo.php,如果看到PHP信息,说明安装成功
欢迎转载,转载请注明出处!
独立域名博客:flywill.com
欢迎关注公众微信号:Java小镇V
分享自己的学习 & 学习资料 & 生活
想要交流的朋友也可以加微信号备注入群:EscUpDn
手动部署LNMP环境(CentOS 7)的更多相关文章
- 手动编译部署LNMP环境(CentOS7.5+Nginx-1.18.0+MySQL-5.7.30+PHP-7.4.14)
在平时运维工作中,经常需要用到LNMP应用框架.LNMP环境是指在Linux系统下,由Nginx + MySQL + PHP组成的网站服务器架构. 可参考前面的文章: 如何在CentOS 7上搭建LA ...
- 【转载】Centos系统快速部署LNMP环境
PHP语言在Linux系统上运行的时候,需要在Linux系统上部署相应的Nginx.MySQL.PHP等环境,只有将这些环境参数都设置好,PHP相关应用程序才可正常运行,部署环境的方法有很多种,可手动 ...
- docker中基于centos镜像部署lnmp环境 php7.3 mysql8.0 最新版
Docker是一个开源的应用容器引擎,基于Go语言并遵从Apache2.0协议开源. Docker可以让开发者打包他们的应用以及依赖包到一个轻量级.可移植的容器中,然后发布到任何流行的Linux机器上 ...
- 十九.部署LNMP环境、构建LNMP平台、地址重写
proxy client web1 web2 1.部署LNMP环境 1.1 部署nginx(前面已部署过) 1.2 部署mariadb ]# yum -y install mariadb mari ...
- 通过yum在CentOS7部署LNMP环境(Centos7.4+Nginx1.12+mariadb5.5.56+PHP7.0)
LNMP环境 CentOS Linux release 7.4.1708 PHP 7.0.25 nginx version: nginx/1.12.2 mariadb: 5.5.56-MariaDB ...
- 高级运维(三):部署Lnmp环境、构建Lnmp平台、地址重写
一.部署LNMP环境 目标: 安装部署Nginx.MariaDB.PHP环境 1> 安装部署Nginx.MariaDB.PHP.PHP-FPM: 2> 启动Nginx.MariaDB.FP ...
- ansible-playbook通过github拉取部署Lnmp环境
1. 配置服务器初始化 1.1) 关闭防火墙和selinux 1 [root@test-1 ~]# /bin/systemctl stop firewalld 2 [root@test-1 ~]# ...
- centos-6.5安装部署LNMP环境
安装部署前,确保安装了gcc和gcc-c++ 系统信息: [root@zww ~]# cat /etc/redhat-release CentOS release 6.5 (Final) [root@ ...
- RedHat6.2 x86手动配置LNMP环境
因为公司要求用RedHat配,顺便让我练习一下Linux里面的操作什么的. 折腾来折腾去终于搞好了,其实也没那么难嘛.但是也要记录一下. 首先,是在服务器里面用VMware搭建的RedHat6.2 x ...
随机推荐
- Linux常用高级命令
目录 linux命令是对Linux系统进行管理的命令.对于Linux系统来说,无论是中央处理器.内存.磁盘驱动器.键盘.鼠标,还是用户等都是文件,Linux系统管理的命令是它正常运行的核心,与之前的D ...
- 转 NAT技术详解
NAT产生背景 今天,无数快乐的互联网用户在尽情享受Internet带来的乐趣.他们浏览新闻,搜索资料,下载软件,广交新朋,分享信息,甚至于足不出户获取一切日用所需.企业利用互联网发布信息,传递资料和 ...
- Display 1 No cameras rendering
解决: 点击Main Camera ,
- [JZOJ5781]【NOIP提高A组模拟2018.8.8】秘密通道
Description 有一副n*m的地图,有n*m块地,每块是下列四种中的一种:墙:用#表示,墙有4个面,分别是前面,后面,左面,右面.起点:用C表示,为主角的起点,是一片空地.终点:用F表示,为主 ...
- 初识mpvue
听说mpvue可以实现H5和小程序的同时开发 对使用过vue的选手几乎是0难度 忍不住搓搓小手手 看了文 唔~ 似乎不是很难的样子 然后实际上手操作了一下 老规矩:新建项目 npm install ...
- postman简单介绍
- SSH框架项目配置和启动的加载顺序及请求的执行顺序
1:======配置和启动====== (1)配置web.xml 配置<context-param>,其中内容为Spring的配置文件applicationContext.xml.注意&l ...
- 卡特兰(Catalan)数入门详解
也许更好的阅读体验 基本概念 介绍 学卡特兰数我觉得可能比组合数要难一点,因为组合数可以很明确的告诉你那个公式是在干什么,而卡特兰数却像是在用大量例子来解释什么时卡特兰数 这里,我对卡特兰数做一点自己 ...
- java架构之路-(Redis专题)简单聊聊redis分布式锁
这次我们来简单说说分布式锁,我记得过去我也过一篇JMM的内存一致性算法,就是说拿到锁的可以继续操作,没拿到的自旋等待. 思路与场景 我们在Zookeeper中提到过分布式锁,这里我们先用redis实现 ...
- Arduino学习笔记③ 经典LED
1.前言 今天我们开始同时讲解理论以及实践.对于绝大部分有过单片机编程经历的人来说,第一个接触的大多数就是LED灯(忽然想起博主大一那个懵懂的时代,当时大三的师兄给我们展现了一把流水灯功力,当 ...