【python实现卷积神经网络】池化层实现
代码来源:https://github.com/eriklindernoren/ML-From-Scratch
卷积神经网络中卷积层Conv2D(带stride、padding)的具体实现:https://www.cnblogs.com/xiximayou/p/12706576.html
激活函数的实现(sigmoid、softmax、tanh、relu、leakyrelu、elu、selu、softplus):https://www.cnblogs.com/xiximayou/p/12713081.html
损失函数定义(均方误差、交叉熵损失):https://www.cnblogs.com/xiximayou/p/12713198.html
优化器的实现(SGD、Nesterov、Adagrad、Adadelta、RMSprop、Adam):https://www.cnblogs.com/xiximayou/p/12713594.html
卷积层反向传播过程:https://www.cnblogs.com/xiximayou/p/12713930.html
全连接层实现:https://www.cnblogs.com/xiximayou/p/12720017.html
批量归一化层实现:https://www.cnblogs.com/xiximayou/p/12720211.html
包括D的平均池化和最大池化:
class PoolingLayer(Layer):

    """A parent class of MaxPooling2D and AveragePooling2D

    """

    def __init__(self, pool_shape=(2, 2), stride=1, padding=0):

        self.pool_shape = pool_shape

        self.stride = stride

        self.padding = padding

        self.trainable = True

    def forward_pass(self, X, training=True):

        self.layer_input = X

        batch_size, channels, height, width = X.shape

        _, out_height, out_width = self.output_shape()

        X = X.reshape(batch_size*channels, 1, height, width)

        X_col = image_to_column(X, self.pool_shape, self.stride, self.padding)

        # MaxPool or AveragePool specific method

        output = self._pool_forward(X_col)

        output = output.reshape(out_height, out_width, batch_size, channels)

        output = output.transpose(2, 3, 0, 1)

        return output

    def backward_pass(self, accum_grad):

        batch_size, _, _, _ = accum_grad.shape

        channels, height, width = self.input_shape

        accum_grad = accum_grad.transpose(2, 3, 0, 1).ravel()

        # MaxPool or AveragePool specific method

        accum_grad_col = self._pool_backward(accum_grad)

        accum_grad = column_to_image(accum_grad_col, (batch_size * channels, 1, height, width), self.pool_shape, self.stride, 0)

        accum_grad = accum_grad.reshape((batch_size,) + self.input_shape)

        return accum_grad

    def output_shape(self):

        channels, height, width = self.input_shape

        out_height = (height - self.pool_shape[0]) / self.stride + 1

        out_width = (width - self.pool_shape[1]) / self.stride + 1

        assert out_height % 1 == 0

        assert out_width % 1 == 0

        return channels, int(out_height), int(out_width)

class MaxPooling2D(PoolingLayer):

    def _pool_forward(self, X_col):

        arg_max = np.argmax(X_col, axis=0).flatten()

        output = X_col[arg_max, range(arg_max.size)]

        self.cache = arg_max

        return output

    def _pool_backward(self, accum_grad):

        accum_grad_col = np.zeros((np.prod(self.pool_shape), accum_grad.size))

        arg_max = self.cache

        accum_grad_col[arg_max, range(accum_grad.size)] = accum_grad

        return accum_grad_col

class AveragePooling2D(PoolingLayer):

    def _pool_forward(self, X_col):

        output = np.mean(X_col, axis=0)

        return output

    def _pool_backward(self, accum_grad):

        accum_grad_col = np.zeros((np.prod(self.pool_shape), accum_grad.size))

        accum_grad_col[:, range(accum_grad.size)] = 1. / accum_grad_col.shape[0] * accum_grad

        return accum_grad_col
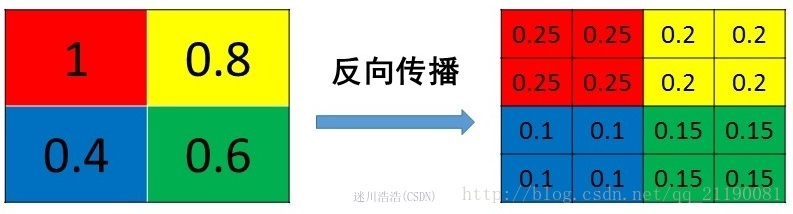
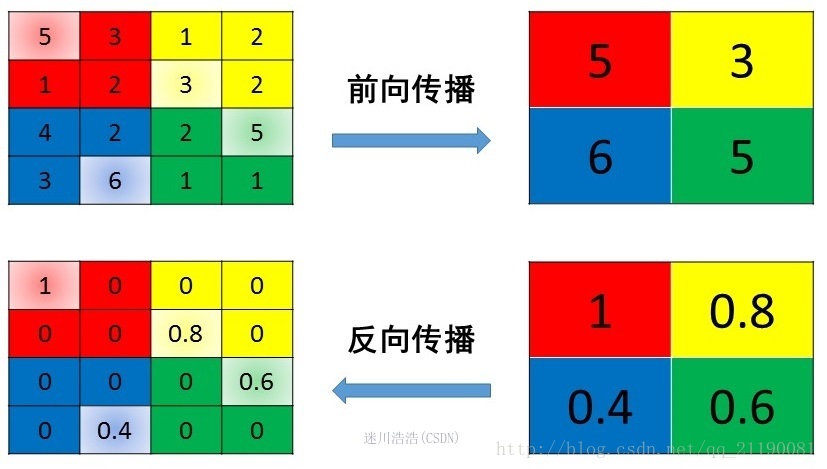
需要注意的是池化层是没有可学习的参数的(如果不利用带步长的卷积来代替池化的作用),还有就是池化层反向传播的过程,这里参考:https://blog.csdn.net/Jason_yyz/article/details/80003271
为了结合代码看直观些,就将其内容摘了下来:
【python实现卷积神经网络】池化层实现的更多相关文章
- tensorflow的卷积和池化层(二):记实践之cifar10
在tensorflow中的卷积和池化层(一)和各种卷积类型Convolution这两篇博客中,主要讲解了卷积神经网络的核心层,同时也结合当下流行的Caffe和tf框架做了介绍,本篇博客将接着tenso ...
- tensorflow中的卷积和池化层(一)
在官方tutorial的帮助下,我们已经使用了最简单的CNN用于Mnist的问题,而其实在这个过程中,主要的问题在于如何设置CNN网络,这和Caffe等框架的原理是一样的,但是tf的设置似乎更加简洁. ...
- 【python实现卷积神经网络】padding2D层实现
代码来源:https://github.com/eriklindernoren/ML-From-Scratch 卷积神经网络中卷积层Conv2D(带stride.padding)的具体实现:https ...
- 【python实现卷积神经网络】Flatten层实现
代码来源:https://github.com/eriklindernoren/ML-From-Scratch 卷积神经网络中卷积层Conv2D(带stride.padding)的具体实现:https ...
- 【python实现卷积神经网络】Dropout层实现
代码来源:https://github.com/eriklindernoren/ML-From-Scratch 卷积神经网络中卷积层Conv2D(带stride.padding)的具体实现:https ...
- 【python实现卷积神经网络】激活层实现
代码来源:https://github.com/eriklindernoren/ML-From-Scratch 卷积神经网络中卷积层Conv2D(带stride.padding)的具体实现:https ...
- 基于深度学习和迁移学习的识花实践——利用 VGG16 的深度网络结构中的五轮卷积网络层和池化层,对每张图片得到一个 4096 维的特征向量,然后我们直接用这个特征向量替代原来的图片,再加若干层全连接的神经网络,对花朵数据集进行训练(属于模型迁移)
基于深度学习和迁移学习的识花实践(转) 深度学习是人工智能领域近年来最火热的话题之一,但是对于个人来说,以往想要玩转深度学习除了要具备高超的编程技巧,还需要有海量的数据和强劲的硬件.不过 Tens ...
- tensorflow CNN 卷积神经网络中的卷积层和池化层的代码和效果图
tensorflow CNN 卷积神经网络中的卷积层和池化层的代码和效果图 因为很多 demo 都比较复杂,专门抽出这两个函数,写的 demo. 更多教程:http://www.tensorflown ...
- Python3 卷积神经网络卷积层,池化层,全连接层前馈实现
# -*- coding: utf-8 -*- """ Created on Sun Mar 4 09:21:41 2018 @author: markli " ...
随机推荐
- angular 项目中遇到rxjs error TS1005:';'
因为rxjs的版本问题,只需要在package.json 中将依赖的 rxjs:'^6.00' 改为 rxjs'6.00', 然后执行 npm update 更新下rxjs的依赖版本即可解决
- IdentityServer4实现.Net Core API接口权限认证(快速入门)
什么是IdentityServer4 官方解释:IdentityServer4是基于ASP.NET Core实现的认证和授权框架,是对OpenID Connect和OAuth 2.0协议的实现. 通俗 ...
- CSS导入方式和六种选择器
1.css的导入方式 1.1 行内嵌式 1.2 内部方式 1.2.1含义: css代码写在<head>的<style>标签中 1.2.2 优点 方便在同页面中修改样式 1.2. ...
- Postman从入门到入门
1.Postman简介 Postman是一个接口测试工具,在做接口测试的时候, Postman相当于一个客户端,可以发送请求到服务器端.Postman分为Chrome插件版本(不再更新维护)和Nati ...
- Javascript之网页版待办事项
本文使用原生JS实现站点 http://www.todolist.cn/ 的基本功能. 其中页面的HTML布局和CSS样式取用原站,JS部分为自己编写. 效果图 完整代码 HTML.JS部分 < ...
- linux-manjaro下添加Yahei Hybrid Consola字体
1.下载地址 http://www.win10zhijia.net/soft/20160921/3217.html 2.解压 unzip xxx 3.安装 sudo mkdir /usr/share/ ...
- 【问题解决】-《java.lang.NoClassDefFoundException》
此问题相比与ClassNotFoundException,不容易找到,当然这两者都属于jvm加载类时的错误.导致 NoClassDefFoundException的原因:编译时不报错,运行时在内存中找 ...
- intelliJ IDEA 教育版下载教程
声明:本教程针对的是在校本科大学生及以上学历学生群体,因为申请账号需要学校的邮箱来进行验证,所以"社会人士"为了对的起"社会"这两个字,还是花点钱买个正版吧! ...
- Material Design 组件之 AppBarLayout
AppBarLayout 是一个垂直方向的 LinearLayout,它实现了许多符合 Material Design 设计规范的状态栏应该具有的功能,比如滚动手势. AppBarLayout 一般直 ...
- eclipse常用功能及快捷键
1.更改默认字体 Window->Preferences->General->Appearance->Colorsand Fonts ->Basics->Text ...