
0109 springboot的部署测试监控
springboot的部署测试监控
部署
基于maven
打包
JAR
打包方式一般采用的jar包,使用springboot的默认方式即可;
使用maven命令:
mvn clean package -Dmaven.test.skip=true
执行成功之后,可以在对应的target目录下找到对应的包,比如: eg-zuul-0.0.1-SNAPSHOT.jar
WAR
运行
内置容器运行
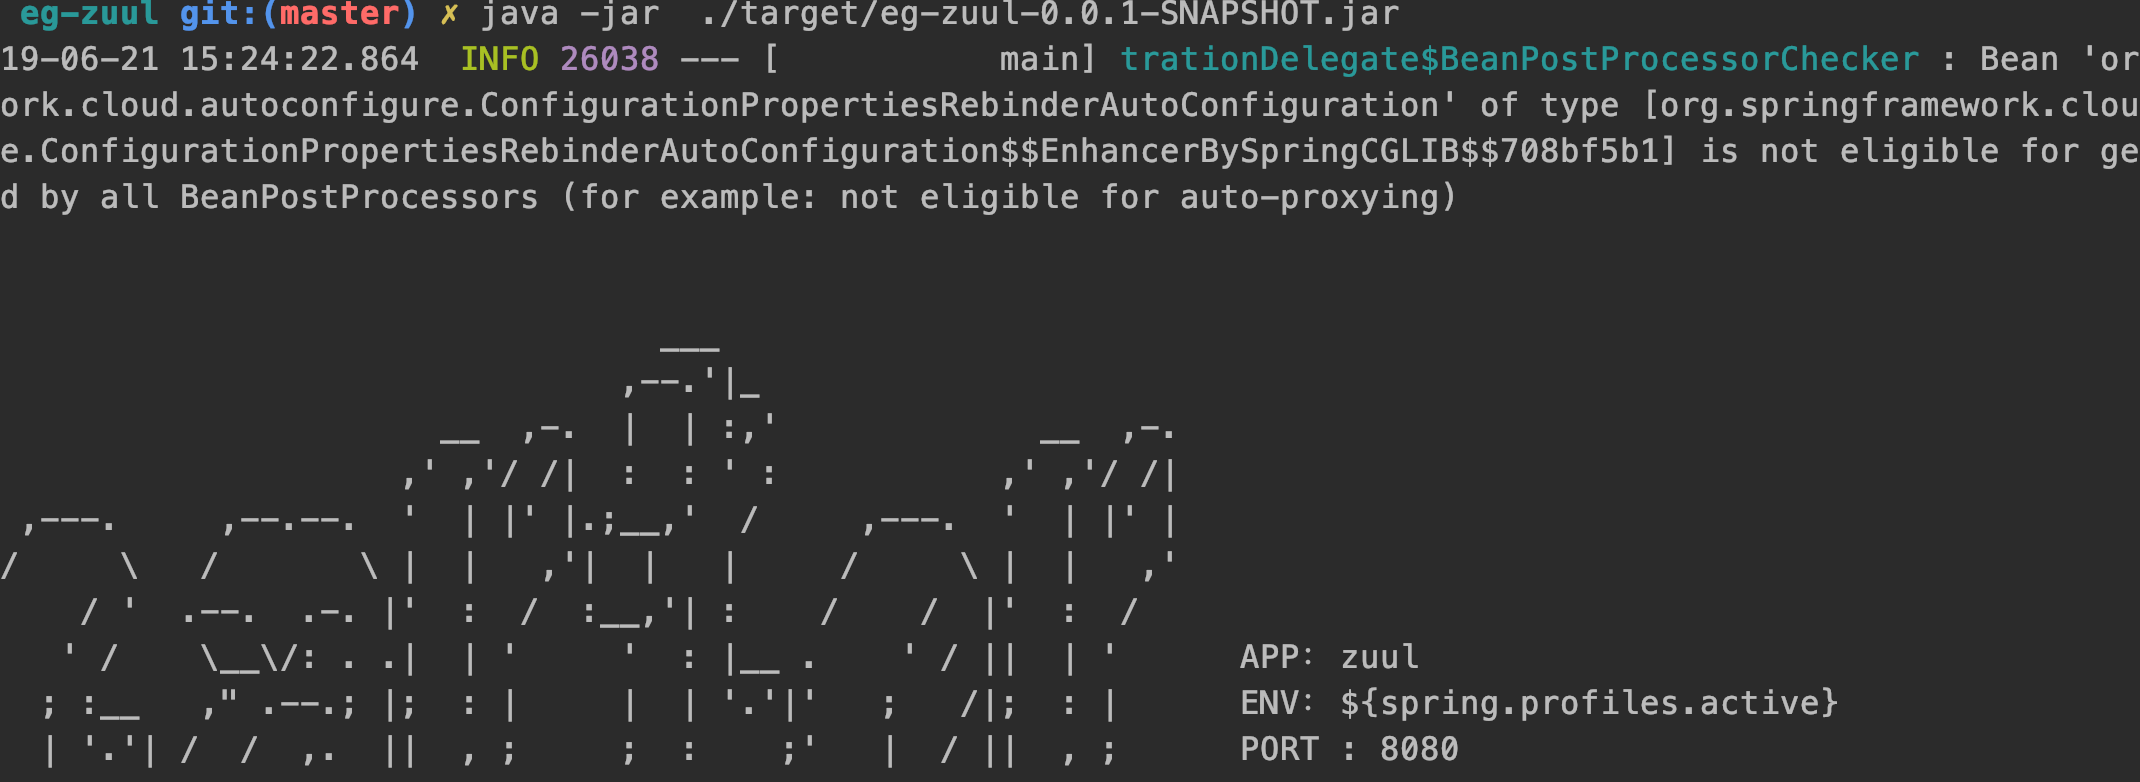
springboot内置了web container容器 tomcat, 可以直接使用 java -jar命令运行;
例如:
java -jar xxx/target/eg-zuul-0.0.1-SNAPSHOT.jar
外置容器运行
也可使用war的方式,使用外置的tomcat运行,不过代码需要改造一下:
1 改造打包方式
打包方式改为 war包;
在pom.xml中,在version标签的下面添加配置:
<package>war</package>
2 添加改造启动代码
package com.springbootpractice.egzuul;

import org.springframework.boot.builder.SpringApplicationBuilder;

import org.springframework.boot.web.servlet.support.SpringBootServletInitializer;

/**

 * @author <a href="mailto:505847426@qq.com">carterbrother</a>

 * @description 通过外置的容器运行springboot

 * @date 2019年06月21日 15:32

 * @Copyright (c) carterbrother

 */

public class ServletInitializer extends SpringBootServletInitializer {

    @Override

    protected SpringApplicationBuilder configure(SpringApplicationBuilder builder) {

        return builder.sources(EgZuulApplication.class);

    }

}
原理是: 从servlet3.1开始,运行无web.xml的web程序,只需要实现ServletContainerInitializer接口,而SpringBootServletInitializer扩展了该类,所以可以实现无xml启动;
3 配置外置tomcat
4 忽略打包检查
  <plugin>

                <groupId>org.apache.maven.plugins</groupId>

                <artifactId>maven-war-plugin</artifactId>

                <version>2.3</version>

                <configuration>

                    <failOnMissingWebXml>false</failOnMissingWebXml>

                </configuration>

            </plugin>
热部署
开发的时候用到, spring-boot-devtools ;
引入依赖:
<dependency>

            <groupId>org.springframework.boot</groupId>

            <artifactId>spring-boot-devtools</artifactId>

            <optional>true</optional>

</dependency>
暴露的配置信息可以配置更多细节方面的处理:
测试
基于junit 和 mockito (消除各种环境对于http带来的困难)
测试业务层
测试REST
package com.springbootpractice.eguser;

import com.springbootpractice.api.user.dto.UserPro;

import com.springbootpractice.eguser.service.UserService;

import org.junit.Assert;

import org.junit.Test;

import org.junit.runner.RunWith;

import org.springframework.beans.factory.annotation.Autowired;

import org.springframework.boot.test.context.SpringBootTest;

import org.springframework.boot.test.web.client.TestRestTemplate;

import org.springframework.test.context.junit4.SpringRunner;

import java.util.Map;

@RunWith(SpringRunner.class)

@SpringBootTest(webEnvironment = SpringBootTest.WebEnvironment.RANDOM_PORT)

public class EgUserApplicationTests {

    @Autowired

    private UserService userService;

    @Autowired

    private TestRestTemplate testRestTemplate;

    @Test

    public void testUserService() {

        UserPro userPro = new UserPro();

        userPro.setId(1L);

        userPro.setUserName("xxxaaa");

        final Map<String, Object> map = userService.insertUser(userPro);

        Assert.assertEquals("插入失败",true,map.get("success"));

        final UserPro userProReturn = userService.getUserPro(1L);

        Assert.assertEquals(userPro,userProReturn);

    }

    @Test

    public void testUserRest() {

        UserPro userPro = new UserPro();

        userPro.setId(2L);

        userPro.setUserName("BBBB");

         Map map = testRestTemplate.postForObject("/insert", userPro, Map.class);

        Assert.assertEquals("插入失败",true,map.get("success"));

        UserPro userProReturn = testRestTemplate.getForObject("/user/{id}", UserPro.class, 2L);

        Assert.assertEquals(userPro,userProReturn);

    }

}
Mock测试
当依赖的服务还没有开发完毕,而需要测试的功能却强烈依赖,可以使用Mock来测试;
package com.springbootpractice.egproduct;

import com.springbootpractice.api.user.UserApi;

import com.springbootpractice.api.user.dto.UserPro;

import org.junit.Assert;

import org.junit.Test;

import org.junit.runner.RunWith;

import org.mockito.BDDMockito;

import org.springframework.boot.test.context.SpringBootTest;

import org.springframework.boot.test.mock.mockito.MockBean;

import org.springframework.test.context.junit4.SpringRunner;

@RunWith(SpringRunner.class)

@SpringBootTest(webEnvironment = SpringBootTest.WebEnvironment.RANDOM_PORT)

public class EgProductApplicationTests {

    @MockBean

    private UserApi userApi;

    @Test

    public void mockUserApiTest() {

        UserPro mockUserPro = new UserPro();

        mockUserPro.setId(1L);

        mockUserPro.setUserName("xxxx");

        BDDMockito.given(userApi.getUserPro(1L)).willReturn(mockUserPro);

        UserPro userProReturn = userApi.getUserPro(1L);

        Assert.assertEquals(userProReturn,mockUserPro);

    }

}
监控
基于 actuator ,监控运行状态,进行一些简单的管理
WEB监控
引入依赖:
 <dependency>

            <groupId>org.springframework.boot</groupId>

            <artifactId>spring-boot-starter-actuator</artifactId>

        </dependency>

        <dependency>

            <groupId>org.springframework.hateoas</groupId>

            <artifactId>spring-hateoas</artifactId>

            <version>0.24.0.RELEASE</version>

        </dependency>
默认只开放了 health , info ;
如果要开放所有的监控点:
management.endpoint.web.exposure.include=*
常见的监控点有:
| url | 监控说明 |
|---|---|
| health | 监控信息 |
| info | |
| beans | 容器中的Bean |
| mappings | url mapping |
| env | 配置参数 |
| shutdown | 关闭服务 |
| conditions | 自动装配相关的信息 |
对敏感的配置信息,可以使用spring-security来控制保护起来;
shutdown端点默认是关闭的,开启的配置属性是:
management.endpoint.shutdown.enabled=true
开启之后 访问 /actuator/shutdown 需要是post请求才能调用;
一般的配置端点开关的方式是:
//默认所有的端点都是关闭的,然后选择一些需要暴露的端点进行打开
management.endpoints.enabled-by-default=false
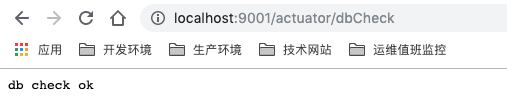
标注@Endpoint注解类,
@ReadOperation标注方法 标识GET方法
@WriteOperation 标识POST方法
@DeleteOperation 标识Delete方法
package com.springbootpractice.egproduct.endpoint;

import org.springframework.boot.actuate.endpoint.annotation.Endpoint;

import org.springframework.boot.actuate.endpoint.annotation.ReadOperation;

import org.springframework.stereotype.Component;

/**

 * @author <a href="mailto:505847426@qq.com">carterbrother</a>

 * @description 新增actuator的一个端点

 * @date 2019年06月21日 18:42

 * @Copyright (c) carterbrother

 */

@Endpoint(id = "dbCheck",enableByDefault = true)

@Component

public class DBCheckEndpoint {

    @ReadOperation

    public String test(){

        return "db check ok";

    }

}
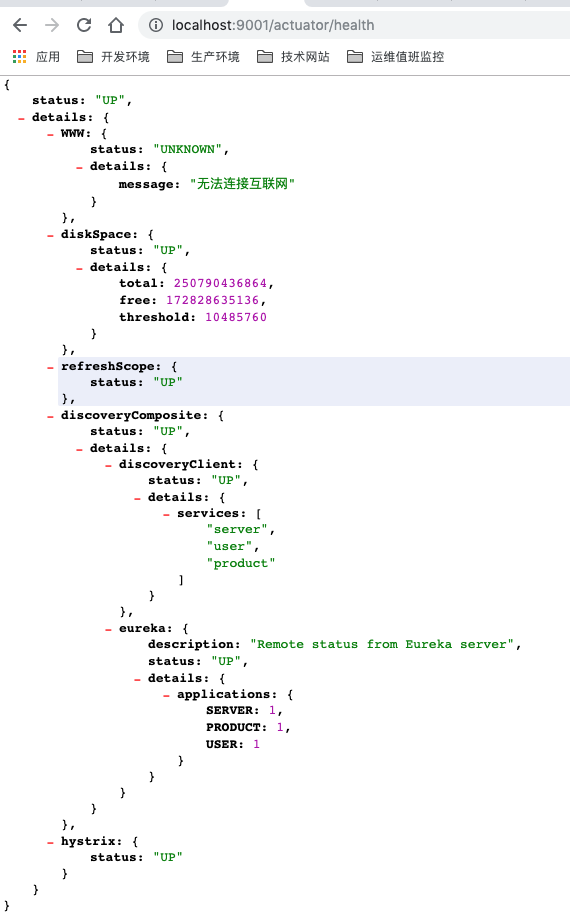
actuator内置了很多的健康指标 需要配置才能显示,配置方法:
management.endpoint.health.show-details=always
package com.springbootpractice.egproduct.health;

import org.springframework.boot.actuate.health.AbstractHealthIndicator;

import org.springframework.boot.actuate.health.Health;

import org.springframework.stereotype.Component;

import java.io.IOException;

import java.net.InetAddress;

/**

 * @author <a href="mailto:505847426@qq.com">carterbrother</a>

 * @description 进行网络检查

 * @date 2019年06月21日 18:30

 * @Copyright (c) carterbrother

 */

@Component

public class WWWHealthIndicator extends AbstractHealthIndicator {

    @Override

    protected void doHealthCheck(Health.Builder builder) throws Exception {

        if (ping()){

            builder.withDetail("message","可以正常连接互联网").up();

            return;

        }

        builder.withDetail("message","无法连接互联网").unknown();

    }

    private boolean ping() {

        try {

            return   InetAddress.getByName("www.baidu.com").isReachable(3000);

        } catch (IOException e) {

            return false;

        }

    }

}
JMX监控
相对于http监控,也提供了jmx的监控方式;
典型使用方式使用的是jdk的 jconsole,使用jmx协议连接本地的jvm,进行监控,MBean下的Health下可以查看到返回信息;以此来进行监控。
原创不易,转载请注明出处。
0109 springboot的部署测试监控的更多相关文章
- springboot热部署与监控
一.热部署 添加依赖+Ctrl+F9 <dependency> <groupId>org.springframework.boot</groupId> <ar ...
- SpringBoot 原理分析、监控、项目部署
目录 SpringBoot 监控 概述 使用 SpringBoot Admin 概述 使用 SpringBoot 项目部署 SpringBoot 监控 概述 SpringBoot 自带监控功能 Act ...
- SpringBoot系列——admin服务监控
前言 springboot项目部署起来后,如何实时监控项目的运行状况呢?本文记录使用springboot-admin对服务进行监控. springboot-admin介绍:https://codece ...
- CentOS 6.5安装部署Zabbix监控系统
CentOS 6.5安装部署Zabbix监控系统 先说一点废话,我没有用centos7做实验,讲真,centos 7我也不常用,喜欢新版本的同学其实可以尝试下,注意一点的就是centos 6.5只支持 ...
- SpringBoot(六):springboot热部署
在j2ee项目开发中,热部署插件是JRebel.JRebel的使用为开发人员带来了极大的帮助,且挺高了开发便捷.而在SpringBoot开发生态环境中,SpringBoot热部署常用插件是:sprin ...
- SpringBoot热部署配置(基于Maven)
热部署的意思是只要类中的代码被修改了,就能实时生效,而不用重启项目.spring-boot-devtools 是一个为开发者服务的一个模块,其中最重要的功能就是自动应用代码更改到最新的App上面去.原 ...
- HDFS部署测试记录(2019/05)
目录 HDFS部署测试记录 0.HDFS基础知识 1.基本组成结构与文件访问过程 2.NameNode启动时如何维护元数据 3.HDFS文件上传流程 1.系统环境 1.安装大致记录: 2.磁盘分区 3 ...
- 部署zabbix监控平台(源码安装)
案例:部署Zabbix监控平台 1 问题 本案例要求部署一台Zabbix监控服务器,一台被监控主机,为进一步执行具体的监控任务做准备: 安装LNMP环境 源码安装Zabbix 安装监控端主机,修改基本 ...
- CentOS 7.4 下安装部署Nagios监控系统详细攻略(三)
Nagios是一个流行的电脑系统和网络监控程序,它检测主机和服务,当异常发生和解除时能提醒用户.它是基于GPLv2开发的开源软件,可免费获得及使用. nagios工作原理 nagios的功能是监控服务 ...
随机推荐
- 吴裕雄 Bootstrap 前端框架开发——Bootstrap 排版:显示在 <abbr> 元素中的文本以小号字体展示,且可以将小写字母转换为大写字母
<!DOCTYPE html> <html> <head> <title>菜鸟教程(runoob.com)</title> <meta ...
- FTP、SFTP、SCP的区别
转载于>> FTP(File Transfer Protocol) 是TCP/IP网络上两台计算机传送文件的协议,FTP是在TCP/IP网络和INTERNET上最早使用的协议之一,它属于网 ...
- 微信授权登陆接入第三方App(步骤总结)Android。
这几天开发要用到微信授权的功能,所以就研究了一下.可是微信开放平台接入指南里有几个地方写的不清不楚.在此总结一下,以便需要的人. 很多微信公众平台的应用如果移植到app上的话就需要微信授权登陆了. 目 ...
- Linux centos7 rsync工具介绍、rsync常用选项、rsync通过ssh同步
一.rsync工具介绍 rsync是类unix系统下的数据镜像备份工具,从软件的命名上就可以看出来了——remote sync.rsync是Linux系统下的文件同步和数据传输工具,它采用“rsync ...
- Eth合约攻击
前言 Ethernaut是一个类似于CTF的智能合约平台,集成了不少的智能合约相关的安全问题,这对于安全审计人员来说是一个很不错的学习平台,本篇文章将通过该平台来学习智能合约相关的各种安全问题,由于关 ...
- 解题报告:luogu P5543 [USACO19FEB]The Great Revegetation S
题目链接:P5543 [USACO19FEB]The Great Revegetation S 好坑啊,都身败名裂了. 思路一: 考虑染色法,跑一遍搜所就好了,不给代码了. 思路二: 考虑并查集,我想 ...
- react - get或set 取值函数
取值函数(getter)和存值函数(setter) 您可以添加以get或set为前缀的方法来创建getter和setter,它们是根据您正在执行的操作执行的两个不同的代码:访问变量或修改其值.对某个属 ...
- vue基础语法摘要
1. 2. 3. 4. 5. 6. 7.“动态路由”和“编程式路由”参数的接收方式:路由的参数-----页面之间跳转的参数
- python多线程采集图片
cmd中运行 >python untitled2.py 图片的网站 import requests import threading from bs4 import BeautifulSo ...
- 【剑指Offer面试编程题】题目1283:第一个只出现一次的字符--九度OJ
题目描述: 在一个字符串(1<=字符串长度<=10000,全部由大写字母组成)中找到第一个只出现一次的字符. 输入: 输入有多组数据 每一组输入一个字符串. 输出: 输出第一个只出现一次的 ...