SpringBoot应用操作Rabbitmq(topic交换器高级操作)
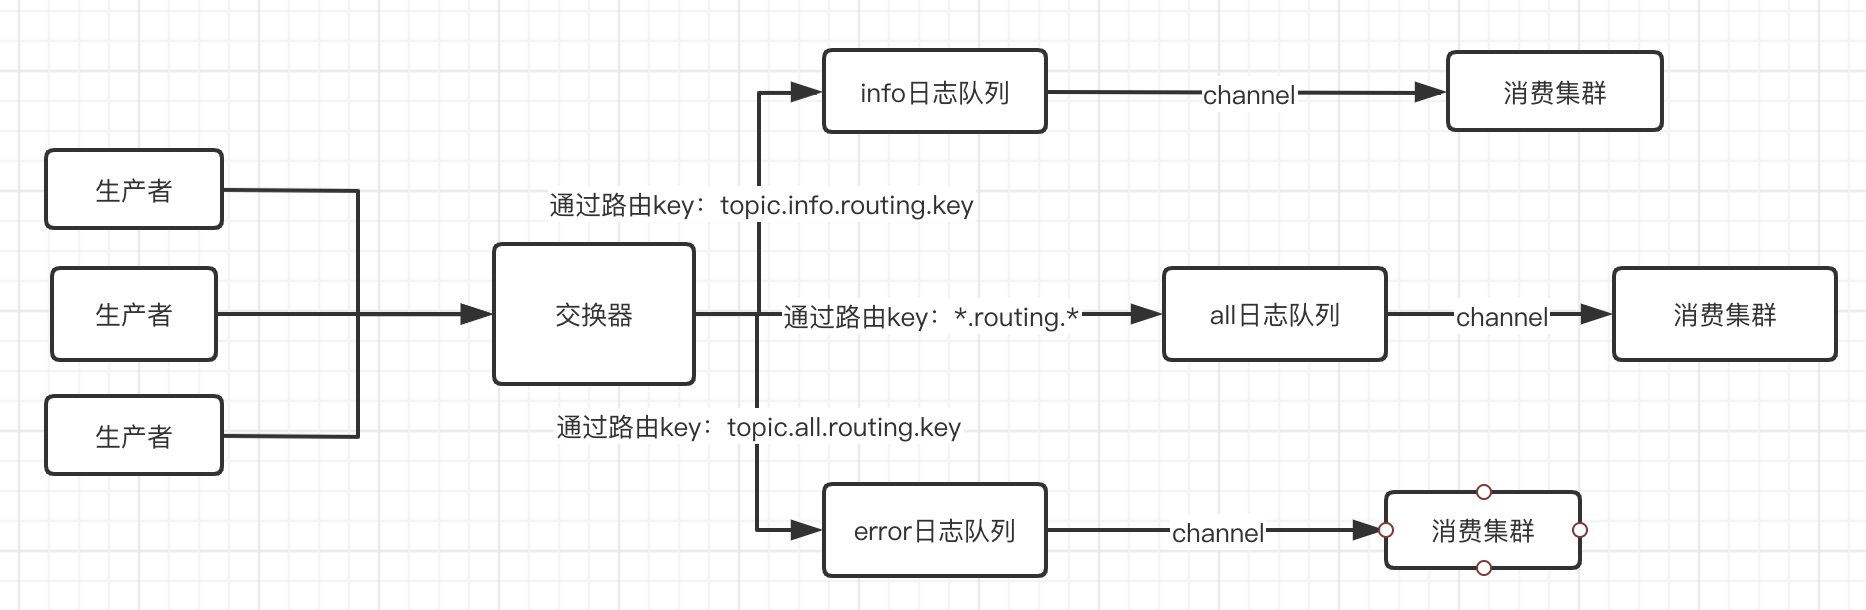
一、topic交换器为主题交换器,可以根据路由key模糊匹配
实现模型图
二、实战
1、引入maven
        <dependency>

            <groupId>org.springframework.amqp</groupId>

            <artifactId>spring-rabbit</artifactId>

        </dependency>
2、修改配置文件
server:

  port: 8080

  servlet:

    context-path: /rabbitmq

spring:

  application:

    #指定应用的名字

    name: rabbit-add

  #配置rabbitmq

  rabbitmq:

  #链接主机

    host: 127.0.0.1

  #端口

    port: 5672

  #已经授权的用户账号密码

    username: user

    password: user

  #指定的虚拟主机,默认/,

    virtual-host: my_vhost

# 自定义配置应用于topic交换器

mq:

  config:

   #自定义交换器名称

     exchange: log.topic

     queue:

        #自定义error、info、all队列名称

        errorName: topic.error.log

        infoName: topic.info.log

        allName: topic.all.log

        #自定义error、info、all路由键的名称

        routingInfoKey: topic.info.routing.key

        routingErrorKey: topic.error.routing.key
3、消费者代码
a、模糊匹配所有的数据队列,注意在配置路由key的时候是*代表阶段的配置,.不在匹配范围内
package com.niu.topic;

import lombok.extern.slf4j.Slf4j;

import org.springframework.amqp.core.ExchangeTypes;

import org.springframework.amqp.rabbit.annotation.*;

import org.springframework.stereotype.Component;

/**

 * @author niunafei

 * @function

 * @email niunafei0315@163.com

 * @date 2020/4/28  7:20 PM

 * @RabbitListener 自定义监听事件

 * @QueueBinding 绑定交换器与队列的关系value 指定队列exchange指定交换器

 * value= @Queue 指定配置队列的信息 value队列名称 autoDelete是否是临时队列

 * exchange= @Exchange 指定交换器 value指定交换器名称 type交换器类型

 * key  指定路由键

 */

@Component

@Slf4j

@RabbitListener(

        bindings = @QueueBinding(

                value = @Queue(

                        value = "${mq.config.queue.allName}", autoDelete = "true"

                ),

                exchange = @Exchange(

                        value = "${mq.config.exchange}", type = ExchangeTypes.TOPIC),

                key = "*.*.routing.*")

)

public class AllReceiver {

    /**

     * 设置监听方法

     *

     * @param msg

     * @RabbitHandler 声明监听方法是下面的 isDefault属性是默认false接受的完整对象,true接受body体

     */

    @RabbitHandler(isDefault = true)

    public void process(String msg) {

        log.info("接受到消息:all {}", msg);

    }

}
b、error的消费端
 package com.niu.topic;

 import lombok.extern.slf4j.Slf4j;

 import org.springframework.amqp.core.ExchangeTypes;

 import org.springframework.amqp.rabbit.annotation.*;

 import org.springframework.stereotype.Component;

 /**

  * @author niunafei

  * @function

  * @email niunafei0315@163.com

  * @date 2020/4/28  7:20 PM

  * @RabbitListener 自定义监听事件

  * @QueueBinding 绑定交换器与队列的关系value 指定队列exchange指定交换器

  * value= @Queue 指定配置队列的信息 value队列名称 autoDelete是否是临时队列

  * exchange= @Exchange 指定交换器 value指定交换器名称 type交换器类型

  * key  指定路由键

  */

 @Component

 @Slf4j

 @RabbitListener(

         bindings = @QueueBinding(

                 value = @Queue(value = "${mq.config.queue.errorName}", autoDelete = "true"),

                 exchange = @Exchange(value = "${mq.config.exchange}", type = ExchangeTypes.TOPIC),

                 key = "${mq.config.queue.routingErrorKey}")

 )

 public class ErrorReceiver {

     /**

      * 设置监听方法

      *  @RabbitHandler 声明监听方法是下面的 isDefault属性是默认false接受的完整对象,true接受body体

      *

      * @param msg

      */

     @RabbitHandler(isDefault = true)

     public void process(String msg) {

         log.info("接受到消息:error {}", msg);

     }

 }
c、info的消费端
package com.niu.topic;

import lombok.extern.slf4j.Slf4j;

import org.springframework.amqp.core.ExchangeTypes;

import org.springframework.amqp.rabbit.annotation.*;

import org.springframework.stereotype.Component;

/**

 * @author niunafei

 * @function

 * @email niunafei0315@163.com

 * @date 2020/4/28  7:20 PM

 * @RabbitListener 自定义监听事件

 * @QueueBinding 绑定交换器与队列的关系value 指定队列exchange指定交换器

 * value= @Queue 指定配置队列的信息 value队列名称 autoDelete是否是临时队列

 * exchange= @Exchange 指定交换器 value指定交换器名称 type交换器类型

 * key  指定路由键

 */

@Component

@Slf4j

@RabbitListener(

        bindings = @QueueBinding(

                value = @Queue(

                        value = "${mq.config.queue.infoName}", autoDelete = "true"

                ),

                exchange = @Exchange(

                        value = "${mq.config.exchange}", type = ExchangeTypes.TOPIC),

                key = "${mq.config.queue.routingInfoKey}")

)

public class InfoReceiver {

    /**

     * 设置监听方法

     *

     * @param msg

     * @RabbitHandler 声明监听方法是下面的 isDefault属性是默认false接受的完整对象,true接受body体

     */

    @RabbitHandler(isDefault = true)

    public void process(String msg) {

        log.info("接受到消息:info {}", msg);

    }

}
4、生产者
 package com.niu.topic;

 import org.springframework.amqp.rabbit.core.RabbitTemplate;

 import org.springframework.beans.factory.annotation.Autowired;

 import org.springframework.beans.factory.annotation.Value;

 import org.springframework.stereotype.Component;

 /**

  * @author niunafei

  * @function

  * @email niunafei0315@163.com

  * @date 2020/4/29  9:44 AM

  */

 @Component

 public class Sender {

     /**

      * spring整合的操作类

      * Message 发送的消息对象

      * void send(Message var1) throws AmqpException;

      * <p>

      * var1 路由键 Message 发送的消息对象

      * void send(String var1, Message var2) throws AmqpException;

      * <p>

      * var1 指定交换器名称 var2 路由键 Message 发送的消息对象

      * void send(String var1, String var2, Message var3) throws AmqpException;

      *

      * convertAndSend() 方法不需要指定MessageProperties属性即可发布

      */

     @Autowired

     private RabbitTemplate rabbitTemplate;

     @Value("${mq.config.queue.routingInfoKey}")

     private String routingInfoKey;

     @Value("${mq.config.queue.routingErrorKey}")

     private String routingErrorKey;

     @Value("${mq.config.exchange}")

     private String exchange;

     public void send(String msg) {

         //需要指定交换器和路由键就可以转发

         rabbitTemplate.convertAndSend(exchange, routingInfoKey, "info+"+msg);

         rabbitTemplate.convertAndSend(exchange, routingErrorKey,"error+"+ msg);

         rabbitTemplate.convertAndSend(exchange, "topic.order.routing.key","order+"+ msg);

         rabbitTemplate.convertAndSend(exchange, "topic.warn.routing.key", "warn+"+msg);

     }

 }
5、测试截屏

注意:ack确认机制,容易产生数据丢失,和产生内存泄漏,消费者进行死循环,配置这两个属性进行确认。
1、autoDelete属性设置为false
@Queue(value = "${mq.config.queue.orderName}", autoDelete = "false"
2、消费者进行死循环问题

docker安装rabbitmq:rabbitMQ安装docker版 /权限管理命令
简单应用来这里吧: SpringBoot应用操作Rabbitmq
简单应用来这里吧:SpringBoot应用操作Rabbitmq(direct高级操作)
简单应用来这里吧:SpringBoot应用操作Rabbitmq(topic交换器高级操作)
简单应用来这里吧:SpringBoot应用操作Rabbitmq(fanout广播高级操作)
SpringBoot应用操作Rabbitmq(topic交换器高级操作)的更多相关文章
- SpringBoot应用操作Rabbitmq(direct高级操作)
一.首先声明完成任务架构,通过direct订阅/发布的模式进行生产消费. a.消息生产指定交换器和路由key b.消费者绑定交换器,路由key和队列的关系(集群监控收到的消息不重复) 二.实战演练 1 ...
- RabbitMQ topic 交换器
topic交换器:"."将路由键分为几个标识符,"*"匹配一个, "#"可以匹配多个 1:路由键为*或者#的时候 *:只能匹配单个的字符串 ...
- SpringBoot应用操作Rabbitmq(fanout广播高级操作)
一.广播模式fanout.不需要指定路由key. 注:与topic和direct区别是:fanout广播模式会两个队列同时发送相同的消息,并非由交换器转发到某一个队列 二.实战(广播模式) 1.引入m ...
- SpringBoot应用操作Rabbitmq
记录RabbitMQ的简单应用 1.springboot项目中引入maven包,也是springboot官方的插件 <dependency> <groupId>org.spri ...
- Scala学习——函数高级操作
scala函数高级操作 一.字符串高级操作 多行字符串和插值 package top.ruandb.scala.Course06 object StringApp { def main(args: A ...
- Python之路第十二天,高级(4)-Python操作rabbitMQ
rabbitMQ RabbitMQ是一个在AMQP基础上完整的,可复用的企业消息系统.他遵循Mozilla Public License开源协议. MQ全称为Message Queue, 消息队列(M ...
- EasyNetQ操作RabbitMQ(高级消息队列)
RabbitMQ是实现了高级消息队列协议(AMQP)的开源消息代理软件(亦称面向消息的中间件).写消息队列的时候用RabbitMQ比较好,但是写的时候需要自己封装下,自己的封装,就需要对RabbitM ...
- SpringBoot操作ES进行各种高级查询
SpringBoot整合ES 创建SpringBoot项目,导入 ES 6.2.1 的 RestClient 依赖和 ES 依赖.在项目中直接引用 es-starter 的话会报容器初始化异常错误,导 ...
- Python菜鸟之路:Python基础-Python操作RabbitMQ
RabbitMQ简介 rabbitmq中文翻译的话,主要还是mq字母上:Message Queue,即消息队列的意思.rabbitmq服务类似于mysql.apache服务,只是提供的功能不一样.ra ...
随机推荐
- 一夜搞懂 | Java 内存模型与线程
前言 本文已经收录到我的 Github 个人博客,欢迎大佬们光临寒舍: 我的 GIthub 博客 学习导图 一.为什么要学习内存模型与线程? 并发处理的广泛应用是 Amdah1 定律代替摩尔定律成为计 ...
- C - Monkey and Banana
文章目录 题意如下 思路如下 题解如下: A group of researchers are designing an experiment to test the IQ of a monkey. ...
- 使用Markdown编辑总结
Markdown是轻量级标记语言,它允许人们使用易读易写的纯文本格式编写文档. Markdown可以导出HTML .Word.图像.PDF.Epub 等多种格式的文档. 后缀为.md或者.markdo ...
- PTA数据结构与算法题目集(中文) 7-16
PTA数据结构与算法题目集(中文) 7-16 7-16 一元多项式求导 (20 分) 设计函数求一元多项式的导数. 输入格式: 以指数递降方式输入多项式非零项系数和指数(绝对值均为不超过1000 ...
- Java进行二元操作类型转换
当对两个数值进行二元操作时,先要将两个操作数转换为同一种类型,然后再进行计算. 如果两个操作数中有一个是double类型,另一个操作数就会转换为double类型. 否则,如果其中一个操作数是float ...
- MYSQL索引类型。MYSQLc储存引擎
MYSQL索引类型,MYSQLc储存引擎 MySQL索引创建与删除 MySQL存储引擎的 ...
- Mysql数据库错误代码大全
Mysql数据库错误代码大全 出现较多的一些网页代码提示的意思: 1016错误:文件无法打开,使用后台修 ...
- Scratch 第1课 让小猫动起来
素材下载 链接:https://pan.baidu.com/s/1qX0T2B_zczcLaCCpiRrsnA提取码:xfp8
- go 基础安装
一.安装: 1.下载GO的地址:https://golang.org/dl/ 点击安装包进行安装(linux直接解压) 设置环境变量(linux) 1. export GOROOT=$PATH:/pa ...
- linux中忘记了mysql的root用户的密码怎么办?
1.vim /etc/my.cnf skip-grant-tables #取消此行的注释 2.重启mysql systemctl restart mysqld 3.mysql 登陆mysql mys ...